Windows Development on .NET
When you are learning how to develop Windows applications, the following question is bound to come up: Is a Windows application still a viable user interface? Often, there are those who will quickly refer to the Web browser “style interface (HTML, ASP.NET, and so forth) as the only choice. The fact is that with .NET, both types of graphical user interfaces (GUIs) are available choices.
Depending on your business needs, there are times when a Web browser front-end will be a better choice than the Windows front-end. Yet, in other cases, a Windows application may be the appropriate user interface choice. Although you have many factors to weigh to properly choose between the two, here are just a few to get you started:
-
Choose a Windows application “based interface if you need to offload the processing overhead from a centralized server to several distributed client workstations.
-
Choose a Web browser “based interface if distributing a Windows application presents unwanted challenges. Even though .NET has improved the deployment of Windows applications, there is still the deployment of the .NET Framework to consider.
-
Choose a Windows application “based interface if you need to leverage
.NET's GDI+ graphics classes to create a graphically rich user interface.
Again, these are just a few of the possible considerations. Other considerations exist. You may have security, design, or cross-platform issues that make one choice better than another. You'll want to evaluate your business need thoroughly. The point that I want to emphasize here is that .NET does provide you with a choice between the two types of GUIs: Windows application or Web application. Having stated that point, I'll proceed with this chapter's Windows application exploration.
| |
If you were to take a selected veteran Web developer and ask him or her to create a Windows application, you potentially could run into the CICS versus batch type of attitude that you sometimes find among CICS veteran developers (mentioned in this chapter's introduction). Some Web developers look upon Windows development as if it is " beneath " them.
As stated earlier for those few CICS developers, the same applies to the few Web developers who may have a "negative attitude" when it comes to this topic. Having a development preference, or even a development expertise, is one thing. In some cases, a strong preference or expertise can plant the seeds for what grows into a "negative attitude." This sort of attitude is generally not helpful.
If you are not careful, a strong preference for or against a particular development tool could be blinding. In such cases, developers run the risk of letting their personal preferences cloud their judgment when they need to provide the best technical solution for a business problem.
| |
Exploring Windows Applications
If you have ever used Microsoft Word, Microsoft Notepad, or even the Microsoft Calculator, you have used a Windows application. As you learn about .NET Windows development, you will quickly realize that it is similar to mainframe CICS development. For example, when you look at the Windows Form (also called a Win Form ), you may compare it with a CICS BMS map. When you see the Windows Toolbox controls, such as the TextBox and Label controls, you will likely be reminded of the CICS BMS assembler macros (i.e., DFHMSD, DFHMDI, and DFHMDF).
As you explore the properties of the various Windows controls, you will be reminded of the various parameters available on the BMS macros (i.e., POS, LENGTH, ATTRB, COLOR , and INITIAL). Even when you come across the Windows Forms feature called multiple-document interface (MDI), you can loosely compare the Windows concept/feature with the practice of combining multiple CICS BMS maps to make a BMS mapset.
For those CICS mainframe developers who have been fortunate enough to have a screen painting software tool available to create mainframe CICS screens, Windows development will feel (and almost look) extremely familiar. Soon, you will be creating your own .NET Windows application. Let's now take a quick look at a simple "Hello, World" Windows application. Afterward, you will explore the technology involved in creating a Windows application.
VB .NET Does "Hello, World" in Windows
Starting with an open VS .NET IDE window, navigate to the New Project window. [4] You will notice that in Figure 13-1, I selected the Visual Basic Projects folder from the Project Types box. You will also notice that I selected Windows Application as my Templates choice. I entered MyFirstWinFormVB as the name of this first Windows application sample.
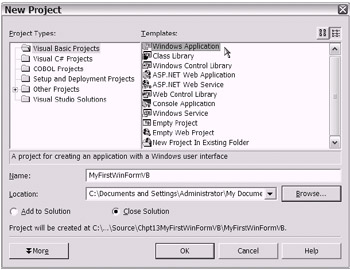
Figure 13-1: Preparing to create a new Windows application using the appropriate template
Once you have created the new project, an empty Windows Form will be displayed. For this example, you will simply add two controls onto the Windows Form: a Button control and a TextBox control. You can accomplish this by opening the Toolbox window and dragging the appropriate controls from the Toolbox window over to the Windows Form and dropping them. (Optionally, you can select the controls and "draw" them onto the Windows Form using your left mouse button.) You can then add code as desired.
Here's a review of the steps you need to perform to add the controls to the Windows Form:
-
Open the Toolbox window by pressing the key combination Ctrl-Alt-X. (There are several other ways to open the Toolbox window.)
-
As shown in Figure 13-2, you can select the targeted control (Button, TextBox, or another control). Once you have selected a control, you can drag and drop the control onto the Windows Form, draw the selected control onto the Windows Form, or just click the Windows Form surface while the targeted control remains selected.

Figure 13-2: Selecting the Button control in the Toolbox -
Choose the Code view for the Button control's Click event. To do so, you can double-click the Button control or access View Code from the Solution Explorer window. Then add the following simple line of logic: TextBox1.Text = "Hello, World :-)" inside of the Button control's Click event procedure. When your code entry is complete, it should look similar to the following code snippet:
. . . Private Sub Button1_Click _ (ByVal sender As System.Object, ByVal e As System.EventArgs) _ Handles Button1.Click TextBox1.Text = "Hello, World :-) " End Sub . . .
-
Now, build and run the sample application. As you might have guessed, when you click the Button control, the text box will display the "Hello, World" message. Figure 13-3 shows the sample application running after the Button control has been clicked.
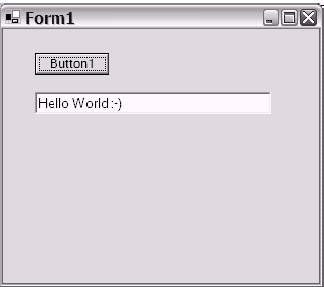
Figure 13-3: MyFirstWinFormVB executing after Button1 has been clicked
Great! Congratulations, you've created your first Windows application. It's simple, but it's a Windows application all the same. Let's turn now to the world of COBOL .NET and build another Windows application.
COBOL .NET Does "Hello, World" in Windows
Start by navigating to the VS .NET IDE New Project window. Choose COBOL Projects from the Project Types window, choose Windows Application from the Templates window, and enter MyFirstWinFormCobol as the name for this new project. Then click OK. At this point, you should be viewing an empty Windows Form.
After you follow the same steps that you performed in the previous section to move the controls from the Toolbox to the Windows Form, you have completed the required user interface design steps (see Figure 13-4).
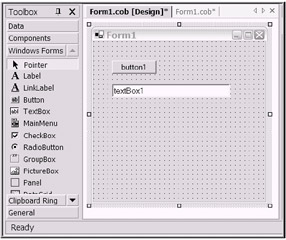
Figure 13-4: MyFirstWinFormCobol in Design view
The only other requirement for your "Hello, World" application is to add a line of code to set the Text property of the TextBox to the "Hello, World" string constant. You do this in the button1_Click method. This way, when you click the button, the TextBox content area will display the desired value. Your code in the button1_Click method should look similar to Listing 13-1.
| |
. . . 008630 METHOD-ID. button1_Click PRIVATE. 008640 DATA DIVISION. 008650 LINKAGE SECTION. 008660 01 sender OBJECT REFERENCE CLASS-OBJECT. 008670 01 e OBJECT REFERENCE CLASS-EVENTARGS. 008680 PROCEDURE DIVISION USING BY VALUE sender e. 008690 SET PROP-TEXT OF textBox1 TO "Hello, World". 008700 END METHOD button1_Click. . . .
| |
The only thing left to do is compile and run the sample application. Creating a Windows application is rather simple, right? Don't worry, you'll have plenty of time for building more complex, real-world applications. Although the "Hello, World" applications are extremely simple, they should help you understand how Windows applications function. In the next section, you'll dive deeper in search of a more complete understanding of the Windows application.
Introducing the System.Windows.Forms Namespace
To really understand how to build Windows applications, you need to be familiar with the System.Windows.Forms namespace. In order to do this, you might assume that you will start with the Form class. It is the Form class, after all, from which the Windows Form is instantiated . Actually, a proper exploration of the System.Windows.Forms namespace should begin with the Control class (as in System.Windows.Forms.Control ). The reason for this will soon become clear.
The Form class, along with the majority of the other System.Windows.Forms namespace classes, derives from the System.Windows.Forms.Control class. The general hierarchy of the Control class is shown in Listing 13-2. You can see that the classes derived from the System.Windows.Forms.Control class are all classes that represent a "visual" type of element. See if you can locate the actual Form class.
| |
System.Windows.Forms.Control System.ComponentModel.Design.ByteViewer System.Windows.Forms.AxHost System.Windows.Forms.ButtonBase System.Windows.Forms.Button System.Windows.Forms.CheckBox System.Windows.Forms.RadioButton System.Windows.Forms.DataGrid System.Windows.Forms.DateTimePicker System.Windows.Forms.GroupBox System.Windows.Forms.Label System.Windows.Forms.LinkLabel System.Windows.Forms.ListControl System.Windows.Forms.ComboBox System.Windows.Forms.ListBox System.Windows.Forms.CheckedListBox System.Windows.Forms.ListView System.Windows.Forms.MonthCalendar System.Windows.Forms.PictureBox System.Windows.Forms.PrintPreviewControl System.Windows.Forms.ProgressBar System.Windows.Forms.ScrollableControl System.Windows.Forms.ContainerControl System.Windows.Forms.Form System.Windows.Forms.PropertyGrid System.Windows.Forms.UpDownBase System.Windows.Forms.UserControl System.Windows.Forms.Design.ComponentTray System.Windows.Forms.Panel System.Windows.Forms.Design.ComponentEditorPage System.Windows.Forms.TabPage System.Windows.Forms.ScrollBar System.Windows.Forms.HScrollBar System.Windows.Forms.VScrollBar System.Windows.Forms.Splitter System.Windows.Forms.StatusBar System.Windows.Forms.TabControl System.Windows.Forms.TextBoxBase System.Windows.Forms.RichTextBox System.Windows.Forms.TextBox System.Windows.Forms.DataGridTextBox System.Windows.Forms.ToolBar System.Windows.Forms.TrackBar System.Windows.Forms.TreeView
| |
Were you able to find the Form class? It's located underneath the class that it directly inherits from, System.Windows.Forms.ContainerControl . The ContainerControl class is located underneath its base class, System.Windows.Forms.ScrollableControl . So, what does this tell you about the Form class? For one thing, a Form is basically a special type of control; it's a container control that is also scrollable. You can deduce this from a casual observation of the hierarchy of classes from which the Form class is eventually derived. There's more to the Form class, though ”let's now drill down further.
| |
You understand that a Windows Form is just a class from the System. Windows.Forms namespace. Perhaps you can appreciate that the Windows Form, as seen in the VS .NET IDE, is really just the visual representation ( courtesy of the Windows Forms Designer) of the Form class.
This means that you could (conceivably) create an entire Windows application using just a simple text editor (outside of the VS .NET IDE) and a command-line compiler. The Form class, along with its members , is exposed and programmable, much like any other .NET Framework class. Now, why anyone would ever dream of doing this is beyond me.
The rapid application development (RAD) experience offered by drag-and-drop development should not be underestimated. Learn to fully leverage the Windows Forms Designer. By the way, if your needs are aimed in the direction of extending the Windows Forms Designer, you may wish to explore the System.Windows.Forms.Design namespace.
| |
A Closer Look at the Form Class
As you create Windows applications, adding controls and business logic to the Windows Form(s), you will quickly realize that the Form class is packed with many members (i.e., properties, events, and methods ). I suggest that you browse them, familiarize yourself with them, and experiment with them.
Taking on the daunting task of attempting to memorize the extensive list of members may be impractical . A more reasonable approach is to just familiarize yourself with the implied "groupings" of members that exist. From the VS .NET IDE browser window, I have captured a few groups of the Form class (and Control class) members. Please review the groupings of members shown in Figures 13-5 through 13-8.
Figure 13-5 shows a partial list (subset) of methods from the Form class. Notice that they each begin with the prefix "On". This group of methods is used to raise events. The targeted events may be of the Form class or the Control class.
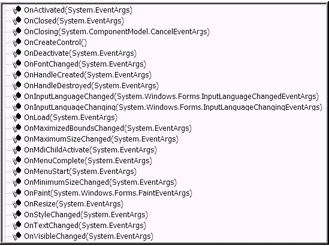
Figure 13-5: Partial list (subset) of methods from the Form class
Figure 13-6 shows the events of the Form class. These events are raised by their respective Form methods.
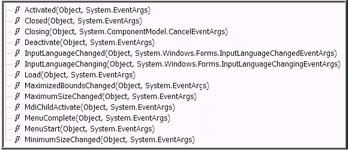
Figure 13-6: The events of the Form class
Figure 13-7 shows a partial list of methods from the Control class. (Recall that the Form class is derived from the ContainerControl/Control lineage.) Each method shown here can be used to raise a mouse- related event.
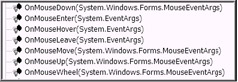
Figure 13-7: Partial list of methods from the Control lass
Figure 13-8 shows a partial list of events from the Control class. (Recall that the Form class is derived from the ContainerControl/Control lineage.) These are mouse-related events.
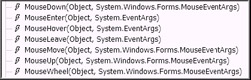
Figure 13-8: Partial list of events from the Control class
From the preceding series of figures, you can easily see patterns that exist in the names of the Form class (and Control class) members. As you browse the list members, you will see other event and method groupings not shown here. Additionally, the Form (and Control) class offers an impressive list of properties (a group in and of itself). You will not want to forget about those.
| Note | Because all of the "visual" control classes in the System.Windows.Forms namespace are derivatives of the Control class, you will notice that a large number of the Control members (properties, methods, and events) are either inherited or overridden in the downstream derived classes. So, once you learn the most common members in one Control class derivative, you will have transferable knowledge that will carry across other classes that are also derived from the Control class. |
In the "Hello, World" sample applications (MyFirstWinFormCobol and MyFirstWinFormVB) created earlier, you will recall placing a simple line of program code in the Click method associated with the Button control. As you code more Windows applications, you will become much more familiar with the Click method of other controls as well.
| Note | The behavior experienced by the Form after a control is "clicked" (or any other method or event occurs) is much like the mainframe CICS application's behavior after an attention key is pressed. In your legacy mainframe CICS application you would add code at the top of your program to interrogate the CICS communication area field (Execute Interface Block Attention Identifier, or EIBAID) to detect the specific attention key that was pressed. In Windows programming, the specific event or method associated with the control or component is fired as appropriate. |
So now you have a general idea of what a Windows Form is. A discussion of the Control class helped to introduce this .NET Framework class. Although this section covered the majority of the System.Windows.Forms namespace, there are a few more classes that at least deserve mention. The following section will address that need.
Revisiting the System.Windows.Forms Namespace
The Control class (discussed in the previous section) happens to be derived from the base class System.ComponentModel.Component . Let's now review several other classes from the System.Windows.Forms namespace that also derive from the Component class.
| Note | This Component class is rather special. It serves the purpose of enabling object sharing between applications. You will learn more about the System.ComponentModel.Component class in Chapter 20. |
Please take a moment to view the code snippet in Listing 13-3. I have indented several of the lines to show the implied hierarchy caused by inheritance. This represents a partial listing of System.ComponentModel.Component's derived classes. Specifically , these are the ones that are housed in the System.Windows.Forms namespace.
| |
System.Windows.Forms.ColumnHeader System.Windows.Forms.CommonDialog System.Windows.Forms.ColorDialog System.Windows.Forms.FileDialog System.Windows.Forms.OpenFileDialog System.Windows.Forms.SaveFileDialog System.Windows.Forms.FontDialog System.Windows.Forms.PageSetupDialog System.Windows.Forms.PrintDialog System.Windows.Forms.Control (hierarchy presented earlier) System.Windows.Forms.DataGridColumnStyle System.Windows.Forms.DataGridBoolColumn System.Windows.Forms.DataGridTextBoxColumn System.Windows.Forms.DataGridTableStyle System.Windows.Forms.ErrorProvider System.Windows.Forms.HelpProvider System.Windows.Forms.ImageList System.Windows.Forms.Menu System.Windows.Forms.ContextMenu System.Windows.Forms.MainMenu System.Windows.Forms.MenuItem System.Windows.Forms.NotifyIcon System.Windows.Forms.StatusBarPanel System.Windows.Forms.Timer System.Windows.Forms.ToolBarButton System.Windows.Forms.ToolTip
| |
Of the classes shown in Listing 13-3, you might consider becoming familiar with the following three classes first:
-
System.Windows.Forms.CommonDialog
-
System.Windows.Forms.Menu
-
System.Windows.Forms.Timer
For now, I will provide a brief, high-level summary of the CommonDialog, Menu, and Timer classes. When time allows, you will want to drill down further into each of these classes.
System.Windows.Forms.CommonDialog
If you have used "Windows" for any length of time, you have come across instances when you needed to perform tasks such as opening and saving files, manipulating the font or text color, or perhaps printing documents. In these cases, a dialog box was available for you to interact with. By using the System.Windows.Forms.CommonDialog class, you will be able to provide this same type of dialog box through your own Windows application.
System.Windows.Forms.Menu
To perform common tasks using any typical Windows application, you have certainly used the menu bar. This feature is usually located at the very top the "window." You will want to leverage the functionality of the System.Windows.Forms.Menu class to add menus to your own Windows application. Perhaps you could extend the "Hello, World" applications (MyFirstWinFormCobol and MyFirstWinFormVB) created earlier. Consider adding a menu to each sample application.
System.Windows.Forms.Timer
The System.Windows.Forms.Timer class is very useful when you want to create a "timed loop" inside your code. I suggest you spend some time experimenting with this extremely useful class. When you have a need to simulate your application "sleeping" and " waking ," the Timer class may be a good choice for your application. The Timer class has property settings to allow flexible interval settings.
| Tip | Remember, there are lots of existing sample applications provided by Fujitsu and Microsoft (the samples are included with the .NET products provided by each software vendor). You can find Fujitsu and Microsoft's samples at the follow hard drive locations: <drive>:\Program Files\Fujitsu NetCOBOL for .NET\Examples and <drive>:\Program Files\Microsoft Visual Studio .NET\ FrameworkSDK\Samples, respectively. Additionally, you can use the references provided in the "To Learn More" section at the end of this chapter to view other sample applications and tutorials. |
Up to this point, I have covered the major portions of the System.Windows.Forms namespace. Still, I have not discussed or mentioned the handful of delegates, enumerations, and structures found in the System.Windows.Forms namespace. As your needs dictate , you will want to seek them out and review their use. The better acquainted you become with the entire System.Windows.Forms namespace, the more productive you will be as you develop Windows applications.
Let's now turn briefly to a different type of application: Windows Services. You'll want to be aware of this type of programming model, which is currently available in the Visual Basic Projects Templates group.
| Note | The fact that a .NET application runs on the Windows operating system [5] is certainly reason enough to label it as a "Windows application." Nevertheless, for simplicity, I will make the distinction between .NET Windows applications (those that have a form-type GUI) and .NET Windows Services (briefly discussed in the next section, "Exploring Windows Services"). The console application (used in the previous chapter's sample applications) is another example of a Windows application. However, this chapter's discussion excludes further mention of the console application to allow more focus on the other types of Windows applications . |
Exploring Windows Services
The name of this particular type of application, Windows Service, is likely to cause confusion to those who are relatively new to the Windows development world. Let's start by first considering the following points:
-
The Windows Service type of application was formerly called an NT Service (pre-.NET and pre “Windows 2000). During the pre-Windows/DOS era, these types of programs were commonly called Terminate and Stay Resident (TSR) programs.
-
The expected design of a Windows Service does not include a GUI. In other words, a Windows Service does not have a Windows (Windows Form) front-end.
-
A Windows Service does not make use of the System.Windows.Forms namespace as Windows applications do.
-
The Windows Service type of application gets its name from the fact that the programs are typically providing a service and they happen to run on the Windows operating system.
To shed more light on what a Windows Service is, let's look at services in general first. In Chapter 11, you may recall starting the SQL Server service. Guess what? This SQL Server service is . . . well, it's an example of a service . As it turns out, many services run on Windows. As shown in Figure 13-9, you can use the Computer Management console (with the Services tree view node expanded) to view the installed Windows Services.
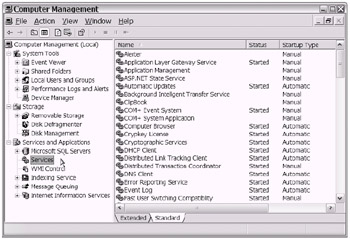
Figure 13-9: The Computer Management console with the Services tree view node expanded
| Note | Generally speaking, services that you create with VS .NET will be called Windows Services. Services that run on Windows that were not created with VS .NET are just services (that run on Windows). Over time, I expect that this distinction will disappear. |
A Windows Service will likely remind you of some of the legacy mainframe subsystems that have existed for years . For example, on the mainframe you had the Job Entry System (JES2 or JES3) subsystem running on the system in the background. In the list of other mainframe subsystems, you might include the following:
-
The security subsystem (i.e., Resource Access Control Facility [RACF], Access Control Facility [ACF2], and so forth)
-
The Time Sharing Option (TSO) subsystem
-
The communications device management (i.e., Virtual Telecommunications Access Method [VTAM]) subsystem
-
The transaction processing (i.e., CICS) subsystem
Does reflecting on the legacy mainframe help put this Windows Service into perspective? Is everything clear as mud now? Do you wish that Microsoft had named the Windows Service "A Service That Runs on Windows"? Be that as it may, a Windows Service is simply a program that runs on the system in an unattended mode. Most important, with VS .NET, you can create your own Windows Service.
VS .NET Supports Windows Service
As of the writing of this book, the NetCOBOL for .NET product does not include a VS .NET project template for Windows Services. This is not a problem for you, right? You have been working toward the goal of being bilingual anyway, working with both the COBOL .NET and Visual Basic .NET (VB .NET) samples. Good for you! Technically speaking, you actually have two choices: You can choose to use the VB .NET Windows Services template, or you can choose the COBOL .NET empty template and code Windows Services without the help of a project template. You decide.
As shown in Figure 13-10, the Windows Services template is an available choice in the Visual Basic Projects Templates group.
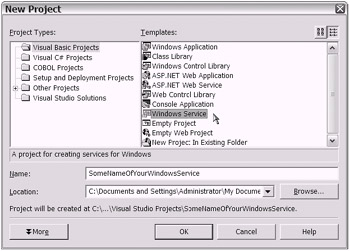
Figure 13-10: Using the VB .NET Windows Services project template to create a new Windows Service
Your continued learning about Windows Services will have you learning how to create a Windows Service and how to install your Windows Service (to have it show up in the Computer Management console). There are basically two .NET Framework classes that you will use: System.ServiceProcess.ServiceBase and System.Configuration.Install.Installer . As you can tell from the class names, you will be working with two namespaces: System.ServiceProcess and System.Configuration.Install .
Being able to easily create Windows Services with VB .NET is considered by many to be a great .NET feature. Try it out ”you will likely agree that this is definitely another advantage in using .NET for Windows/Web development. Naturally, there are details that you will want to include during your research and experimentation. I refer you to the references located at the end of this chapter in the "To Learn More" section for further information on creating and installing Windows Services.
That concludes your brief (well, sort of brief) introduction to Windows Services. I trust that having this Windows Services topic immediately following the Windows applications topics (discussed in section "Windows Development on .NET") helped clear up any confusion regarding the difference between the two "Windows" technologies.
In the following section, you'll explore other types of user interfaces ”specifically, those available when you develop with the ASP.NET technology.
[4] Please refer to the section "The IDE of Today and Tomorrow: VS .NET" in Chapter 5 to review the steps taken when navigating to the VS .NET New Project dialog window.
[5] Discussing the possibilities of Microsoft's .NET Framework or perhaps some other .NET creation running on non-Windows operating systems (e.g., Linux, Macintosh, and so forth) is beyond the scope of this book. Additionally, discussing the "Windows applications" that will be built using the .NET Compact Framework and Smart Device Extensions targeting the Windows CE .NET operating system (e.g., Pocket PCs, tablet PCs, and other so-called smart devices) is also beyond this book's intended scope.
EAN: 2147483647
Pages: 204