My iDisk Free Space Is Wrong


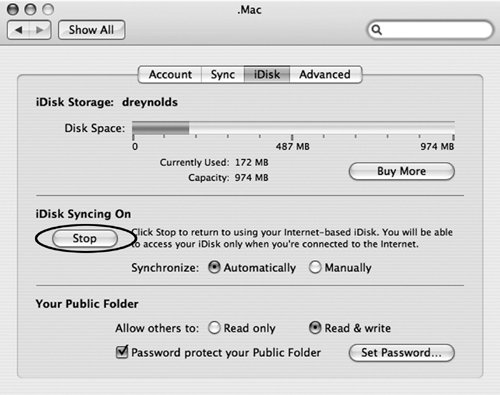
Sometimes the amount of available space on your iDisk isn't correcteither you should have more than your iDisk says you do, or you should have less than your iDisk says you do. If you're confronting either of these situations, you can do something about it.

To correct your reported iDisk free space, try the following:

  • Wait a while. If you wait 24 hours or so especially if you maintain a local copy of your iDisk or you've just upgraded your iDisk storagethe problem may correct itself. Sometimes it takes a while for these changes to take effect, or a hiccup on the server may cause the wrong disk size to be shown. If the problem hasn't corrected itself after a day or so, it's time to try something new.

  • Try unmounting your iDisk by dragging it to the Trash and then remounting it (see Chapter 3, "Using iDisk"), which may force the disk size to be represented properly. If that doesn't work, try unmounting your iDisk, restarting your Mac, and then remounting your iDisk.

  • If you're maintaining a local copy of your iDisk, try turning off iDisk synchronization. To do this, choose Apple menu > System Preferences and click the .Mac icon. In the .Mac pane, make sure the iDisk tab is selected. Next, click the Stop button in the iDisk Syncing On section (Figure 13.5). Wait until your iDisk shows the proper size, and then turn synchronization back on. This should also take care of cases where you receive a message that your local and remote iDisks are different sizes.

    Figure 13.5. A click of the Stop button turns off iDisk synchronization. In Mac OS X 10.4, it'll also leave you with a disk image on your Desktop that contains the contents of your iDisk, which is an easy way to create a backup of your entire iDisk.


  • If you're comfortable using Terminal, you can use it to hunt for invisible files that may be using iDisk space you don't know about. (You can use the Get Info command when selecting folders in your iDisk to see if folders are larger than they should be.) To look for invisible files, open Terminal (in Applications > Utilities), and type the following, with each line followed by a return (and replace youriDiskname with the name of your iDisk, typically iDisk), as shown in Figure 13.6:

    cd /Volumes/youriDiskname ls -la 


    Figure 13.6. Although they look like near-gibberish to the uninitiated, these two Terminal commands merely move you to your iDisk and then list all of its files (visible and invisible), as shown in Figure 13.7.


    So, what's going on here (Figure 13.7)? The cd command changes your present working directory to /Volumes/iDisk (or whatever your iDisk name is). The ls command lists the files in the iDisk's root level. In the -la flags (which are l and a), the l flag shows the long version of the file listing (including details such as file size along with the file's name), and the a flag shows all fileseven invisible ones. Use the file listing to look for files that don't belong, and delete them.

    Figure 13.7. Well, who knew all this stuff was on an iDisk? Nothing here is amiss, though, so if we're looking for space savings, we'll have to look elsewhere.


    If a file name begins with a dot (or period), it's invisiblethat is, it won't show up in the Finder or using the regular ls command. And, since you can't see these files in the Finder, you'll have to use a terminal command to delete them.

    To delete a file with the Terminal, type rm filename, and press Return (replacing filename with the name of the file to be deleted). The file will be deletedand you won't be given a chance to confirm, so be sure you want to do this.

    Finally, if you're not sure what a file is, you're best off leaving it alone.

Tip

  • Do not perform this task if you do not feel comfortable using Terminal to perform basic file manipulations.


.Mac with iWeb Visual QuickStart Guide Series
.Mac with iWeb, Second Edition
ISBN: 0321442288
EAN: 2147483647
Year: 2006
Pages: 113

flylib.com © 2008-2017.
If you may any questions please contact us: flylib@qtcs.net