| Using your iDisk's Public folder, you can share files and folders with just about anyone who has Internet access. This Public folder is a special folder on your iDisk that others can connect to without having to use your login and password. The settings for controlling it are built into Mac OS X. Using your System Preferences, you can set access to the Public folder to allow people to see and download files from it, but not upload to it, or to both upload and download files from it. Setting your Public folder to allow people only to download items from it, however, protects you from having someone upload objectionable material or fill up the folder with stuff you don't want or need. You upload files to this folder as you would any folder on your iDisk. The folder is special, however, in that items inside it can easily be downloaded by anyone who has access to your .Mac member name. If you're sensitive about who can access your iDisk's Public folder, you can give it a password so that only those who know the password can access it. To Set Access to Your Public Folder 1. | From the Apple menu, choose System Preferences.
The System Preferences window opens.
| 2. | In the Internet & Network section, click the .Mac icon (Figure 3.60).
Figure 3.60. Some of your .Mac preferences are built into Mac OS X, and you can click the .Mac icon in the main System Preferences window to access them. 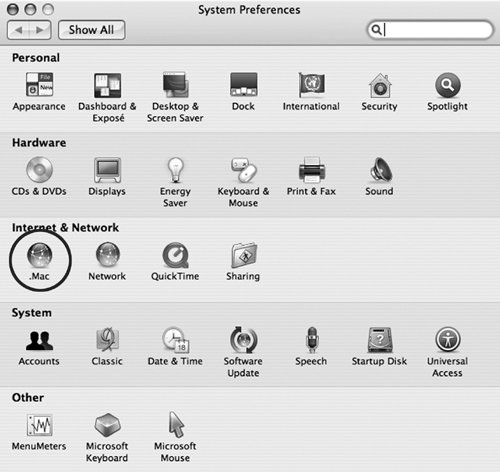
The .Mac preference pane opens (Figure 3.61).
Figure 3.61. The .Mac preference pane defaults to the Account pane, which contains your .Mac member name and password, and it tells you how long you have until you need to resubscribe. 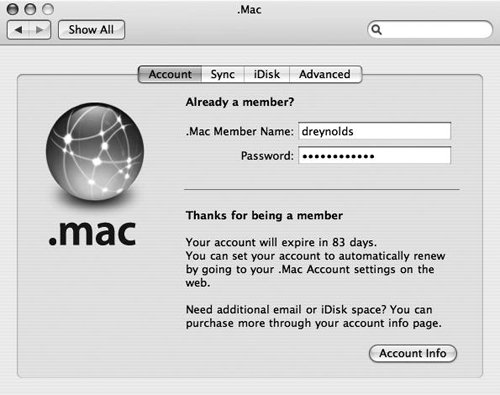
| | | 3. | Click the iDisk tab.
The iDisk preference pane opens (Figure 3.62).
Figure 3.62. The iDisk preference pane contains good at-a-glance information about your iDisk, including how much storage you have (and have used), whether you have iDisk synchronization turned on, whether you allow others to upload items to your Public folder, and whether that folder is password protected. 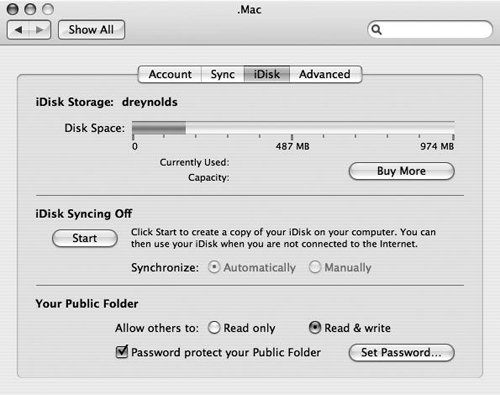
| 4. | In the Your Public Folder section, do one of the following:
- To allow users to see and download files from your Public folder but not upload to it, choose the "Read only" radio button.
- To allow users to upload and download files to and from your Public folder, choose the "Read & write" radio button.
Your Public folder is ready to be used by others according to the access privileges you've just set.
|
Provide Web access to your Public folder In the spring of 2006, Apple introduced a simplified method for accessing iDisk Public folders, using any Web browser. All the other methods described in this chapter still work, but the easiest way to steer others to your Public folder is to have them aim their browsers at the following URL (typed all on one line, with no spaces): http://idisk.mac.com/membername-Public (replacing "membername" with your .Mac member name). Note that the "P" in Public must be capitalized for this to work. If your Public folder is password-protected, visitors will be prompted for a name and a password. They should enter "public" (without the quotation marks)not your .Mac member namein the Name field (which may be filled in for them already). They should type your Public folder password (not, once again, your .Mac account password) in the Password field. You can use this method to get at your Public folder as well, but if you do, your options will be limited to those you've given the public. If you've made the folder read-only, for example, you won't be able to upload files if you log in this way. For full access to your Public folder contents and settings (and the rest of your iDisk), log in at http://iDisk.mac.com, using your .Mac member name and account password. |
To Password-Protect Your Public Folder 1. | Follow Steps 1-3 under "To set access to your Public folder."
| 2. | In the Your Public folder section, check the "Password protect your Public Folder" box (Figure 3.63).
Figure 3.63. Check this box to require guests to enter a password before accessing your Public folder. 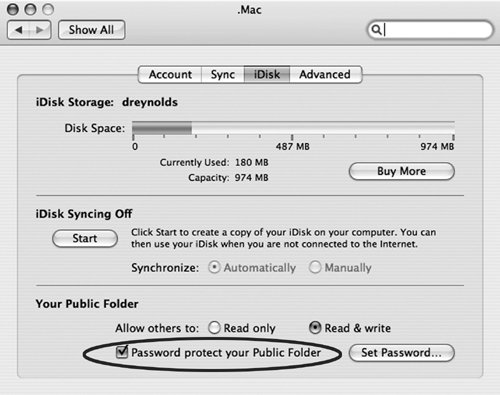
A dialog slides down, asking for password information (Figure 3.64).
Figure 3.64. Set and confirm a password for your Public folder. 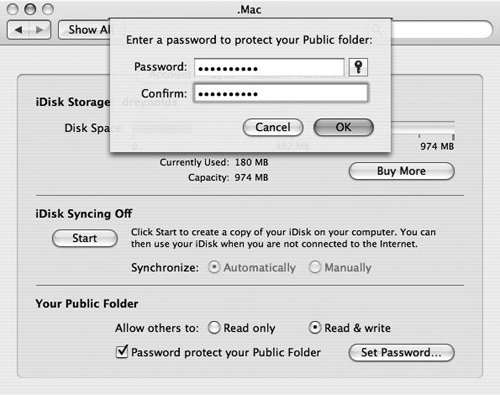
| 3. | In the Password field, type the password you want to use for your Public folder.
The text of the password will not appear, but you will see a bullet for each character you type.
| 4. | In the Confirm field, type the password a second time. This ensures that you spelled the password properly.
| 5. | Click OK.
Your Public folder is password-protected, and you are returned to the iDisk preference pane.
|
 Tips Tips
Your Public folder password and your .Mac account password cannot be the same. If you need to change your Public folder password, click the Set Password button in the lower right area of the iDisk preference pane. Don't give others your .Mac password this is different from your Public folder password.
To Connect to Someone Else's Public Folder using Mac OS X v10.3 or Later 1. | From the Go menu, choose iDisk > Other User's Public Folder (Figure 3.65).
Figure 3.65. To connect to someone else's Public folder, choose Go > iDisk > Other User's Public Folder. 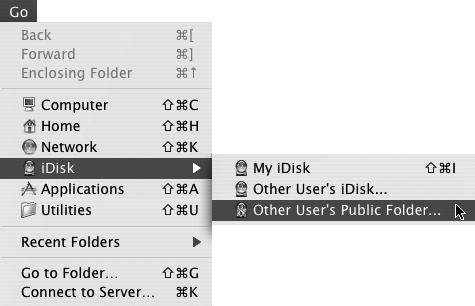
The Connect To iDisk Public Folder dialog opens.
| 2. | In the "Member name" field, enter the .Mac member name for the Public folder to which you're connecting (Figure 3.66).
Figure 3.66. Enter the member name of the Public folder to which you want to connect in the Connect To iDisk Public Folder dialog. 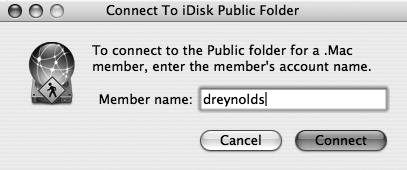
| 3. | If prompted for a password, enter one (Figure 3.67).
Figure 3.67. iDisk shows its WebDAV roots when you connect to a password-protected iDisk. Here, enter the password for the Public folder to which you want to connect (the name "public" is already filled in for you). 
The Public folder is mounted on your Desktop, and you can upload and download files to and from it.
|
Connecting to Someone Else's Public Folder Using Mac OS X v10.2 or Earlier If you're running an older version of Mac OS X, you can still connect to someone else's iDiskyou'll just have to download and install an Apple-supplied utility to do it. To connect to a Public folder using Mac OS X v10.2 or earlier, visit the Member Central page (after you log into your .Mac account) and download iDisk Utility. After the download is complete, mount the iDisk Utility disk image by double-clicking it, and then run the installer that you find there. Once iDisk Utility is installed, run it, and when it opens, click the Open Public Folder button. Enter the member name for the iDisk that you want to connect to, and click Open. The Public folder for the .Mac member you indicated mounts on your Desktop, and you can upload and download files to and from it. |
To Connect to Someone Else's Public Folder using Windows XP 1. | Download and install iDisk Utility for Windows as described in steps 110 in "To connect to iDisk using Windows XP," earlier in this chapter.
The iDisk Utility for XP dialog opens (Figure 3.68).
Figure 3.68. iDisk Utility for Windows XP lets you connect to Public folders as well as iDisks. 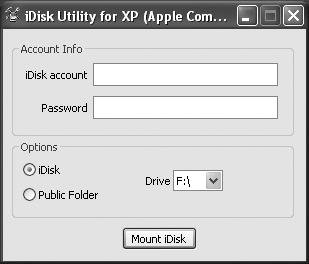
| 2. | Choose the Public Folder radio button.
| 3. | In the "iDisk account" field, enter the member name for the Public folder you want to use (Figure 3.69).
Figure 3.69. Choose the Public Folder radio button, and in the "iDisk account" field type the .Mac member name for the Public folder to which you want to connect. 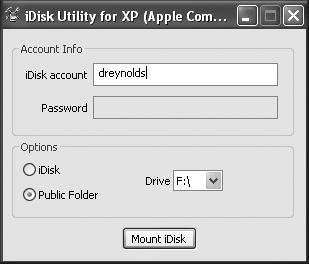
If the Public folder has a password, a dialog opens asking you to enter it (Figure 3.70). If it doesn't, the iDisk mounts, and a message appears, letting you know that the iDisk has been mounted successfully.
Figure 3.70. The "Public login" dialog opens if the Public folder has a password. 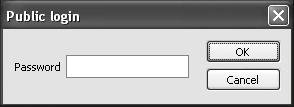
|
To Connect to Someone Else's Public Folder using Windows 2000 1. | Double-click the My Computer icon.
The My Computer window opens.
| 2. | From the Tools menu, choose Map Network Drive (Figure 3.71).
Figure 3.71. To begin creating a connection to a .Mac Public folder in Windows 2000, choose Map Network Drive from the Tools menu. 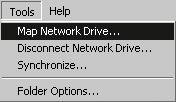
The Map Network Drive dialog opens.
| 3. | At the bottom of the dialog, click "Create a shortcut to a Web folder or FTP site" (Figure 3.72).
Figure 3.72. Click "Create a shortcut to a Web folder or FTP site," which will take you to a dialog where you can type in the URL for the Public folder. 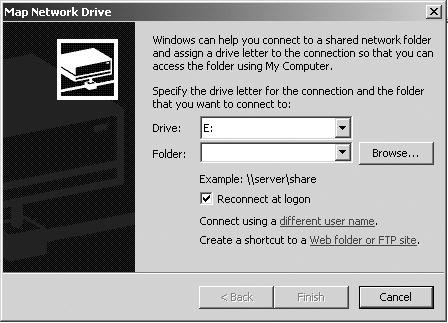
The Add Network Place Wizard dialog opens.
| 4. | In the field marked "Type the location of the Network Place," type http://idisk.mac.com/membername-Public? (replacing membername with the .Mac member name for the Public folder you're accessing) (Figure 3.73).
Figure 3.73. To connect to a Public folder using Windows 2000, you have to type the URL of the Public folder, and then follow that with -Public?. The URL for my Public folder is shown here as an example. 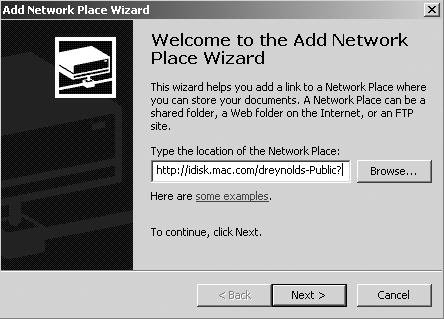
| 5. | Click Next.
If the Public folder has a password set, the Enter Network Password dialog opens.
| | | 6. | In the "User name" field, enter public (Figure 3.74).
Figure 3.74. Once you've entered a location for the Public folder, you'll be asked for the passwordif one is required. 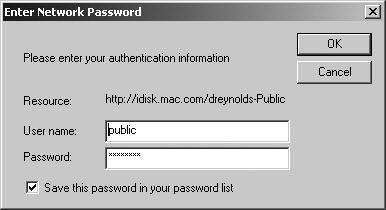
| 7. | In the Password field, enter the password for that Public folder.
| 8. | Click OK.
The Add Network Place Wizard dialog opens, asking you to name your new Network Place.
| 9. | In the Network Place name field, type a name for your Network Place (such as Bill's Public Folder) (Figure 3.75).
Figure 3.75. When completing the Public folder setup, you'll be asked to name the connection. A suggested name is already entered for youoften, that's descriptive enough for most purposes and you can just click Finish. 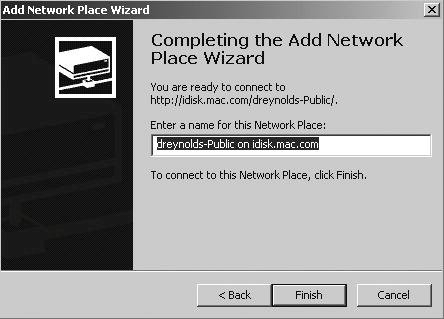
| 10. | Click Finish.
The iDisk public folder opens in a new window (Figure 3.76).
Figure 3.76. Once you've finished your Public folder's connection setup, a new window opens, displaying its contents. 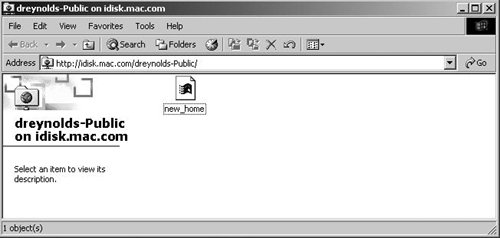
|
Tips Having trouble connecting? Make sure the Public folder that you're connecting to has its permissions set properly, or you (or others) may not be able to connect or will not be able to upload files, at least. A Network Place is a Windows term for a network bookmarka quick way of connecting to a network service, such as an often-used file server.
|