Designing Demand-Dial Routing for Internal Networks
|
| < Day Day Up > |
|
Broadband connections are seemingly pervasive in the United States nowadays. But there are still many locations where they are not available or are too costly. In addition, most will face higher prices for broadband abroad, if it is available at all. In these cases, you can take advantage of the Windows Server 2003 RRAS demand-dial feature. You can have Windows Server 2003 dial an ISP or a phone number connected to a modem at a remote office when packets need to be routed to another location.
Windows Server 2003 can use Plain Old Telephone Service (POTS), Integrated Services Digital Network (ISDN), or Asynchronous Digital Subscriber Lines (ADSL) lines through new support for Point-to-Point Protocol Over Ethernet (PPPoE) with the appropriate modem type (POTS, ISDN, or DSL) for demand-dial. You can configure the type of demand-dial interface by launching the Demand-Dial Interface Wizard through the following steps:
-
Navigate to the Routing And Remote Access MMC by selecting Start
 All Programs Administrative Tools Routing And Remote Access.
 -
Right-click your server name in the left pane and choose Configure And Enable Routing And Remote Access from the context menu.
-
In the Routing And Remote Access Server Setup Wizard, select Next.
-
Choose the Secure Connection Between Two Private Networks option.
-
Choose the Yes option for the question Do You Want To Use Demand-Dial Connections To Access Remote Networks?
-
Choose how you would like to assign IP addresses to remote clients.
-
Click the Finish button to launch the Demand-Dial Interface Wizard.
-
Click the Next button to advance to the Interface Name screen. Give the interface a name.
-
Choose the type of demand-dial connection, as shown in Figure 3.8. Click Next.
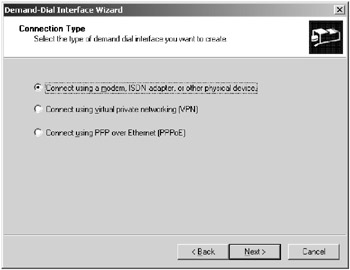
Figure 3.8: Various demand-dial connection types that can be used for the demand-dial interface -
Choose the modem or interface over which the connection will be established. Click Next.
-
Enter the phone number that will be used to establish the connection. Click Next.
-
Choose the transport and security options available for the connection. You will have the choice to route IP packets over this connection, to add a user account so that a remote router can dial into the demand-dial RRAS server and authenticate, to send a plain-text password to the computer on the other end if necessary, or to use scripting to complete the connection with the remote router. Click Next.
-
You will need to establish a static route to enable the demand-dial interface. This should encompass the networks on the other side of the connection. Click Next.
-
Specify the connection credentials that will be used to authenticate with the demand-dial server on the other end of the connection. This provides security by specifying who can establish a demand-dial connection with the server on the other end. Click Next.
-
Click Finish to complete the Demand-Dial Interface Wizard.
Once you create a demand-dial connection, it is essentially the same as if you had a routed Internet or network connection. Therefore, you should design security for your dial-up connection as if it were a permanent connection to the Internet.
Determining the Type of Demand-Dial Connection to Use
The first thing that you need to decide is whether you are going to dial an ISP or dial directly to your company or branch office. This will be a decision for which you’ll need to consider the level of security desired versus the cost of managing and maintaining your own phone lines and modems. You have more security if you dial into your own lines because you’ll avoid sending your data over the Internet where it can be viewed or manipulated and you’ll have control over your own lines. However, don’t think that you are secure in using your own lines. There are ways to eavesdrop on data traveling over all types of connections, so you will need to take the same precautions in encrypting your data and authenticating the client as you would for any remote access client, earlier in this chapter. Having your own lines will make it more difficult for the attacker to get to the devices and infrastructure.
If you decide to use the Internet to make your connection, you will need to consider how you are going to authenticate and encrypt data that travels over the Internet. You can treat this connection to your branch office just as you would handle a remote client authentication and establish a VPN for the information you need to send over the connection. You can use IPSec to establish a tunnel or use L2TP/IPSec to perform point-to-point communication, as discussed in the section “Designing for a Secure Remote Access Infrastructure.” Just make sure you also treat this connection as if it were a broadband connection to the Internet, and remember that it is a two-way connection. Just as you should never have your network exposed to the Internet, you should consider setting your demand-dial router behind a NAT server at a minimum or, even better, use a firewall. You can, at the very least, use a new feature of Windows Sever 2003 called Internet Connection Firewall (ICF) to enable a basic firewall on the demand-dial router.
Setting up a dial-up broadband connection to an internal branch network means that you have predictability because the client on the other side is at a set location. This means that you can use RRAS features like caller ID verification and various callback options for the dial-up adapter properties configuration, as shown in Figure 3.9.
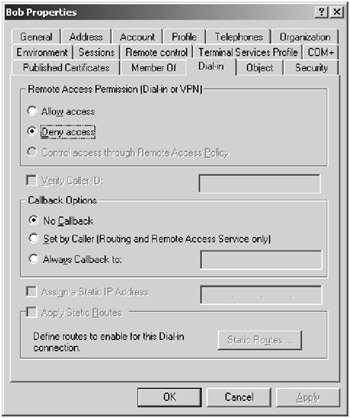
Figure 3.9: Setting up caller ID and callback.
You should take advantage of both of these features on a demand-dial router because they call from a fixed number. Caller ID and callback can be set up using remote access policies on the Windows account used to authorize the connection.
The account used to authenticate a connection can be either a client computer connection or a demand-dial router connection. Typically, you will only want to allow the demand-dial account to connect to a demand-dial router. Windows Server 2003 will differentiate between a demand-dial router and a client connection by looking at the account used by the connecting client to authenticate. If the user ID is the same as the user ID configured for the answering router, it is a demand-dial router connection. You should set the user ID used by the demand-dial router to be the same as the user ID for the demand-dial interface on the answering router.
You also should consider the following when configuring a demand-dial connection: You need to configure the connection on both ends to enable communication in both directions; otherwise, it will be a one-direction communication. You should avoid using dynamic routing protocols like RIP over a demand-dial interface, because they add unnecessary overhead and an added security risk. This means that you would need to configure static routes on the interface. Microsoft has provided an option called auto-static update mode to update routes if you would rather not do it manually.
Designing Security for Demand-Dial Routing
When designing demand-dial routing, you need to consider whether the connection is required on demand or is a persistent connection. An on-demand connection is generally used if the bandwidth is paid based on time connected, and it’s common to ISDN and long-distance calls. This will affect some of your security design when setting up the connection. You have a choice to use a modem to connect or a VPN. The on-demand option will not always be up, so it has less of an attack footprint and you could take advantage of caller ID or callback technology in many cases. The persistent connection option will generally use a VPN connection, so you will need to consider the security of the VPN or installing one if it does not exist.
You will also need to decide whether the connection will be one-way or two-way initiated connections. In two-way connections, both routers must be able to accept and initiate connections, so both sides must be configured. In a one-way connection, you would not configure the answering demand-dial interface to dial out because it is used only to answer calls. This helps you go beyond authenticating the demand-dial router.
Demand-dial routers will need to be authenticated just like a client that was connecting to the network. This means that you need to make sure you use a user account to validate the connection between the branch office and the central office. You can indicate to the answering RRAS router that this is a demand-dial router call by naming the demand-dial interface on the answering RRAS demand-dial router with the same name as the user account that is used by the calling router to authenticate.
The user account that you use for your demand-dial connections will need to be given some consideration. By default, it will have its remote access permission set to allow access even if you want to control it with the remote access policy through the Routing And Remote Access MMC or in the user’s Properties dialog box under the Dial-In tab. The remote access policy allows you to control who can connect to an RRAS server. You will also need to consider the password strength used for this account. The domain password policy will be enforced on the account, but you might want to consider making it stronger (for example, 14 characters instead of the usual 8 for user accounts) because this connection is vulnerable. You need to do the following on the General tab of the user’s Properties dialog box:
-
Clear the setting for User Must Change Password At Next Logon because the demand-dial interface is not able to change the password and will not be able to connect because it is not an interactive process. If you use the Demand-Dial Interface Wizard, this will be set automatically.
-
Check the Password Never Expires check box to make sure that the password will not have to be changed at an inopportune time. The password expiring will cause the demand-dial connection to fail. You should establish a password rotation policy that you control to make sure the passwords get changed on a regular basis.
Designing for Demand-Dial Authentication
When setting up a demand-dial connection, you should use the strongest authentication possible on Windows Server 2003, which is EAP-TLS with certificates. If you don’t have a PKI, you should use MS-CHAPv2 and enforce a strong password policy to guard against attacks.
The EAP-TLS solution will require that you install a user certificate on the calling router and a machine certificate on the answering router to verify the identities of the routers to each other. You will need to consider a method of deploying the certificates in your design. You can distribute the certificates on a floppy disk and then import them on the demand-dial routers after physically delivering the routers. You can also use smart cards as a means of distributing the certificates.
If you use EAP-TLS, you will also need to make sure that the demand-dial routers can see the certificate revocation list (CRL) on a server, which means the certificate authority (CA) must be available. Or, if you published the list into Active Directory, you can use a local domain controller computer. You will need to use the latter if you will not be able to see the certificate authority until after you have established the demand-dial connection.
You can also verify the identity of the calling router by using a Remote Authentication Dial-In User Service (RADIUS) server. This can be used to provide accounting and auditing for your demand-dial activity, and it supports MS-CHAPv2 and EAP with smart cards or machine certificates for authentication. This is particularly useful if you need to dial into a router that is not running Windows Server 2003 RRAS or if you need to establish a VPN connection by first dialing up an ISP, authenticating against the corporate network, and then establishing the VPN. In addition to strong authentication, you can use encryption to enhance security over your demand-dial connection.
You can encrypt data over your demand-dial link with either link encryption or end-to-end encryption. Link encryption is sometimes referred to as tunnel mode and will only encrypt the data between two routers. End-to-end encryption protects data from the source host to its final destination. You will typically use link encryption for a demand-dial router connection unless you are dialing through a VPN to establish the connection. IPSec is the industry standard protocol for setting up link encryption. IPSec should be used in conjunction with L2TP to establish end-to-end encryption and stronger authentication on the connection.
You would use the security protocols previously discussed to provide for the VPN demanddial tunnel because you have all the same encryption options with demand-dial routers as you have with VPNs. If you use the L2TP/IPSec solution, you will need to distribute the certificates that are used to authenticate the IPSec security association. You also need to make sure that your design provides for a firewall at the branch office and that you allow L2TP/IPSec traffic to pass between the corporate and branch offices. If you are using L2TP, the gateway IP address cannot be set because L2TP is a point-to-point protocol. You will need to set up a static route to the branch and/or corporate office, which will make sure the appropriate traffic will be forwarded to the correct interface.
The default settings for a demand-dial connection is to require data encrypting using MS-CHAP or MS-CHAPv2. The type of encryption will be negotiated by the client and server before the connection is established. You should not clear the Require Data Encryption (Disconnect If None) check box in the Remote Router Properties dialog box, which is accessed from the Routing And Remote Access MMC. You can also configure the use of a particular encryption algorithm by using the Encryption tab of the property page for the remote access policy for the account used on the calling routers.
Controlling Connections to a Demand-Dial Router
You can control when a demand-dial router can use the connection through two properties of the demand-dial interface: demand-dial filtering and dial-out hours. Demand-dial filtering allows you to specify the types of IP traffic that will cause a connection to be made. All other types of IP traffic will not establish a connection. The dial-out hours option allows you to restrict the hours in which the demand-dial router is able to make a demand-dial connection. This will guard against attacks that could occur when, for example, a branch office is closed and the connection is not needed.
You can also apply IP packet filters to the interface, as discussed in the section “IP Packet Filtering” earlier in this chapter. You need to realize that demand-dial filters are applied before the connection is made and IP packet filters are applied after the connection is made. Make sure you don’t allow IP filters to pass through the demand-dial filters only to be discarded by IP filtering on the firewall or IP packet filtering on the server. It is recommended that you apply the same filters to each type of filtering.
In summary, you should consider the following points when securing your demand-dial connection:
-
If you need more security for your connection, you can rent a leased line that is dedicated to you and not shared as the Internet is. This should not lull you into thinking your data is safe. You should still be concerned with the eavesdropping or manipulation of packets, either by the phone company or more likely internal employees, so you should use encryption.
-
Use remote access policies to manage the remote access settings for your network so you can control the authentication protocol used, the types of connections allowed, who can connect with the RRAS server, and the encryption level.
-
Use demand-dial filters, IP packet filters, and dial-in hours to gain control over who can access the server and when.
-
Use strong passwords on the accounts used for remote access. Consider using EAP to use certificate-based authentication in conjunction with a password to provide two-factor authentication for demand-dial routers.
-
For packet encryption and integrity, use L2TP/IPSec to establish a tunnel between two demand-dial routers if the connection is over the Internet.
In the following Design Scenario, you will design a demand-dial solution for a branch office.
Design Scenario: Designing a Demand-Dial Solution for a Branch Office
Frankfurters has two offices in South America that oversee its main beef production facilities. The main office, located in Rio de Janeiro, has a high-speed connection to the corporate office in the United States. The other office is located on a large ranch in a remote location in Brazil. There are a few employees there and a server with some applications installed on it that are used to support the ranching operation. There is a need for the office in Rio de Janeiro to access the remote office on the ranch. The IT manager states that he does not want to support modems at each desktop that needs to communicate with the remote location. He also mentions that it would be a violation of the security policy. The same security policy also states that all precautions should be taken in securing modem communications. The users are worried about the performance of the applications over the modem. You determine that the applications are web based and geared for low-bandwidth environments, but you don’t want to add too much overhead. High-speed bandwidth is not available to the remote site. The company does not have a PKI.
-
Question: What solution should you propose to connect the two offices together and what authentication protocols would you use to verify the identity of the server? Answer: You should propose the use of a demand-dial router solution because the clients cannot directly connect to the location with a modem. This solution would need to be configured to be a one-way connection to the ranch. The demand-dial gateway at the ranch should be configured to use caller ID to validate the incoming call. You should require that the demand-dial router authenticate with the remote location by using a secure authentication protocol lik e MS-CHAPv2 because PKI is not available. You should enable demand-dialfilters to prevent undesired traffic from traveling to the ranch through the demand-dial interface. This can help guard against worms.
|
| < Day Day Up > |
|
EAN: 2147483647
Pages: 168