Phase 1: Setting Up the Gallery Class
On this book's CD-ROM, in the ch35 folder, you can find two folders: starter files and finished files. Each folder has the same structure, featuring dev and prod folders. The dev folder contains all of the source files, such as .fla files and ActionScript files, while the prod folder contains all of the Web-ready files that should be uploaded to the Web server for final deployment.
| On the CD-ROM | You can learn more about our dev and prod folder structures in Chapter 3, "Planning Flash Projects." |
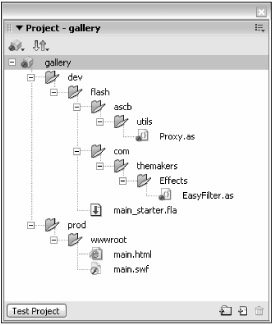
The starter files and finished files folders also have their own version of the gallery.flp file, which is a Flash Project file. If you're using Flash Pro 8, you can open these .flp files to see the dev and prod folder structures. The gallery.flp file from the starter files folder is shown in Figure 35-3.

Figure 35-3: The gallery.flp file from the starter files folder
Reviewing the Starter Files
Let's review the files that have already been built in the starter files folder. You can access each of these files from the gallery.flp file in the Project panel.
Proxy.as
This ActionScript class file, found in the dev/flash/ascb/utils folder, enables a class named Proxy, which has a create() method. This class is very similar to the Delegate class we have used with several examples in previous chapters of the books. The advantage of using the Proxy.create() method over the Delegate.create() method is that the Proxy.create() method enables you to pass additional parameters to the proxied (or delegated) function. For example, with the Delegate class, you can only specify a scope and a handler
import mx.utils.Delegate; var mcButton:MovieClip; function onButtonClick():Void { trace("onButtonClick >"); } mcButton.onRelease = Delegate.create(this, onButtonClick); which instructs the onRelease() handler of the MovieClip instance named mcButton to invoke the onButtonClick() function whenever the mcButton instance is clicked. However, with the Proxy class, you can pass one or more parameters to the proxied function. In the following example, the onButtonClick() function receives a reference to the mcButton instance:
import ascb.util.Proxy; var mcButton:MovieClip; function onButtonClick(mc:MovieClip):Void { trace("onButtonClick >"); trace("\tclicked instance: " + mc); } mcButton.onRelease = Proxy.create(this, onButtonClick, mc); For the Gallery component, you use the Proxy class to delegate events for several handlers, including the User Interface components and the thumbnail image buttons.
| Note | Many thanks to Joey Lott, lead author of the Flash 8 ActionScript Bible (Wiley, 2006), for providing us with his Proxy.as class. You can find more information about Joey and his books at www.person13.com. Joey is also a writing partner at CommunityMX.com. |
EasyFilter.as
This class file, which can be found in the dev/flash/com/themakers/Effects folder, contains one method named saturate. This method can create a ColorMatrixFilter instance. This filter is the ActionScript class responsible for enabling the new Adjust Color filter available for MovieClip and TextField instances in the Filters tab of the Property inspector. Forthe Gallery component, you use the EasyFilter.saturate() method to easily control the saturation color values of thumbnail images. The saturate() method accepts values from -100 to 100, just like the Saturation slider in the Adjust Color filter of the Filters tab of the Property inspector. The following code sample illustrates a typical use of the method:
import com.themakers.Effects.EasyFilter; var mcButton:MovieClip; mcButton.filters = [EasyFilter.saturate(-50)];
| Note | Many thanks to Joey Lott and Guy Watson for their help with creating the ActionScript code within the saturate() method. It's beyond the scope of this book to discuss the intricacies of using matrix values with the ColorMatrixFilter class — look to the Flash 8 ActionScript Bible by Joey Lott (Wiley, 2006) for more information. |
main_starter.fla
This Flash document contains the basic layout for the Gallery component and can be found in the ch35/starter files/dev/flash/main_starter.fla folder. If you open this file, you can see that the Main Timeline of the movie has three layers:
-
_tCaption: This layer has a TextField instance of the same name. The instance is located near the bottom of the Stage. This field displays the caption text for the JPEG image. This field also embeds most of the Basic Latin characters for the Arial font, and the field uses the new Anti-alias for readability setting in the Property inspector. Note that not all JPEG images have caption metadata — we specifically added caption data to each sample JPEG image in the project, using Adobe Photoshop's File ð File Info command.
-
_csp: This layer has a ScrollPane component of the same name. The instance is located at the top of the Stage. The ScrollPane instance stores MovieClip holders for each of the loaded JPEG thumbnail images.
-
_clo: This layer has a Loader component of the same name. The instance is located below the ScrollPane instance. When a user clicks a thumbnail image in the ScrollPane instance, the fullsize JPEG image loads and scales within the width and height of the Loader instance.
The Publish Settings for the main_starter.fla file have already been set up to publish the .swf and .html files for the document to the prod/wwwroot folder. The .swf file is named main.swf, and the .html file is named main.html. Both of these files have already been added to the gallery.flp file.
Constructing the Gallery Component
Before you start to modify the starter files, create a copy of the starter files folder on your computer. In the following steps, you learn how to create a Gallery class file for the Gallery component. Then, you associate the class with a new Gallery clip in the Library panel.
| On the CD-ROM | Make a copy of the ch35/starter files folder on your computer. |
-
Browse to the dev/flash/com/themakers folder in the starter files folder you copied.
-
Create a new folder named Portfolio. This folder is used to store the Gallery.as file you create in the next steps. This folder could also be used to store other class files related to a Portfolio set of components, such as a gallery chooser.
-
In Flash Pro 8, open the gallery.flp file in the starter files folder you copied.
-
Create a new ActionScript document by choosing File ð New and selecting ActionScript File in the New Document dialog box. Save the new ActionScript file as Gallery.as in the dev/flash/com/themakers/Portfolio folder you created in Step 2.
-
In the Gallery.as script file, add the code shown in Listing 35-2. This code imports all of the necessary classes that the Gallery class requires and creates the constructor for the class. We discuss many of the imported classes as we add further portions of code to the class. For now, you declare three private variables representing the three elements currently on the Stage of the main_starter.fla document. The constructor invokes the init() function, which contains a trace() action to indicate that the class has instantiated.
Listing 35-2: The Gallery Class Constructor

import ascb.util.Proxy; import flash.display.BitmapData; import flash.filters.*; import flash.net.FileReference; import mx.transitions.Tween; import com.themakers.Effects.EasyFilter; class com.themakers.Portfolio.Gallery extends MovieClip { private var _csp:mx.containers.ScrollPane; private var _clo:mx.controls.Loader; private var _tCaption:TextField; function Gallery(){ init(); } private function init():Void { trace("Gallery.init >"); } }
-
Save the Gallery.as file.
-
In the Project panel, double-click the main_starter.fla file.
-
In the Timeline window, select all the frames, from top to bottom, across the three layers. Right-click (or Control+click on Mac) the frame selection, and choose Copy Frames from the contextual menu.
-
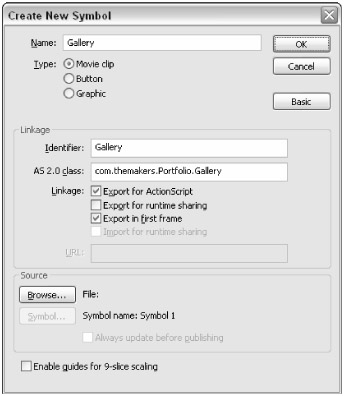
Choose Insert ð New Symbol. In the Create New Symbol dialog box, type Gallery in the Name field. Select the Export for ActionScript check box. The Identifier field should automatically fill with the name Gallery. In the AS 2.0 Class field, type com.themakers. Portfolio.Gallery. This path points to the Gallery.as file you saved in Step 6. Note that the path is relative to the main_starter.fla document and does not include the .as file extension. Refer to Figure 35-4. Click OK.
Tip Alternatively, you can assign global class paths in the Flash tab of the Publish Settings dialog box — click the Settings button next to the ActionScript Version menu.
-
In the new timeline of the Gallery symbol, select frame 1 of Layer 1. Right-click (or Control+click on Mac) the frame, and choose Paste Frames. The elements from the Main Timeline should now be pasted into the Gallery symbol timeline. Note that the layer names are automatically copied as well.
-
With all of the elements selected on the Stage, open the Property inspector. The elements are not aligned to the top-left corner of the symbol's registration point. In general, it's considered best practice to align elements within components to the top-left corner. In the Property inspector, change the X position to 0 and the Y position to 0. When you deselect the elements on the Stage, the registration point should be at the top-left corner of the ScrollPane component.
-
Believe it or not, that's all you need to do on the timeline of the Gallery symbol. Everything else happens within the Gallery.as file. Remember, because you attached the Gallery class in the AS 2.0 Class field for the Gallery clip, all of the code within the class file is automatically associated with the symbol.
Tip If you want to change the embedded font used for caption text, select the _tCaption field on the Stage of the Gallery clip and change the font name in the Property inspector.
-
Go back to the Main Timeline (Edit ð Edit Document). Create a new layer named cgl (short for component Gallery), and delete the other layers.
-
Open the Library panel (Ctrl+L or z+L), and drag an instance of the Gallery symbol on to the Stage. Place the instance near the top-left corner of the Stage. In the Property inspector, name the instance cgl.
-
To make sure the Gallery.as class file is attaching correctly to the Gallery symbol, save the Flash document, and test it (Ctrl+Enter or z+Enter). When the movie loads, you should see the Gallery.init > statement appear in the Output panel. If this message does not appear, right-click (or Control+click on Mac) the Gallery clip in the Library panel, choose Properties, and check the AS 2.0 Class path value.

Figure 35-4: The Create New Symbol dialog box
| On the CD-ROM | You can find this version of the main_starter.fla file as main_100.fla in the ch35/in_process folder. The Listing35-1.as file located in the ch35 folder can be renamed to Gallery.as and inserted into your Portfolio folder. |
EAN: 2147483647
Pages: 395