Replacing Component Skins
You can also add your own symbols to your Flash movie's Library panel to overwrite the built-in symbols included with the compiled clip of a component. For example, if you don't like the check mark graphic for a CheckBox component, you can add your own background symbol(s) for the CheckBox component to use in place of the default skins.
The general process for replacing a component's built-in skin graphics involves the following steps:
-
Find out the linkage identifiers for the component's skin symbols. In the exercise for this section, we show you how to find the source file used for the User Interface components.
-
In your own Flash document, create (or modify a copy of) a symbol for the skin item you want to change.
-
Make sure the new symbol(s) are set to export for ActionScript, using the same linkage identifiers as the original component's skin symbols.
Let's try this process with the CheckBox component. In the following steps, you learn how to change the check mark graphic of the CheckBox component.
-
Create a new Flash document, and save it as component_skin.fla.
-
Rename Layer 1 to cch.
-
On frame 1 of the cch layer, drag the CheckBox component from the Components panel to the Stage. In the Property inspector, name the new instance cch.
-
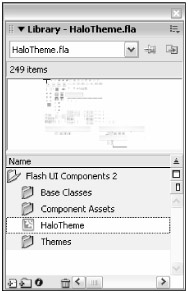
Now, open the HaloTheme.fla file, which is included with the installed files of Flash 8. If you're using Windows, you can find this file in the C:\ProgramFiles\Macromedia\Flash8\en\Configuration\ComponentFLA folder. If you're using Mac OS X, you'll find the file in the [StartupDisk]: Applications: Macromedia: Flash 8: en: Configuration: ComponentFLA folder. The HaloTheme.fla contains all of the skin symbols used by the User Interface components. Open this document's Library panel, and open the Flash UI Components 2 folder. There, double-click the HaloTheme symbol, as shown in Figure 33-19.
-
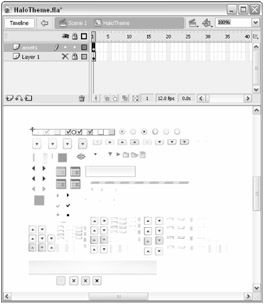
The HaloTheme symbol contains nested instances of each component's skin symbols. Select the CheckBox component's assets at the top-left corner of the asset assemblage, as shown in Figure 33-20. Copy this symbol (Ctrl+C or z+C).
Caution Do not save changes to the HaloTheme.fla document. This is the only original copy of the symbol skins included with Flash 8. If you delete or alter this file, you will need to reinstall Flash 8 to get the original HaloTheme.fla document. If you want to save changes to the HaloTheme.fla document, resave the changes in a new .fla file.
-
Switch back to the component_skin.fla document, and paste the copied symbol on to the Stage. You can delete the instance from the Stage once you've pasted it — the Library panel for the component_skin.fla document has copies of the symbols.
-
Open the Library panel for the component_skin.fla document (or switch to it in the Library panel's new combo box). You'll now find new folders containing the assets you just pasted. Open the Elements folder, and examine the contents. You'll find that the check mark graphic is contained within a symbol called CheckShape1. While this Graphic symbol is not set to export, it is included in the CheckTrue symbols (set to export) in the States folder of the Library panel. Double-click the CheckShape1 symbol to edit the check mark graphic.
-
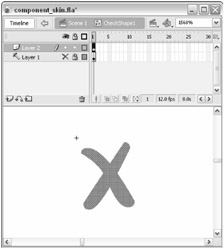
On the CheckShape1 symbol timeline, turn the existing layer (Layer 1) into a Guide layer, and lock and hide the layer. By doing this, you're preserving the original graphic just in case you want to go back to it. Create a new layer, and draw a new check mark graphic. For our example, we drew an X shape with the Brush tool, as shown in Figure 33-21.
-
Save the component_skin.fla document, and test it (Ctrl+Enter or z+Enter). When you click the CheckBox instance in the movie, you should see the new check mark graphic you created in Step 8.

Figure 33-19: The HaloTheme symbol

Figure 33-20: The CheckBox component's skin assets

Figure 33-21: The new check mark graphics
| Caution | Not all graphics of User Interface components are available as skin symbols in the HaloTheme.fla document library. For example, the Button component uses ActionScript code to draw the graphical states of the button. |
| On the CD-ROM | You can find the completed file, component_skin.fla, in the ch33 folder of this book's CD-ROM. |
EAN: 2147483647
Pages: 395
- Structures, Processes and Relational Mechanisms for IT Governance
- Measuring and Managing E-Business Initiatives Through the Balanced Scorecard
- Technical Issues Related to IT Governance Tactics: Product Metrics, Measurements and Process Control
- Governance in IT Outsourcing Partnerships
- The Evolution of IT Governance at NB Power