Accessing Items in Shared Libraries
Since Flash 5, Web designers and developers have had the good fortune of using an exciting feature to manage assets in Flash movies: the capability to link the symbols, sounds, bitmaps, and font symbols within external .swf files to other Flash movies that they use on their Web sites. These external .swf files, called shared libraries, are different than loaded .swf files. Flash 8 enables you to easily use shared libraries, and has an intuitive interface and dialog boxes to create shared items.
| Tip | Flash 8 enables you to easily update shared assets in the Flash document files (.fla) that use them. Flash 8 refers to shared assets as runtime sharing. We'll take a look at this feature in just a moment. |
The primary benefit of using a shared library .swf file is that it needs to be downloaded only once, even though several other Flash movies may need to access the same element. For example, if you want to use Blur Medium as an embedded font in several Flash movie files (.swf), you would need to embed the font into each movie. A font can easily consume more than 30 KB in each movie. Multiply that by 10 or 20 files in your Web site that use the font, and you may be eating up a lot of bytes just for the font usage. Instead, if you add a Font symbol to one Shared library .swf file and use that shared asset in all of the Flash movies, you will need to download the font only once, even though it's used by several movies.
A shared library .swf file doesn't load into a level or a Movie Clip instance location. Instead, you set up the Library of a Flash document file (.fla) with assets that you want to use in other Flash movies. This document is the basis of the shared library .swf file. After you assign an identifier to each asset in the Library, you save the Flash document, publish a Flash movie file (.swf) from it, and close the Flash document. Then you open another Flash document file (.fla) and, using File ð Import ð Open External Library, you open the shared library Flash document file (.fla). Its Library panel will open (in a dimmed gray state), and you can drag and drop assets to your new Flash movie file.
| Note | Even though the assets are linked to the external Shared library .swf file, the Flash document file (.fla) actually stores copies of the assets. However, they will not be exported with the published Flash movie. |
After you have established a shared library file, any changes to the actual contents of the Shared library Flash document file (.fla) and movie file (.swf) will propagate to any Flash movie that uses the shared assets. In the following sections, you learn how to create a shared library file and use it with other Flash movies.
| Caution | It is recommended that you use only small (low byte size) elements in your shared libraries to ensure that they are downloaded and available for Flash movies that use them. As with any Web production, make sure that you test early and often before you develop an entire project. |
Setting Up a Shared Library File
To share assets among several Flash movies, you need to establish a shared library file (or files) available to other Flash movie files. To create a shared library file, follow these steps:
-
Create a new Flash document (Ctrl+N or z+N).
-
To place Flash artwork into the Library, draw the shapes and other elements (text, lines, gradients, and so on). Select the artwork and choose Modify ð Convert to Symbol (F8). In the Convert to Symbol dialog box, choose a symbol type (for example, Graphic, Button, or Movie Clip) that best suits the nature of your artwork.
Flash 8 also enables you to define export parameters directly in this dialog box. Click the Advanced button; and in the extended options, check Export for runtime sharing. Specify a linkage identifier name, and type the relative or absolute URL for the shared .swf file in the URL field. This URL should simply be the path to this Flash movie on the Web server, such as http://mydomain.com/files/sharedLib.swf. Alternatively, if you know all of your Flash movies will be stored in the same directory on the Web server, you can simply type the name of the .swf file, as shown in Figure 28-26.
-
To place bitmaps and sounds into the Library, import the source files as you normally would, using File ð Import ð Import to Library.
-
Delete all artwork that you have placed on the Stage. Every asset that you want to share should be in the Library panel.
-
To place an entire font (or typeface) into the Library, open the Library panel and choose New Font from the options menu located at the top-right corner of the Library panel. In the Font Symbol Properties dialog box, type a reference name for the font, choose the font face from the Font menu, and select a faux font style (Bold or Italic) to be applied (optional), as shown in Figure 28-27.
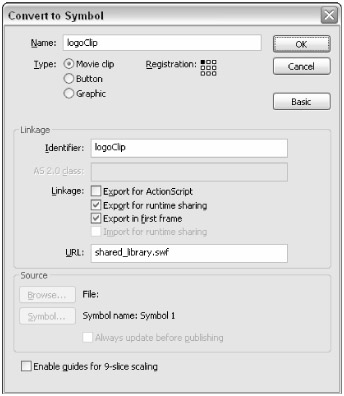
Figure 28-26: Add runtime-sharing information directly in the Convert to Symbol dialog box.
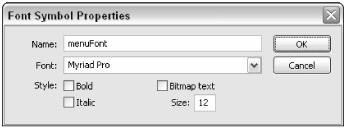
Figure 28-27: Give each embedded font face a descriptive name that indicates its functionality within the Flash movie.
| Note | In Flash 8, you can specify bitmap text and size settings in the Font Symbol Properties dialog box. However, in our tests, we could not see any visible difference in the way in which a shared font (or any Font symbol) was rendered. |
Assigning Names to Assets
After you have placed each asset into the Library of your starter Flash document file (.fla), you'll need to assign a unique identifier to each asset.
-
Select the symbol, bitmap, sound, and font in the Library. Right-click (or Control+click on Mac) the selected asset and choose Linkage. Alternatively, you can select the item and choose Linkage from the Library panel's options menu.
-
In the Linkage Properties dialog box, shown in Figure 28-28, choose Export for runtime sharing for the Linkage option. This forces the asset to export with the published .swf file. Then, type a unique name in the Identifier field. In the URL field, enter the intended final location of the .swf file that you will publish from this Flash document. We discuss this option in more detail in the next section. Click OK to close the dialog box.
-
Repeat Steps 1 and 2 for each asset in the Library.
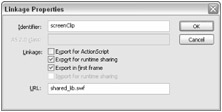
Figure 28-28: Each asset in the Library of the Shared library document needs a unique name.
Specifying the Shared Library's Location
A required setting for each asset of the Shared library document is the relative or absolute path (as a URL) to the shared library SWF on your Web server. To change the URL for all of the assets with the current Shared library document, follow these steps:
-
In the options menu in the Library panel, choose Shared Library Properties.
-
In the URL field, type the location of the Shared library .swf file (or where you intend to publish it on the Web). This location will be prepended to each shared asset's identifier in the movies that use the assets.
| Caution | Make sure that you specify this URL before you start using the Shared library document file (.fla) with other Flash document files (.fla). The URL location is stored within each document that uses the Shared library .swf file, and it will not update if you decide to change the URL later in the Shared library .fla file. Also, the URL applies to all items in the shared library .fla and .swf file; you cannot set unique URLs for each item in a shared library. |
Publishing the Shared Library Movie File
After the assets of the Flash document have been assigned identifiers and the URL of the Shared library has been set, you need to publish an .swf file of the Flash document.
-
Save the Flash document file (.fla). Use a descriptive name that notifies other members of your Web production team that this is a shared library file, such as shared_lib.fla.
-
Publish the Flash movie as an .swf file. No other publish formats are necessary. In the Publish Settings (File ð Publish Settings), select only the Flash format in the Format tab. Click OK. Choose File ð Publish to create an .swf file from your document.
-
Close the Flash document.
| Tip | To retain the most backwards compatibility with your shared library files, you might want to consider publishing your Shared libraries as Flash Player 6 or 7 .swf files. |
Linking to Assets from Other Movies
After the Shared library .swf file is published, you can use the shared assets in other Flash movies.
-
Create a new Flash document or open an existing one.
-
Using the File ð Import ð Open External Library command, browse to the folder where your Shared library Flash document file (.fla) was saved. For testing purposes, you should keep this document in the same folder as the other Flash documents that share it. Select the shared library .fla file and click Open. A separate grayed-out Library panel for the shared library .fla file will open in the Flash 8 authoring environment.
-
Drag the asset(s) that you wish to use into the new Flash document's Library or onto its Stage. Even though Flash 8 will copy the contents of each shared asset, the asset will load from the separate Shared library .swf file at run time.
-
To see whether an asset is native to the Flash movie or from a shared library .swf file, right-click (or Control+click on Mac) the symbol or asset in the Library. Select Linkage from the contextual menu. The Linkage Properties dialog box, shown in Figure 28-29, will indicate whether the symbol (or asset) will be imported from an external Shared library .swf file.
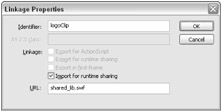
Figure 28-29: If a Shared library asset is used in another movie, the Linkage Properties indicate the name (and path) of the Shared library .swf file.
| Tip | You can also expand the width of the Library panel to reveal the Linkage column, which indicates whether a library item is exported or imported. |
When you are done dragging the assets from the Shared library file, close its Library panel. When you publish the new Flash movie(s) that use the Shared library .swf file, make sure you put all of the files on your Web server for live testing. If you used relative URL locations for the shared library .swf file(s), make sure the files are stored in the proper directories on your Web server.
| On the CD-ROM | You can find a shared library document and Flash document that uses the shared assets in the ch28/sharedLib folder of this book's CD-ROM. |
Updating Shared Assets
Flash 8 has an update feature for assets that have been imported from a Shared library document. To see which assets in your current document are imported, expand the width of the Library panel to view the Linkage column, as shown in Figure 28-30.
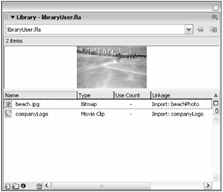
Figure 28-30: The Library panel enables you to quickly view the Linkage settings for each item.
If you have changed the contents of an asset in a shared library document file (.fla) and published the new Flash movie file (.swf), you can choose to update the reference assets in other Flash documents that use the shared assets.
| Tip | Actually, you can use the update feature with any symbol that you have dragged, copied, or imported into one .fla file from another. Flash 8 stores the name of the original .fla file with the copied symbol. |
Let's walk through the complete process of updating a shared library asset.
-
Open the shared library document file (.fla).
-
Open the Library panel and edit the shared asset you wish to update. For example, if you need to change the artwork with a Movie Clip symbol, double-click the symbol and edit the symbol's content.
-
When you're done editing the asset, save the Flash document and publish a Flash movie. Close the Shared library document.
-
Open a Flash document that uses an asset from the shared library.
-
Open the Library panel for the document. You'll notice that any changed elements still appear as they did before the update occurred. Select the asset that was changed in the shared library document and choose Update from the Library panel's options menu. Or right-click (Control+click on Mac) the asset and choose Update from the contextual menu. The Update Library Items dialog box appears, as shown in Figure 28-31. Select the check box next to the asset's name you wish to update and then click the Update button.
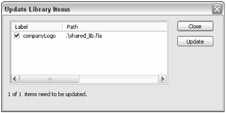
Figure 28-31: You can update shared assets in other Flash documents that use them.
You can also select multiple items in the Library panel and choose Update in the Options menu to update several items at once.
| Web Resource | We'd like to know what you think about this chapter. Visit www.flashsupport.com/feedback to send us your comments. |
EAN: 2147483647
Pages: 395