Integrating Behaviors with Movie Clips
Chapter 15, "Adding Sound," discussed the ins and outs of sound import and use in Flash documents. In this chapter, we show you how to create a sound library using Flash MX 2004's new Behaviors panel. Once the set of sounds is created, you learn how to stop the sounds from keyframes in another Movie Clip timeline.
| On the CD-ROM | You'll find sound files (WAV and AIF formats) in the ch19/pianoKeys/sounds folder of this book's CD-ROM. Make a copy of the pianoKeys_starter.fla file for this exercise. This file is located in the ch19/pianoKeys folder. |
Overview of the pianoKeys Movie Clip
Open the pianoKeys_starter.fla file. A mcKeys Movie Clip instance is already on the Stage of the Main Timeline. Double-click the mcKeys instance to enter Edit mode, as shown in Figure 19-9. Note that the Timeline window is docked to the left side of the Document window.
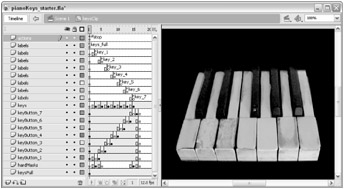
Figure 19-9: The Timeline window showing the frames of the keysClip Movie Clip symbol
The timeline for the keysClip symbol has several layers for individual Button instances and labels. If you test this movie using Control ð Test Movie (Ctrl+Enter or z+Enter), you'll see that the Button instances over each piano key will tell the Playhead of the keysClip timeline to go to that key's frame label. For the first key on the left, the button on layer keyButton_1 has the following action list:
on (press, keyPress "a") { gotoAndStop ("key_1"); } on (rollOver) { gotoAndStop ("keys_full"); } These actions don't use any dot notation — they are simple navigation actions that you learned in the last chapter. When the keyButton_1 instance is clicked with the mouse, the Playhead moves to the key_1 label on the current timeline, which is the keysClip timeline.
When the timeline goes to the key_1 frame label, a new PNG bitmap of a "pressed" piano key (key_01.png on the keys layer) appears on top of the keys_full.png bitmap that is placed on the bottom keysFull layer. Note that the keys_full.png bitmap is present throughout the entire keysClip timeline. Each Button instance in the keysClip Movie Clip sends the Playhead to the appropriate piano key frame label.
Now that you have an understanding of what's happening in this Movie Clip, let's create some sounds with the Behaviors panel. These sounds will be targeted within the mcKeys instance later in this chapter.
Create Sound Instances with a Behavior
Before you start making sound instances, you need to establish a naming convention for your sounds. A naming convention is simply a way of consistently identifying components in any project, in or out of Flash. To a member of a Web production team, the importance of naming conventions cannot be overemphasized — everyone involved with the project should know how to give names to images, sounds, symbol names, instance names, and so on. Even if you work by yourself, a naming convention provides a system of integrating elements from project to project and enables you to identify elements much more easily when you open old files.
-
For each key on the piano, you'll make a unique sound. Each sound will be on its own timeline where it can be targeted to play. Because there are seven keys on this odd piano, you need to import seven sounds into the Flash document. Using File ð Import ð Import to Library, locate the ch19/pianoKeys/sounds folder on the CD-ROM in the back of this book. Import each of the key sounds (AIF or WAV files) into your Flash document. You can import all of the sounds at once if you Shift-select all of the sound files in the Import dialog box.
-
Link each sound in the library, so that the sounds can be referenced by ActionScript (and behaviors). Open the Library panel (Ctrl+L or z+L) and right-click, or Control+click on Mac, the key_1.wav (or key_1.aif) file. Choose Linkage in the contextual menu. When the Linkage Properties dialog box opens, select the Export for ActionScript check box. Change the auto-filled text in the Identifier field to key_1. Refer to Figure 19-10. When you are finished, click OK to accept the settings.
-
Repeat Step 2 for each sound file in the Library panel, matching the number of the link-age identifier name to the number used in the filename. For example, you should link the key_2.wav (or key_2.aif) file to key_2. When you are finished, expand the width of your Library panel to reveal the Linkage column. Your sound files should have identifiers displayed, as shown in Figure 19-11.
-
Now you're ready to use behaviors to create ActionScript-ready references to the sounds in the Library. Make sure you are on the Main Timeline (Scene 1) of the pianoKeys_starter.fla document. On this timeline, you should see a mcKeys layer. Create another layer and rename it behaviors.
-
Select the first frame of this new layer, and open the Behaviors panel (Shift+F3). Click the Add Behavior (+) button in the top-left corner of the panel, and choose Sound ð Load Sound from Library from the menu. In the Load Sound from Library dialog box, type key_1 in the top field, which specifies the linkage ID for the asset you want to load. In the lower field, type sndKey_1. This term will be the ActionScript object to target with behaviors you'll use later in this exercise. Also, clear the "Play this sound when loaded" check box — you don't want the sound to start playing when the movie starts. See Figure 19-12 for a review of these settings. Click OK to accept the parameters of the behavior.
-
Repeat Step 5 for each sound in the Library, matching the instance name's number to the number used in the linkage identifier. For example, the Load Sound from Library behavior for the key_2.wav (or key_2.aif) file should specify key_2 for the top field and sndKey_2 for the lower field. When you are finished completing this task for every sound in the Library, you should have seven behaviors listed in the Behaviors panel. You can double-click the Action name of each behavior to review that behavior's settings.
-
Save your Flash document as pianoKeys_sounds.fla. Test the movie (Ctrl+Enter or z+Enter). If you hear any sounds play when the movie loads, you forgot to clear the Play this sound when loaded check box on one of the behaviors. Go back and double-click each behavior in the Behaviors panel until you find the one you missed.
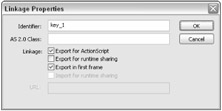
Figure 19-10: The Linkage Properties settings for the key_1.wav (or key_1.aif) file in the Library panel
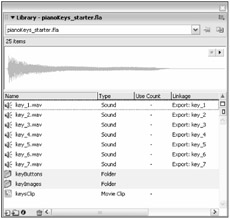
Figure 19-11: The Library panel's Linkage column displays the identifier values for all linked assets.
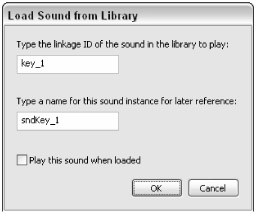
Figure 19-12: Each sound requires a unique instance name (the lower field name).
| On the CD-ROM | You can refer to the pianoKeys_sounds.fla file located in the ch19/pianoKeys folder of this book's CD-ROM. This file has the seven sound files in the Library panel, sorted in the keySounds folder. |
Targeting the Sounds with More Behaviors
Now that you have behaviors set up for the sounds, you're ready to begin controlling the sounds with additional behaviors attached to keyframes in the keysClip timeline. This section of the exercise shows you how to add behaviors to the keysClip timeline that will target the sound instances.
| Note | There will be more than one actions layer in this timeline. The actions layer in Step 1 is a new layer in addition to the existing actions layer (with the //stop comment). |
-
Enter Edit mode by double-clicking the mcKeys instance on the Main Timeline (Scene 1). On the keysClip Timeline, add a new layer and name it behaviors. Move this new actions layer underneath the layer that contains the key_1 frame label, as shown in Figure 19-13.
-
On frame 3 of the new behaviors layer, you need to add a behavior that will play the first Sound instance, sndKey_1. Remember that the Button instances on the keysClip timeline already move the Playhead to each key's label. Insert a blank keyframe (F7) on frame 3.
-
With the new keyframe selected, open the Behaviors panel (Shift+F3). Click the Add Behavior (+) button, and choose Sound ð Play Sound. In the Play Sound dialog box, type sndKey_1, as shown in Figure 19-14. Click OK to close the dialog box.
-
Now, open the Property inspector. With frame 3 of the second actions layer selected, type //play sound into the <Frame Label> field. Your Timeline window should resemble Figure 19-15
At this point, you will want to test your movie to see if the behavior is finding the target and playing the sound. Save your document as pianoKeys_behaviors.fla, and use Control ð Test Movie to create a Flash movie file (.swf). Make sure that the behavior on the keyframe works by clicking the first key on the piano keyboard (from the left), and that you hear a sound.
-
Now, you need to enable all the other sound instances created by your earlier Load Sound from Library behaviors. Create a new layer and name it behaviors. Place the new layer underneath the label layer that contains the key_2 frame label. Copy the //play sound keyframe from the previous actions layer, by selecting the keyframe and choosing Edit ð Timeline ð Copy Frames. Then, paste the copied keyframe to frame 5 of the new behaviors layer. Select frame 5 and choose Edit ð Timeline ð Paste Frames.
Tip You can also copy and paste frames by selecting the frame(s), right-clicking (or Ctrl-clicking on Mac) the frame(s), and choosing Copy Frames or Paste Frames from the contextual menu. Frames are copied to a separate Clipboard than other elements in a Flash document that you use with the standard Edit ð Copy and Edit ð Paste commands. As such, you can have two types of elements in Clipboard storage simultaneously.
-
Select the new //play sound keyframe in the behaviors layer underneath the key_2 frame label layer. Open the Behaviors panel (Shift+F3). You need to change the copied Play Sound behavior to point to the sndKey_2 instance. Double-click the Play Sound item in the Action column of the panel. In the Play Sound dialog box, change the target to sndKey_2, as shown in Figure 19-16.
-
Repeat Steps 5 and 6 for each key and sound. Each key_ frame label should have its own behaviors layer with a //play sound keyframe. Test your movie each time you add a new keyframe with ActionScript. If a particular key doesn't work, check the target's name in the Play Sound settings.
-
When you've finished adding a behavior for every key, save the document and test it. After all's been said and done, you should have a functional Flash piano (well, at least seven keys' worth!) that plays a sound whenever you click a piano key. If you want to change the sounds, you can either update the sound file in the Library or import new ones.
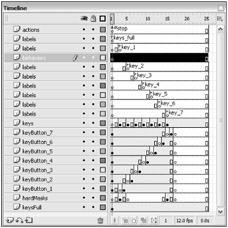
Figure 19-13: Don't be afraid to keep information separated on actions, labels, and behaviors layers. Separating the information will make it much easier for you to access the appropriate sections of your timelines.
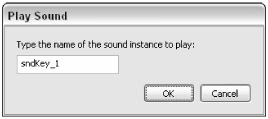
Figure 19-14: The Play Sound behavior can play a sound set up by the Load Sound from Library behavior.
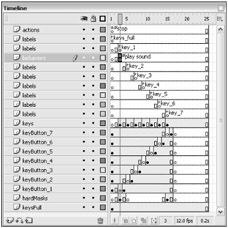
Figure 19-15: The //play sound comment lets you know what the behavior on this keyframe does.
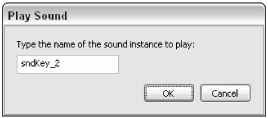
Figure 19-16: This Play Sound behavior targets the sndKey_2 instance.
| On the CD-ROM | You can refer to the complete exercise file, pianoKeys_behaviors.fla, located in the ch19/pianoKeys folder of the book's CD-ROM. |
| Web Resource | We'd like to know what you think about this chapter. Visit www.flashsupport.com/feedback to send us your comments. |
EAN: 2147483647
Pages: 395