Using the FLV QuickTime Export Plug-In
If you used Flash MX Pro 2004, you might have known that most QuickTime-enabled applications could use an export plug-in to create .flv files direct from your video-editing applications. Flash Pro 8 continues to offer this plug-in. This feature is not accessible from any menu or command in the Flash Pro 8 authoring environment. Rather, the tool works with other video applications such as Adobe After Effects or Apple Final Cut Pro to export high-quality Flash Video files (.flv) that use the Sorenson Spark or On2 VP6 codec. Once you have created an .flv file, you can import the file into a Flash 8 document with the Video Import wizard.
| New Feature | The interface for the plug-in is identical to the Flash Video Encoding Settings dialog box featured in the Flash 8 Video Encoder application and the Video Import wizard of Flash Pro 8. |
You should be running Apple QuickTime 6.1.1 or higher on your system in order to use the FLV QuickTime Export plug-in. You can download QuickTime 6 at www.apple.com/quicktime. You do not need the Pro version of QuickTime Player to use the plug-in in most video applications. In the next section, though, we demonstrate the use of the plug-in from QuickTime Player Pro. You can't export video (of any type) in the basic version of QuickTime Player.
Most applications that support QuickTime output can utilize the plug-in. In this section, you learn how to export a high-quality Flash Video file (.flv) from Apple QuickTime Player Pro. You must be using the Pro edition of QuickTime Player to complete this exercise. If you don't have QuickTime Player Pro, we suggest that you read through these steps and see if you can apply the same procedure in your preferred video application. Usually, you will find the .flv file option in the settings available in the dialog box opened by the File ð Export menu (or some variation thereof) in your video-editing application.
| On the CD-ROM | You'll need a source video file to use in QuickTime Player Pro. You can use one of the video files found in the ch17/source folder of this book's CD-ROM. |
-
Open QuickTime Player Pro on your Windows or Mac computer.
-
Choose File ð Open Movie in New Player, and browse to the location of the video file you want to compress in Flash Video format. For this example, we use the lizard.mpg file from this book's CD-ROM.
-
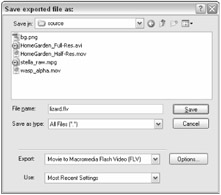
Once the file has opened in the player, choose File ð Export. In the Save exported file as dialog box, choose Movie to Macromedia Flash Video in the Export menu, as shown in Figure 17-36. Do not click any other options at this time.
-
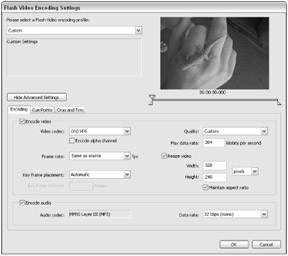
Now click the Options button. As you can see in Figure 17-37, the options you see in this dialog box are the same as those available in the Encoding stage of the Video Import wizard of Flash Pro 8. To quickly show you the power of the Flash Video Exporter tool, choose the options shown in Figure 17-37 and click OK.
Note Regardless of the video application you use, the dialog box shown in Figure 17-37 is exactly the same. You always have access to these options from any compatible video-editing program.
-
In the export dialog box of QuickTime Player, click the Save button. (If you want to specify a new location and/or filename, do so before clicking the Save button.) QuickTime then exports the .flv file from the source video file.

Figure 17-36: The Export menu option in QuickTime Player Pro, shown in the Windows version

Figure 17-37: The encoding settings
After you have created an .flv file, you can import it into a Flash document.
EAN: 2147483647
Pages: 395