Backgrounds and Scenery
As you have learned in previous chapters, in Flash you work in an area that is called the Stage area. For broadcast animation (or any other kind, for that matter), it is better to think of it as the viewfinder of a camera. The main difference between this camera and the traditional kind, or even those used in 3D animation, is this: You can't move it. So, to give the illusion of camera movement, everything within the view must move. This is not as hard as it might seem with Flash's capability to use animated graphic symbols. A good example is in Richard Bazley's animated short, The Journal of Edwin Carp.
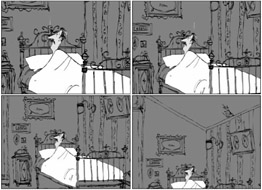
In a scene where the view seems to pan up from Edwin's bed to show a crack in the ceiling, all of the elements on the Stage have to move to create the illusion of a camera move. Here are the steps for creating this effect, as shown in Figure 14-16:
-
A Graphic symbol of the entire scene of animation that was larger than the camera's view was made (so that white space wouldn't show at the edges).
-
The symbol was placed in the Main Timeline.
-
The symbol was scaled and placed on the first keyframe to frame the medium view of Edwin in his bed.
-
The symbol was then scaled and placed on a later keyframe to frame the view of the cracked ceiling.
-
By tweening between these two keyframed views, the illusion of a camera zoom out and pan up is created as the whole scene moves on the Stage.

Figure 14-16: A few shots from the bedroom scene in The Journal of Edwin Carp
| On the CD-ROM | We include this scene and several others from The Journal of Edwin Carp, an animated feature film that was done entirely in Flash, on the CD-ROM in the R_Bazley folder inside the ch14 folder. |
| Web Resource | Richard Bazley describes some of his other clever animation techniques in his tutorial for the Flash MX Bible (Wiley) on "2D Character Animation." This tutorial is archived online for readers who wish to learn more about specialized animation techniques. Go to www.flashsupport.com/archive. |
Runtime Bitmap Caching
We're all waiting for the day when intensive animation will play as smoothly on the Web as it does when output for offline viewing. You will be pleased to discover that Flash 8 has brought that day a little bit closer. A new feature enables the Flash Player to optimize playback of complex vector graphics in MovieClip or Button symbols by caching them as bitmaps, or surfaces, at run time. The benefit of caching complex vectors as bitmaps is that the Flash Player does not have to tie up the CPU by constantly redrawing these background vectors as other elements are animating in front of them. Your animation will play back faster and smoother. You can apply this option with ActionScript or by selecting a MovieClip (or Button) instance in the Document window and selecting the check box in the Property inspector to Use runtime bitmap caching.
Runtime bitmap caching only optimizes Web playback for Flash movies with complex background images that are static or panned vertically or horizontally. The position, but not the content, of the cached symbol can change without requiring the Flash Player to redraw the vector information. Bitmap caching will fail if the MovieClip (or Button symbol) is larger than 2880 pixels in any direction or if the MovieClip is rotated. You will not notice a significant improvement with bitmap caching on simple vector graphics. Before you publish your final Flash movie, it is always best to test with bitmap caching turned on and turned off to see which delivers the best performance for the specific graphics and animation in your file.
Bitmaps
As we mentioned previously, when you're designing with Flash for the Web, use raster (bitmap) images with a careful eye on their file size. But for broadcast output, there's no limit. Not only can you use as many images as you'd like (within system constraints), but also doing so will make a richer, far more attractive finished product. And, unlike the .swf format, when they're output as raster video, even animations built with a lot of bitmaps will play at the proper frame rate. So move, animate, scale, and rotate them — even play sequences of them. The sky and RAM are the only limits.
QuickTime Limitations
Beginning with Flash 4, Flash expanded its import capabilities to include raster video — QuickTime and AVI. When using video output for broadcast, you can export to these formats, too, and video that has been embedded in a Flash project file (.fla) will show up when output to .swf format. In the past, Flash did not recognize alpha channels embedded in the QuickTime 32-bit animation codec (which supports traveling mattes, or alphas). The workaround was to use Mask layers on the video in Flash. One of the most impressive new features of Flash 8 (Professional edition only) is that it is now possible to import video with an alpha channel! This is exciting news for anyone who wants to integrate video with her Flash artwork or interface designs in more seamless and creative ways. If you can set up a basic blue or green screen and create some nice alpha channels on your video, you can take advantage of all that work when you bring the video into Flash and start layering your video with other elements.
Remember that you also have the option to link the video file rather than save it within the Flash project file (thank goodness) — Flash makes a pointer to it instead. This keeps your file sizes much more manageable. The only drawback to linking video instead of embedding it is that it won't show up when output to the .swf format.
The option of combining video with vector animation has brought tremendous functionality to Flash because animations can be keyed, or composited, over (or behind) live video without having to recomposite in After Effects. To take advantage of this, keep your live video at the same frame rate as the Flash project. Note, however, that Flash will export only the audio from the video clip in some formats, so you may need to reapply sound in a video-editing application. An alternate solution is to bring the video and audio tracks into Flash separately and to synchronize them there before exporting to your chosen format.
| Web Resource | You can find an archived version of the "Exporting Animation" chapter from the Macromedia Flash MX 2004 Bible (Wiley, 2004) at www.flashsupport.com/archive. The chapter includes more detailed information about the various options for exporting animation and audio. |
Building Layered Backgrounds in Photoshop
The drawing and effect tools in Flash have become more robust with each release. Flash 8 Professional finally brings the addition of blend modes and more sophisticated gradient controls that make it easier for artists to get the effects that were previously only possible in raster applications. Our suggestion is to try working directly in Flash first, but if you need to go back to Photoshop, you'll be happy to know that the two applications work well together. By using layers in Photoshop to create artwork, multiplane shots are easily accomplished in Flash. Using layers is very important to the organization of the animation. It is not uncommon for a single shot to require more than 20 layers to keep things where they need to be in the visual stacking order. When designing backgrounds (or scenery, to be more precise), remember that, at some point, background elements may need to be foreground elements. For instance, the sky will always be in the background, so it is on a layer furthest down in the stack. Other background elements, however, may sometimes need to be in the foreground to facilitate movement of the character, either in front of or behind him. To allow flexibility in how your various elements interact, you should keep them on separate layers.
When creating layered backgrounds, using Photoshop and alpha channels delivers the most versatility. When using Photoshop for scenery elements, it's mandatory to work in layers and to save a master file with all layers intact. Elements can then be exported to individual files (with alpha channels) as needed. (Retaining the master layered Photoshop file gives you maximum options later, if edits or changes occur. It can also be used as a resource for subsequent animations, so don't flatten or discard your master layered Photoshop file. Instead, number and archive it!) Why the alpha channels? When translating the Photoshop elements into Flash vector scenery, they automatically mask themselves — so a little preplanning in Photoshop can save lots of time later.
Flash Mask Layers
Whoops! You got to a point where you didn't use layers and now you need a mask. Some situations may be either too complicated or else unforeseeable in the original design. Flash Mask layers can come to the rescue. Here's the good news: You can mask (and animate the mask) interactively with the other elements while in Flash. The bad news is that it might be more difficult to create a precise mask in Flash than to export an alpha channel from the original Photoshop file. A classic example of masking used in character animation is the black circle that closes in on a scene at the end of an animated episode — this simple animated shape mask is easy to add in Flash.
Long Pans
Long pans are a standard device of animated cartoons; an example is when Fred Flintstone runs through the house and furniture keeps zipping past (that must be one looooong living room). This can be done a couple of ways in Flash. For landscape backgrounds, it's usually best to first create a very wide graphic (bitmap or vector) of the landscape and then to Motion tween it horizontally, with keyframes for stopping and starting as needed within the tween. If something is either falling or ascending, use a tall graphic and Motion tween vertically. Another solid technique is to create art of the objects that will pan (such as clouds) and then loop them as the background layer, across the view. To get smooth results when using looping, don't use easing in or out with the tween setup. Also, to maintain constant speed, maintain the exact number of frames between the keyframes. Then, copy the tween by Alt (Option) dragging the selected tween frames to the desired area in the Timeline. Repeat copying until you've covered the time needed.
| Caution | For Web animation, it is best to use Movie Clips for looping animation, but if you are planning to output your animation to video, you have to lay out all animation in keyframes on the main Timeline (or in Graphic symbols). When it's exported to video, only the first frame of any Movie Clips will display, unless you use After Effects or Macromedia Director to translate the .swf file before final output. |
| Web Resource | You can find an archived version of the "Exporting Animation" chapter from the Macromedia Flash MX 2004 Bible (Wiley, 2004) at www.flashsupport.com/archive. The chapter includes more detailed information about the various options for exporting animation. |
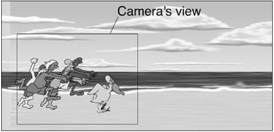
In the Weber cartoon scene of a chase along the beach, a camera pan was created by tweening a symbol of the whole beach scene horizontally. As shown in Figure 14-17, the "camera view" reveals only a small area of the larger background scene.

Figure 14-17: The chase scene from the Weber cartoon is created with a looping pan.
| New Feature | The Work area in Flash is now called the "Pasteboard," and it has been expanded in Flash 8 to better support workflows that require extra-long graphics that will be tweened across the Stage. This feature is also handy for developers who like to store extra elements off the Stage where they won't be visible in the final .swf. Think of it as the theatre wings of your Flash stage. |
Multiplane Pans
To provide 3D-motion depth during the pan, keep this rule in mind: An object that is farther away appears to move more slowly (than a nearer object) as it moves across the view. This takes some experimenting to get it right, but once mastered, this will add a professional touch to your animations. For example, in a 100-frame pan of a beach scene looking toward the water:
-
The sky moves very slowly at 100 pixels total.
-
The water moves more quickly at 125 pixels total.
-
The character on the beach moves more quickly than the water at 150 pixels total.
-
A parked car in the immediate foreground moves most rapidly at 250 pixels total.
Blurring to Simulate Depth
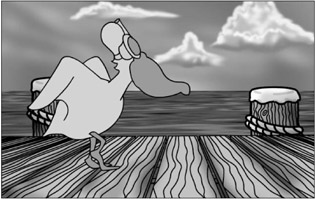
The multiplane camera was used in early Disney films to give a feeling of depth in the animation of flat artwork. There was physical space between the individual cels when photographed. By using a short depth of field lens, the artwork that was further away from the lens lost focus slightly. (You may have noticed this in still photography yourself.) A good example of this is the pier scene from the Weber cartoon, which is shown in Figure 14-18. Even if you set up your scenery using bitmaps, you can re-create this effect.

Figure 14-18: The opening pier scene from the Weber cartoon has a feeling of depth created by using increasing levels of blur on the background layers.
In Photoshop, it's a simple case of using incrementally higher doses of Gaussian blur on the layers of your scenery that are farther way. The farther the object is, the more blur that is applied — just be sure that the blur is applied to the alpha channel that Flash will use in compositing. In Flash 8 Professional, gradually apply more intensive levels of blur using the Blur filter. Photographers use this technique to bring attention to the element in the shot that is in focus. Using it in animation enhances the illusion of depth. However, using it in the foreground can also portray various elements, such as fog.
EAN: 2147483647
Pages: 395