12.2 Starting and Stopping SAM
| |
When you start SAM, it checks what type of terminal you are using. If you are using a text-type terminal and the DISPLAY variable is not set, SAM starts in text mode and displays the menu-based text interface. If you are using a graphical terminal or console, SAM starts in graphical mode. You can start SAM on a remote system and view the GUI at your local graphical terminal by correctly setting the DISPLAY variable.
Starting and Stopping SAM in Text Mode
To start SAM, you use the sam command. As already mentioned, if you are using a text-type terminal, SAM will start in text mode. In the first screen, it will show you some instructions on how to use menus and help. The first screen that appears after starting SAM is shown in Figure 12-1.
Figure 12-1. SAM starting page in text mode.
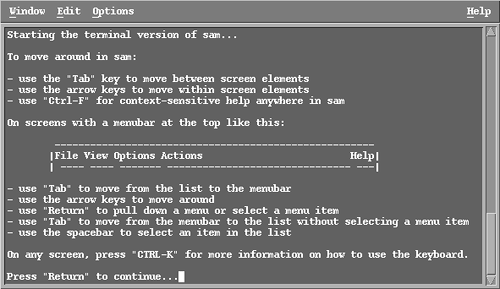
Figure 12-1 shows basic instruction of how to use the ![]() ,
, ![]() , and arrow keys. You can get more help by pressing
, and arrow keys. You can get more help by pressing ![]() whenever this message is displayed. If you press the
whenever this message is displayed. If you press the ![]() key, the next screen is displayed that shows actual SAM menus. This is shown in Figure 12-2.
key, the next screen is displayed that shows actual SAM menus. This is shown in Figure 12-2.
Figure 12-2. SAM menus in text mode.
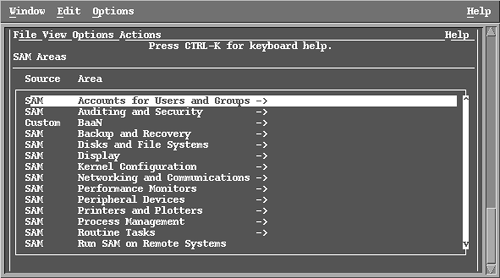
In the top of the screen is the menu area where you can see the File , View , Options , Actions , and Help menus. You can activate a menu area by pressing the ![]() key. When you press the
key. When you press the ![]() key, the File menu is activated. Then, by pressing the
key, the File menu is activated. Then, by pressing the ![]() key, you can see the list of actions that can be performed using this menu. You can use arrow keys or the
key, you can see the list of actions that can be performed using this menu. You can use arrow keys or the ![]() key to move forward in the menus. The
key to move forward in the menus. The  key combination is used for movement in the backward direction.
The remainder of the window shows the SAM functional areas and is divided into two columns . The first column is the Source column, which shows whether the area is a standard SAM component or one customized by the system administrator. The second column is a short description of the functionality provided by the component. SAM is organized in a tree structure such that minor functional groups are contained inside major groups. For example, Account for Users and Groups is a major area. Under this area, you can find options for separately managing users and groups. In this figure, a right arrow symbol at the end of a group shows that it contains other functional entities if you go inside it. It means that selecting this item will not perform any action but will lead to other items that may be used to perform an action.
SAM functional areas show the tasks that can be performed with the help of SAM. The built-in SAM areas are listed below.
-
Auditing and Security
-
Kernel and Device Configuration
-
Networks and Communications
-
Peripheral Device Management
-
Printer and Plotter Management
-
Process Management
-
Remote System Administration
-
Routine Tasks
-
User and Group Account Management
-
Backup and Recovery
-
Disk and File System Management
-
Display Management
-
Performance Monitoring
-
Software Management
-
Time Server Management
In addition, you can build your own functional areas by customizing SAM. SAM also provides context-sensitive help that can be utilized at any time by pressing the ![]() key combination. More help can be obtained using the Help menu. To stop SAM, you go to the File menu and use the Exit option.
key combination. More help can be obtained using the Help menu. To stop SAM, you go to the File menu and use the Exit option.
Starting and Stopping SAM in GUI
If you are using a monitor capable of using the X-Window system and the DISPLAY variable is correctly set, SAM will start in graphical mode. Figure 12-3 shows part of a typical GUI window that is displayed just after starting SAM.
Figure 12-3. SAM in GUI mode.
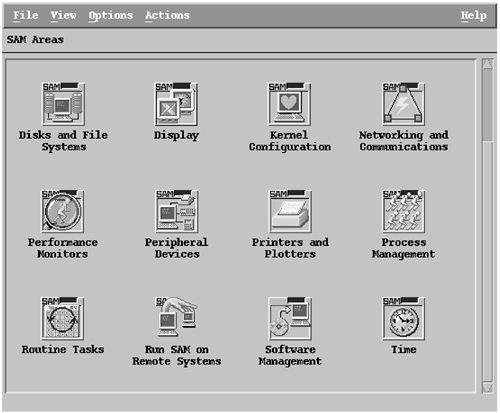
You have the same menus in GUI as you have in the text mode. The functional area now contains icons. You can use your mouse to activate any menu by clicking the left mouse button on it. If you double-click on an icon in the functional area that represents an action, the action corresponding to that icon starts. If you double-click on an icon that represents a functional group, it will open the subgroups and action icons contained in that functional group.
| |
| |
| Top |
EAN: 2147483647
Pages: 390