Looking Inside a Package
| A package is made up of a collection of files that tell Installer what to install, how to install it, and how to verify that it was installed. These items reside in the Contents folder inside the package. To view the contents of a package, Control-click the package and choose Show Package Contents from the shortcut menu. This command opens a new Finder window, in which the package contents are displayed. Or, simply cd into the package from the Terminal. 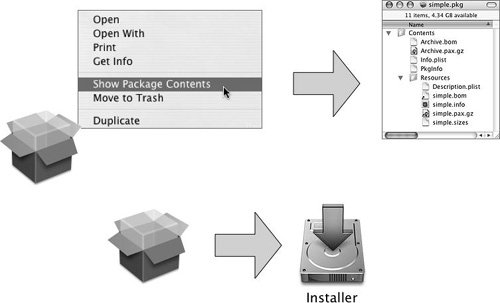 The Contents folder includes a bill of materials (.bom) file that describes the contents of the package. The BOM file contains a list of every file installed by the package, along with the ownership and permissions of each file. You can examine the contents of a BOM file by typing lsbom Archive.bom from inside the Contents folder. This folder also contains an information property list file (.plist) that contains the information entered in the package definition file when it was created. This file contains such details about the package as the authorization required to install and whether the package requires the computer to be rebooted after installation. You can view this file in any text editor or with the Property List Editor application included with the Xcode Developer Tools. The archive file contains the set of files to be installed (payload) and is usually compressed (in gzip format) to save space. The size-calculation file is a text file that contains the compressed and uncompressed sizes of the package's payload. Installer uses this to calculate the space required to install the payload. The Resources folder contains files that customize the behavior and look of Installer during the installation process. Resource files include environment test scripts and installation scripts (described later in this lesson), in addition to text files and a background image. The text files may include an introduction file, a read-me file, and a license file. When your resource folder contains these text files, the program will display the text contained within them in the Installer interface. The files should be in RTF format with the .rtf suffix, so the introduction file will be named Welcome.rtf, the read-me file will be ReadMe.rtf, and the license file will be License.rtf. Installer has the ability to show many types of files, including raw text (.txt), HTML (.html), and RTF directories (.rtfd), which are RTF files with embedded images. The background image, which must be named background.tif, will display in the background of each screen in Installer. The background image can be of any of the following file types: .jpg, .tif, .tiff, .gif, .pict, .eps, and .pdf. To use localized versions of the resources, create folders with the name languagename.lproj, and put the resources for that language in that folder. Note that the scripts cannot be localized, but any of the information presented to the user can be localized. You enter localized versions of messages in files with the .strings extension. Each .strings file contains messages localized for one language. You then place these files in the appropriate localized-resource directories (which have the .lproj extension). You don't need to create all of the resources. If any resources are missing, either they will be skipped or a default will be presented. For example, if Welcome.rtf is missing, a default pane asks the user to proceed to the installation. If License.rtf is missing, no license pane will appear. Creating Distribution ScriptsIn order to make sure that your software is installed correctly, PackageMaker allows scripts to customize the installation behavior. JavaScript can be used to create a distribution script to customize the installation experience. Specific shell scripts can be used in a package to carry out commands before and after the package is installed. Installer distribution scripts are new in Mac OS X v10.4 and can help verify various hardware requirements prior to installing packaged software. This feature allows you to define the user experience within Installer using a single configuration file. You store this file in either a .pkg file or a .mpkg file, or save it as a .dist file. You can also take a metapackage and convert it to a distribution script. Use distribution scripts to do the following:
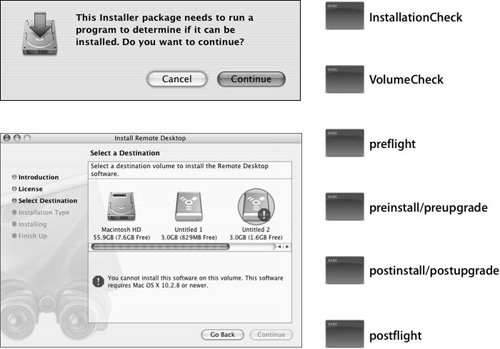
 You can now consolidate many of the flags and functions configured by PackageMaker and the included shell scripts (such as InstallationCheck and VolumeCheck) into a single distribution script. The entire range of flags and standard package scripts, plus new features of Installer, are configured using JavaScript within that one file. For more information on distribution scripts, install the Xcode tools for Mac OS X v10.4 and open /Developer/ADC Reference Library/releasenotes/DeveloperTools/Installer.html. Note Distribution scripts are used only by Mac OS X v10.4 and later. They are ignored by Mac OS X v10.3 and earlier, so you should not depend on their functionality if you need to install on older operating systems. Running Package ScriptsScripts are an optional element of an installation package. You add scripts when you need to test certain conditions before installation or when you need to perform special tasks as the installation takes place. (You'll learn to add a script to an installation later in this lesson.) Scripts can be run before and after the package's contents are installed. You can define two types of scripts: environment-test scripts and installation scripts. Environment-test scripts can determine whether the hardware and software of the target computer meet the package's requirements. Environment-test scripts include the following:
Installation scripts perform tasks you deem necessary to prepare for installation and to clean up after an installation is completed. Use these scripts to create needed files, add configuration options to existing files, start and stop services, and verify that setup is done correctly. These are the default installation scripts:
The following list shows the order in which the scripts are executed and the point at which the actual installation takes place:
When a package script is run, four arguments are automatically passed to it that contain information useful to the script:
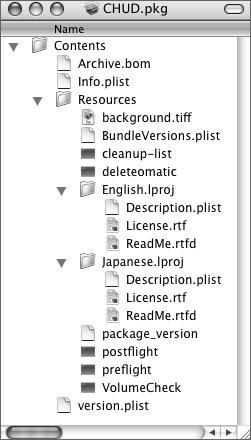
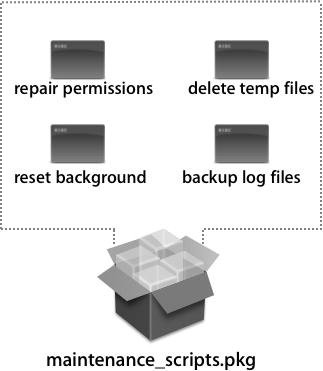
Environmenttest scripts and installation scripts can refer to other scripts, but the referred scripts must be included in the package's resources folder. You can see numerous example scripts by examining other packages. The scripts used by packages that have already been installed on your system can be found in /Library/Receipts/PackageName.pkg/Contents/Resources. Tip You should preface most of the paths in your script with the third argument ($3 in a shell script, $ARGV[2] in a Perl script). In most cases, this is all that is necessary to allow your package to be installed on volumes other than your boot volume. Remember that volume names commonly have spaces in them, so you should quote every path. Using Payload-Free PackagesA payload-free package is a package that contains no files to install, so the Installer application uses scripts to automate any process. Payload-free packages are created using the same methods as with regular packages, but with no installed files. Payload-free packages contain only scripts that can automate tasks, as shown in the following figure. You can populate the resources folder with the same scripts as described in the previous section. This is particularly useful if you need users to run Unix commands on their computers, even if they aren't comfortable working in Terminal. Simply include the command in a postflight script in a payloadfree package and ask the user to install the package by doubleclicking it. One way to use this method would be to create a Network Install image from a payloadfree package containing a script that runs Apple Software Restore (ASR) over multicast to restore the local volume. See Lesson 2, "Creating and Using Disk Images," and Lesson 4, "Delivering Images and Packages," for information on setting up Network Install images and ASR multicast. Using ReceiptsDuring installation, Installer creates a package file called a receipt that contains the package's resources and a list of the files, permissions on the file with the file size, and a checksum. Note that the receipt doesn't actually contain the files that are installed (the payload), so receipt files are small. For a list of the files that were installed by the package, enter the following command on the command line: lsbom /Library/Receipts/PackageName.pkg/Contents/Archive.bomWhen Installer is installing a package, it uses the existence of a receipt to determine whether to install or upgrade. If a receipt exists, and version information exists in the software that is being installed, Installer can skip some files that don't need to be upgraded. Installer will also execute the preupgrade and postupgrade scripts instead of the preinstall and postinstall scripts that are run during an install. As the following figure shows, receipt packages do not contain the actual files that were installed, but they contain the information about those files. Doubleclicking a receipt will produce the error message shown below. 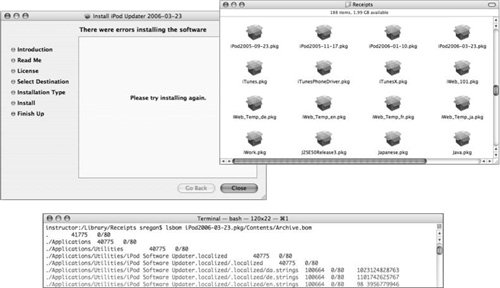 Warning If you doubleclick a receipt for a package installed as part of the Mac OS X or Mac OS X Server installation, Installer will open as if there is a package to install. If you proceed through the screens in Installer, you will uninstall portions of the operating system. The result will be that the operating system will not work correctly. Tip If you need to do a full install of a package that was previously installed on your system, delete the old package receipt first. When you do this, Installer no longer knows that you had previously installed the package and will treat the next install like the first. This is particularly useful if you need to replace a file that has become corrupt or is missing. |
EAN: 2147483647
Pages: 128
- The Second Wave ERP Market: An Australian Viewpoint
- Enterprise Application Integration: New Solutions for a Solved Problem or a Challenging Research Field?
- Context Management of ERP Processes in Virtual Communities
- Intrinsic and Contextual Data Quality: The Effect of Media and Personal Involvement
- Development of Interactive Web Sites to Enhance Police/Community Relations