| Mac OS X Server has other server tools that let you set up and configure optional hardware and software, such as RAID, NetBoot, and QuickTime Streaming. These tools are used to manage those hardware configurations and services. RAID Admin tool setup The RAID Admin tool  is used to configure and manage an Xserve RAID array. It lets you view the current settings and configure the Xserve RAID in a variety of ways (Figure 2.100). is used to configure and manage an Xserve RAID array. It lets you view the current settings and configure the Xserve RAID in a variety of ways (Figure 2.100). Figure 2.100. The RAID Admin tool lets you view the current settings and configure the Xserve RAID in a variety of ways. 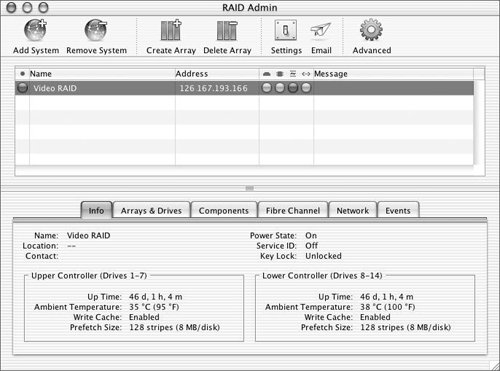
When you first launch the RAID Admin tool, you're presented with a window that shows all connected Xserve RAIDs. Clicking a RAID array shows information about the array in the tabs within the window. These tabs are as follows: - Info Provides information about the RAID such as the name, location, contact email address, and controller status (Figure 2.101).
Figure 2.101. The RAID Admin Info tab provides information about the RAID such as the name, location, contact email address, and controller status. 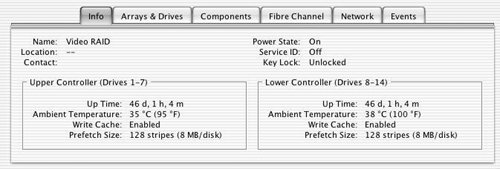
- Arrays & Drives Gives the status of your arrays and drives, such as how the drives are configured and their respective capacity (Figure 2.102).
Figure 2.102. The RAID Admin Arrays & Drives tab gives the status of your arrays and drives. 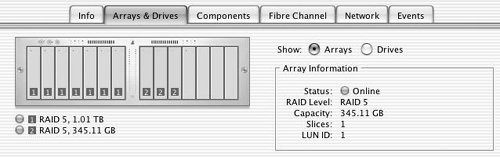
- Components Tells you the status of the installed components, such as the left and right power supplies, blowers, RAID controllers, and network cards (Figure 2.103).
Figure 2.103. The RAID Admin Components tab tells you the status of the installed components. 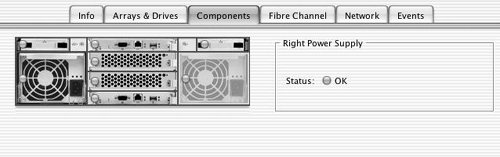
- Fibre Channel Provides information for each fibre-channel interface (Figure 2.104).
Figure 2.104. The RAID Admin Fibre Channel tab provides information for each fibre channel interface. 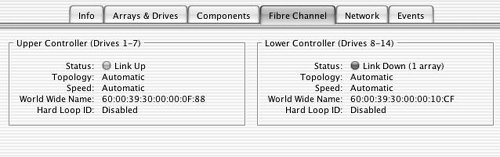
- Network Provides information about each Ethernet interface (Figure 2.105).
Figure 2.105. The RAID Admin Network tab provides information about each Ethernet interface. 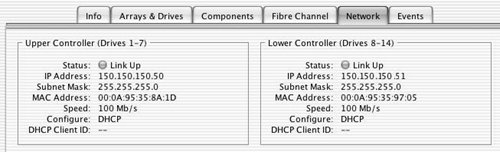
- Events Describes monitored events, if any.
When you create an array, you have several options about how that array is created (Figure 2.106). Refer to Chapter 1 for references on the various levels of RAID. Figure 2.106. When you create a RAID array, you have several options about how that array is created. 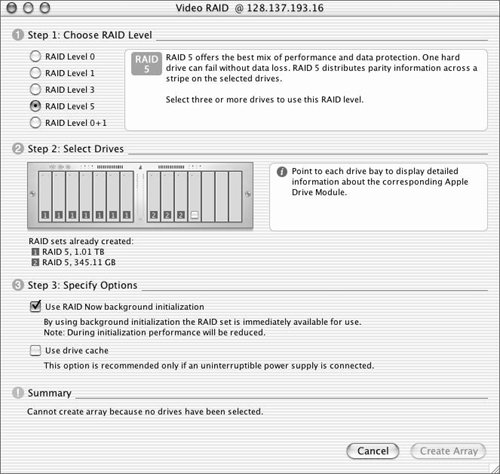
Xserve RAID The Xserve RAID is a configurable double array of disks with one controller for each array. Each array can hold up to 7 disks, with a total of 14 disks and a possible total capacity of 7.0 terabytes. You can configure these disks in a variety of RAID formats depending on your needs. An Xserve RAID also has dual power supplies and dual fans, and it can have dual Ethernet or fibre cards and dual backup batteries. You configure the Xserve RAID using the RAID Admin configuration tool. |
To create a RAID array 1. | In the Toolbar, click Create Array  (authentication is required) and then click Settings. (authentication is required) and then click Settings.
The RAID Settings window opens.
| 2. | In the System tab, set up the system configuration (Figure 2.107).
Figure 2.107. In the RAID Settings System tab, set up the system configuration. 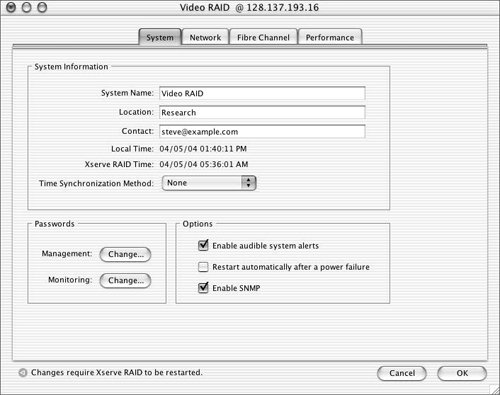
This includes the name of the array, the location and email address of the contact, the method of synchronizing the time (none, local time, or a Network Time Protocol server), a password, and system alert options.
| 3. | In the Network tab, choose whether to use DHCP or manual addresses for each controller (Figure 2.108).
Figure 2.108. In the RAID Settings Network tab, choose whether to use DHCP or manual addresses for each controller. 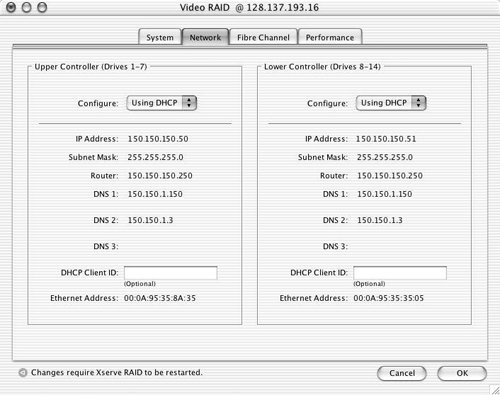
| 4. | In the Fibre Channel tab, set options such as the speed of the connections and the topology (Figure 2.109).
Figure 2.109. In the RAID Settings Fibre Channel tab, set options such as the speed of the connections and the topology. 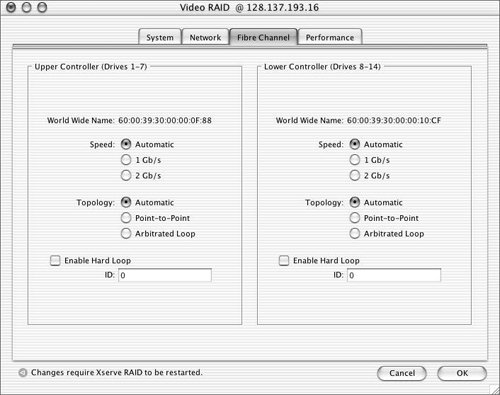
| 5. | In the Performance tab, set your specifications (the cache setup for each controller) (Figure 2.110).
Figure 2.110. In the RAID Settings Performance tab, set your specifications (the cache setup for each controller). 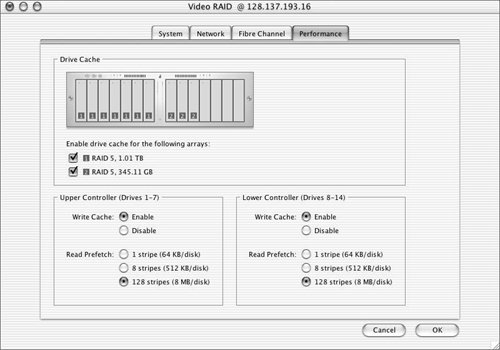
Once the configuration is finished, the RAID array is available for use by the Xserve.
|
Fibre Channel Utility options The Fibre Channel Utility lets you change both the speed and topology of the fibre card on the Power Mac or Xserve that's connected to the Xserve RAID (Figure 2.111). Figure 2.111. The Fibre Channel Utility lets you change both the speed and topology of the fibre card on the Power Mac or Xserve that's connected to the Xserve RAID. 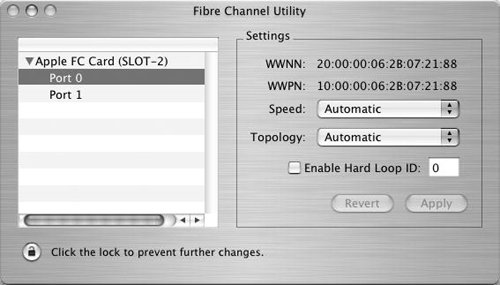
You can select each port and change the options. Click Apply to commit the changes to the card. System Image Utility overview The NetBoot service is unique in that it shares entire bootable volumes that Macintosh clients can start up over a network connection. You can use the System Image Utility  to create and manage special types of disk images known as a NetBoot image and a NetInstall image. The NetBoot service uses these disk images to provide the remote startup and install services for your Macintosh clients (Figures 2.112). to create and manage special types of disk images known as a NetBoot image and a NetInstall image. The NetBoot service uses these disk images to provide the remote startup and install services for your Macintosh clients (Figures 2.112). Figure 2.112. The System Image Utility is used to create NetBoot and/or NetInstall images. 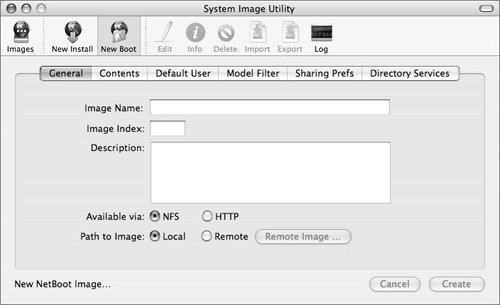
As with most server administration tools, you can run the System Image Utility on any Mac OS X or Mac OS X Server. Likewise, you can use the Server Admin tool to remotely manage the NetBoot service settings. For more information about the System Image Utility and the NetBoot service, refer to Chapter 11, "Running a NetBoot Server." QuickTime Streaming from Mac OS X You can install the QuickTime Streaming Server on any Mac OS X computer. To do this, either select the QuickTime Streaming Server package in your Mac OS X Server CDs or download and install the Darwin Streaming Server from Apple's Open Source project. Although it's interesting and fun to experiment with the QuickTime Streaming Server/Darwin Streaming Server on Mac OS X, it isn't officially supported by Apple, and you won't receive phone support if you have questions or problems streaming from a Mac OS X computer. |
QTSS Publisher overview The QuickTime Streaming Server (QTSS) is used to deliver streamed audio and video content over your network or the Internet. Apple's QTSS stands out when compared to other streaming solutions due to its open standards compatibility, unlimited streaming capabilities, lack of licensing fees, and unparalleled ease of use. You are literally limited only by disk performance, CPU speed, and network bandwidth. This ease of use is made possible through a variety of comprehensive management tools. One such tool is the QTSS Publisher  , which you can use to manage all of your previously recorded streaming audio and video content (Figure 2.113). , which you can use to manage all of your previously recorded streaming audio and video content (Figure 2.113). Figure 2.113. The QuickTime Publisher tool is used to manage playlists. 
The primary objective for the QTSS Publisher is to provide content creators with an easy method of adding and managing QTSS media without having to use the more complicated administration tools (Figure 2.114). However, to properly set up a QTSS, you must also enable and configure the server settings via the System Admin tool. Thus, the server administrator can initially configure the QTSS and then delegate the task of populating the server with media to a less experienced user. Figure 2.114. Server Admin is used to manage the QuickTime Streaming Server service. 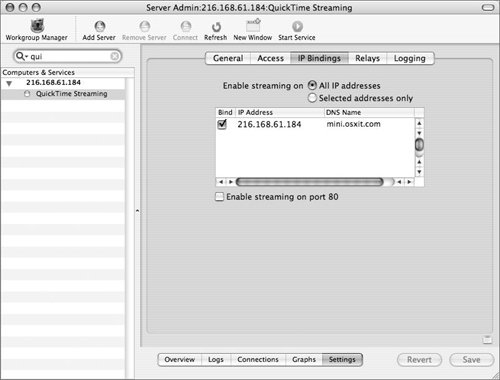
This chapter is designed to introduce you to the Mac OS X Server administration tools, so configuration of the QTSS goes beyond its scope. However, this topic is discussed at length in Chapter 12, "QuickTime Streaming Server."  Tip Tip
QuickTime Broadcaster overview The QuickTime Broadcaster tool is used to compress audio and video in real time to facilitate live streaming over a network or the Internet. Typically, QuickTime Broadcaster  is used in conjunction with one or more QuickTime Streaming Servers (QTSS) to share this live content with a large number of clients. The number of QTSSs and the amount of network bandwidth through which your broadcast relays directly affect the number of clients that can view your live stream. As expected, the more QTSSs and network bandwidth you have, the more clients you can stream to. Configuration of the QTSS goes beyond the scope of this chapter, but it's discussed at length in Chapter 12. is used in conjunction with one or more QuickTime Streaming Servers (QTSS) to share this live content with a large number of clients. The number of QTSSs and the amount of network bandwidth through which your broadcast relays directly affect the number of clients that can view your live stream. As expected, the more QTSSs and network bandwidth you have, the more clients you can stream to. Configuration of the QTSS goes beyond the scope of this chapter, but it's discussed at length in Chapter 12. You need only one Macintosh running QuickTime Broadcaster to create the initial live stream. In fact, you can use QuickTime Broadcaster without being connected to a QTSS to stream content to a few clients. Tip
To set up a simple live broadcast 1. | Connect your audio and/or video source.
QuickTime Broadcaster is compatible with most audio input devices and digital video devices. This includes Apple iSight cameras, digital video cameras, and analog-to-digital video converters.
| 2. | Open the QuickTime Broadcaster tool by choosing /Applications/QuickTime Broadcaster.
| 3. | When the tool first opens, it shows a compact window with only a few basic settings (Figure 2.115).
Figure 2.115. The Show Details button expands the QuickTime Broadcaster window. 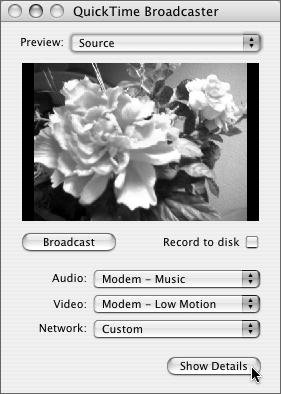
Click Show Details to view all the options.
| 4. | Click the Audio tab, and then select the Enable Audio Stream check box (Figure 2.116).
Figure 2.116. In the Audio settings dialog, select the Enable Audio Stream check box. 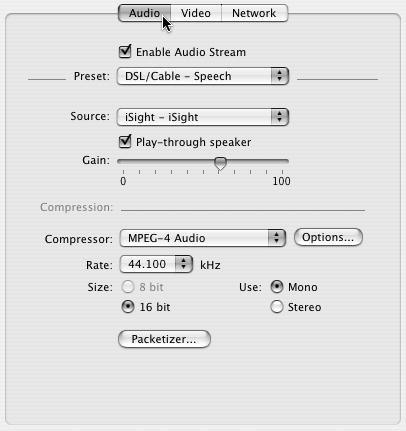
You must select the compression preset and the audio source from the pop-up menus. Several built-in compression presets are good starting points; you can tweak them further with the settings that follow.
| | | 5. | Click the Video tab, and then select the Enable Video Stream check box (Figure 2.117).
Figure 2.117. In the Video settings dialog, select the Enable Video Stream check box. 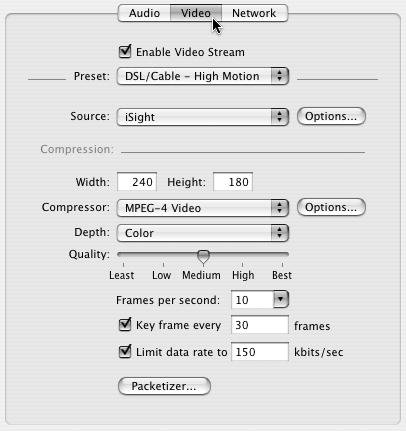
You must select the compression preset and the video source from the pop-up menus. Again, several built-in compression presets are good starting points; you can tweak them further with the settings that follow.
| 6. | Click the Network tab (Figure 2.118).
Figure 2.118. In the Network settings dialog, select Manual Unicast from the Transmission pop-up menu and enter the client's IP address. 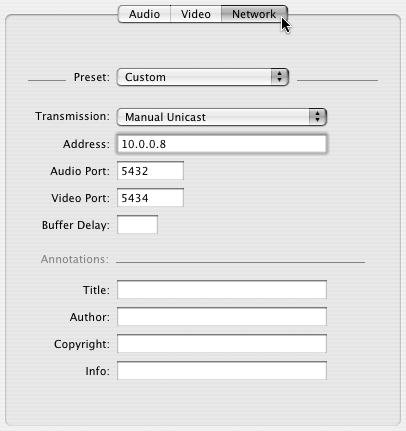
Select Manual Unicast from the Transmission pop-up menu, and enter the IP address of the client you're sending the broadcast to.
| | | 7. | Select Compress from the Preview pop-up menu in the main QuickTime Broadcaster window to preview the video feed with your current settings (Figure 2.119).
Figure 2.119. Select Compress from the Preview pop-up menu to preview the video feed with your current settings. 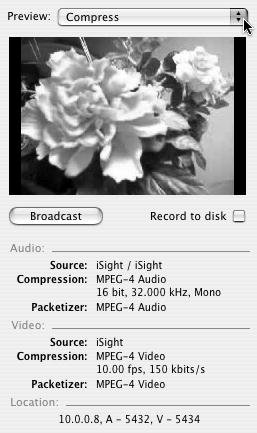
Verify the settings below the Preview window before you start streaming.
| 8. | Select File > Export > SDP to save the session description file (Figure 2.120).
Figure 2.120. Select File > Export > SDP. 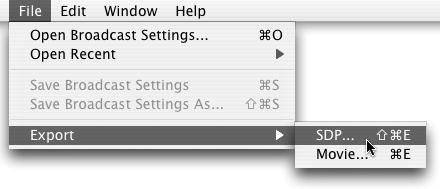
A Save dialog appears, in which you can choose the destination and name for the session description file. The client uses this file as instructions for connecting to your broadcast.
| 9. | In the QuickTime Broadcaster window, click the Broadcast button to begin the live media stream (Figure 2.121).
Figure 2.121. Click the Broadcast button to begin the live media stream. 
Selecting the "Record to disk" check box saves the streamed file to the local hard disk for future streaming.
| 10. | Transfer the session description file to the client computer.
Double-click the file to open it (Figure 2.122).
Figure 2.122. Double-click the SDP (Session Description Protocol) file to open it. 
| | | 11. | QuickTime Player automatically opens, and the broadcast appears (Figure 2.123).
Figure 2.123. The QuickTime Player window opens, and you can view the live broadcast. 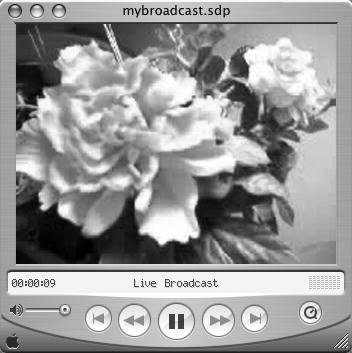
There will be a slight delay in the broadcast due to compression time and network overhead.
|
Tips As your stream is being broadcast, you can also monitor the video feed and connection settings from QuickTime Broadcaster. Click Stop to stop the live media stream (Figure 2.124). Figure 2.124. Click the Stop button below the broadcast Preview window to stop the stream. 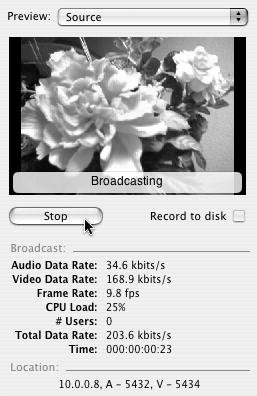 Each of the tools in this chapter is used to administer, manage, and edit parts and pieces of Mac OS X Server. It's good practice not to authenticate as root when running any of these tools (most tools won't let you, but some will, using both the short name root and the long name System Administrator). Doing so could have unexpected results such as failure to authenticate later as your administrator account, effectively locking you out of working with your server tools.
Broadcast Management Options QuickTime Broadcaster is used to manage the streaming of live audio and video content. Use QTSS Publisher to manage the streaming of previously recorded audio and video content. Real-time compression and streaming of audio and video are processor intensive. For this reason, QuickTime Broadcaster requires at least a G4-based Macintosh, if not a dual-processor G4 or G5 computer, for best results.
|
Additional Administration Tools In addition to the tools discussed here, you may wish to add the following items to the Dock on your server (some items, such as the Terminal, are already on the Dock): |  | Activity Monitor Monitors processes | |  | Console Lets you view local log files easily | |  | Directory Access Allows the server to authenticate and connect to other directory types | |  | Disk Utility Lets you carry out permissions repair on your server | |  | NetInfo Manager Lets you edit data on local accounts | |  | Network Utility Checks the network status and connections | |  | Printer Setup Utility Lets you create printers on your server | |  | Terminal Utility Used to manage command-line executables and binaries |
|
|