| So far, we've talked about what any user can do to protect his or her personal email. For the rest of this lesson, we'll discuss what you can do if you're a system administrator responsible for your own email service. As you've already seen, many small techniques play a part in email security. It's best to configure your email service to offer as many of these as you can. If you're running services already, you know that there's always a fine line between security and usability. On one hand, it would be nice to force users to utilize more secure methods of email communication, such as requiring SSL or more robust authentication methods. But on the other side, one must keep usability in mind. Some people may have email clients that aren't capable of those higher levels of security, or may be prohibitively complex to configure that way. If you're new to the world of email server administration, fear not. Maintaining an email server today is far simpler than it was in years past thanks to the creation of user-friendly graphical configuration environments. Although we'll be talking about how to secure an email server in this lesson, many email services topics are beyond the scope of this book. Be sure to read, at a minimum, Apple's online documentation about Mail Service Administration. As we discussed in the first half of this lesson, there are two parts to email. Sending and receiving messages with other servers is done via the Simple Mail Transfer Protocol (SMTP). The other major mail subsystem allows users to retrieve messages from their inboxes using either the Post Office Protocol (POP) or the Internet Message Access Protocol (IMAP). Although these are very separate aspects of email, they are all configured via the same service in the Apple Server Admin tool. Setting Up a Secure Email Service In this exercise, you'll set up an email server to demonstrate many forms of mail server security. As was mentioned earlier, however, this is not an exhaustive lesson on setting up an email server. There are other tasks, particularly with DNS, that won't be covered here. 1. | Install the Server Admin utilities (included with Mac OS X Server, or downloadable from Apple).
| 2. | Open /Applications/Server/Server Admin and connect to your server.
| 3. | Select the mail service in the left frame, and click the Settings tab.
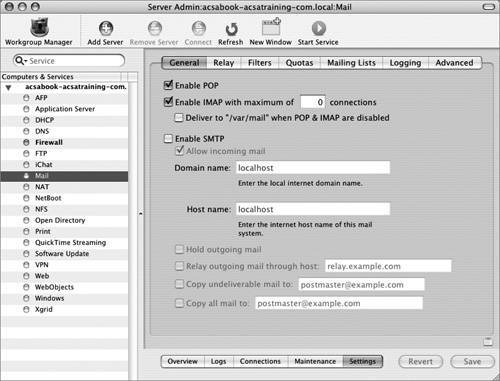 | 4. | In the General tab, disable the POP service by deselecting the Enable POP checkbox.
POP and IMAP can both be used to access email. They both have advantages and disadvantages, but if you won't be using both of them, your server will be more secure with fewer services enabled. POP is more friendly for your network and server load, but it's best used only when users are always connecting from the same computers. IMAP, on the other hand, keeps everything on the server, and thus works great for users accessing their email from multiple computers. The downside to IMAP is that users who are connected to the email server will maintain a connection to the server, increasing the load on both the server and the network.
| 5. | Leave IMAP enabled.
| 6. | Enable the SMTP servicewhich will allow users to send email out through this serverby selecting the Enable SMPT checkbox. Since you'll be setting up a general-purpose email server, leave the "Allow incoming mail" option enabled.
In a high-usage environment, you might have different servers handling your domain's incoming and outgoing mail. This would be better for the server load and more secure, but it would be practical only if you have multiple servers.
| 7. | On the Relay tab, leave the "Accept SMTP relays only from these hosts and networks" option selected. The 127.0.0.1/32 host in the list indicates that this SMTP server will relay mail only from itself. If this host were acting as the SMTP server handling all outbound email for your organization, you would add more entries to this list, indicating all of the IP address ranges or domain names allowed to send email through this server.
This setting affects only mail relaying, not mail acceptance. The mail server will always accept mail destined for users that exist on that machine. What you want to limit are the hosts that are allowed to pass messages through your server to another server. Generally, this is just people in your organization. If you don't set this option appropriately, you may inadvertently allow anyone to relay through your servera situation known as an open relay. This is good for spammers, but bad for you.
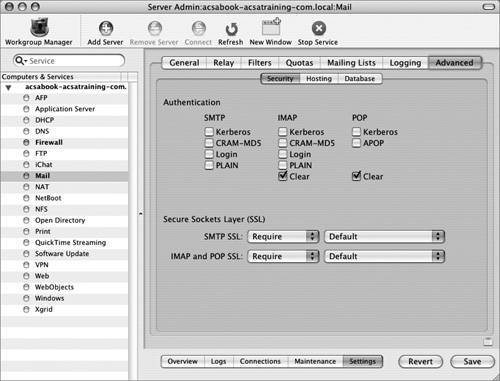
| 8. | Click the Advanced tab, followed by the Security tab.
| 9. | The quickest and biggest win for security is to enable SSL. From both the SMTP SSL and IMAP/POP SSL pop-up menus, choose Require.
If you have older mail clients on your network that can't do SSL, choose Use instead.
| 10. | For both entries, choose Default from the next pull-down menu.
This menu controls which SSL certificate will be used to protect this service. This is similar to the public/private key pair used to sign and encrypt email in the first half of this lesson. Normally, when you obtain an officially signed SSL certificate, you will have created it in (or added it to) the server's Settings tab that contains the Certificates tab. Every Mac OS X server comes preconfigured with a default SSL key pair that is self-signed, appropriately named Default. Although the use of this certificate will show a warning on every client that connects to it, it's free, and you can use it to test the encryption of your service. If desired, you can even set each client to trust this certificate if you'd like to continue using it.
 | 11. | Click Save.
| 12. | Click the green Start Service button at the top of the window.
| 13. | Open /Applications/Server/Workgroup Manager.
| 14. | Select all users (or at least yourself).
| 15. | Click the Mail tab.
| 16. | Change the Mail setting to Enabled. Leave all of the other options at their defaults and click Save.
| 17. | Quit Workgroup Manager.
|
Everything is configured correctly now. If you'd like to test the configuration, do the following: 1. | Open Apple Mail and create a new IMAP account to connect to the server localhost. Use localhost as your SMTP server as well. Don't forget that you must enable SSL for both the IMAP server and the SMTP server since you required them in the preceding exerciseyou'll have to do this by selecting Mail > Preferences and then clicking the Accounts tab.
| 2. | Choose Mail > Go Online. You'll see a certificate warning since you're using a self-signed certificate. Click OK to close the warning, and enter your password when prompted.
| 3. | Send a new message to yourself.
| 4. | Click the Get Mail button, and you will see the message you just sent.
| 5. | Quit the Mail application.
| 6. | Back in the Server Admin application, click the Logs tab for the Mail service, and click Refresh. Examine the SMTP and IMAP logs.
|
Tightening Authentication Requirements One of the easiest ways to balance security and usability is to offer email clients their choice of all available authentication schemes. Many modern-day clients are smart enough to choose the most secure method automatically. 1. | In Server Admin, select Mail in the left frame, and click Settings tab.
| 2. | Click the Advanced tab.
| 3. | For the IMAP column, select every box (Kerberos, CRAM-MD5, Login, PLAIN, Clear).
| 4. | For the POP column, select every box (Kerberos, APOP, Clear).
| 5. | For the SMTP column, select every box (Kerberos, CRAM-MD5, Login, PLAIN).
Note PLAIN is plaintext passwords on the wire. At a minimum, administrators should disable PLAIN authentication. Choosing these settings means that anyone sending messages through your server will have to authenticate. Normally SMTP is an anonymous service that doesn't require authentication. Anonymous SMTP is the default because a number of email clients can't do authenticated SMTP. Automated scripts are also unable to authenticate when sending status emails since there's no user present to type in a password.
| 6. | Click Save.
Now you have an email server that offers higher security. This allows mail clients the option of using higher security if they choose to. You may, however, want to require users to use a higher security method. If this is the case, you need to disable some of the less-secure methods:
For the IMAP column, deselect Login, PLAIN, and Clear. For the POP column, deselect Clear. For the SMTP column, deselect Login and PLAIN.
| 7. | Click Save.
To support Kerberos authentication, you must either be using an Open Directory system or have your mail server tied into an existing Kerberos infrastructure. To support CRAM-MD5 and APOP, each user's account must have the supporting password type enabled. You can verify this with these steps:
| 8. | If your server is a member (or master) of an Open Directory system:
In Server Admin, select the Open Directory service in the left frame.
Click the Settings tab.
Click the Policy tab.
Click the Security tab.
Otherwise, if you're just using a dtandalone directory service (not an Open Directory system):
Open Workgroup Manager and connect to your server.
Select a user.
Click the Advanced tab.
Click the Security button.
A window appears listing all of the supported password types for that user.
| 9. | If a password type you're using isn't enabled, click the box to enable it, and change that user's password.
As the following figure indicates, you should use caution in enabling the APOP method because all of your users' passwords can be determined if your server is ever compromised. For this reason, many mail server administrators choose to not enable POP access at all.
 |
Controlling Spam at the Server We spoke earlier of open relays through which a spammer can anonymously send large quantities of mail. Let's pretend that a mail server at openrelay.example.com was one such open relay, and you were getting bombarded with spam from that host. 1. | Return to the Server Admin application if you are no longer in it.
| 2. | Select Mail in the left pane, click the Settings tab, and click the Relay tab.
| 3. | Add openrelay.example.com to the second box, and select the "Refuse all messages from these hosts and networks" box.
You can also reduce spam by the use of real-time blacklists (RBLs). This works by having a remote server tracking a dynamic list of open relays. Although this is usually more effective than maintaining such a list by hand (as in the previous step), you should use caution because it's possible for legitimate mail sources to be mistakenly added to RBLs, which would result in missed messages for your users.
| 4. | Click the Filters tab.
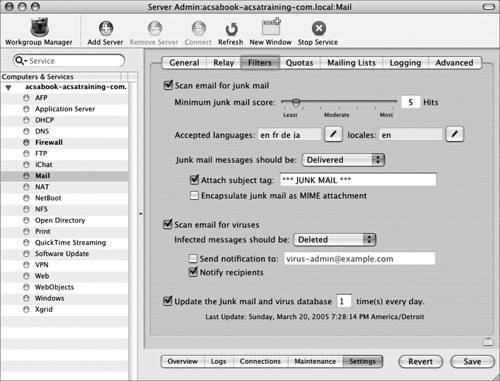 | 5. | Select the "Scan email for junk mail" checkbox.
This option turns on the Spam Assassin junk mail filter. This is the server's way of detecting spam based on a weighted set of tests on the message, such as certain patterns of words, HTML usage common to spam, obviously forged email headers, and much more.
| 6. | Leave the "Minimum junk mail score" set to its default of 5 hits.
Every message that is scanned by Spam Assassin on the server will be assigned a score. The higher the score, the more likely it is to be spam. There are, however, two things to watch out for:
False negatives are messages that are actually spam, but are missed by the spam filter. Although annoying for users, this isn't an important concernthe user is just getting extra mail. If you set your minimum junk mail score too high, you will get more false negatives, but the quantity will decrease over time as your junk mail filters become better trained. False positives are messages that are not spam but are mistagged as spam. These messages are more problematic since users may never see legitimate messages intended for them if a junk mail filter automatically deletes the messages thinking they're spam. If you set your minimum junk mail score too low, you will get more false positives, and more upset users.
Remember, it's always better for users to get a few extra messages that they didn't want than to not get messages they did want. Leaving the minimum score at the default of 5 is generally a good starting point.
| 7. | Click the pencil icons next to the "Accepted languages" and "locales" fields.
If, for example, you wanted all non-English messages to be marked as spam, you could deselect the other languages. However, if someone corresponds with a pen pal in a foreign country, getting messages in a different language may be normal, so use this feature with care.
| 8. | Take a look at the "Junk mail messages should be" menu. Leave it set to Delivered so that users can decide on their own what they want to do with their spam.
If spam becomes a huge problem at your organization, you may want to just bounce spam, which hopefully will make the spammers think they have an invalid email address. Be sure to keep in mind though the possibility of false positives getting bounced if you change this option.
| 9. | You can optionally change the subject of any messages by using the "Attach subject tag" option.
This is generally a good thing to do because it allows users to quickly identify messages the server thinks are spam.
| 10. | Click Save.
Just like with the Apple Mail application, Spam Assassin must learn the difference between spam and non-spam (or "ham" as Spam Assassin refers to it). There are two methods to teach Spam Assassin:
Have users of your mail system bounce, or redirect, any messages that are spam to junkmail@your.email.domain. Bounce any messages that are not spam to notjunkmail@your.email.domain.
|
Be sure to empty those mailboxes every day. Spam Assassin scans the messages in those mailboxes during the night, but won't delete them for you. Hopefully, you have a folder or mailbox already stuffed with spam, and another mailbox or folder that contains only non-spam. An outbox, or sent-mail folder, is a great example of the latter. Save all the messages from each category to two distinct folders. Be sure to use at least 200 messages for each to sufficiently train Spam Assassin. From a Terminal window, type the following two commands: sa-learn spam NameOfFolderContainingJunkMail/* sa-learn ham NameOfFolderContainingNonJunkMail/*
These two commands will take some time to run, so be patient. If you prefer to have visual feedback, add the showdots option to each of the commands. As you can see, setting up spam filtering at the server is both simple and powerful. There are many other options you can use to further configure Spam Assassin directly from its configuration files, but those are beyond the scope of this book. Protecting Everyone from Viruses Although today there are few (if any) viruses that can affect Macs, it should be remembered that an email virus will still affect others even if it passes through a Mac. Also, since a Mac OS X email server uses standard email protocols, it's possible that some of your users may be accessing their email from a PC or other platform, and thus would be susceptible to viruses. Every email-server administrator should implement virus-scanning software for the good of the entire Internet. Here's how simple it is on a Mac OS X server: 1. | In Server Admin, select Mail in the left pane, and click the Settings tab.
| 2. | Click the Filters tab.
| 3. | Select the "Scan email for viruses" checkbox.
This will scan each message with a popular Open Source antivirus scanner known as ClamAV.
| 4. | From the "Infected messages should be" pop-up menu, choose Deleted.
You have a number of different options here, each with their own advantages:
Bounced: Lets the sender know that they've probably been infected by a virus. Deleted: Lets the message get through to the recipient. Quarantined: Saves the message in case the recipient needs to get something out of it, or if the virus needs further examination. This can also be useful for examining the infected email headers and manually notifying the infected users if desired.
| 5. | Select the "Send notification to" box and type in your email address.
It's a good idea for the mail system administrator to know if there's a virus storm in progress because you may need to tighten up security briefly at that time.
| 6. | Select the "Notify recipients" box.
This will send a message to the original recipients letting them know why they may not have gotten the message they might have been expecting.
| 7. | Select the "Update the junk mail and virus database" box. Given the speed at which email viruses spread and the frequency in which new ones are born, you should set the number of times per day to at least 2, but 8 might be a better number.
| 8. | Click Save.
|
|