Installation of the Secure Gateway Deployment
|
The following is a list of tasks that must be completed in order to successfully install and use MetaFrame Web Interface, MetaFrame STA, and MetaFrame Secure Gateway for the CME deployment.
-
Select server(s) that meet the minimum requirements for each component (Web Interface, Secure Gateway, and STA).
-
Create DNS records for the Web Interface/Secure Gateway server and STA(s).
-
Obtain an SSL certificate for the Web Interface/Secure Gateway server using the fully qualified domain name (FQDN).
-
Optionally, obtain an SSL certificate for the STA using the FQDN.
-
Install and configure the Web Interface web server.
-
Install and configure the STA component.
-
Install and configure the Secure Gateway component.
-
Lock down the MetaFrame Secure Gateway deployment.
Secure Gateway Deployment Requirements
The following are requirements for each of the components necessary for the Secure Gateway Deployment.
Client System Requirements
-
ICA Version 6.30 or later
-
A web browser and operating system that support 128-bit encryption and have the appropriate root certificates installed.
Web Interface System Requirements
-
Microsoft Windows 2000 or 2003 Server with the latest service packs and hotfixes installed. Web Interface will run on Solaris platforms as well, but since Secure Gateway does not, this total solution requires a Windows Server platform.
-
1GB RAM.
-
Internet Information Server 5.0/6.0 (IIS) installed and configured.
-
Citrix Secure Gateway is natively supported by Web Interface, as well as by NFuse Classic 1.6 and 1.7.
STA System Requirements
-
Microsoft Windows 2000 or 2003 Server with the latest service packs and hotfixes installed
-
500MB RAM
-
Internet Information Server 5.0/6.0 (IIS) installed and configured
MetaFrame Secure Gateway System Requirements
-
Microsoft Windows 2000 Server or Windows Server 2003 with the latest service packs and hotfixes installed
-
1GB RAM
-
Additional 150MB hard drive space
MetaFrame Server Farm Requirements
-
MetaFrame XP Server for Windows with Feature Release 2 or later
and/or
-
MetaFrame Secure Access Manager, Version 2.0
and/or
-
MetaFrame Server for UNIX Operating Systems, Version 1.1 or later
Creating DNS Records for the Web Interface/Secure Gateway Server and STA(s)
The assigned URL for the Web Interface/Secure Gateway server must be Internet resolvable. The STA only needs to be resolved by the Web Interface/Secure Gateway server. The ability to resolve FQDNs is an important security aspect required for certificate-based implementations.
Obtaining an SSL Certificate for the Web Interface/Secure Gateway Server
A Digital ID, also known as a digital certificate or SSL certificate, is the electronic equivalent of a passport or business license. It is a credential issued by a trusted authority that individuals or organizations can present electronically to prove their identity or their right to access information.
When a CA such as VeriSign issues Digital IDs, it verifies that the owner is not claiming a false identity. Just as when a government issues a passport and officially vouches for the identity of the holder, when a CA gives your business a digital certificate, it is puting its name behind your right to use your company name and web address.
This section describes the basic process for obtaining a third-party server certificate from a well-known CA such as Verisign or Thawte. The processes for obtaining a certificate may differ slightly between CAs, but the steps are basically the same. Most CAs will include a variety of services and extras with their certificate offerings. These services may include 40- or 128-bit SSL (Global Server) IDs, business authentication, and protection against economic loss resulting from the theft, corruption, impersonation, or loss of a certificate. Services may also include trials of a security analysis or security auditing service, accelerated certificate delivery, and certificate revocation and replacement periods. Be sure and check with each potential CA for details on their individual services.
CME has chosen to use a 128-bit SSL Server ID from Verisign for their Web Interface/Secure Gateway server. This will secure the traffic and packets from the Internet to the DMZ. CME uses Microsoft Certificate Services for the STA server certificate to secure the traffic and packets from the DMZ to the internal network. These certificates allow all the traffic passing from the client to the server in the Secure Gateway deployment to use port 443 through the firewalls it traverses.
Requesting the Server Certificate
In order to complete the certificate request, you must provide the following documentation to the CA:
-
Proof of Organization Before a Secure Server ID can be issued, the CA will need to verify that your company or organization has the legal right to conduct business under the name you specify in your enrollment request. Documentation may include a business license, the registration of a trade name, or a Dun & Bradstreet number. If you have a Dun & Bradstreet D-U-N-S Number registered for your organization, it may help expedite the verification process and issuance of your Secure Server ID.
Note Your organization's legal name must match the organization name in your enrollment request. Otherwise, the CA will be unable to authenticate your organization.
-
Proof of Domain Name To issue your certificate, your domain name registration must be verified against the organization name provided during enrollment. CAs can only issue a Secure Server ID to the organization that has the legal right to use the domain name. The Common Name (domain name) for the server that will use the Server ID must be the FQDN. For CME's FQDN, "access.cme.com," cme.com is the domain name and access is the host name. In "www.cme.com," cme.com is the domain name and www is the host name.
-
Generate a CSR Follow the instructions that came with your server software to generate a key pair and a Certificate Signing Request (CSR). Key pair generation is the creation of the server's private and public keys. A copy of the public key is included with the submitted CSR and then integrated into your Digital ID. To create the CSR, do the following:
-
Open Internet Services Manager on the Web Interface/Secure Gateway server.
-
Right-mouse-click on the Default Web Site link and select Properties from the context menu. On the Directory Security tab, select Server Certificate.
-
Begin the Certificate Request Wizard.
-
Create a new certificate. To do so, provide the following:
-
Name Pick a name that's easy for you to remember. This will correspond to the Friendly name on the summary screen. The bit length field determines the certificate's encryption strength. We recommend a setting of 1024 to provide reasonable encryption strength without sacrificing performance.
-
Organization and Organizational Unit The legal name of your organization and the name of your division or department.
-
The Common Name (domain name) This is the valid DNS name of your Web Interface site and Secure Gateway server. If you decide to change the common name of the site, you will have to obtain a new certificate. This will correspond with the Issued To: field on the summary screen.
-
Geographical Information Fill in the appropriate information.
-
File Name Name your file and place it in a location that is easy to find. The default is C:\certreq.txt; do not alter the file extension.
-
Request File Summary Confirm all the request information, and make sure the Issued To: entry matches the FQDN assigned to the Web Interface site. Also confirm that the Organization entry contains the legal name of your organization.
-
-
Complete the wizard by clicking Finish.
-
-
Submit the CSR and Select Your Server Software Open a web browser on the Web Interface/Secure Gateway and enter the URL for a CA. CME used Verisign at www.verisign.com. Since each CA has their own instructions for submitting a request for a certificate, we will not document all the steps involved. However, each CA has detailed instructions on their web sites for submitting the request. Some generic answers to the required CSR information are that the request should be for a Web Server Certificate or SSL certificate, the type of server software will be Microsoft, and the encryption strength should be a minimum of 128-bit.
When you cut and paste the request from the text file to the CA's online form, select the entire text area including the lines "-----BEGIN NEW CERTIFICATE REQUEST-----" and "-----END NEW CERTIFICATE REQUEST-----".
-
Complete and Submit the Application Review and confirm the information drawn from your CSR. If any of the information is incorrect, generate a new CSR with the appropriate information. Things to note for filling out the online forms include
-
Technical contact This person must be authorized to run and maintain your secure web server. The technical contact receives the Secure Server ID and other notification e-mails.
-
Organizational contact The organizational contact must be employed by your company. This contact must be authorized to make a binding agreement to the Secure Server Service Agreement for your organization. This should be a different person than the technical contact.
-
Billing contact The billing contact receives invoices and receipts by regular mail.
-
-
Wait for Processing and Final Verification The CA now examines the information you have submitted. If everything you entered is correct, they should be able to authenticate your organization and issue your Secure Server Digital ID, usually in three to five business days. Your technical contact will usually receive an e-mail message confirming your enrollment. Final Verification is the last step of the order process and can only be completed after your organization name and domain name have been verified.
-
Install Your ID When your Digital ID is approved, the CA will usually e-mail it to your technical contact. When you receive your Digital ID, make a backup copy of it and store it on a floppy disk or CD-ROM, noting the date you received it. The Secure ID will look much like the request.txt file submitted earlier. Open Notepad on the server and paste in the entire certificate response including the lines "-----BEGIN CERTIFICATE-----" and "-----END CERTIFICATE-----". Save the file with an extension of .CER somewhere where it is easy to access. To install your Digital ID, follow these instructions:
-
Open Internet Services Manager on the Web Interface/Secure Gateway server.
-
Right-mouse-click the Default Web Site, and from the context menu select Properties. On the Directory Security tab, select Server Certificate.
-
Complete the certificate request wizard with the following steps:
-
Process the pending request and install the certificate.
-
Enter the path and filename by browsing to the .CER file you saved earlier.
-
Check the certificate summary and verify that the information contained in the response file matches the original request.
-
Complete the wizard by clicking Finish.
-
-
The Web Interface/Secure Gateway server is now ready to continue the installation and configuration of the MetaFrame Secure Gateway.
Optional Installation of Internal STA
For maximum security, a server certificate can be installed on the STA to encrypt the traffic from the DMZ to the internal STA server using SSL encryption. An Internet-based certificate can be used, as described in the previous section, or a certificate can be obtained from your company's internal CA. For more information on configuring a nonpublic CA, such as Microsoft Certificate Services, please refer to that system's technical documentation.
Installing MetaFrame Web Interface
Although Web Interface can be installed as part of the MetaFrame XP installation, in order to take advantage of its security features for external users, we recommend installing it on a stand-alone machine in a DMZ separate from the internal domain. For LAN-based Web Interface deployments supporting Program Neighborhood Agent Clients, the Web Interface server should be installed in the LAN. If both external and internal users will be supported (which is very common), two Web Interface servers should be used—one internal and one in the DMZ.
Upgrading from Previous Versions
You can upgrade from NFuse 1.51, 1.6, or 1.7 to Web Interface using the Components CD-ROM or the Web Interface files downloaded from the Citrix web site. If you are upgrading from NFuse 1.51 (or a newer version), settings in the NFuse.properties file are migrated to the nfuse.conf file. This means that existing settings are automatically migrated to the latest version of Web Interface. If you are upgrading from a version prior to NFuse 1.51, you must first remove the old version before installation.
We recommend performing a complete reinstall of the Windows operating system and Web Interface rather than doing an upgrade from a previous version of NFuse.
When Web Interface is installed, files are installed in two main locations: the software directory and the web server's document root.
Web Interface Installation File Locations
On the Windows platform, the installation directory is located in C:\Program Files\ Citrix\NFuse. Web Interface software and configuration components are stored in the installation directory, including
-
nfuse.properties file
-
Web Interface Java objects (.jar files)
-
nfuse.conf file
-
ICA templates (.ica files)
| Note | On Windows platforms, the nfuse.conf file is stored in C:\Program Files\Citrix\NFuse\conf. The Web Interface files in this location are global. Therefore, if you make changes to nfuse.conf, these settings are applied to all web pages served by this Web Interface server. |
The web server's document root location depends upon where you installed your web server. On Windows, this is typically installed in the C:\Inetpub\wwwroot directory. The Web Interface presentation and layout components are stored in this location.
Required Information
When Web Interface is installed separately from MetaFrame XP using the Components CD-ROM or web download files, the installer is prompted for information during the installation that includes
-
MetaFrame server identity You must identify one or more MetaFrame servers in the farm that will act as contact points between the server farm and the Web Interface server. You can specify MetaFrame server names, IP addresses, or FQDNs. You can specify the name of any server in the farm. We highly recommend using the FQDN for ease of deployment and management.
-
TCP/IP port You must specify the TCP/IP port on which the specified servers are running the Citrix XML Service. If you do not know this port number, you can determine it by checking a MetaFrame server's port information. For more information about how to do this, see the next section, "Viewing the Citrix XML Service Port Assignment." In the CME deployment, we have chosen port 8081 for the XML service running on the MetaFrame servers.
-
ICA Clients You will be prompted for the Components CD-ROM or CD image. Setup copies the contents of the CD's ICAWEB directory to a directory called /Citrix/ICAWEB that it creates off the web server's document root. All web sites created by the installation process assume that the web server contains the ICA Client files in this directory structure. If you do not want to copy the ICA Clients to the web server during Web Interface installation, you can copy them to the server later. Make sure you create the required directory structure. For example, in a typical English installation, it would be webroot>/Citrix/ICAWEB/en/<icaclientplatform>.
Viewing the Citrix XML Service Port Assignment
The Citrix XML Service is the communication link between the MetaFrame server farm and the server running Web Interface. Since IIS shares default port 80, and it is a well-known port for hackers, an alternative port such as 8081 is recommended for the Citrix XML Service. This should have been selected during the install of MetaFrame on the first server in the farm. See Figure 16-3 for a screen shot of the configuration page for the XML port.
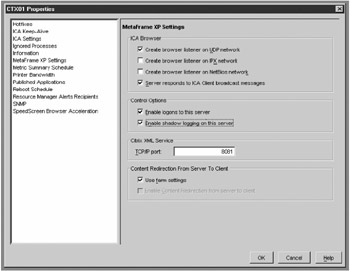
Figure 16-3: MetaFrame Management Console's XML port identification tab
| Note | To view the Citrix XML Service port assignment, open the Management Console for MetaFrame XP. In the left pane, right-click the server and select Properties. In the Properties dialog box, select the MetaFrame Settings tab to view the port assignment. If necessary, you can change the port used on the MetaFrame XP server. See Chapter 12 for more details. |
Step-by-Step Installation of MetaFrame Web Interface
These steps provide a detailed installation guide for Web Interface:
-
Log in as an administrator.
-
If you are installing the Web Interface from the Components CD-ROM, insert the CD-ROM in your web server's CD drive. The Citrix MetaFrame XP Components dialog box appears. Select the Web Interface option. If you downloaded Web Interface from a download site, copy the file NFuseClassic20-IIS.msi to your web server. Double-click the file.
-
The Installation Wizard guides you through the installation process.
-
On the Welcome to Web Interface For MetaFrame XP Installation Wizard screen, click Next.
-
Read and accept the license agreement and click Next.
-
Click OK to restart IIS.
-
Click Next to accept the default location for the Web Interface files. By default, Setup will install Web Interface into the C:\Program Files\Citrix\NFuse directory. Make note of this directory as it is the directory where the NFuse.txt and nfuse .conf files reside. These will be discussed in more detail later in this chapter.
-
On the Connecting To A Citrix Server screen enter the FQDN or IP address of a Citrix server in your farm that will provide Web Interface with published application information. This will include the TCP port on which that server is running the Citrix XML service. (For CME Corp this will be 8081.) Additional servers can be added for redundancy at a later point.
-
If the port is changed from the default port of 80, a warning dialog box will appear. Click Accept to continue.
-
The next screen asks if you would like to install the ICA Clients from the Components CD to the ICAWEB directory for use in the Web Interface portal. This is highly recommended, as this is the ICA Client that will be downloaded to the users prior to starting the ICA session. This location will be the directory where all future ICA Client updates are installed. Accept the defaults and click Next.
Caution Although there is an ICAWEB directory on the MetaFrame XP Presentation Server CD, installing the clients from this CD-ROM or sources other than the components CD will not create the proper directory structure under the Web Interface root web. This will cause a failure when the user attempts to install the auto-detected client due to incorrect path configurations.
-
Click Next on the Ready To Install screen to continue with the installation.
-
After installation is successful, click Finish.
-
Exit the installer screen.
-
Test the Web Interface installation by opening a web browser and in the address box type http://localhost/citrix/metaframexp. Enter a username, password and domain and verify that you are able to launch a published application.
Configuring Web Interface Through the Web Administration Tool
Citrix introduced a new, easy-to-use GUI administration tool to configure the MetaFrame servers, authentication settings, server-side firewall settings, client-side firewall settings, ICA Client deployment settings, and ICA customization. The Web Interface Web Administration tool is a GUI interface for making changes to the nfuse.conf file located in C:\Program Files\Citrix\NFuse\conf folder. After making changes using the Web Administration tool, simply save and apply them so the new configuration takes effect.
The Web Administration tool can only configure Windows 2000 or 2003 servers running Internet Information Server, and requires Internet Explorer version 5.0 or later. The configuration of Web Interface using the Web Administration tool will be broken into four sections:
-
General Settings
-
Configuring User Authentication
-
-
Server Settings
-
Configuring MetaFrame Farms
-
Configuring MetaFrame Servers
-
Configuring the Server-Side Firewall
-
-
Client Settings
-
Configuring the Client-Side Firewall
-
Controlling ICA Client Deployment
-
Controlling ICA Customization
-
-
How to customize the text on the Web Interface web site
-
Introduction to Web Interface Extension Mode
General Settings
The general settings page and its configuration options provide the interface for general administration of the Web Interface site. The next section details these options and the recommended settings. To begin configuration, open a browser and enter the URL http://localhost/citrix/metaframexp/wiadmin. Figure 16-4 shows the Web Interface configuration page.
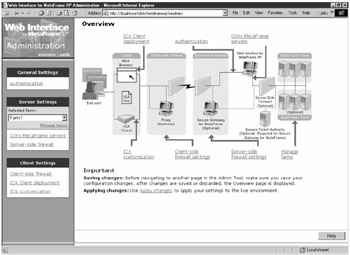
Figure 16-4: The Web Interface configuration page
Configuring User Authentication In the Authentication section, you can configure the ways in which users can authenticate to Web Interface and, subsequently, to your MetaFrame XP server farm. Authentication to Web Interface takes place when a user accesses Web Interface using the Login dialog box. If authentication is successful, Web Interface returns the user's application set. Explicit authentication, guest logins, desktop credential passthrough (single sign-on), and smart card authentication to Web Interface can all be configured.
Methods for Authenticating to Web Interface In this section, we explore the methods Web Interface employs to authenticate users.
| Note | The type of authentication you specify does not affect the method used for ICA Program Neighborhood Agent Clients. To change the authentication method used by the Program Neighborhood Agent Clients, edit the Config.xml file. |
The following are the authentication options:
-
Smart card By selecting this check box, users can authenticate to Web Interface by inserting a smart card into a smart-card reader attached to the client device. The user is prompted for a PIN.
-
Desktop Credential Passthrough By selecting this check box, users can authenticate to Web Interface using the credentials they provided when they logged in to their Windows desktop. Users do not need to reenter their credentials at the Web Interface Login page, and their application set is automatically displayed. By combining Desktop Credential Passthrough with Passthrough authentication, users are provided with single sign-on. Passthrough authentication is a feature provided by the Win32 ICA Client.
Caution If the Passthrough authentication feature is enabled on the Win32 ICA Client, an attacker can send the user an ICA file that causes the user's credentials to be misrouted to an unauthorized or counterfeit MetaFrame server. Thus, we do not recommend enabling this feature.
-
Guest login Selecting this check box will give guest users access through Web Interface (without requesting a username and password) to any applications published for anonymous use on the MetaFrame server(s).
-
Explicit authentication Selecting this check box requires users to supply a username and password to log in to Web Interface. You can configure User Principal Names (UPN) (username@domain.com, for example), Microsoft domain-based authentication, Novell Directory Service (NDS), and RSA SecurID authentication.
To configure explicit login to Web Interface:
-
Click Authentication in the left menu.
-
Select Explicitly Login.
-
Select one of the following authentication methods:
-
Use UPN authentication This option specifies User Principle Name (UPN) authentication.
-
Use NT authentication This option allows the specification of Microsoft domain-based authentication. To force users to log in to a specific domain, enter a domain in the Login domain field and click Add.
-
Use NDS authentication This option allows the specification of Novell Directory Service (NDS) authentication.
-
Use RSA SecurID This option allows the specification of an RSA SecurID authentication database for token support.
-
-
Under Allow User to Change Password, select Yes, On Expiry, or No. Choosing On Expiry will allow a user to change their login password only when the password has expired. When a password expires, a web page is displayed in which users can enter a new password. The expiration time is set in the operating system. On Expiry support was introduced with MetaFrame XP Feature Release 2.
Password Change Considerations If there are differences between your MetaFrame farms, there are additional issues that should be considered before giving users the option to change their password. For example, password changing is only supported by Citrix MetaFrame XP with Feature Release 2, thus the password change request must be directed to a farm containing this version of MetaFrame XP.
| Caution | If multiple MetaFrame XP farms utilizing different authentication domains will be supported, a password change will only affect the domain to which it is issued, potentially leading to inconsistency in the farms that can be accessed by the associated user (as the same credentials must be valid across all farms). Citrix recommends that end-user password changing be disabled in these situations. |
To configure authentication to MetaFrame XP:
-
Click Authentication in the left menu.
-
To enable Passthrough authentication, select either Auto, Yes, or No under Enable ICA Client Passthrough Authentication. Auto will provide the greatest amount of compatibility with other Web Interface and MetaFrame settings. If the user logs in to the Web Interface using desktop credential Passthrough authentication, the Web Interface attempts to authenticate to MetaFrame XP using Passthrough authentication and the ICA Client passes the captured credentials to the MetaFrame server. If the user logs in to the Web Interface using a smart card, the ICA Client does not pass the captured PIN to the MetaFrame server and the user is prompted for their PIN.
-
To enable smart card authentication, select either Auto, Yes, or No. Choose No unless Smart Card support is required.
| Note | After all the configurations have been made, click Save. The Overview page appears. Click the Apply Changes link. When the Apply Changes page appears click the Apply Changes button. Until you click this button, the configuration changes you made will not be written to the nfuse.conf file. If you exit the Administration Tool before applying the changes, all configurations will be lost. |
Server Settings
This section of the Web Interface Administration page provides the hooks into the MetaFrame server farm infrastructure. It is linked from the main Web Interface admin page.
Configuring MetaFrame Farms You can configure one or more MetaFrame farms within the same administrative domain to communicate with Web Interface. Applications from multiple MetaFrame farms are displayed in the same way as a single farm; folders are displayed first, followed by application icons. Consequently, applications with the same name from multiple farms will appear in a random position in the user's application set. We recommend you ensure application names are unique across the farms by publishing applications in folders with different names.
To create and manage the MetaFrame farms to be accessed by Web Interface, perform the following:
-
Click Manage Farms in the left menu.
-
Enter a name for the MetaFrame farm in the farm name field.
-
Click Add. The farm name appears in the Citrix MetaFrame Farms list.
-
If you specify more than one farm name, highlight a name in the list and click the up and down buttons to place these in the appropriate order. To remove a farm name, highlight it in the Citrix MetaFrame Farms list and click Remove.
| Note | The Web Interface acquires application data from all farms before displaying applications; each farm is contacted in the order that it appears in the configuration file. As a result, a farm that is slow to respond will impact overall responsiveness when obtaining application sets. |
Configuring MetaFrame Servers for Use by Web Interface Use the Citrix MetaFrame Servers page to specify the names of one or more MetaFrame servers running the Citrix XML Service. Server settings are configured for each individual MetaFrame farm. To view and configure farm settings, select a farm from the Selected Farm drop-down list, and click the appropriate Server Settings links.
You can specify
-
MetaFrame servers running the XML Service The address of one or more MetaFrame servers running the Citrix XML Service.
-
Fault tolerance This option enables fault tolerance among servers running the Citrix XML Service.
-
Load balancing between servers This option enables load balancing between servers running the Citrix XML Service.
-
XML service port This is the TCP/IP port used by the Citrix XML Service on the MetaFrame servers specified in the Server addresses list.
-
Transport type This is the protocol used to transport data between the server running Web Interface and the MetaFrame server.
Specifying MetaFrame Servers Running the Citrix XML Service Specify the MetaFrame servers running the Citrix XML service in the server list box by entering the server name or IP address. By adding multiple servers from the same farm, Web Interface will detect when an error occurs while communicating with a server, and cause all further communication to be transferred to the next server in the list. The failed server is bypassed for a specific time period (by default, 60 minutes), and the bypass time period can be specified in the Bypass Any Failed Server For field in the Citrix MetaFrame Servers page. If all servers in the list fail to respond, Web Interface will retry the servers every ten seconds.
| Note | If you are using a secure connection between the web server and the MetaFrame server (in other words, you set the Transport type to SSL Relay or HTTPS), ensure the server name you specify matches the name on the server's certificate. |
Configuring Load Balancing You can enable load balancing between servers running the Citrix XML Service by selecting the Load Balancing check box. Enabling load balancing evenly distributes all incoming session requests among the servers listed in the server address box.
Configuring the TCP/IP Port for XML Communication To configure the MetaFrame XP farm's TCP/IP listener Port for XML Communication, enter the port number in the XML service port field. All MetaFrame servers in the farm must have the Citrix XML Service configured on the same port. For CME Corp, we used port 8081.
Configuring the Transport Protocol To configure the transport protocol, select HTTP, HTTPS, or SSL Relay. If SSL Relay will be used, specify the TCP port of the SSL Relay in the SSL server port field. Integration with Secure Gateway eliminates the need to use anything other than the default HTTP transport type.
| REMEMBER: | After all the configurations have been made, perform the Save | Apply Changes | Apply Changes routine to commit the changes to the nfuse.conf file. |
Configuring Server-Side Firewall In the Server-Side Firewall section of the Web Interface Administration console, you can configure Web Interface to include the firewall IP address in the .ICA files. Depending upon how you have configured your firewall and your MetaFrame servers, you can use the Server-Side Firewall Settings page to configure Web Interface. The following types of addressing are supported within Web Interface:
-
Normal addressing The IP address given to the client is the actual address of the MetaFrame server.
-
Network address translation Some firewalls use IP address translation to convert private (internal) IP addresses into public (external) IP addresses. If you are using a firewall with network address translation enabled and you have configured your MetaFrame server(s) for this feature, you need to configure the Web Interface to supply the appropriate IP address, depending upon whether clients connect from inside or outside the firewall.
-
Port address translation You can define mappings from internal MetaFrame IP addresses to external IP addresses and ports. Using this feature, you can route traffic to internal MetaFrame servers through a single external IP address.
From the Server-Side Firewall Settings page, the sections that can be configured by the administrator are
-
Default address translation setting
-
Specific address translation settings
-
MetaFrame server address translation map (for all clients using translated address)
-
Secure Gateway for MetaFrame (for all clients using Secure Gateway)
To help decipher these firewall interaction options, we will use our case study CME again. CME's secure deployment places the Web Interface server in their DMZ. CME's network administrators have chosen not to support Network Address Translation (NAT) from their internal network into the DMZ. This dramatically simplifies the deployment since the Citrix servers will communicate directly to the Web Interface server on their native LAN IP addresses. Additionally, since Secure Gateway will be used, there is no need to specify alternative addresses within the configurations of the MetaFrame XP servers. With a configuration like CME's, the only setting that requires further discussion is the Secure Gateway for MetaFrame option. Detailed instructions for Secure Gateway configuration settings are covered later in this chapter in the "Step-by-Step Instructions for Installing and Configuring MetaFrame Secure Gateway" section.
Web Interface ICA Client Settings
The Client Settings portion of the Web Interface Administration page allows configuration of the ICA Client firewall settings, client proxy settings, client download settings, and ICA Client customization settings.
Configuring Client-Side Firewall Settings on the Web Interface Server If a proxy server firewall is in place between the ICA client and the Web Interface server, you can specify whether clients must communicate with the MetaFrame server via the proxy server.
From the Client-Side Firewall Settings page, you can
-
Configure Default Proxy Setting Specify default proxy rules for clients, or specify that proxy behavior is controlled by the ICA Client.
-
Configure Individual Proxy Settings Configure exceptions to the default behavior by associating client addresses or partial addresses with a particular proxy server address.
Configuring Default Proxy Settings If a proxy server is used at the client side of your Web Interface installation, you can set default proxy rules for clients. Alternatively, you can specify that the proxy behavior is controlled by the ICA Clients. For most installations, the default value of Auto (Client autodetects proxy settings) provides the greatest interoperability with the variety of networks that the ICA Client runs behind, while requiring the least amount of client-side configuration. In our CME case study, their Secure Gateway deployment utilizes this Auto setting to improve the ICA client deployment choices while minimizing the need to have remote administrators make changes to their proxy server or firewall settings.
To configure the default proxy settings, click the Client-Side Firewall link. For most cases, keep the default Auto choice. The other choices are Client, None, and Use Explicit Mapping.
Configuring Individual Proxy Settings on the Web Interface Server In the event that the default Auto setting was not chosen, the Client-Side Firewall settings page provides a place to configure exceptions to the default proxy server behavior. To do this, associate client addresses or partial addresses with a particular proxy server address.
| Note | If web browsers connect to Web Interface through a proxy server or firewall that hides the client's IP address, the Client address prefixmust specify the client address, as Web Interface sees it. If a web browser connects through a proxy, specify the external address of the proxy in the Client address prefix. This does not apply to Program Neighborhood Agent users. |
Deploying ICA Clients with Web Interface As discussed in previous chapters, Web Interface is an excellent tool for deploying and upgrading the ICA Client. In the ICA Client deployment page, the following actions can be accomplished in order to configure and customize the deployment of ICA Clients:
-
Automatically deploy the ICA Win32 Web Client Configure the Web Interface to automatically deploy the ICA Win32 Web Client installation file.
-
Specify how applications are launched and embedded Control whether applications are launched from, or embedded into, HTML web pages.
-
Customize ICA Java Client deployment Specify the components included in the ICA Java Client deployment, or allow users to select the components that they require.
The ICA Client Deployment page of the Web Interface Administration tool provides for easy deployment and installation of the appropriate ICA Clients on client devices. Web Interface detects the user's client operating system and web browser type, then displays a link to download the appropriate ICA Client installation file. Chapter 14 identifies the differences in ICA Clients and discusses how to choose which one to use. See Table 14-1 for more information.
| Note | To use ICA Client installation, the server running the Web Interface must contain the appropriate ICA Client installation files. Administrators should periodically (monthly) check for updates on Citrix's web site and update the Web Interface ICA Client directory (the default English directory is in %webroot%/Citrix/ICAWEB/en/). |
To configure ICA Client installation, click ICA Client Deployment in the left menu. Under Client Download Setting, select either Auto, Yes, or No. The default setting is Auto, which is appropriate for most environments, as it will present to the user (via the Web Interface message center) a link to install the appropriate version of the ICA Client, based on the client operating system. If Yes is chosen, the user will always be presented with the option to install the ICA Client, which can be confusing to end users.
Also available in the Client download setting dialog box is a check box labeled Enable Automatic Download Of ICA Win32 Web Client. The advantage to enabling this feature is that, if Web Interface detects an older version of the ICA Web Client, it will allow the client to be upgraded to the latest installed version on the Web Interface server.
| Note | To use the automatic download feature on Windows 2000 Professional clients or other locked-down workstations, users must have administrative rights on the client device, or the ActiveX control must be registered in Active Directory. See Chapter 15 for more details. |
Specifying How Applications Are Launched and Embedded Web Interface allows administrators to configure how ICA published applications are launched from a web browser. The applications can either be launched as a new seamless window or embedded in the body of the web browser. The default behavior of Web Interface is to launch a new ICA seamless session window. The advantage of this behavior is that it will support multiple simultaneous ICA applications running on a user's desktop. In some instances, the web browser may be too locked down to support launching a new window (Internet Explorer in kiosk mode, for example), or an administrator may prefer to embed an application to provide users the perception of a "webified" application. In both of these scenarios, the embedded choice is appropriate.
The choice of whether applications are launched from or embedded into HTML pages is configured using the ICA Client Deployment page.
To specify how applications are launched and embedded, click on the ICA Client deployment link in the left menu. Under Embedded applications, select one of the following:
-
No Choosing this option launches applications in a separate window on the local desktop. An ICA Client must be installed on the client device. If an ICA Client is not present, you can deploy ICA Clients on your users' devices using web-based ICA Client installation.
-
Yes This option embeds applications into web pages. Specify the ICA Client that will be used to launch the embedded application.
-
Auto This option automatically detects the user's client device and web browser and deploys the appropriate ICA Client. If a Windows platform is detected, the ICA Win32 Web Client or Netscape plug-in is deployed, depending on the user's web browser. The Web Interface deploys the Java Client if it detects that the user is not on a Windows platform, or if it is unable to detect the user's client device and web browser.
-
Java Client Selection of this option forces deployment of the ICA Java Client, regardless of the user's platform. The ICA Java Client can be configured to be a small download, so this option works well for users on low bandwidth connections or on devices with high levels of security that limit the install of additional software.
-
-
User decides This selection lets users decide how to launch their applications. When this option is enabled, users can choose how their applications are launched in their Settings page. If the check box labeled By Default Launch Applications As Embedded Applications is selected, then applications are embedded into web pages by default. There will be two options to specify the ICA Client that will be used to launch the embedded application.
-
-
Auto This option automatically detects the user's client device and web browser and deploys the appropriate ICA Client.
-
Java Client Select this to force deployment of the ICA Java Client, regardless of the user's platform.
-
-
| Note | If this check box is left unselected, applications will launch in a separate window on the local desktop by default. |
If the Java ICA Client will be used, it can be configured in the Java Client Settings section of the ICA Client Deployment page of the Web Interface Administration site.
The size of the ICA Java Client download is determined by the packages included in the download. The fewer packages selected, the smaller the download (the download can be as small as 300K). To limit the size of the download for users on low bandwidth connections, deploy only a minimum set of components. Alternatively, administrators can enable users to control which components are required.
The following is a descriptive list of the ICA Java Client packages, which can be loaded from the Java Client Settings dialog box:
-
Audio This package enables applications running on the MetaFrame server to play sounds through a sound device installed on the client computer.
-
Clipboard This enables users to copy text and graphics between web server applications and applications running locally on the client device.
-
Legacy server support This package will allow users to connect to servers running MetaFrame XP Server for Windows with earlier Feature Releases of MetaFrame XP and MetaFrame for UNIX.
-
Local text echo This option accelerates the display of the input text on the client device.
-
SSL/TLS Secures communication using Secure Sockets Layer (SSL) and TLS (Transport Layer Security). SSL/TLS provides server authentication, encryption of the data stream, and message integrity checks.
-
Encryption Selecting this package provides strong encryption to increase the privacy of ICA connections.
-
Client drive mapping Enables users to access their local drives from within an ICA session. When a user connects to the MetaFrame server, their client drives are automatically mounted, such as floppy disks, network drives, and CD-ROM drives. Users can access their locally stored files, work with them during their ICA sessions, and save them again on a local drive or on a drive on the MetaFrame server. To enable this setting, users must also configure client drive mapping in the ICA Java Client Settings dialog box. See the Citrix ICA Java Client Administrator's Guide for more information.
-
Printer mapping This selection enables users to print to their local or network printers from an ICA session.
-
Configuration UI This enables the ICA Java Client Settings page. This web page can be used to configure the ICA Java Client.
In addition to the preceding package options, the administrator may allow users to control which Java Client packages are enabled. To enable this feature, select the Allow User To Choose Packages check box.
The final selection in the Java Client Settings dialog box provides support for private Certificate Authorities. If you have configured Secure Gateway or the Citrix SSL Relay service with a server certificate obtained from a private CA (such as Microsoft Certificate Services), select Use Private Certificate Authority. Enter the filename for the certificate in the Root Certificate File Name field. The certificate must be located in the same directory on the web server as the Java Client packages (such as /Citrix/ICAWEB/en/icajava on IIS).
| Note | When enabling this option, Citrix recommends that you configure the web server to use SSL/TLS connections in order to encrypt the transfer of the root certificate with the Java Client. |
| REMEMBER: | After all the configurations have been made, perform the Save | Apply Changes | Apply Changes routine to commit the changes to the Web Interface nfuse.conf file. |
Controlling ICA Customization of the Web Interface Site The final section of the Web Interface Administration tool, ICA Customization, allows administrators to control whether users can override the default published application settings for Window size, Window color, and Audio quality.
User-configured settings are stored as cookies on the client device. These settings are remembered for all future applications launched via the Web Interface from that device. Depending on the operating system and web browser used, these cookies may be specific to each user or all users will have the same settings. Customized settings made by guest users (logged in using the Guest User option) are not saved to the client device. These settings are local to the user's machine and will not follow a user from PC to PC.
| REMEMBER: | After all the configurations have been made, perform the Save | Apply Changes | Apply Changes routine to commit the changes to the Web Interface nfuse.conf file. |
Customizing the Text on the Web Interface Web Site
Web Interface for MetaFrame may be "branded" with custom text and graphics to customize the default web site. The following section describes how to make subtle changes that customize the site to match your organization. Figure 16-5 shows an example of a custom Web Interface application list page.
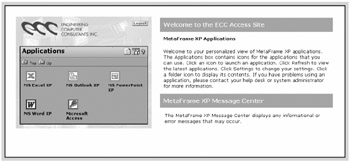
Figure 16-5: A custom Web Interface page showing the contents of a Microsoft folder
Customizing the Text on the Web Interface Default Web Site Customization of the text found on the Web Interface web pages is done through a single file, the nfuse.txt file located in the default Web Interface directory (C:\program files\Citrix\NFuse\).
In order to change the text on the Web Interface screens, change the text in the referenced sections (LoginTitle, Welcome, PleaseLogin, for example).
After making changes to the nfuse.txt file, restart the IIS services:
-
Click Start | Run and type iisreset. Click OK.
-
Verify that all the necessary services have started.
| Caution | Be careful when editing this file. For recovery purposes, make a copy of the Web Interface.txt file before editing. |
Customizing the Graphics on the Web Interface Default Web Site Customizing graphics is more complex than customizing the text due to the nature of ASP pages. However, an administrator may substitute their own custom graphics and edit the associated .inc files to point to the new graphic files.
The graphics files are located in the \Citrix\MetaFrameXP\site\media folder under the web root of the default Web Interface web site. Two commonly modified graphics files and their associated reference files are
-
citrix.jpg This graphic is the Citrix logo found on the button on the right-hand side of the default web site. To change this logo, first place a copy of your company's logo in the aforementioned directory. Then edit the messagecenter.inc file in the Citrix\MetaFrameXP\site\include directory and replace it with the name and location of your logo.
-
nfusehead.gif This graphic is the Web Interface banner found over the login box and list of enumerated applications. To change this logo, first place a copy of your company's logo in the aforementioned directory. Then edit the layout.inc file in the Citrix\MetaFrameXP\site\include directory and replace it with the name and location of your logo.
| Caution | Be careful when using large files or resolution-intensive graphics, as these images will affect the load performance of the page. Make sure that the files are prepared for web use. The recommended file types are .jpg or .gif. |
About Web Interface Extension Mode
Web Interface Extension, which is only supported in the MetaFrame XPe version, gives users the ability to access published applications from multiple MetaFrame XPe server farms located in separate administrative domains. Web Interface Extension provides users unified access to these typically disparate published application sets. This process, called aggregation, greatly simplifies user access to applications in organizations with multiple server farms.
| Note | Enterprise Services for NFuse and NFuse Classic have been integrated into MetaFrame XPe. Enterprise Services for NFuse is now called Web Interface Extension for MetaFrame XP. |
Configuring Web Interface Extension Mode To use Web Interface Extension, configure the Web Interface server to communicate with the MetaFrame XPe server running Web Interface Extension. This is a global setting that causes Web Interface to communicate with a server running Web Interface Extension, rather than with MetaFrame servers running the Citrix XML Service.
To configure Web Interface Extension mode, click Mode in the left menu, and select the Enable The Web Interface Extension check box. To allow desktop credential Passthrough and smart card authentication between Web Interface and the Web Interface Extension, type a password in the Password For Authenticating To The Web Interface Extension field. Web Interface Extension checks this password to authenticate the server running Web Interface.
| Note | In addition to these basic Web Interface steps, there are myriad other configuration considerations required to support Web Interface Extension mode. Please refer to the Web Interface Extension for MetaFrame XP Administrator's Guide for complete details on configuring Web Interface Extension mode. |
Step-by-Step Instructions for Installing STA
STA is an ISAPI DLL that is loaded and called by Internet Information Services (IIS) when a request for a ticket is received from Web Interface. The primary purpose of the STA is to generate and validate tickets for access to MetaFrame published applications. The recommended deployment is on a dedicated server installed in the secure network alongside the MetaFrame XP server farm. Figure 16-1, shown earlier in this chapter, depicts CME's deployment of the STA.
Installing STA
To install STA, perform the following tasks:
-
Make sure the server you are using for STA installation has IIS 5.0 or greater installed, configured, and running. If this is a Windows 2003 Web Edition server, the IIS version will be 6.0.
-
On the STA server, insert the Citrix MetaFrame XP Feature Release 3 Components CD-ROM. The Components menu will appear.
-
Click the Secure Gateway button.
-
Click Secure Ticket Authority to start the installation program. Follow the standard installation steps. During the installation folder selection screen, select an appropriate destination folder. This folder must be the IIS scripts folder. By default, this will be C:\inetpub\scripts. If you have altered the default location for the scripts, browse to the correct location.
Configuring STA
When installation of the software is complete, the STA Configuration tool is launched. The following information needs to be entered to configure STA:
-
Select Typical or Advanced Configuration. Our recommendation is to select the Advanced Install option to specify all the configuration values required for STA operation. Click Next.
-
Specify configuration values for STA.
-
STA ID This is a unique identification string for the STA server. Enter a maximum of 16 alphanumeric characters, uppercase only. Spaces, punctuation, and special characters are not allowed.
-
Ticket Timeout Specifies the lifetime (in milliseconds) of a ticket issued by the STA. A value of 0 means that the ticket will never expire. The default value for Ticket Timeout is 100000 ms (100 seconds).
-
Maximum Tickets This option specifies the maximum number of valid tickets that an STA can be issued at any given point in time. The default value for Maximum Tickets is 100000.
-
-
To use the new configuration settings, the World Wide Web Publishing Service must be restarted. If you prefer to restart the service manually, clear the Restart The Service check box.
-
Click Finish to exit the configuration utility.
Changing STA's Configuration Settings
To change the configuration settings entered during the install process, run the STA Configuration tool. To run the configuration utility:
-
Click Start | Programs | Citrix | Secure Gateway | Secure Ticket Authority Configuration.
-
Make the necessary changes and click Finish to exit the utility.
| Note | Restart the World Wide Web Publishing Service to allow configuration changes to take effect. |
Step-by-Step Instructions for Installing and Configuring MetaFrame Secure Gateway
Secure Gateway acts as an SSL gateway for ICA network traffic that services requests between the ICA Client and the MetaFrame XP Server using a Windows service that must run on a Windows 2000 or 2003 server. For our case study, CME Corp, we are using a single DMZ deployment. The Secure Gateway and Web Interface components will be installed on the same machine. The following step-by-step instructions show how to implement this configuration.
Installing MetaFrame Secure Gateway
Log in as an administrator to the Web Interface/Secure Gateway server (installed in the DMZ) and perform the following tasks:
-
Insert the Citrix components CD-ROM or download the image file and select the Secure Gateway Service option.
-
For the Installation mode, select Secure Gateway Service and for the Deployment scenario choose MetaFrame XP Server Only, then proceed to the installation.
-
Install the Secure Gateway Service, Management Console, and Diagnostic tools. The default selected items are appropriate for a standard secure deployment.
Configuring the MetaFrame Secure Gateway
After installation of the Secure Gateway Service is complete, the Secure Gateway Service Configuration tool is launched. The following configuration is a typical best practices install and accommodates the needs specific to our case study, CME Corp.
-
At the configuration prompt, the administrator can choose either a Typical or Advanced configuration. We recommend an Advanced configuration to properly set Secure Gateway Service parameters such as security strengths and STA servers.
-
At the Certificate Configuration screen, select the server certificate to be used by the Secure Gateway Service. Since only one certificate can be bound to the Secure Gateway Service, ensure that the proper certificate is selected by using the View button.
-
In the Select Secure Protocol And Select Cipher Suite section, the default setting is acceptable for most commercial deployments. Check with your organization's security policy for a definitive answer.
-
An additional configuration screen allows for customization of the IP addresses and ports that the Secure Gateway server listens on for incoming client connections. The Monitor All IP Addresses check box forces the Secure Gateway to listen for client connections on all available IP addresses on this server. In the TCP port field, enter a listener port number. The Secure Gateway listens for client connections on the port specified for all available IP addresses on the server. The default TCP port, and the one we will be using, is 443.
-
Custom connection settings can be configured on the Secure Gateway server as well. These options include No Outbound Traffic Restrictions, Use The Secure Gateway Proxy, and Use An Access Control List (ACL). In a typical DMZ install, there is no need to configure these options, so the default value of No Outbound Traffic Restrictions is appropriate.
-
The (STA) configuration screen is an important component of the Secure Gateway installation. Add the FQDN of the STA and appropriately set its communication protocol. We recommend securing the communication protocol by enabling the Secured With HTTPS check box. If multiple STA servers have been deployed to support redundancy, these can be configured here but the administrator needs to ensure this matches the list of STAs configured during the Web Interface install.
-
The Connection Parameters setting allows the administrator to configure Connection Timeout (sec), Cookie Cache Timeout (sec), and Connection Limits. In most cases, the default settings are appropriate. We recommend you baseline the server during initial testing of the deployment and then modify these values to best represent your organization's deployment needs.
Note We recommend enabling the Connection Limits field only if the processor on this server is capable of processing the maximum number of connections based on the typical usage profile of your client base. Ensure that enabling this setting does not run the CPU continuously at very high loads, and that your users experience good quality of service.
-
Logging Exclusions lists the IP addresses of network devices (load balancers, for example) that generate extraneous log information you may want to exclude from the Secure Gateway event log. Unless such devices are included in the deployment network, there is typically no need to enter any Logging Exclusions and the default of none is acceptable.
-
Under Logging Parameters, select the appropriate logging level for the environment. Since Secure Gateway writes to its own event log section, we recommend you choose the All Events Including Informational logging option during the initial deployment to help with troubleshooting and then select the Error And Fatal Events option once the deployment normalizes.
-
Under the Web Interface configuration section, enter information about the server running Web Interface and its appropriate location. For CME, we installed Web Interface on the same machine as Gateway Services. As a result, we must choose the Installed On This Computer option and input 443 in the TCP Port field to secure the communications between Web Interface and Secure Gateway.
Changing Secure Gateway Configuration Settings
To change configuration settings entered during the install process, run the Secure Gateway Service Configuration tool. Stop the Secure Gateway Service before making changes to its configuration. To run the configuration utility:
-
Click Start | Programs | Citrix | Secure Gateway | Secure Gateway Service Configuration. Make the necessary changes. Changes made do not take effect until the service is restarted. The program restarts the service automatically; however, if you prefer to do this manually, clear the Start Secure Gateway Service check box. Click Finish to exit the utility.
Configuring the Web Interface Server to Support Secure Gateway
Now that the Secure Gateway components are configured, Web Interface must be configured to properly support the Secure Gateway installation. Web Interface provides the Web front-end that ICA Client users connect to, and supports the ticketing and authentication functions of Secure Gateway. The following list details how to configure Web Interface to utilize Citrix Secure Gateway.
-
From the Web Interface/Secure Gateway server, open the Web Interface Web Administrator (http://localhost/citrix/metaframexp/wiadmin).
-
Click the Server-Side Firewall link.
-
The Server-Side Firewall settings page is presented. Click the Secure Gateway for MetaFrame radio button in the Default Address Translation Setting section to set Secure Gateway as the default method for ICA session traffic.
-
One of the features introduced in Web Interface allows the specification of specific address translation settings per IP network. If you would like to set a specific IP network to utilize a different address translation than the default, enter the IP network number in the Client Address Prefix text box, select the Address Translation Option radio button, and click Add.
-
Scroll down to the Secure Gateway for MetaFrame section of the page.
-
Enter the FQDN address of the server running the Secure Gateway component in the Address (FQDN) text box.
-
Enter the port the Secure Gateway component is listening on in the Port text box.
-
If you have a firewall configured to perform network address translation between the Secure Gateway box and the MetaFrame server, then check the Use Alternate Addresses Of MetaFrame Servers check box.
-
In the Secure Ticket Authorities URL text box, enter the FQDN name of the server running the STA component in place of <server> and click the Add button.
Note In order to secure the communication between Web Interface and STA, change the default URL path from HTTP to HTTPS.
-
Repeat Step 9 in order to add multiple STA servers for high availability. If you will be using multiple STAs we recommend checking the Use The Secure Ticket Authority List For Load Balancing check box to enable round-robin load balancing.
-
Click Save when finished.
-
Click the Apply Changes button to commit the changes.
The Secure Gateway implementation is now complete.
New Secure Gateway Administrative Tools
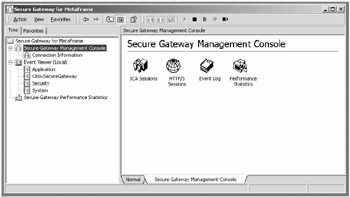
Two additional tools were added to the Secure Gateway 2.0 deployment: Secure Gateway Diagnostics and Secure Gateway Management Console. After the initial install of both Web Interface and Secure Gateway is complete, run the Diagnostic tool before performing any user testing. This utility will verify that all setup and configurations are not only installed but also working properly with their back-end systems (this will test all the way down to Certificate level).
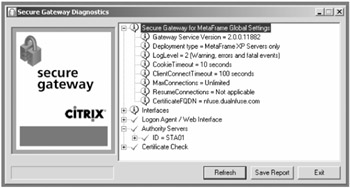
The Management Console is a useful utility to access common system administration tools (such as the event viewer). It is also useful for accessing specific information and statistics regarding the Secure Gateway services, such as number of active connections and performance.
MetaFrame Secure Access Manager
As discussed earlier in this chapter, Web Interface leveraging Secure Gateway for MetaFrame provides a powerful implementation tool for user communities to securely access your Citrix MetaFrame server farm. With that said, there may be business cases or corporate mandates that dictate access to discrete applications or processes that are not necessarily available from the MetaFrame farm. Citrix developed an offering to fulfill this growing need in early 2000 by introducing their first release of a non-MetaFrame ICA server access solution: NFuse Elite.
NFuse Elite was based on Sequoia System's portal technology, which opened the door for Citrix to broaden their product offering beyond the Multi User NT/2000 architecture. After initial successful deployments of this environment and market analysis, Citrix learned from its experiences and listened to their customers/channel partners and integrated a new offering. This offering culminated in 2003 with the release of MetaFrame Secure Access Manager 2.0 (MSAM). This solution has provided many changes over the previous release, including the following noteworthy features:
-
Secure access for remote users utilizing the same Secure Gateway for MetaFrame service described earlier.
-
Advanced indexing services, including file systems and remote web servers, via Index Server for MetaFrame.
-
Integrative support with multiple MetaFrame ICA server farms, which aggregates all access services to one easy-to-use, secure web interface.
-
Improved and updated Content Delivery Agents (CDAs) and development tools (SDKs) for wider integration with corporate data systems.
-
International compatibility via single-byte support for non-English characters associated with Western European languages and compiled installation code for German and Spanish operating systems.
MSAM vs. MetaFrame ICA
Utilizing Citrix's years of experience in providing scalable, enterprise solutions to end-user applications, it is no surprise when examining the MSAM deployment environment that it mimics key concepts developed in the MetaFrame ICA realm. Table 16-1 shows some of the similarities between the environments.
| MetaFrame ICA Environment | MetaFrame Secure Access Environment |
|---|---|
| MetaFrame XP application servers are situated in a load-balanced farm for increased scalability and data resumption of ICA user sessions. | Agent servers are arranged in a load-balanced environment to increase processing performance and data resumption of CDA data presentation. |
| Centralized state tracking of farm data and metrics is stored in the MetaFrame Data Store. | Agent server load information, licensing and session states are centralized to a master State Server. |
| MetaFrame XP provides a secure browser interface for intuitive access to Published Applications utilizing Secure Gateway and STA services, protected with SSL encryption. | Secure SSL deployment enables Internet access to the Access Center's Content Delivery Agents (CDA) utilizing Secure Gateway, Login Agent services, and STA. |
| MetaFrame Web Interface provides a user-customizable/administratively controlled web interface. | MSAM provides flexible user configuration and administration of the access center and available CDAs. |
| MetaFrame XP web and database components are simple to install and administer. | MSAM provides easy-to-install web and database components. |
| MetaFrame XP leverages common user group management systems (MS Active Directory, Novell E-directory, and so on) to provide access-specific Published Applications. | MSAM leverages common user group management systems (MS Active Directory, Novell E-directory, and so on) to provide access-specific CDA, and pages in the Access center. |
So, with all these similarities, what makes MSAM unique? Its uniqueness resides in the concept of creating a very specific access center, which not only allows users to utilize resources from a MetaFrame server farm but also discretely provides a web-based interface into the organization's information stores. MSAM goes beyond the standard, development-intensive application of mining information from a database and providing a web look and feel to view it. Citrix has developed a standard programmatical interface tool called Content Delivery Agents (CDAs) to allow the preprogramming of connectivity between applications and a web page, and has initiated the creation of several hundred CDAs for more popular applications and interfaces. With Content Delivery Agents, it is possible to process data on an Agent server farm and deliver an interactive experience to the end user without significant programming overhead.
The CDA becomes the focus of the MSAM deployment, just as installing and publishing applications do in the MetaFrame XP environment. One advantage is that since the administrator is centrally creating and deploying specific CDAs to access only the content (a subset of the application) a user needs to interact with, there is not the vast amount of administrative overhead required to "lock down" a Terminal Server deployment. The ability to provide data and content to a user more efficiently ultimately leads to time and money savings. An example of this is the following: Under a typical MetaFrame XP application deployment, an administrator installs the full client of the document management system and then publishes access to an end user or group. Each time a user accesses their data from within the application, it may take five to ten menu picks and a lot of user input to access the data required. Under the MSAM deployment scenario, that same administrator would instead configure a CDA and add it to the users' MSAM Access Center, which automatically drills down and pulls the data they need to interact with. Although there may be some programming required to create the interface (depending on whether a CDA already exists), the objective is to streamline user access and use of applications, content, and, ultimately, the data.
One other concept heavily emphasized by MSAM (though administratively controllable, of course) is the capability of the end user to modify the look and feel of their web-based access center. This is very similar in concept to a My Yahoo or MSN Passport-based site over the public Internet. These sites allow a user to log on to what is typically a standard public site and be presented with a personalized view of the content with the ability to customize and optimize the web experience. MSAM, unlike these public sites, does not use local cached credentials or settings to store these optimizations. This allows a user who accesses the data center from various computer resources (such as a business laptop, home machine, or Internet kiosk) to always have access to their customizations, as they are stored in the central MSAM State/Web Server located securely in the company's data center.
CME Case Study of MSAM
The CME deployment architecture requires remote Just In Time (JIT) outsourced manufacturing facilities. To effectively meet this requirement, CME's manufacturing partners require direct, secure, and easy-to-use access to a number of internal systems at CME in order to meet their manufacturing service level agreements and update their project status. For this specific case, we will look at the relationship between Nickel Plastic Parts, Inc. (NPPI) and CME.
NPPI's success has been based on its ability to provide inexpensive, high-quality injection-molded plastic parts specialized for the medical industry. NPPI key technologies involve a propriety processing method of handling raw materials before molding, as well as scrutinized methods of verifying that the parts are accurate according to engineering requirements and are sanitized for use in operating rooms. CME has experienced a long-standing relationship with NPPI, but in recent years CME's shift to JIT manufacturing processes has caused some production scheduling snags. In order to improve the success of their JIT processes, CME mandated that all its outsourced manufacturing partners, including NPPI, utilize an access solution deployed by the CME IT department to review order and forecasting data. Not only will the partner be responsible for monitoring this data and acting on it, but they will have access to overall product shipment schedules as well as the latest engineering and manufacturing requirement documents. This ensures that any late stage changes to design requirements are accounted for.
CME already has established deployments of internally developed manufacturing systems (running from Oracle Database Servers) as well as Documentum for document management and revision control of their procedures and manufacturing specification sheets. In order to provide not only real-time access, but also discrete, role-based control of these data sources, CME's IT staff has turned to Citrix's MetaFrame Secure Access Manager (MSAM) as the access center of choice for these data sources. Key features that made MSAM attractive included ease of deploying a standards-based, browser-accessible Web Interface, availability of existing MSAM Content Delivery Agents to their internal systems, as well as the security provided by MSAM's Gateway Services. Figure 16-6 shows a diagram of CME's full secure access deployment with Web Interface, Secure Gateway, and MSAM.
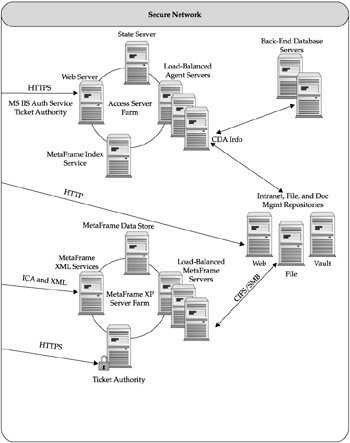
Figure 16-6: CME's full Secure Access Center deployment with Web Interface, Secure Gateway, and MSAM
In this deployment, MSAM administrators are able to create an easily managed, role-based, look and feel so that when a partner accesses the MSAM web interface they are presented only with those Content Delivery Agents (CDA) that have authorization to access their portion of the manufacturing requirements and sales forecasting data from Oracle as well as process documentation from Documentum. As an added benefit, CME is also able to provide their partners with additional information on CME's general marketing, such as recent press releases, stock prices, and other pertinent information.
At the core of this deployment is the MSAM CDA. Information in each area of the access center that the user has rights to is provided by a CDA. In this case, there are one or more Oracle CDAs that connect directly to the specific information required by NPPI account managers to fulfill JIT. In addition, there is a CDA programmed to obtain process documents out of Documentum so that NPPI production teams are generating the correct parts based on the latest requirements. Both the Oracle and Documentum CDAs already exist, limiting the amount of custom programming required to build the connectivity.
In order to provide this data securely over the public Internet, without deploying an expensive and complex VPN solution, CME IT staff have opted to implement Secure Gateway services to provide SSL-encrypted data transfers over common HTTPS ports. An additional requirement was to provide the flexibility to support CME's partners' security deployments without modifications. NPPI's IT staff, for example, requires all internal users to pass through their outbound web proxies in order to gain access to Internet resources. Since Secure Gateway has no problem accepting connections from client-side proxy devices, NPPI's IT staff do not have to change their security policies in order to accommodate this solution.
Once the server-side deployment is completed by CME, NPPI users simply connect to this access center using a functional web browser supporting high encryption and the MSAM Gateway Client.
Deployment Requirements for MSAM
This section outlines the following concepts:
-
Key services required to support the deployment
-
Minimum hardware specifications
-
Typical security requirements for an Internet deployment of MSAM
-
Scaling considerations and growth accommodation
-
Content Delivery Agent resource sites
Key MSAM Services
MSAM, in its most basic Internet-based deployment, has the following components: Secure Access Manager, Web Service extensions, STA, Agent Server, and Secure Gateway for MetaFrame and Login Agent. There are also the additional ancillary components: the user-side MSAM Gateway Client and the Index Server for MetaFrame. Table 16-2 describes the roles associated with each MSAM service.
| MSAM Component Service | System Role |
|---|---|
| Secure Access Manager (SAM) | This is the core of the MSAM deployment. It maintains all information about the Access Center, CDA information, custom user information, licensing, load information, and much more. SAM also requires the existence of a database service to store information. The options are either to use the MS SQL Desktop Engine (provided on the install CD-ROM) or an enterprise Database Service such as Microsoft SQL Server. |
| Web Server Extensions (WSE) | These extensions are where the CDA information is presented to the user in a web format. WSE installs on MS IIS and is dynamically updated by the SAM. LAN users may access this web site directly to utilize their access center. This is also where Internet user requests are relayed by the Secure Gateway in the DMZ. |
| Secure Ticket Authority (STA) | The MSAM STA is installed with each Agent Server and maintains proper state information with the SAM. Secure Gateway also will utilize at least one STA for validation of secure Internet connection states. |
| Agent Server (AS) | Agent Server(s) are the equivalent of Citrix MetaFrame XP farm servers because they generate the bulk of the content/information for end users. In this case, the information processed is data for Content Delivery Agents instead of feature-rich GUI applications. |
| Secure Gateway for MetaFrame | As in a secure Web Interface deployment, Secure Gateway services enable the encryption of data into SSL packets to be relayed to the end user over HTTPS ports. This is a requirement for Internet deployments. |
| Login Agent (LA) | This is in parallel with the Secure Gateway install. LA provides the external MSAM user a web interface. It is able to log the user into the MSAM environment and install any required plug-ins (such as the Gateway Client) and can be secured for HTTPS traffic. This is a requirement for Internet deployments. |
| MSAM Gateway Client | The MSAM Gateway Client is key to proper Internet deployments and similar to having an ICA Client installed. Its role is to facilitate communications with the MSAM internal environments and act as a tunneling client, which will allow a remote client into LAN-based resources at the data center. For example, if there is a web site CDA that links to an internal data center URL, the Gateway Client enables the remote user to view the contents of that URL by tunneling the web browser requests to the Secure Gateway server, which then links to the internal resource. The MSAM Gateway Client is required for Internet deployments. |
| Index Server for MetaFrame (IS) (optional) | Index services in general can be critical to simplifying data access. Citrix has provided IS not only to index file servers and their contents, but also to hook into searchable information from any web site and other data stores. Index Server is optional to the install of MSAM but is included free with the product. |
| Note | In a basic configuration, the administrator can combine MetaFrame Secure Access Manager and STA on the first server in the internal secure LAN. |
Minimum MSAM Hardware Specifications This section outlines the minimum server hardware required to deploy MSAM. In effect, as few as three servers (two internal to your data center network and one in its DMZ), can fulfill the requirements. In a later section, we discuss scaling considerations for a more robust deployment.
Component Minimum Requirements for MetaFrame Secure Access Manager
-
512MB of physical memory
-
Microsoft Windows 2000/2003 Server Family or later with latest service pack
-
For Windows 2000 Server, Microsoft .NET Framework 1.0 with Service Pack 2 or later
-
Microsoft Data Access Components (MDAC) Version 2.7
-
Internet Information Services (IIS) 5 or later
-
Microsoft SQL Server 2000 with Service Pack 2 or later (or)
-
Microsoft SQL Server 7 with Service Pack 3 or later (or)
-
Microsoft SQL Desktop Edition (MSDE) Service Pack 3 or later
-
A network interface card (NIC)
Minimum Requirements for STA
-
256MB of physical memory.
-
150MB additional physical memory.
-
A network interface card.
-
To support secure communication (optional), an installed certificate and installed root path are necessary.
| Note | The administrator can combine the Secure Gateway and the Logon Agent on the second server. This server is installed in the data center's DMZ for increased security. |
Minimum Requirements for MetaFrame Secure Gateway
-
Microsoft Windows 2000/2003 Server Family or later with latest service packs
-
256MB RAM
-
150MB physical memory
-
A network interface card
-
Internet Information Services 5 or later
Minimum Requirements for Logon Agent
-
150MB additional physical memory
-
Installed into IIS service default root
-
To support secure deployment an IIS-based web certificate
| Note | Due to system resources, the index server should be installed on a separate server located on the internal LAN. |
Minimum Requirements for Index Server for MetaFrame
-
Microsoft Windows 2000/2003 Server Family or newer with latest service pack
-
Internet Information Services 5 or newer (installed by default on Windows 2000 servers)
-
Microsoft .NET Framework 1.0 with latest service pack
-
1GB RAM
-
10GB hard disk storage (30GB recommended)
-
1GHz Pentium 4 dual processor
-
A network interface card
Minimum Requirements for the Client Device
-
Standard PC architecture
-
A network interface card
-
Internet connection
-
Compatible 32-bit Windows operating system
-
Internet Explorer 5.0 (with High Encryption Pack) or later
-
Ability to download and install browser plug-ins (the Gateway Client is deployed through browser plug-ins)
-
Trusted root certificate path required to connect to the Secure Gateway/Login Agent server
Typical Security Requirements for an Internet Deployment of MSAM
The following security guidelines should be considered when deploying an Internet-accessible MSAM environment:
Firewall Rules
-
Open appropriate ports. From the Internet, TCP port 80 and 443 inbound access to the Secure Gateway/Login Agent server in the DMZ must be configured.
-
Configure outbound and inbound access. From the Secure Gateway /Logon Agent server in the DMZ, inbound access to STA/SAM server on port 443 and ports to any internal resource server (such as Citrix or web servers) that a CDA may call directly should be configured.
Additional Requirements
-
Configure Address translation rules. Proper Network Address Translation rules from internal LAN to DMZ access, and from the DMZ to the Internet, must be configured and tested.
-
Update DNS tables. Update forward and reverse looks for both internal and Internet DNS servers. Secure Gateway/Logon Agent server must have its FQDN registered with both internal and Internet-based DNS servers. The STA server needs only to have its FQDN registered with internal DNS servers.
-
Install Server Certificates. In order to properly accommodate SSL communications, a verifiable web type certificate must be bound to the Secure Gateway/Logon Agent server and a separate certificate installed on the STA. In most cases, we recommend using a standard Internet deployed certificate (for instance, Verisign, Thawte, and so on) for the Secure Gateway/Logon Agent and then using an internally generated certificate for the STA.
-
Configure Root Certificate paths. Users must have the root path of the Secure Gateway/Logon Agent installed on their clients (this is one of the reasons to purchase an Internet-based certificate as opposed to having to manually deploy the root CA path to each client who wishes to connect). The Secure Gateway/Logon Agent must have the root path for the certificate issued to the STA installed in its system registry in order to properly function.
Environment Scaling Considerations for MSAM
In the previous sections, we outlined what it takes to get the minimum servers implemented in order to support a functional MSAM environment. As with many minimum requirement documents, we have not accounted for "real world" enterprise deployments, where end-user performance and high availability are required. Because of the modular nature of MSAM, an administrator has the option of increasing the deployment footprint in stages or all at once depending on the initial number of users and the type of service required. The following list outlines some of the areas to consider when designing MSAM for an enterprise deployment.
-
Increase the number of Access Servers, as well as disable this responsibility on the primary Secure Access Manager machine.
This is similar in concept to the N+1 rule of thumb in MetaFrame XP server deployments. By increasing the number of Access Servers, you not only provide more processing power to your farm, but you also increase its availability due to server redundancy.
-
Utilize an enterprise database for your state information.
By utilizing an enterprise database service, such as MS SQL Server, instead of MS SQL Desktop Engine, performance and security are greatly improved.
For large-scale deployments, consider clustering the back-end database servers for increased availability.
-
Implement a Web/SSL load balancer for web extensions and Secure Gateway.
This is the most reliable way of increasing availability of Internet access to the Secure Gateway/Logon Agent servers. Load Balancers have the ability to distribute the Secure Gateway process, thus eliminating a bottleneck in the event of high user loads (300–500 plus simultaneous connections).
| Note | Do not enable any type of SSL acceleration or caching as this will degrade the end-user experience due to the dynamic nature of the data processed. |
Common Content Delivery Agent Resource Sites
Since content delivery agents (CDAs) are key to a successful deployment of MSAM, it is worth noting just a few of the many available preprogrammed content delivery agent resources.
-
Citrix product CDs All CDAs available at the time of product release are included on your product CD.
-
Citrix web site You can download new and updated CDAs from the Citrix web site. The main site for information about MetaFrame Secure Access Manager, including information about CDAs and software development kits (SDKs), is www.citrix.com/secureaccess.
-
Citrix customer portal Registered customers can download CDAs from www.citrix.com/mycitrix.
-
Citrix Developer Network The Citrix Developer Network (CDN) is an open enrollment membership program that provides access to developer toolkits, technical information, and test programs for software and hardware vendors, system integrators, licensees, and corporate developers who incorporate Citrix computing solutions into their products. For more information, go to www.citrix.com/cdn.
-
Microsoft web part resources There are a number of web part areas on the Microsoft web site, but this is a good address to get you headed in the right direction: www.microsoft.com/sharepoint/server/downloads/webparts/introduction.asp.
| Caution | Neither Citrix nor the authors of this book have fully tested the large variety of prewritten CDA programs available. Always fully review and understand the impacts of any third-party code under consideration and always implement and thoroughly test it before using it in a production environment. |
|
EAN: 2147483647
Pages: 158