8.4 Formatting Objects
| Formatting objects (FOs) are the building blocks of the transformation result tree that drives the formatter. They are compact containers of content and style with all the information necessary to generate a presentable formatted document. There are two major kinds of FO. Flow objects create areas and appear inside flows. (A flow is a continuous stream of text that may be broken across pages.) Layout objects , or auxiliary objects , help produce areas by contributing parameters. A block object creates a region of content to be inserted into a flow, so it qualifies as a flow object. In contrast, the initial- page-number FO resets the count of page numbering. Since it only contributes some information to aid in processing, rather than create regions on its own, it is a layout object. An FO document structure is a tree, like any other XML document. Every element in it is a formatting object, so we call it an FO tree. The root of this tree is a root element. Its children include:
In the coming sections, I will break down this structure further, starting with page layout. From there, we will move to flows, blocks, and finally inlines. 8.4.1 Page LayoutContained in the layout-master-set object are specifications for pagination and layout. There are two types. page-master s define properties of a page type: its geometry and how it is subdivided. page-sequence-master s control how page types will appear in sequence. When the formatter formats pages, it will take the content inside the flow object children of the page-sequence objects and fit it into pages. The shape of the formatted text in a page is determined by the relevent page-master 's specifications. Which page-master will be used depends on the page-sequence-master and which pages have come before. 8.4.1.1 Page sequence masterspage-sequence-master objects contain pieces of the page sequence, or sub-sequence specifiers . The simplest kind is a reference to a single page master, represented as a single-page -master-reference object. For example: <fo:layout-master-set> <fo:page-sequence-master> <fo:single-page-master-reference master-reference="basic"/> </fo:page-sequence-master> <fo:simple-page-master master-name="basic"> <!-- ... --> </fo:simple-page-master> </fo:layout-master-set> This defines a sequence of exactly one page. It is not very useful by itself unless your whole document fits in one page. Often you may want to define a standalone sequence to handle a special kind of page layout, such as a landscape mode table. Another sub-sequence specifier is repeatable-page-master-reference . It is like single-page-master-reference except that it can repeat by setting the attribute maximum-repeats to a number or no-limit . In this example, the basic page master will be applied to all pages in the document: <fo:layout-master-set> <fo:page-sequence-master> <fo:repeatable-page-master-reference maximum-repeats="no-limit" master-reference="basic"/> </fo:page-sequence-master> <fo:simple-page-master master-name="basic"> <!-- ... --> </fo:simple-page-master> </fo:layout-master-set> Since this is a common occurrence in simple designs, you can leave out the single-page-master-reference , which will imply the simplest possible sequence, that of using one page master throughout. The last and most complex type is repeatable-page-master-alternatives . It defines a set of page master references with conditions for use. For example, you might want to have a differentiate between odd-numbered ( recto ) and even-numbered ( verso ) pages. You can accomplish that effect with this page sequence: <fo:layout-master-set> <fo:page-sequence-master> <fo:repeatable-page-master-alternatives> <fo:conditional-page-master-reference odd-or-even="even" master-reference="verso"/> <fo:conditional-page-master-reference odd-or-even="odd" master-reference="recto"/> </fo:repeatable-page-master-alternatives> </fo:page-sequence-master> <fo:simple-page-master master-name="verso"> <!-- ... --> </fo:simple-page-master> <fo:simple-page-master master-name="recto"> <!-- ... --> </fo:simple-page-master> </fo:layout-master-set> The conditional-page-master-reference object is similar to single-page-master-reference except that it has to fulfill a precondition to be used. The odd-or-even attribute is one such test. Others include blank-or-not-blank and page-position . 8.4.1.2 Page mastersA page master defines the content rectangle for a page and how the rectangle is divided into regions. The one page master object in XSL version 1.0 is simple-page-master (its name suggests that other page master types will be added in future versions of XSL). Its master-name attribute is a handle for page sequence masters to reference. Other attributes include space settings for defining the page's content rectangle. For example: <fo:simple-page-master master-name="title-page" page-height="11in" page-width="8.5in" margin-top="1in" margin-bottom="1in" margin-left="1.2in" margin-right="1.2in"> ...</fo:simple-page-master> This FO declares a page master type whose name is title-page . Its height and width are 11 inches and 8.5 inches, respectively. The content rectangle is positioned inside that area, one inch from top and bottom, and 1.2 inches from the left and right sides. After defining the content rectangle, the page master's other task is to outline the regions for content in the page. simple-page-master allows you to divide a page into as many as five different areas, called body region , before region , after region , start region , and end region . In the European writing mode (lr-tb), these correspond to the page structures typically called body, header, footer, left sidebar, and right sidebar. Figure 8-6 shows how these regions are arranged on a page in lr-tb mode. Figure 8-6. Page regions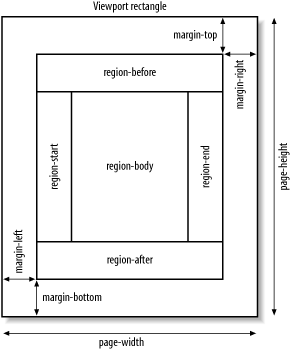 When constructing a page master, you include a formatting object to represent each area. For example, region-body is the FO that sets up the geometry for the body region of a page master. Each region FO may have a region-name attribute that provides a label for flows to attach to it. If you don't define a label, XSL assigns an implicit name with "xsl-" followed by the FO type. For example, the default name for region-body is xsl-region-body . <fo:layout-master-set> <fo:simple-page-master master-name="simple" page-height="11in" page-width="8.5in" margin-top="1in" margin-bottom="1in" margin-left="1.2in" margin-right="1.2in"> > <fo:region-body region-name="pamphlet-body" margin-top="1in/> <fo:region-before region-name="company-logo" extent="1.1in" display-align="before"/> <fo:region-start region-name="navigation-menu" extent="1.1in"/> </fo:simple-page-master> </fo:layout-master-set> The margin properties for region FOs position them within the content rectangle of the page. In the above example, margin-top sets the top of the body region to be one inch below the top of the page's content rectangle. In the peripheral regions, the attribute extent defines the width (if it is on the left or right side) or height (if on the top or bottom). The display-align property adjusts where the region sits inside its reference area, such as centered or flush left or right. 8.4.2 FlowsA flow is a stream of formatting objects that is to be inserted into an area. In the FO tree, flows are stored inside page-sequence objects. They may span many pages or be restricted to a specific area and repeated on multiple pages. The latter type is called a static flow and is typically seen inside a header or footer. The children of a flow object are block-level flow objects. The sequence of these children determine the order in which they will be stacked when formatted inside an area. The formatter takes these flow objects and places them into pages according the layout of the appropriate page master. Which page master is used depends on the pages that have come before and the page master sequence in use. Formatting flows in pages is like pouring liquid into containers. The page master is like a mold for casting containers of different shapes : tall vases or squat trays. The flow objects are a moldable substance that can be poured into these containers. The formatter will create some kind of container depending on which mold it selects. When the container is full, it casts a new container and pours flow objects into it. This process continues until all the objects from all flows have been used up. How flows are applied to regions is determined by a flow map . Each region defined in a page master has a region-name property. This is a unique identifier that distinguishes the region in the page master. Every flow must announce where it is to be placed by setting a flow-name attribute with one of the declared region-name s. The flow map is the implicit connection between flow names and region names . In future versions of XSL, this model is expected to change to make the flow map a separate object. Regions have default values for region names corresponding to the names of their FOs. For example, the body region is named xsl-region-body unless you override that with a name of your own. 8.4.3 BlocksBlock-level FOs are the objects that fill a flow. Each block has at least one area to control. For example, a paragraph in a document will map to a block object in the FO tree. It will stack inside the flow as a single area with a margin, padding, font, and other properties. Some properties that are common in all blocks can be categorized in these groups: background, border, fonts, margin, and padding. We will look at these groups now in more detail. 8.4.3.1 Spacing propertiesCSS gives you two ways to add space to a block. Padding pushes children further inside, and margin pushes the block away from other blocks. In XSL-FO, the padding property is still here, and there are four directional variants of the form: padding- side Where side is before , after , start , or end . Padding properties may be expressed with relative (percentage) or absolute settings (with units). Percentages are calculated in relation to the current block's region. In XSL-FO, the term margin has been renamed space , as in space-before . It follows the same scheme as above, with "padding" replaced with "space." The names of directions have changed from CSS. Instead of "top" and "left" we have the more abstract "before" and "start." This nomenclature is a little confusing, but it is necessary to overcome the bias of Western scripts that go left-to-right and top-to-bottom. In Western-style documents, before , after , start , and end mean top, bottom, left, and right, respectively. The formatter takes properties like space-after as a rigid constraint. This limits its flexibility and consequently can result in some ugly formatting. For example, two paragraphs in a row will be separated by sum of their space-after and space-before properties. It would be better if you could request an optimal space and also require a minimum and possibly maximum space to give the formatter some room to optimize. As it happens, each of the space-* properties can specify minimum, optimum, and maximum values. Each is a compound property , able to express these different values by extending the attribute name with a dot and a component name. For example: space-before.minimum="2pt" If you use space-before="3pt ", forgoing the components , it will be equivalent to this: space-before.minimum="3pt" space-before.optimum="3pt" space-before.maximum="3pt" Let's illustrate these spacing techniques in an example. We will use the following source document: <article> <title>Batten Down the Hatches!</title> <para>People who download copyrighted materials from the Internet should have their computers destroyed, said Senator Orrin Hatch (R-Utah) in a recent statement.</para> <para>In a sweet twist of irony, Wired News reported that the Senator's own web site was guilty of using unlicensed software to generate menus.</para> </article> Here is an XSLT stylesheet to format this document with space around blocks: <?xml version="1.0"?> <xsl:stylesheet xmlns:xsl="http://www.w3.org/1999/XSL/Transform" xmlns:fo="http://www.w3.org/1999/XSL/Format" version="1.0" > <xsl:output method="xml"/> <!-- Set up the master page and apply a flow to it. --> <xsl:template match="/"> <fo:root> <fo:layout-master-set> <fo:simple-page-master master-name="the-only-page-type" page-height="6in" page-width="3in" margin-top="0.5in" margin-bottom="0.5in" margin-left="0.5in" margin-right="0.5in"> <fo:region-body/> </fo:simple-page-master> </fo:layout-master-set> <fo:page-sequence master-reference="the-only-page-type"> <fo:flow flow-name="xsl-region-body"> <xsl:apply-templates/> </fo:flow> </fo:page-sequence> </fo:root> </xsl:template> <!-- Make the article a box with a quarter inch of padding inside. --> <xsl:template match="article"> <fo:block font-family="times, serif" font-size="12pt" padding="0.25in" border="solid 1pt black" > <xsl:apply-templates/> </fo:block> </xsl:template> <!-- The title has no spacing properties. --> <xsl:template match="title"> <fo:block font-weight="bold" text-align="center" > <xsl:apply-templates/> </fo:block> </xsl:template> <!-- A para has a set of space constraints: minimum of 2 points, maximum of 4 points, and ideal of 3 points. I added a silver border for reference. --> <xsl:template match="para"> <fo:block space-before.minimum="2.0pt" space-before.optimum="3.0pt" space-before.maximum="4.0pt" space-after.minimum="2.0pt" space-after.optimum="3.0pt" space-after.maximum="4.0pt" border="solid 1pt silver" text-align="left" > <xsl:apply-templates/> </fo:block> </xsl:template> </xsl:stylesheet> Figure 8-7 shows how it looks when formatted. Figure 8-7. The article formatted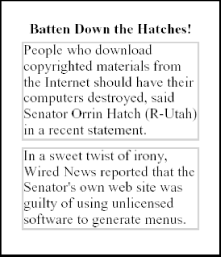 It is possible to make the current block inherit the aforementioned properties from its parent with the value inherit . 8.4.3.2 Background propertiesThere are many options to alter the background of a block. You can set a color , make the background transparent, or display a graphic. Listed below are the background properties, along with their allowed values (default values in bold).
8.4.3.3 Border propertiesThe border is an optional visual component located on the block's perimeter. It can be a complete rectangle, or any combination of the individual edges. Each edge can be styled individually for a huge number of combinations. The basic pattern of a border property is: border- side - option Where side is top , bottom , left , or right and option is color, width, or style. XSL 1.0 offers three different ways of specifying color. The RGB (Red, Green, Blue) scheme uses hexadecimal numbers in ranges of 0 to 255 combined in a triple. In RGB, green would be represented as 00ff00 and white would be ffffff . You can derive colors using functions in expressions. Named colors may also be used, if supported by your XSL implementation. Using the value inherit will cause the FO to inherit this property from its parent in the FO tree. The width parameter can be specified either as a named value (thin, medium, thick), or as an explicit length. The actual thickness of the named values is not specified by XSL 1.0, so it will likely be different depending on the implementation. Width properties may be inherited by setting the value to inherit . The last component is style. A large set of named styles are available:
Style properties can be inherited from parents in the FO tree by setting them to inherit . 8.4.3.4 Font propertiesMost of the font properties available in CSS are present in FOs. XSL goes a little further in some respects by allowing you to be more precise in specifying fallback fonts. The specification gets very detailed about how font positioning works, but it is out of the scope of this book. So let us move on to the specific properties. You select a typeface with the font-family property as with CSS. The form is a list of names, each of which may be a family name , like Verdana or Helvetica, or a generic name that allows the formatter to choose one from a category. The generic names include serif , sans-serif , cursive , fantasy , and monospace . The formatter will choose a typeface in the order of font names given. If the first cannot be found, does not support the style or weight requested , or does not contain all the glyphs necessary to render the FO properly, it will move to the next font name in the list. Typically, you will put your favorite font family name first, and the most generic one last. The font-family property may also be set to the function system-font() , which will discover the current system font and use it. This gives the designer some ability to stick with the local environment. Often user agents like web browsers have preference settings that allow the user to select their favorite font for use in stylesheets. The properties color , font-size , font-size-adjust , font-style , font-variant , and font-weight are all about the same as they are defined in CSS. font-style adds one more style to the CSS set: backslant , which is like italic but leans in the other direction. 8.4.4 InlinesMany block types, such as paragraphs and titles, contain text. The text stream flows from one edge of the content rectangle to the other, breaks and continues line by line until it runs out or hits the bottom of the block. Embedded in these lines are elements that override the default font styles or get replaced with generated content. This is the realm of inline formatting. 8.4.4.1 The inline FOThe inline FO is a generic container of text that allows you to override prevailing text properties. It shares all of the font and color properties of blocks, and some spacing properties as well (including space-before and space-after ). In the following example, the XSLT template maps the element emphasis to an inline element that styles its content green and italic. <xsl:template match="emphasis"> <fo:inline font-style="italic" color="green"> <xsl:apply-templates/> </fo:inline> </xsl:template> Here is another example. It formats text in superscript by shrinking text to 60% of the default size in the block and raising it with the top of the line. <xsl:template match="superscript"> <fo:inline font-size="60%" vertical-align="super" > <xsl:apply-templates/> </fo:inline> </xsl:template> 8.4.4.2 Inline formatting without containmentUsing inline requires that you know where the content to be styled begins and ends. There are times, however, when you do not have any way to know in advance the extent of content to be styled. For example, your design may call for the first line of a paragraph to rendered in small caps. Only when the text has been rendered will you know the last word to be styled this way. XSL provides a different strategy for this case. The formatting object initial-property-set applies properties to the first line of a block only. This example defines a paragraph with an indented first line: <xsl:template match="para[@class='init']"> <fo:block space-after="1em"> <fo:initial-property-set space-before="2em"/> <xsl:apply-templates/> </fo:block> </xsl:template> 8.4.4.3 GraphicsXSL allows one to import external resources into a document, and one important kind is a graphic. An external graphic is an inline object in XSL to allow it to flow along with the rest of the text. This would be convenient if you were using a special icon that could not be represented in Unicode. The external-graphic FO is an empty element that marks the place in text where the formatter will insert a picture. Its src attribute identifies the source of the graphic, typically a filename. For example, this XSL-FO markup contains text with an embedded graphic: <fo:block space-after="2em">The alchemist picked up a bottle and wrote a strange symbol on the label. It looked like this: <fo:external-graphic src="images/blarf.eps"/>. It made me think of a swarm of snakes.</fo:block> Very often, you will want to insert a graphic into a document but have it format as a block. A figure is a structure that acts as a block, set off from the text with a caption. This is easy to achieve by encapsulating the external-graphic in a block . The following XSLT template formats a figure element this way: <xsl:template match="figure"> <fo:block margin="10mm"> <fo:block margin-bottom="3mm"> <fo:external-graphic src="{@fileref}" /> </fo:block> <fo:block> <xsl:apply-templates match="caption"/> </fo:block> </fo:block> </xsl:template> 8.4.4.4 Generated contentAnother class of inline objects stand in for text that has to be generated during the formatting process. For example, a cross-reference that cites a page number should not be hardcoded, but left to the formatter to fill in. The formatting object page-number will be replaced at formatting time with the number of the page it appears on. This is used often in headers or footers where you want to keep a running page number, as in the following example: <fo:static-content flow-name="header-left"> <fo:block font-size="8pt" text-align="left" > <fo:page-number/> </fo:block> </fo:static-content> A similar need is the cross-reference containing the page number of the object it points to. Suppose in the course of writing a book, you want to make a reference to a table in another chapter, giving the page number on which it appears. page-number-citation is the FO you want to use. The XSLT template below will change an xref element into text that includes this type of citation: <xsl:template match="xref[role='@page-number']"> <!-- The attribute 'linkend' holds the ID of the element being cited. --> <xsl:variable name="idref"> <xsl:value-of select="@linkend"/> </xsl:variable> <!-- Go to the element being cited and output some text depending on its type. --> <xsl:for-each select="//*[@id='$idref']"> <xsl:choose> <xsl:when test="self::sect1">the section</xsl:when> <xsl:when test="self::table">the table</xsl:when> <xsl:when test="self::fig">the figure</xsl:when> <xsl:otherwise>the thing</xsl:otherwise> </xsl:choose> </xsl:for-each> <!-- Finally, output the page number. --> <xsl:text> on page </xsl:text> <fo:page-number-citation> <xsl:attribute name="ref-id"> <xsl:value-of select="@linkend"/> </xsl:attribute> </fo:page-number-citation> </xsl:template> |
EAN: 2147483647
Pages: 139