Scanners, Cameras, and Media Readers: Image Capture
| < Day Day Up > |
Disks and Disk Images: Disk UtilityDisk Utility (path: /Applications/Utilities/Disk Utility) can be used to prepare disks, create disk images, repair volumes, and more. We'll approach Disk Utility from two sides: the disk imaging aspect and disk repair features. Launching Disk UtilityDisk Utility combines disk repair with disk formatting and partitioning. As with Mac OS 9, you cannot use either of these functions on your startup partition. If you intend to work with only a secondary disk or partition, launch Disk Utility from the Finder. To use Disk Utility to work on your primary disk, follow these steps:
After launching Disk Utility, the application opens to display a list of your disk resources in a pane on the left side of the window, as shown in Figure 5.33. To the right of the disk list is the content pane, which displays controls for operating on the selected disk item. Figure 5.33. The left pane contains your disk resources; the right pane displays the operation you are performing on your disk.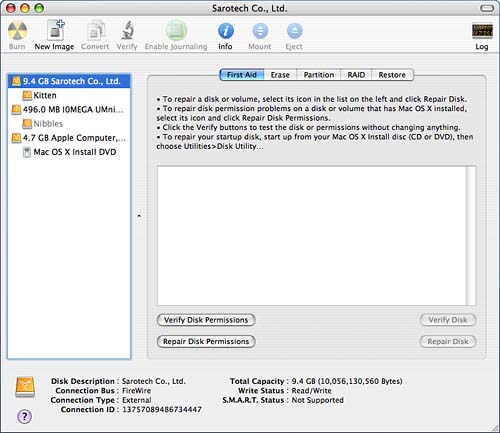 Displaying Disk InformationDisks are listed with each of their partitions displayed under them. Grayed-out partitions are either active system partitions that cannot be verified or repaired or are unmounted partitions.
At the bottom of the Disk Utility window is a display of the details of the selected disk object. Although most of this information is self-explanatory, of interest is the S.M.A.R.T. (Self-Monitoring Analysis and Reporting Technology) status. A disk that supports S.M.A.R.T. can report potential problems before they occur, warning you of imminent drive failure. To get more information about a disk or partition, select it in the list and then choose File, Get Info (Command+I) or click the Info icon in the Disk Utility toolbar. All available information about the object is displayed, as demonstrated in Figure 5.34. Figure 5.34. Get information about a drive or partition.
When a disk is selected, up to five possible buttons appear above the content area: First Aid, Erase, Partition, RAID, and Restore. Each button opens a pane that performs a different function within the application.
Verifying and Repairing DisksTo verify the integrity of a volume or attempt to repair it, highlight the disk or partition, and then click the First Aid button. The First Aid pane, shown in Figure 5.35, can perform basic repair operations on a drive. It functions on UFS, HFS+, and HFS volumes meaning that you can repair both types of Mac OS X partitions and both types of Mac OS 8/9 partitions. Figure 5.35. Use Disk First Aid to repair damaged volumes.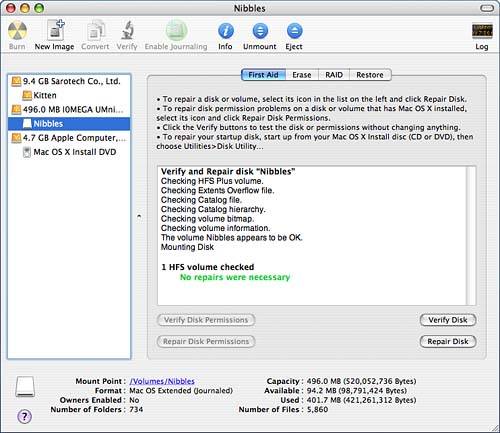 Unfortunately, Disk First Aid is not capable of repairing extensive disk damage, so third-party utilities such as Micromat's Drive 10 and TechTool Pro (http://www.micromat.com/) are still important parts of every software library. In addition to basic disk repair, the First Aid tools can also fix any file permissions that might have been accidentally changed while using your computer. To check or verify a disk, use the four buttons in the lower portion of the pane:
If errors are found, they will be reported. Several things are checked during this process:
If errors cannot be repaired, Disk Utility warns you that it is incapable of fixing your system. If this happens, try rerunning the repair Disk First Aid often requires two passes to work correctly. If the repair does not work, Apple's suggested course of action is to back up the drive, erase it, and then restore your files. I'd recommend trying another disk repair tool before resorting to such desperate measures.
Erasing Volumes, Partitions, and Free SpaceThe Erase pane does exactly what you would think it should: It erases drives and partitions. This is essentially a quick-and-dirty partitioning and initialization tool. If a disk is selected, a single empty partition is created on the selected drive and anything that was previously there is erased. If a partition is chosen, only that partition is erased. You can even use the erase function to securely erase any free space (which might contain previously erased data) on any partition, while leaving active data alone. Figure 5.36 shows the Erase pane. Figure 5.36. The Erase pane is used to quickly erase volumes and create a single empty partition.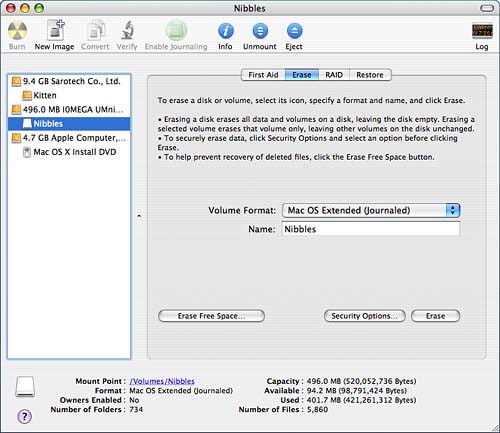 To erase the selected volume or partition, use the Volume Format pop-up menu to choose between Journaled and non-Journaled Mac OS Extended partitions, Case sensitive and insensitive partitions, MS-DOS, and Unix file systems. Enabling Journaling adds a minor speed hit to the drive, but helps protect your machine from data corruption if the system crashes or is otherwise interrupted.
Next, enter a name for the new volume. This will appear as your disk label on the desktop. If you want to securely erase the volume, click the Options button to force Disk Utility to zero all data on the drive, and write and erase random data 7 times or 35 times across the volume. Refer to Chapter 1, "Managing the Tiger Workspace," for more information about why multiple writes are required for a secure erasure. Finally, click Erase to remove all existing information from the device and install the selected filesystem. New to Tiger is the ability to securely erase just the free space on any partition without disturbing any active data. To use this feature, select the partition, and then click the button labeled Erase Free Space. You will be prompted with the secure erase options, just as if you were erasing an entire volume. Pick your poison and click the Erase Free Space button, as shown in Figure 5.37. Figure 5.37. In Tiger, you can erase only the free space on a volume, securely removing any trace of previously erased files.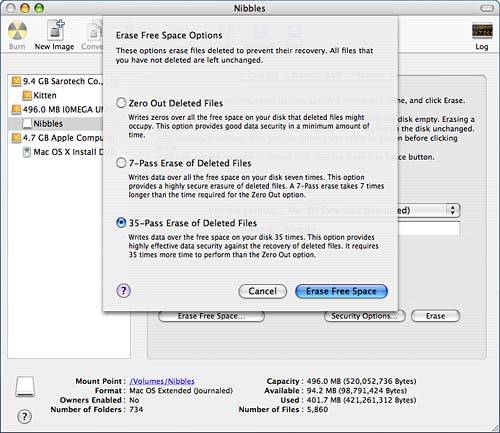 Partitioning VolumesTo create a more complex drive layout than what Erase can manage, use the Partition pane shown in Figure 5.38. The Volume Scheme section of the Partition pane contains a visual representation of the partitions on the system. Each box is a partition. The highlighted box is the active partition. Be warned changes here will make any information on the target drive inaccessible! Figure 5.38. Partitioning your drive erases any existing information.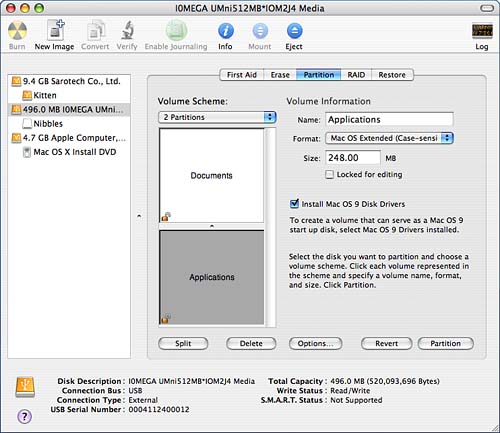
You can change a partition's size by dragging the dividers between the partitions up and down to shrink or grow the available space. As you drag the bar, the Size field on the right portion of the pane changes to show the current settings. In addition to working with the visual view of the partition, you can use the various pop-up menus, fields, and buttons to set other parameters:
Clicking the Partition button is the final step to designing your volume's layout. After you've clicked the Partition button, you will be prompted with a final confirmation, and then the changes will be written to the disk. Using RAIDRAID, or Redundant Array of Independent Disks, is a collection of multiple drives that function together as a single drive. By using drives performing in parallel, the computer can write and read information from the RAID set at a much higher rate than a single drive. Four common types of RAID are available:
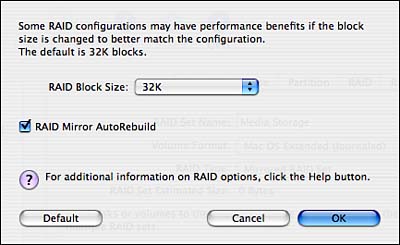
Unfortunately, Tiger supports only Level 0 (striped) and Level 1 (mirrored) in software along with a third, concatenated type that combines the storage space of multiple drives into a single logical partition. This isn't a true RAID volume, but multiple concatenated volumes can be used as part of a RAID set. RAID capabilities are easy to configure if you have multiple drives within a machine. Creating a New RAID SetTo set up a RAID set, you must have at least two matching drives or partitions available. Open the RAID settings pane to begin creating a RAID set definition. Next, enter a RAID Set name, choose a volume format and a RAID type (striped or mirrored). Click the + button to add the configuration to the RAID list, as seen in Figure 5.39. Figure 5.39. Define your RAID set using the fields at the top of the window, and then click + to save it.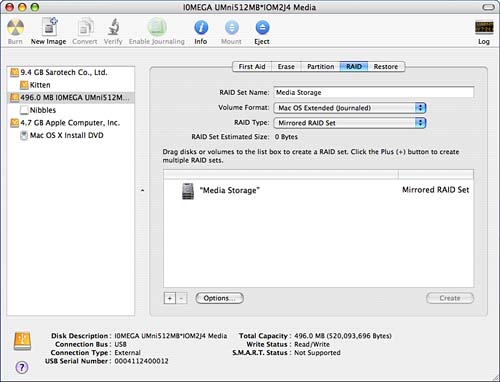 Now, click the Options button below the RAID definition. From this dialog, shown in Figure 5.40, you can choose to change the default block size of the RAID set and enable autorebuild of a mirrored set if a drive fails. Figure 5.40. Choose a block size and autorebuild options.
If you don't know what is being stored on the set, it's best to leave the block size alone. If you know, however, that the drive will be used for small files or large chunks of data (such as video), using a small block size or large block size, respectively, might increase the performance of the set. The AutoRebuild option is useful only if you are adding at least three volumes to your set. If one of the primary volumes (called a slice) in a mirrored set fails, the autorebuild feature will automatically rebuild the set using a spare volume on the fly. If you have only two drives or are using striping, this option is meaningless. Click OK to save your settings.
You can continue to add (or remove) RAID set definitions using the + and buttons at the bottom of the set list. After your sets have been defined, the next step is to add storage. Adding Drives to a RAID SetYou're now ready to add drives to your set definition. Drag the icons of the drives to add from the volume list on the left to the RAID set definition in the list on the right. If you are adding volumes to a mirrored set, you can select each drive and use the RAID Type pop-up menu (or invoke a contextual menu on that drive) to define whether that drive is a slice or a spare. You will need two slices for a working RAID configuration. Additional drives can be added as spares and, with the Autorebuild option discussed earlier, will automatically take over in the event of a drive failure. When you've finished adding volumes, click Create and the new RAID volume will be mounted on the desktop and appear in the volume list on the left.
Restoring a Volume from a Disk or Disk ImageThe Restore pane, shown in Figure 5.41, enables you to completely replace the contents of a disk with the contents of a disk image or another volume. In the case of a disk image, it can even be stored on a web server for retrieving over the network. To use Restore, you must first have either a source drive or disk image. We'll look at creating images later in this section. Figure 5.41. Restore volumes from disk images.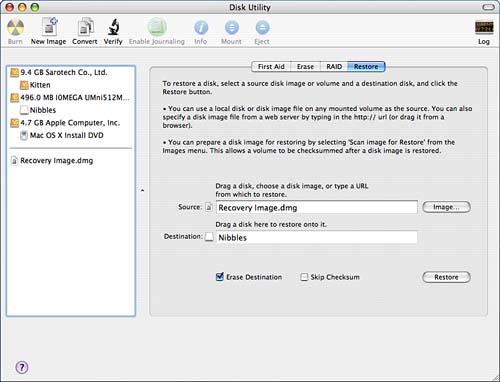 Using Restore is simple either drag the source disk or disk image from the volumes list on the left to the Source field on the right. You can also click the Image button to choose a image file from your filesystem or type in a URL where the image is located.
Next, drag a disk or partition to the Destination field. The destination, obviously, must be equal to or greater in size than the source. If you want to erase the destination before copying the image to the drive, click the Erase Destination check box. Finally, click Restore to start the restoration process.
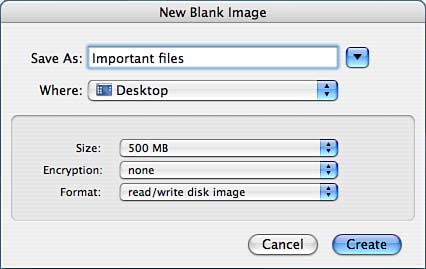
Working with Disk ImagesDisk images are a common and convenient way to distribute software for Mac OS X. Rather than create an archived folder, developers write their applications to a virtual disk that is loaded into memory when used. This disk appears to the computer as a real disk and can be manipulated like any other disk. For the end user, it is a simple way to work with new applications. A single disk image file can contain applications, support files, and any other data a program might need and it never needs to be decompressed. In fact, many applications can actually run directly from disk images, without needing to be copied to your hard drive at all. Disk Utility even has built-in CD burning capabilities to make turning a disk image into a real CD a matter of a few clicks. Adding Disk Images to the Volume ListTo work with an existing disk image, drag the image file into the Disk Utility volume list or use File, Open Disk Image(Option-Command-O). The image is added to an area below your standard hard disks and remains there until you drag it back out (even between executions of Disk Utility). After the disk image has been added, you can work with it much as you would with any other disk in Disk Utility. You can verify it, repair it, repartition it even add it to a RAID set. Creating a Blank Disk ImageDisk Utility can create images as well as mount them. This is useful for creating an exact duplicate of software you don't want to lose, or for making a master image for distributing software over a network with asr. There are three ways to generate an image: copy an existing volume/partition; copy an existing folder; or create an empty image file, mount it, and then copy files to it. To create an empty image file, choose File, New, Blank Disk Image. Figure 5.42 shows the disk image creation dialog box. Figure 5.42. Generate a new blank image, and then copy files to it.
Fill in the Save As field as you normally would this is the name of the image file, not the volume that is will be created. Choose a size for the image from the Size pop-up menu. There are a variety of preset sizes for CDs and DVDs, and a Custom setting for arbitrary sizes. Next, if you want to encrypt the disk image, choose AES-128 from the Encryption pop-up menu. Finally, choose a volume format with the Format pop-up menu. You can choose between a read/write disk image, which occupies the exact amount of space you've set for the image, or a sparse image that grows to accommodate the files you add. Click Create to save the image and add it to the volume list. Creating a Disk Image from an Existing PartitionCreating an image from an existing drive is even easier. Highlight the partition you want to use; then choose File, New, Image from Device where Device is the name of your selected partition, or just click the New Image button in the toolbar. You are prompted for the location to save the image. Using the Image Format pop-up menu, choose the type of image to create: read-only, read-write, compressed, or CD/DVD master. Apply encryption to the image file by choosing AES-128 from the Encryption pop-up menu. Click Save to copy an image of the device onto your hard drive.
Creating a Disk Image from a FolderThe third way to create an image is to copy the contents of a folder or volume. This is the easiest means of building a disk image if you already have all the files in a subfolder of your volume, or want to create an image of a mounted network share. It also results in a disk image that is unfragmented because it isn't based on a direct device copy. Choose File, New, Image from Folder; then use the Mac OS X file browser to pick the folder or volume that you want to use. As with the other two imaging methods, choose the image file and format when prompted, and click Save to create the disk image file. Converting and Verifying Disk ImagesIf you have a disk image that you've saved in read/write format, that you'd like to convert to a CDR image, or perhaps encrypt, you can use Images, Convert resave the image in another format or apply AES encryption. Disk images that will be used for the Apple Software Restore feature are required to be saved as read-only images, and then scanned using the Images, Scan Image for Restore function. This will internally modify the existing image file for use with Restore. To verify the integrity of an image, use Images, Verify. This will check the image and calculate a CRC for comparison against a known CRC value (such as one published by a site where you downloaded the disk image). If the CRCs match, the image is unchanged from the original. If you are publishing a disk image and want to calculate your own CRC value, you can do this by choosing Images, Checksum, CRC-32 image checksum. The image will be scanned and a CRC value generated. Burning CDs and DVDsTo burn a CD or DVD from within Disk Utility, you must have your writer connected and powered on. Select the image you want to burn; then choose Images, Burn or click the Burn toolbar icon. If the image is suitable for burning, Disk Utility displays the dialog shown in Figure 5.43. Figure 5.43. Insert a CD and click Burn.
Click the disclosure pushbutton to choose the maximum speed you want to use during the burn process, along with whether you want to burn additional copies of the image, verify the burn, and eject or mount the disk after it has finished. When you're satisfied with your settings, click the Burn button, and Disk Utility begins writing the CD. |


| < Day Day Up > |
EAN: 2147483647
Pages: 251