Creating Advanced Automation with AppleScript
| < Day Day Up > |
Automating Your System with AutomatorFor years, one of Apple's most compelling technologies within the Mac OS (even before Mac OS X) has been the AppleScript scripting language. Unfortunately AppleScript is a programming language. It requires at least elementary programming skills and has syntax very different from other programming languages meaning that even experienced programmers feel like they're starting from scratch. Starting with Tiger, everything changes. Tiger introduces Apple's new scripting environment designed for end users Automator (path: /Applications/Automator). Automator enables anyone to create complex applications within minutes of starting the application. As a writer, Automator is a dream come true; it takes only a few minutes to describe and provides nearly limitless benefit to the user. It is a perfect example of Apple's legendary simplicity.
Understanding the Workflow ParadigmAutomator is built around the idea that Applications carry out Actions to create a Workflow. Those who have worked in publishing or design will recognize the term workflow immediately it is the path that work takes as it is completed. For example, the workflow for sending an email message might be
In this example, two applications of your computer are used: Finder and Mail. Each of these applications carries out actions within the workflow. Finder collects, organizes, and compresses files. Mail composes and sends the message. In Automator, you can create workflows that automatically integrate applications and their associated actions enabling one application to send information to another seamlessly. All that is required to build a workflow similar to (or much more complex than) the one described here is the ability to drag and drop. Workflows are linear, meaning that you don't need to worry about branching or other traditional programming concerns. Although this does limit some of the functionality that can be implemented, you'll quickly find that Automator is still a very flexible tool.
Actions and Data FlowOne of the most difficult tasks for a programmer is getting a handle on what the programming language is capable of, and what format (data type) information needs to be in order to be passed back and forth between functions (the programming equivalent of an action). Automator abstracts data into very simple types. Instead of dealing with things such as character arrays, pointers, integers, floating-point numbers, and a myriad of other nastiness, Automator works with very simple data types such as folders, files, email messages, URLs, text, and so on. Actions have clearly labeled input and output requirements that must match up with other actions' requirements. The Compress Files action, for example, takes files and folders as input, and produces a file as output. It can't be connected to an action that uses URLs, but can be connected to an action that creates a new email message that accepts files and folders and adds them as attachments to the message. In other development environments, trying to make connections between compatible actions could very well have been a matter of trial and error. But in Automator, Apple has done a wonderful thing: All available actions are sorted based on how well they will work with the action you've currently added or selected in your workflow. Not to oversimplify things, but if you can "connect the dots," you can automate with Automator. In the event that things do go wrong in Automator, the workflow can be debugged and corrected with just a few points and clicks. Exploring the Automator InterfaceThe Automator interface, shown in Figure 4.1, is very similar to Apple's "i" applications. Along the left side of the application window are two columns the Library, which contains Automator-aware applications, and Actions the tasks that applications can carry out. Below the columns is a collapsible information area that provides documentation for the currently selected object. If you aren't sure what something does, selecting it will display more detailed information in this area. Figure 4.1. The Automator interface follows Apple's "i" application interface paradigm.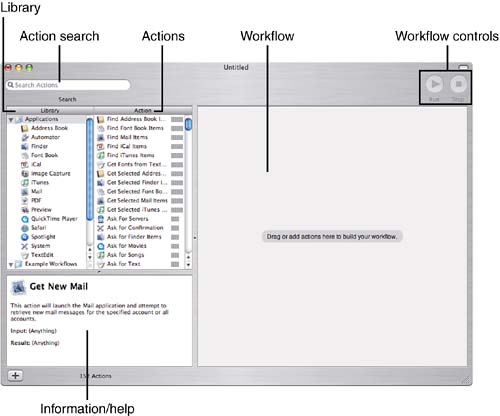 The majority of your workflow composition takes place in the large pane on the right side of the window. Actions are added to this area to create an interconnected chain of applications that is, Your workflow. Finished workflows are executed using the Run and Stop buttons at the top of the window. Creating a WorkflowTo create a new workflow, start dragging actions into the workflow pane. As they are added to the flow, actions will appear as numbered blocks within the pane, as shown in Figure 4.2. Figure 4.2. Drag actions into the right-hand pane to create your workflow.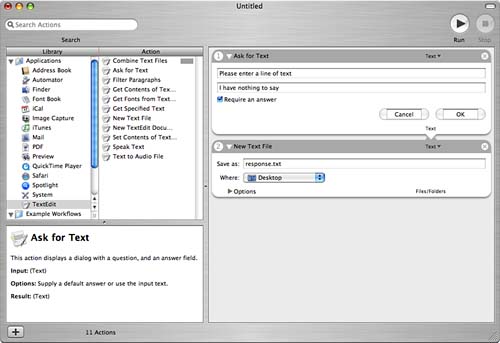
To get you started, let's create a simple workflow that downloads the text from a URL (or URLs) that you specify, and then creates an iPod note based on the page content. This workflow consists of three actions:
Find these actions in the Library list, and then drag them, one by one, into the workflow area, as shown in Figure 4.3. Figure 4.3. Create a simple workflow by dragging the actions into the workflow.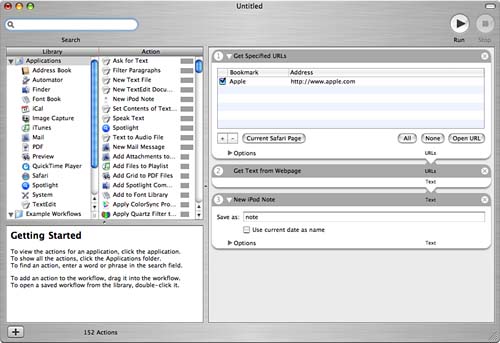 After all the actions have been added, you will need to configure a few properties of the actions. The first action, Get Specified URLs, requires that you provide it with one or more URLs. Use the + and - buttons to add and remove URLs, respectively. The sole purpose is to feed the URLs you specify into the next action: Get Text from Webpage. Get Text from Webpage performs the heavy lifting of the workflow and requires no additional settings. This action uses the curl library to download all the text from the URLs that are passed into it from the previous action. When it has finished, it passes information into the third and final action: New iPod Note. The New iPod Note action, the final step in the workflow, creates a new note that can be read using the scroll wheel on your iPod. By default, the new note will be named note. To save the note based on the current date, click the Use Current Date as Name check box. This workflow is now ready to run. If you have an iPod connected to your system, click the Run button and in a few seconds a text version of the URL you specified will be uploaded to your iPod as a note labeled with the current date. Now wouldn't it be cool if this workflow could be executed everyday automatically? It can. Find out in the "Managing Workflows" section later in this chapter.
Enabling User Control During an ActionThe most useful options for an action are always displayed directly in the action block of the workflow such as the Use Current Date as Name option we just looked at. Many Automator actions also, however, have a Show Action When Run check box. When active, this forces the action to display onscreen dialogs and allow user interaction. To access these additional settings click the Options disclosure arrow at the bottom of the action block (if available); doing so will expand the block as shown in Figure 4.4. Figure 4.4. This is the same New iPod Note action you've seen already, but with additional options displayed.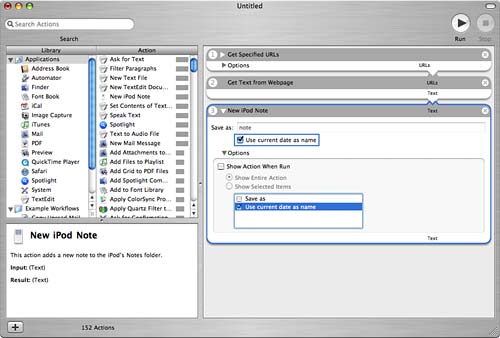 In this example, you can choose how the iPod note is saved. For example, to show a Save As dialog for the note, you would click the Show Action When Run check box, choose Show Selected Items, and finally click Save As.
Managing Workflow ActionsAfter actions have added to a workflow, they can be removed, rearranged, and minimized with only a few clicks. Use these shortcuts to help maintain a clean and manageable workflow:
Running and Debugging WorkflowsAs you've discovered already, Workflows can be executed by clicking the Run button in the toolbar or by choosing Run (Command-R) from the Workflow menu. As a workflow executes, a green checkmark appears in the lower-left corner of each successfully completed action. If an action fails, a red X will be displayed instead. Use the Stop button or choose Workflow, Stop (Command-.) to cancel execution in the middle of a workflow. Workflows don't always work as planned either because an error occurred somewhere during the execution of an action or there was a logical error during the creation of the flow. As with anything that involves creativity, there is always a need to fix things that didn't quite turn out as you originally envisioned that is, debug your workflow. In many cases, errors are caused by either inappropriate or a lack of data being handed off to an action. When this occurs you'll notice that the input and output data types are highlighted in red. You must pass compatible data between actions but, at present, Automator doesn't enforce this. When errors aren't immediately visible in red, there are two ways to track down the problems: through Automator logs and the View Results action. Viewing LogsWorkflow logs record actions as they are executed, the start and stop time for each, and any error that have been encountered. Since the workflow logs are generated in real-time, you can quickly identify bottlenecks or problems with your workflow. The Workflow log, can be displayed by choosing View, Show Log (Option+Command+L), as seen (with error) in Figure 4.5. Figure 4.5. Use the Automator log to determine where things have gone wrong.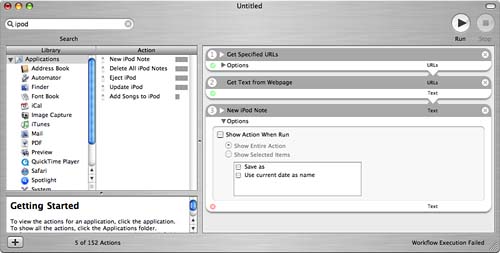 View Results ActionThe second error type, a logical workflow error, might not result in an actual visible error, but rather in incorrect information being passed between actions. If you developed a workflow with an action that processes a group of files, but provided it with input of a folder, the action would essentially receive no input and probably produce no results. Here, the logical error would be forgetting to insert a Finder Get Folder Contents action before the action expecting the group of files. In these cases, the View Results action can be used as an important debugging tool. View Results is found in the Automator application's actions and accepts any type of Automator input, stops the workflow, and then shows the information that was received from the preceding action. You can use the View Results action to ensure that the data you think is entering an action really is. For example, Figure 4.6 shows the results of the View Results action applied to a Finder filter that filters the contents of a folder based on the string "green". Notice that the results are not image files, yet the subsequent action operates on image files indicating that I've obviously done something wrong with this workflow. Figure 4.6. The View Results action can help debug logical errors in the workflow.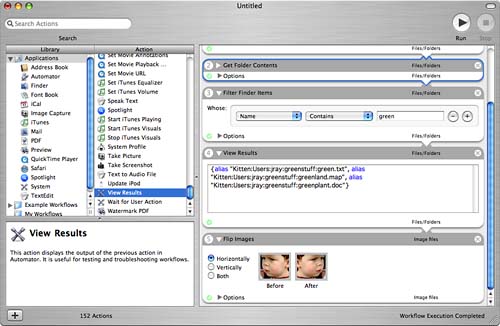 Managing WorkflowsAfter you've developed a workflow, you obviously need to do something with it. Automator gives you quite a bit of flexibility in packaging your final workflows. Saving Workflows as Documents and ApplicationsBy using File, Save As, workflows can be saved as documents or applications. Double-clicking a document workflow will load it within Automator just as you'd expect. You can also create double-clickable applications that can be used invoked directly from the Finder by double-clicking or dragging and dropping files onto their icon. Workflows saved as applications cannot be imported into the Automator Library which you'll learn about directly. After a workflow has been saved as a document or application, it can be shared with other users who are running Tiger, assuming that they have the appropriate applications and actions installed for the workflow to function. Adding Workflows to the Automator LibraryThe Automator Library is seemingly a combination of two rather different functions. I'm sure that Apple is trying to follow the iApplication model of collections on the left side of the window, but, in my opinion, this implementation is a bit of a stretch. First and foremost, the Library provides instant access to the applications that you can automate you use it to select individual applications to view their actions, or the entire Applications folder to show all actions. The second role for the Library is to contain collections of workflows. The My Workflows collection contains any workflows placed in the ~/Library/Workflows. Expand the collection by clicking the disclosure triangle in front of the name. Workflows stored in the collection will be displayed and can be loaded by double-clicking their names. You can import into My Workflows by placing workflow documents in ~/Library/Workflows, or by dragging a workflow from the Finder or Automator into the collection. To create a new collection, click the + button at the bottom of the Automator window. This will create a new empty workflow collection that you can use just like My Workflows.
Saving Workflows as Plug-InsEarlier in our discussion of Automator, we mentioned that you could create an Automator action that would repeat on a timed schedule. This is made possible by the ability for workflows to be saved as plug-ins for other applications and tools. Six plug-in options are provided:
The ability to interface and integrate with so many parts of the operating system make Automator an intriguing tool that might very well change how we work with and control our computers. |
| < Day Day Up > |
EAN: 2147483647
Pages: 251
- Using SQL Data Definition Language (DDL) to Create Data Tables and Other Database Objects
- Using SQL Data Manipulation Language (DML) to Insert and Manipulate Data Within SQL Tables
- Using Data Control Language (DCL) to Setup Database Security
- Using Keys and Constraints to Maintain Database Integrity
- Retrieving and Manipulating Data Through Cursors