Synchronizing Information Between Devices: iSync
| < Day Day Up > |
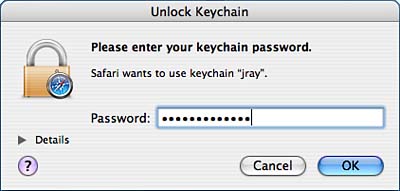
Storing and Managing Sensitive Information: Keychain AccessUsing a computer is a never-ending struggle to keep track of passwords for email servers, file servers, websites, and other private information. The Keychain Access software (path: /Applications/Utilities/Keychain Access) automatically stores passwords from Keychain-aware applications such as Mail and Safari. Users can also manually add their own passwords to the keychain. Later, the keychain can be unlocked to reveal the original cleartext password. Keychain also manages digital certificates virtual documents that are used to authoritatively identify servers and individuals. Understanding Keychains and Keychain ScopeBy default, all users have their own keychain named login. This is called the User keychain. Additional User keychains can be created to store specific information, such as credit card numbers, PINs, and so on. Think of the keychain as a database of your most sensitive information, all accessible through your account password. The User keychain is automatically unlocked by your account password when you log in. Sensitive information is best placed in a secondary keychain with a different password; otherwise, a single compromise of your account unlocks access to all your secure information. Read how to add new keychains in the "Managing Keychains" section later in the chapter. In addition to User keychains, Global keychains are accessible by all users on the system. A Global keychain can be created by an administrator and shared to the other users on the system. An example of the usefulness of this feature is creating a keychain with corporate login data for intranet file servers that should be available to everyone. There can also be System Global keychains these global keychains are also for use throughout the system, but should be maintained by the operating system, not the end user. By default, there are two Global keychains that your account inherits: System and X509Anchors. The System keychain is initially empty, but can be used by the administrator to add new global entries for all users. The second Global keychain, X509Anchors, is a System Global keychain that contains all the Tiger-recognized certificate authorities. These certificates are used by applications such as Safari to validate websites that present a certificate purportedly signed by one of these authorities. (that is, these certificates enable websites to positively identify themselves for the sake of secure online transactions). User keychains are stored in ~/Library/Keychains, whereas Global and System Global keychains are located in /Library/Keychains and /System/Library/Keychains, respectively. Understanding Keychain and Application InteractionLaunching Keychain Access displays the contents of your default keychain: login. For an account that has been using the keychain to store file server passwords, HTTP authentication information, and so on, the Keychain Access window should look similar to that shown in Figure 2.36. Don't worry about the interface just yet, right now we just want to figure out how these items got here. Figure 2.36. The Keychain Access window displays a list of stored passwords and other information.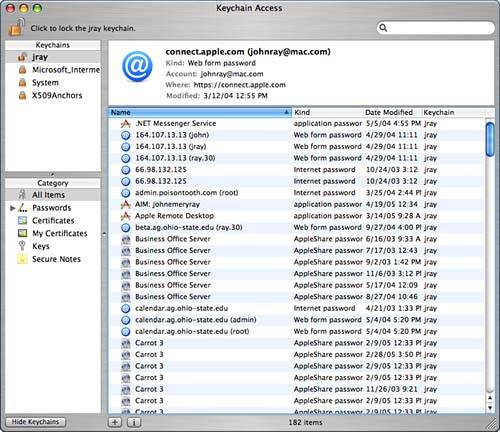 When an application wants to store something in the keychain, you'll typically be given the option of storing it. For example, when accessing a site that requires HTTP authentication, some web browsers present a dialog box requesting a username and password, and offering to remember it or "add to keychain." Choosing these options automatically adds the entered password to the default keychain. Over time, your keychain could become populated with hundreds of items and you might not ever know it! When an application wants to access information from your keychain, it must first make sure that the keychain is unlocked. Your login keychain is automatically unlocked when you log in to your account, making its passwords accessible to the applications that stored them. To manually lock or unlock a keychain, click the Lock button at the top of the Keychain Access window. The Keychain Access window, along with its Dock icon, changes to reflect its security status. If an application attempts to access information on a locked keychain, it displays a dialog box, as shown in Figure 2.37. Entering the correct password (your account password for the login keychain) unlocks the keychain. Clicking the Details disclosure pushbutton displays what keychain is being unlocked and the application making the keychain request. Figure 2.37. If an application attempts to access data in a locked keychain, you are prompted for the keychain's password.
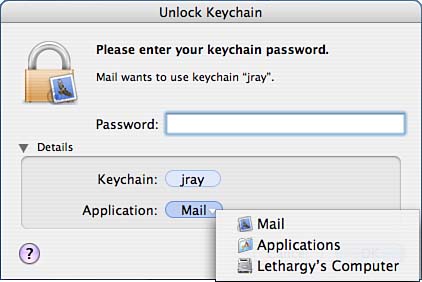
Even after a keychain has been unlocked, an application might require a bit more help before it can retrieve the information it needs from the keychain. Each stored piece of information can be controlled in a way that makes it accessible to only specific applications. Mail passwords, for example, are accessible only by the Mail application. If a program you just downloaded off the Internet attempts to unlock your web or email passwords, you'll know something nefarious is afoot. When the keychain notices an unauthorized application attempting to access a piece of information, it prompts the user with a window to deny the access, allow it only once (Allow Once), or allow the application to access the information whenever it wants (Always Allow), demonstrated in Figure 2.38. Figure 2.38. Each application must be authorized to access a specific piece of information.
Before making a choice, always click the Details disclosure pushbutton to view which keychain is being accessed and which application wants the data. If you don't recognize the application, click Deny to disallow access. Creating and Managing Passwords and NotesUsers who want to access stored data, or manually add new information to a keychain, can do so through the Keychain Access program. Keychain Access has a simple interface categories of secure information in the column on the left:
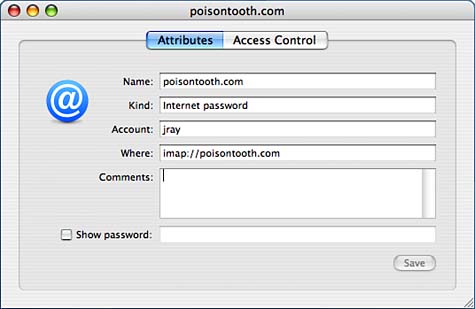
Selecting a category displays the entries on the right, with a summary of the selected item's details directly above it, as shown in Figure 2.39. Figure 2.39. The Keychain Access interface is easy to navigate and follows the interface model of most Tiger applications.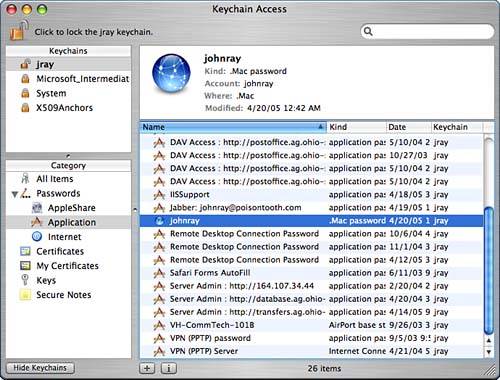 The list of keychain items can be sorted using the column headings or the View menu, or for extremely long lists, the search field can be used to locate items by name. Directly below the keychain item list are two buttons: + and i. The + button is used to manually add a new Keychain item to the active keychain. The i button displays and allows editing of item attributes and access controls. Viewing and Editing AttributesTo view an item's attributes, double-click its list entry, or select it and click the i button at bottom of the window. The Attributes pane provides basic information about the stored information. For example, Figure 2.40 shows the attributes for an IMAP password in my default keychain. Figure 2.40. The Attributes pane displays what type of data is stored and when it was added to the keychain.
The Kind field identifies the type of information, Where shows the resource that stored the information, and Account displays the creating user account. Additional comments can be added by typing in the Comments field. Click the Show Password button to display the password in cleartext.
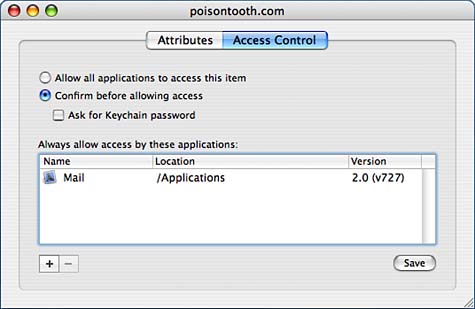
You can edit any of the item attributes within the Attributes pane. Click the Save button in the lower-right corner to save any modifications you've made. Setting Access ControlsTo control what applications can access a piece of information and when, first open the item attribute view, and then click the Access Control button to switch panes. Shown in Figure 2.41, the controls of this pane are straightforward. Click Allow All Applications to Access This Item to transparently provide access to the resource with no user interaction. Figure 2.41. The Access Control pane provides control over what applications can access a piece of data.
You can specify individual applications by clicking the Confirm Before Allowing Access radio button; then use the + and - buttons to add and remove applications from the list. Leave the application list blank to always force a confirmation. Finally, check the Ask for Keychain Password check box to force the user to enter a password each time access is confirmed. Adding and Removing ItemsNew passwords and notes can be added to the keychain by clicking the + button in the main Keychain window, or choosing File, New Password Item or File, New Secure Note Item from the menu, or clicking the Password or Note buttons in the toolbar. Keychain Access opens a window for entering the attributes for the new item, as demonstrated in Figure 2.42. Figure 2.42. Enter the information to store in the keychain.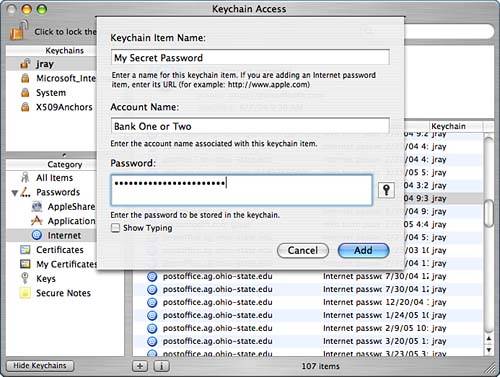 Enter the name or URL of the stored item in the Name field, the account name associated with the data in the Account field, and, finally, the sensitive data in the Password field. By default, the password is hidden as you type. To display the password as it is typed, click the Show Typing check box. Click Add when you've finished.
To remove any item from the keychain (either automatically or manually entered), select its name in the list and then Edit, Delete or press the Backspace key. Managing Digital CertificatesDigital certificates are used to provide authoritative identification information for people and services online. Secure websites use certificates to prove that they are legitimate for online transactions, whereas email certificates are used to send and receive encrypted email. Tiger supports secure mail services to and from clients using the S/MIME standard. Unlike passwords or other keychain items, digital certificates are more than just an encrypted password. They contain information about an individual or service and are subject to a number of policies and verifications to ensure that they are properly used and contain accurate information. Certificates are signed by a Certificate Authority (CA) a recognized and trusted third party that vouches for an entity. Consider it the digital equivalent of visiting a notary public. To properly use a certificate, your system must verify both the certificate of the service/individual you are trying to use and the signature of the CA that signed it. Luckily, there is a limited set of CAs and Tiger includes certificates for dozens of popular authorities already. The assumption is that if the CA is trusted, the individual or service that obtained a certificate through them can also be trusted.
Requesting and Adding an S/MIME Digital CertificateTo support encryption in mail, you must add an X.509 digital certificate containing a private and public key. The public key is used to sign outgoing messages so that other users can encrypt mail to you, which, subsequently is decrypted with your private key. Other users who sign their outgoing messages with their public key (using the S/MIME standard) can send you mail, and the Tiger Mail application automatically saves a certificate with their public key to your keychain. This, in turn, allows you to send encrypted messages to that person. To obtain a certificate for signing mail, contact a Certificate Authority (CA), such as http://www.thawte.com/email/index.html and step through the application process (it varies from CA to CA). The Thawte Freemail certificates take only a few minutes to request and works wonderfully with Mail. When requesting the certificate, you will be prompted for the application you want to use it in sadly, Mac OS X is rarely (never?) given as an option. That said, choosing Netscape Communicator works just fine. In fact, the certificate, which is downloaded through your web browser, is automatically recognized by Safari and Keychain Access and added to your login keychain, as shown in Figure 2.43. Figure 2.43. After a simple application process, the certificate is downloaded and added to my login keychain automatically.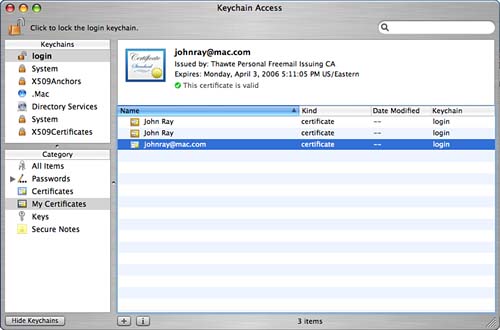
After an S/MIME certificate has been added, encryption features appear in Mail, as described in the next chapter. Importing and Exporting Certificate FilesIf a certificate downloads as a file without being imported, choose File, Import to manually import the certificate or just double-click the certificate file. Keychain Access supports certificates with the extensions .cer, .crt, .p12, .pfx, .p7r, .p7b, .p7m, .p7c, and .p7s. You will be given the option of viewing the certificate details and choosing the Keychain to hold the certificate before it is imported. To export a certificate, select it in the Items list, and then choose File, Export from the menu. You will be prompted for a certificate name and format. You quickly export a file by dragging the certificate icon from the detailed summary pane to a Finder window. Generating Your Own Certificates: Certificate AssistantHidden within Tiger's new Keychain Access application is a new utility that makes it possible to become a CA and issue your own digital certificates or create a new self-signed certificate. Obviously no one out in the real world will have your CA root certificate stored on their system or trust a self-signed certificate, but within a controlled LAN environment, you can import your CA certificate into the X509Anchors chain and become a one-stop certificate shop for inter-office communications. To start the Certificate Assistant, choose Keychain Access, Certificate Assistant from the menu bar. The Certificate Assistant will launch and walk you through one of five different processes:
When working in the Certificate Assistant, you will need to have a good grasp of how to configure certificate capabilities for your specific needs. This can be quite complex, and a dedicated reference is wise investment for large-scale deployment. Digital Certificates: Applied Internet Security by Jalal Feghhi, Peter Williams (Addison-Wesley Professional, ISBN: 0201309807) is an excellent reference for everything related to digital certificates. Viewing and Setting Certificate Information and TrustTo view all available information about a certificate, select the certificate in the Keychain items list, and then click the i button at the bottom of the window to display full details, as demonstrated in Figure 2.44. Figure 2.44. View the full details of a certificate including issuer, expiration, and so on.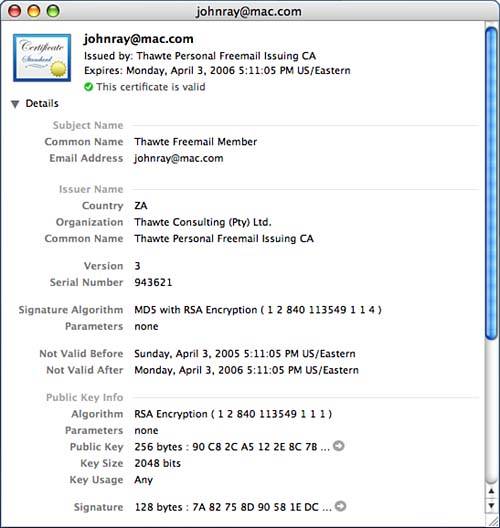 At the bottom of the information window are trust settings. A trust setting is used by the system to determine how, when, and if a certificate should be used. By default, Tiger makes some assumptions that you can overrule, if need be. To change the trust policies for the certificate you are viewing, click the disclosure triangle in front of the Trust Settings label; pop-up menus appear for each potential certificate. Use the pop-ups to force the certificate to always be trusted, have the system prompt before using it, or to never be trusted. Note that not all certificates can be used for all functions, so changing many of the trust settings would probably not have an effect. Setting Certificate Revocation PreferencesA feature of digital certificates is that they are not valid indefinitely and can be revoked at any time. Invalid certificates are displayed with a red error message when viewed in Keychain Access and will not be used by the system. Mail, in fact, will display a large banner noting that it cannot verify an invalid digital signature. Tiger has two means of detecting invalid certificates the Online Certificate Status Protocol (OCSP) and the Certificate Revocation List (CRL). To choose which of these methods is used to validate signatures, use the Certificates application preference pane. Use the pop-up menus to enable or disable each method and also pick which is the higher priority service (if any). A useful option for both OCSP and CRL is Best Attempt. When Best Attempt is selected, the certificate will be assumed valid unless it gets an explicit negative response from the remote server. Managing KeychainsEach user account can have as many keychains as needed, including systemwide Global keychains. Click the Keychains button at the bottom of the window to manage the available keychains for your user account; the Keychains pane appears in the upper-left corner of the window, as seen in Figure 2.45. (Note: This has been visible in the screenshots preceding this point.) Figure 2.45. Use the Keychain list to manage your available keychains.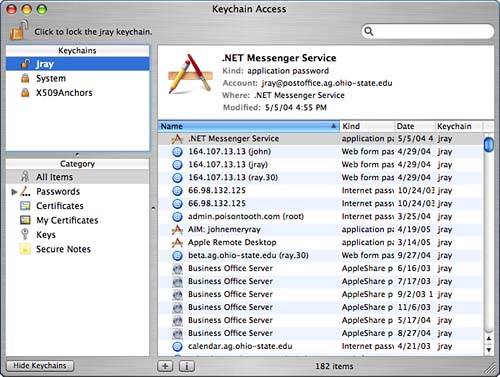 As mentioned earlier, a default keychain is generated for each user account named login. Also included is a default Global keychain named System, which is shared throughout all user accounts, and the System Global keychain X509Anchors, which contains root certificates for dozens of CAs.
Adding and Removing KeychainsTo create a new keychain, choose File, New Keychain. You are prompted for a name and a save location for the keychain. The default for a User keychain is ~/Library/Keychains; Global keychains should be stored in /Library/Keychains. Next, you need to enter a passphrase that unlocks the new keychain. It's best to choose something different from your account password to prevent people who might gain access to your account from seeing your most sensitive information. Click OK and your keychain is unlocked and added to the Keychain list. To add an existing keychain file (perhaps from your account on another Tiger machine), just double-click the keychain file and it will be imported into Keychain Access. To work with your new keychain, you can switch to it by clicking its name in the Keychain list. To remove a keychain from the system, highlight its name in the list and then choose File, Delete Keychain. You will be given the option of deleting just the reference to the keychain (removing it from the Keychain list, but leaving the actual data), or removing the reference and file associated with the keychain. Creating Shared KeychainsShared keychains are just like any other keychain, but have a flag toggled to make them immediately available to all users the Shared flag (surprise). You can convert any keychain to or from Shared keychain status by using the Keychain List (Edit, Keychain List; Command-Option-L). The Keychain List is shown in Figure 2.46. Figure 2.46. Manage Shared keychains.
The pop-up menu at the top of the list enables you to choose between User (your keychains) and System keychains. System keychains are stored at the system (/Library/Keychains, /System/Library/Keychains) level but are not necessarily Shared keychains. If installing a keychain for everyone on the system, it should be stored as a System keychain and should also be set as a Shared keychain. To add additional keychains to the list, click the + button at the bottom of the window; to remove keychains, click the -button. This action also adds or removes the reference to the keychain in the main Keychain Access window, but does not change the actual keychain data files. To convert a keychain to or from shared status, highlight it in the Keychain List; then use the Shared check box to change its status. Shared keychains automatically show up in other users' Keychain Lists. Common Keychain FunctionsAfter you've established your keychains, you can use the following functions to configure them to your heart's content from replacing the default login keychain to resetting your keychain passwords and settings:
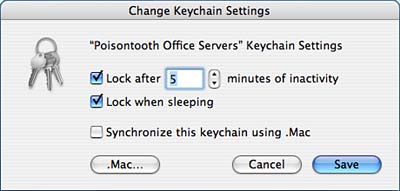
Configuring Keychain Security and .Mac Sync SettingsEach keychain in Keychain Access can be configured with additional security settings and included in .Mac syncing (see Chapter 3 for more information about .Mac). To open the settings, highlight the appropriate keychain from the Keychains List and then choose Edit, Change Settings for Keychain. You should see a new window, much like the one shown in Figure 2.47. Figure 2.47. Set your keychains to lock after a certain length of time.
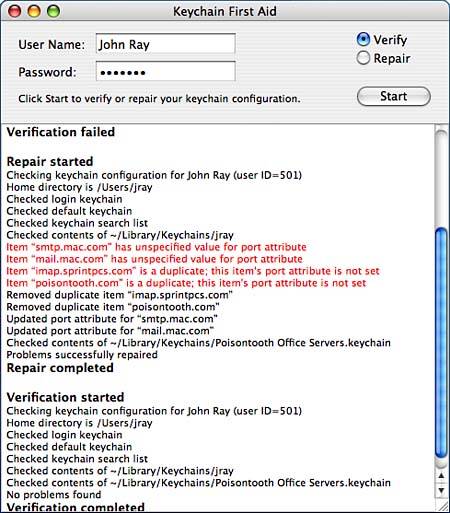
Within the Settings window, you can use the Lock After XX Minutes of Inactivity setting to force the system to lock a keychain if it isn't used for a certain length of time. Clicking Lock When Sleeping causes the keychain to be locked if the computer goes to sleep. Finally, if you have a .Mac account and would like the keychain to automatically be synchronized between all of your .Mac registered computers, check the Synchronize This Keychain Using .Mac button. Click Save to put your changes into effect. Repairing Keychain ProblemsAs you work with keychains, a variety of problems can occur, such as passwords getting out of sync, improper keychains being set as the default, or invalid data being stored or duplicated within entries. The Keychain First Aid tool can repair some of these common problems for any user account on the system. To access Keychain First Aid, choose Keychain Access, Keychain First Aid (Option-Command-A). The First Aid window, shown in Figure 2.48, appears. Figure 2.48. Keychain First Aid can repair common keychain problems.
To verify a user's keychain, click the Verify radio button, enter the username and password, and click the Start button. If problems are found, switch to Repair mode and then click Start again. To change what repairs will be made by Keychain First Aid, use the First Aid pane of the application preferences. Choose whether to force the login keychain to always be the default, to synchronize the login keychain password and the actual Tiger login password, and to force login to always remain unlocked. The First Aid features are primarily useful for fixing problems for users who have accidentally messed up their default login keychain. It does not fix a keychain that has suffered serious data corruption or recover information that has otherwise been lost. It is a tool to help you, as an administrator, handle keychain problems for your users without logging in to their accounts. For most, the default First Aid preferences will be the behavior they expect. Advanced security conscience folks might decide to set up their keychains differently, so be sure that any repairs you perform actually are repairing a problem.
|

| < Day Day Up > |
EAN: 2147483647
Pages: 251