Sessions
A connection to the ISA server from a particular client is known as a session. ISA Server lets you quickly see the users with active sessions and the type of connection or connections that client is making.
Monitoring Sessions
As soon as you make Internet access available to the end users in your organization, you'll find that you need to know which users are connected to your ISA server, and whether they're connected as firewall clients, SecureNAT clients, Web proxy clients, or all three.
To view active sessions, follow these steps:
-
Open the ISA Server Management console.
-
In the console tree, click the Monitoring node.
-
In the details pane, click the Sessions tab. All active sessions appear in the details pane.
There are six descriptive columns shown for active sessions by default, with a total of eight available columns, which are described in Table 6-3. You can add, remove, or move any of the columns by right-clicking a column and selecting the action you wish to perform. Table 6-3 illustrates the type of information you can gather from the Sessions tab.
| Title | Description |
|---|---|
| Activation | Provides the date and time the session was activated. |
| Session Type | Identifies the session type: firewall, Web proxy, SecureNAT, VPN client, or VPN remote site. |
| Client IP | Displays the authenticated computer's IP address. |
| Source Network | Identifies the source network from which the connection is being made. |
| Client Username | Displays the authenticated user name if it's available, based on the type of connection. |
| Client Host Name | Displays the host name of the client computer, if available; this option is available when using the Firewall client. |
| Server Name | Identifies the specified ISA server (not shown by default). |
| Application Name | Identifies the application name; this is not shown by default, and is available only when the client uses a Firewall or Web proxy client. If the session is a VPN client, this section shows the VPN protocol used (PPTP or L2TP/IPSec). |
Filtering Sessions
The ability to filter data is a time saver whether you are responsible for a single ISA server or thousands. In ISA Server 2004, filtering has been included so that you can isolate the data being presented to you within the Sessions tab and Logging tab. The following steps show you how to filter sessions:
-
Open the ISA Server Management console.
-
In the console tree, click the Monitoring node.
-
In the details pane, click the Sessions tab.
-
In the task pane, under Session Tasks, click Edit Filter.
-
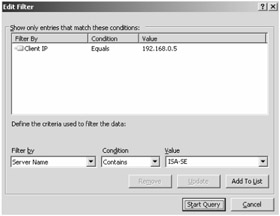
In the Edit Filter dialog box, select appropriate choices in the Filter By and Condition drop-down lists, type the value, and click Add To List as shown in Figure 6-4. You can insert additional filters if needed.
-
Click Start Query to filter the sessions.
The filter remains in place after stopping to monitor sessions. To restore the defaults, you must right-click the filter and then click Edit Filter. On the Edit Filter dialog, select each filter condition, and then click Remove. Finally, click Start Query.

Figure 6-4: You have a lot of control over the types of filters you would like to configure, which can even be saved for future use.
Creating Connectivity Verifiers
ISA Server can use several methods (Ping, TCP Connect, or an HTTP request, for example) to verify connectivity from the ISA Server computer to any computer or URL on any network. This helps you to monitor certain functions from the ISA Server console.
From the dashboard view, there is a connectivity area that displays the status of groups like Active Directory, DNS, DHCP, Web (Internet), and so on. By default, the status of these groups is Not Configured because connectivity verifiers are required to establish checks from the ISA server to a select server on the network. The following steps show how to create a connectivity verifier so that when viewing the dashboard, you can see the actual status of your DNS server or Web servers, for example.
To create a connectivity verifier, follow these steps:
-
Open the ISA Server Management console.
-
In the console tree, click the Monitoring node.
-
In the details pane, click the Connectivity tab.
-
In the task pane, under Connectivity Tasks, click Create New Connectivity Verifier.
-
On the Welcome To The New Connectivity Verifier page, type a name for the connectivity verifier, and click Next.
-
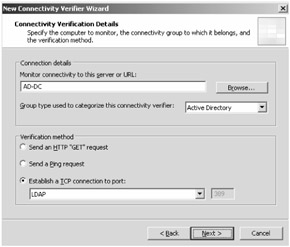
On the Connectivity Verifier Details page, you choose the server to monitor, the group to assign the verifier, and the verification method, as shown in Figure 6-5. In the Monitor Connectivity To This Server Or URL text box, type the server name or URL address of a Web site you wish to verify. In the Group Type Used To Categorize This Connectivity Verifier drop-down list, select the applicable group type. For the verification method, select either Send An HTTP "GET" Request, Send A Ping Request, or Establish A TCP Connection To Port, and then click Next.
-
On the Completing The New Connectivity Verifier Wizard page, review the summary of information, and then click Finish.
-
In the details pane, click Apply to save the changes, and then click OK.

Figure 6-5: Creating a connectivity verifier to ensure communications on your network.
Disconnecting a Session
Disconnecting an active session becomes more important when you're changing rules and policies. For example, you reconfigure an access rule to remove a set of users and groups for outbound Internet access. Later that day, you notice that users in the group you removed can still access the Internet. If any of the users in the group have an active session on the ISA server when you make a policy change, they are allowed to remain on the Internet until they end their session. You can disconnect those users' sessions so that Internet access will immediately be denied by following these steps:
-
Open the ISA Server Management console.
-
In the console tree, click the Monitoring node.
-
In the details pane, click the Sessions tab, and select the session you wish to end.
-
In the task pane, click Disconnect Session.
Note If the session represents a VPN tunnel, you will have the added option to disconnect the VPN tunnel.
Exporting and Importing Filter Definitions
If you filter session activity on a regular basis, you can create a filter definition to assist with the repetitive work. To export and import filter definitions, complete the following steps:
-
Open the ISA Server Management console.
-
In the console tree, click the Monitoring node.
-
In the details pane, click the Sessions tab.
-
In the task pane, under Sessions Tasks, click either Export Filter Definitions (to save the filter settings to a file) or Import Filter Definitions (to load filter settings from a file), browse to the location of the existing .xml file if importing, and then click Load.
EAN: 2147483647
Pages: 173