Alerts
Alerts give you a way to proactively assess the security of the ISA server. The preconfigured alerts that ship with ISA Server 2004 offer information on a variety of events such as IP Spoofing, Slow or No Connectivity, DNS Intrusion, and Service Shutdown.
Viewing Predefined Alerts
ISA Server 2004 includes 56 predefined alerts. To view a predefined alert, follow these steps:
-
Open the ISA Server Management console.
-
In the console tree, click the Monitoring node.
-
In the details pane, click the Alerts tab.
-
In the task pane, click Configure Alert Definitions.
-
In the Alert Properties dialog box, you will see each of the predefined alerts. On this page, you can add an alert, edit an alert, or remove an alert.
Creating an Alert
Although many predefined alerts exist by default in ISA Server 2004, there might be times when you would like to customize your own alert and create a new one. To create an alert, complete the following steps:
Open the ISA Server Management Console
-
In the console tree, click the Monitoring node.
-
In the details pane, click the Alerts tab.
-
In the task pane, click Configure Alert Definitions.
-
In the Alert Properties dialog box, click Add.
-
On the Welcome To The New Alert Wizard page, type a name for the new alert, and then click Next.
-
On the Events And Conditions page, select an event and condition that will trigger the alert you are creating. In the Event drop-down list box, select the event you would like to establish, such as DNS Intrusion. If applicable, select a condition from the Additional Condition drop-down list, and then click Next.
Note If you specify an event and a condition, both must be met before the alert is triggered. Also, if you are trying to create an alert that has already been defined, you receive an error that the alert already exists.
-
In Enterprise Edition, on the Server page, select whether you want any server or a specific server to trigger the alert, and then click Next.
-
On the Category And Severity page, from the Category drop-down list box, select the category to which you wish to assign this alert. From the Severity drop-down list box, select the severity for the alert. Click Next to continue.
-
On the Actions page, you select the actions that should occur when the alert is triggered. The five actions alerts can trigger are as follows:
-
Send An E-Mail Message
-
Run A Program
-
Report The Event To The Windows Event Log
-
Stop Selected ISA Server Services
-
Start Selected ISA Server Services
-
| Note | You must select at least one action or the New Alert Wizard won't continue. You can select more than one action to transpire in the event of the alert. |
The remaining wizard steps vary depending on the actions you selected. The following sections provide continuing instructions for configuring each of the possible actions.
Sending an E-Mail Message
To inform you when an alert takes place on the ISA Server computer, you might configure an alert to send an e-mail to the address of your choosing by following these steps:
-
On the Actions page, select the Send An E-Mail Message check box, and click Next.
-
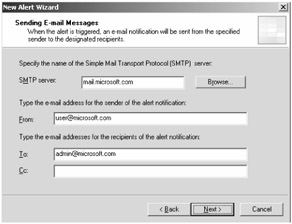
On the Sending E-mail Messages page, you must specify the SMTP server and e-mail addresses as shown in Figure 6-1. In the SMTP text box, type the name of your SMTP server. In the From text box, type the e-mail address of the mailbox that the e-mail should come from. In the To and CC text boxes, type the email addresses of the mailboxes to receive the e-mail when the alert is triggered. Click Next to continue.
Note The SMTP server could be either a server already available on your internal network or an external SMTP server that supports relaying. An internal SMTP server will make configuration much easier. If you're using an external server that supports relaying, ensure that ISA Server rules allow outgoing SMTP traffic from the LocalHost network. Although this is outside the scope of this book, ensure that you don't have an open relay, which would allow spammers to use your SMTP server to send unauthorized messages. Do be sure to contact your e-mail server administrator to ensure appropriate authentication is used.
-
On the Completing The New Alert Configuration Wizard page, review the summary of information, and then click Finish.
-
Click OK to close the Alert Properties dialog box.
-
In the details pane, click Apply to save the changes, and then click OK.

Figure 6-1: To receive alerts by e-mail, the SMTP server information must be entered and verified.
| Note | Configuring an alert action to send an e-mail message allows you to be notified of alert events even when away from the office. |
Running a Program
You can configure an alert to start and run a program of your choosing by completing the following steps:
-
On the Actions page, select the Run A Program check box, and click Next.
-
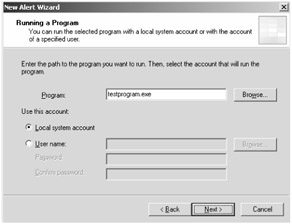
On the Running A Program page, in the Program text box, type the name of the executable that should be run, as shown in Figure 6-2. In the Use This Account section, select Local System Account, or User Name to choose a user name defined on your network. If you select User Name, you can either type the name or browse to find the name in the selected directory database. To complete this stage of the wizard, you'll also be required to type in the password for the user name and then confirm the password. Click Next to continue.
Note For the ISA server to query Active Directory directory service, ensure that the System Policies allow the ISA server access to Active Directory. For more information about how to configure System Policy, see the ISA Server Help file.
-
On the Completing The New Alert Configuration Wizard page, review the summary of information, and then click Finish.
-
Click OK to close the Alert Properties dialog box.
-
In the details pane, click Apply to save the changes, and then click OK.

Figure 6-2: If you would like to execute a program after an alert is triggered, the program and an account with sufficient access needs to be configured.
Reporting the Event to the Windows Event Log
To keep all reporting consistent for your ISA server, you might want ISA Server to log its alerts into a centralized tracking location: the Windows Event Log.
-
On the Actions page, select the Report The Event To The Windows Event Log check box, and click Next.
-
On the Completing The New Alert Configuration Wizard page, review the summary of information, and then click Finish.
-
Click OK to close the Alert Properties dialog box.
-
In the details pane, click Apply to save the changes, and then click OK.
Stopping Selected ISA Server Services
There will be times when you want to start or stop an ISA Server service. To do so, follow these steps:
-
On the Actions page, select the Stop Selected ISA Server Services check box, and click Next.
-
On the Stopping Services page, you can stop the following ISA services:
-
Microsoft Firewall
-
Microsoft ISA Server Job Scheduler
You can select the ISA services individually or choose to select all or clear all check boxes. Click Next to continue.
-
-
On the Completing The New Alert Configuration Wizard page, review the summary of information, and then click Finish.
-
Click OK to close the Alert Properties dialog box.
-
In the details pane, click Apply to save the changes, and then click OK.
Starting Selected ISA Server Services
-
On the Actions page, select the Start Selected ISA Server Services check box, and click Next.;
-
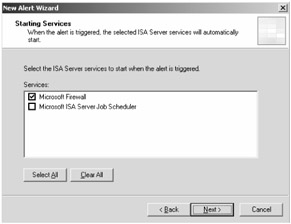
On the Starting Services page, select the check boxes for the applicable ISA services as shown in Figure 6-3, and click Next.
-
On the Completing The New Alert Configuration Wizard page, review the summary of information, and then click Finish.
-
Click OK to close the Alert Properties dialog box.
-
In the details pane, click Apply to save the changes, and then click OK.

Figure 6-3: You can configure an alert to start one or all ISA Server services.
Configuring an Alert
After you've walked through the wizard to create a new alert, you can configure additional alert properties. In the task pane, click Configure Alert Definitions, select an alert, click Edit, and then you'll see the three tabs detailed in Table 6-2.
| Tab Name | Tab Description |
|---|---|
| General | Provides name, description, drop-down lists for Category and Severity, and a check box to enable or disable the alert. |
| Events | Provides the event and description of the event used in triggering the alert. Displays additional conditions if applicable. Contains the specific settings for defining how many times the event should occur before triggering the alert, along with how to handle recurring actions. |
| Actions | Provides check boxes for the five actions that can be used in notification when an alert is triggered. |
On the General tab you can enable or disable the alert. When you disable an alert, in the Alert Properties dialog box, the check box for the alert is empty. By default, the following six alerts are disabled:
-
Cached Object Discarded
-
Event Log Failure
-
Network Configuration Changed
-
Quarantined VPN Clients Network Changes
-
Server Publishing Is Not Applicable
-
SMTP Filter Event
The Events tab is important because it contains properties you can't configure using the Creating A New Alert Wizard. On the Events tab, you can configure the following items:
-
Number Of Occurrences Identifies the number of times the event must occur before the alert triggers.
-
Number Of Events Per Second Indicates the number of events that must occur per second before the alert triggers.
-
Each Subsequent Time The Thresholds Are Met, Trigger The Alert: Immediately, Only If The Alert Was Manually Reset, or If Time Since Last Execution Is More Than XX Number Of Minutes Allows you to choose the way in which ISA Server will handle alerts if events after the first alert occur.
On the Actions tab you can modify the five types of actions that are executed when an alert is triggered.
| Note | By default, all predefined alerts are configured to report to the Windows Event Log. |
Viewing Alerts
After you create a new alert, the next step is to verify that the alert is working properly.
To view when an alert has been triggered, complete the following steps:
-
Open the ISA Server Management console.
-
In the console tree, click the Monitoring node.
-
In the details pane, click Alerts, and view the alerts that have been triggered. Multiple alerts of the same type are rolled up and can be viewed in detail by clicking the plus (+) sign to expand the alerts.
The information you require to determine how to assess the situation is provided in the ISA Server Help files under the topic of Alerts. If the information provided by the alert doesn't assist in determining the exact cause, because all predefined alerts write to the Windows Event Log, you can open Event Viewer, locate the specific Event ID and description, and use Microsoft's Knowledge Base to find more information.
Resetting and Acknowledging Alerts
After locating and investigating the root cause of the alerts that have been triggered, your next step is to reset or acknowledge the alert. Resetting an alert removes it from the Alerts pane, and clears ISA Server's "memory" of the event or events—all alerts are reset when the ISA server is rebooted. Acknowledging an alert removes it from the Dashboard view, and changes the alert status—this option is most helpful when more than one administrator manages ISA Server. One administrator can acknowledge the alert so that others know that the alert occurred, but that someone else has claimed ownership and is working on the issue.
To reset an alert, follow these steps:
-
Open the ISA Server Management console.
-
In the console tree, click the Monitoring node.
-
In the details pane, click the Alerts tab, and then either select the grouping of alerts or select an individual alert.
-
In the task pane, under Alert Tasks, click Reset Selected Alerts.
-
When prompted by the Confirm Alert Notification Reset warning, click Yes. The alert should disappear from the details pane.
To acknowledge an alert, follow these steps:
-
Open the ISA Server Management console.
-
In the console tree, click the Monitoring node.
-
In the details pane, click the Alerts tab, and then either select the grouping of alerts or select an individual alert.
-
In the task pane, under Alert Tasks, click Acknowledge Selected Alerts.
-
In the details pane, the Status column changes from New to Acknowledged.
EAN: 2147483647
Pages: 173