Configuring ISA Server Enterprise Edition
To configure your ISA server, follow the steps on the Getting Started page that appears in the center pane when you've selected the ISA server in the left pane as shown in Figure 3-8. We provide references to other chapters in this book that discuss those steps in detail.

Figure 3-8: The Getting Started pane guides you through the options available for configuring your ISA server.
The first step is to assign administrative roles and configure the means by which you will administer your ISA Server environment. You can choose to install the ISA Server Remote Console (MMC), or you can decide to connect to the ISA server using Terminal Services. We describe the actions needed to configure all these scenarios later in this chapter. After you've completed preparing your ISA server for administration, you can then undertake these Getting Started activities.
Click the Enterprise node in the scope pane of the ISA Server Management console, and then you will see the following described in the details pane to help you prepare your server:
-
Define enterprise networks, as covered in Chapter 9, "Configuring Multinetworking."
-
Define enterprise policies and array settings, as described in Chapter 14, "Enforcing Enterprise and Array Policies."
Click an array name in the scope pane, and then you will see the following described in the details pane to help you prepare your server:
-
Configure your networks, as covered in Chapter 9.
-
Create your firewall policy rules to allow internal machines to connect externally, or to allow external machines to gain access to selected internal resources, like Web servers. See Chapter 8, "Configuring ISA Firewall Policy," for more information.
-
Define how you wish ISA Server to cache Web content, as described in the "Configuring the Cache Properties" section in Chapter 2.
-
Set up your VPN settings as described in Chapter 11, "Securing Virtual Private Network Access."
Once you've implemented your ISA Server, you can use the monitoring functions, which we cover in Chapter 6, "Monitoring and Reporting."
Assigning ISA Administrative Roles
ISA Server uses role-based administration, which can utilize Active Directory or Windows users and groups. ISA Server Enterprise Edition provides enterprise-level roles and array-level roles. These roles are built into ISA Server 2004 Enterprise Edition:
Enterprise Administrator Roles
-
ISA Server Enterprise Administrator This role allows for unlimited access to the enterprise and array configurations, and includes the capabilities of the ISA Server Enterprise Auditor.
-
ISA Server Enterprise Auditor This role allows for viewing the enterprise and array configurations only.
Array Administrator Roles
-
ISA Server Array Monitoring Auditor This role allows for viewing and monitoring of the ISA server, but does not allow for any configuration modifications to monitoring functionality.
-
ISA Server Array Auditor This role allows for viewing of firewall policy, creating reports, session and service management. It includes the capabilities from the ISA Server Array Monitoring Auditor.
-
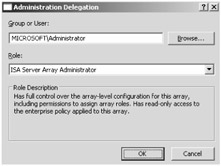
ISA Server Array Administrator This role can perform any ISA Server task, including firewall policy management, creating reports, and alerts. It also includes the capabilities from the ISA Server Array Monitoring Auditor and the ISA Server Array Auditor.
To assign ISA enterprise-level administrative roles, follow these steps:
-
Open the ISA Server Management console, then select the Enterprise node in the scope pane.
-
In the task pane, click the Tasks tab, and then click Assign Administrative Roles.
-
On the Assign Roles tab, click Add, type the group or user name, and then, in the Role drop-down list, select the role you want to assign.
-
Click OK twice to close the dialog boxes and finish the role assignment.
-
Click Apply to successfully apply your changes, and then click OK.
To assign ISA array-level administrative roles, follow these steps:
-
In the scope pane, click the applicable array name you wish to configure.
-
In the task pane, click the Tasks tab, and then click Assign Administrative Roles.
-
On the Assign Roles tab, click Add, type the group or user name, and then, in the Role drop-down list, select the role you want to assign.
-
Click OK twice to close the dialog boxes and finish the role assignment.
-
Click Apply to successfully apply your changes, and then click OK.
EAN: 2147483647
Pages: 173
- Challenging the Unpredictable: Changeable Order Management Systems
- ERP System Acquisition: A Process Model and Results From an Austrian Survey
- The Second Wave ERP Market: An Australian Viewpoint
- Data Mining for Business Process Reengineering
- Healthcare Information: From Administrative to Practice Databases