Flylib.com

Books Software


set up guides


set up guides

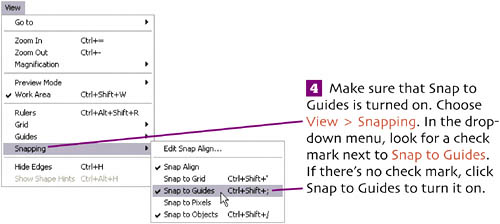
Using guides in your .le helps you de .ne areas of your Stage and eases placement of objects.Let 's add some guides before we begin drawing our background.


draw background

With our Stage divided into different areas, we're ready to begin drawing the objects that will serve as the background for our Web site.


add linear gradient

Next we'll draw some background rectangles with gradient fills to give our Stage some visual interest.

Choose the Rectangle tool. Set the Stroke color well to None, and the Fill color well to any color you choosewe'll change it in a moment.


edit linear gradient

Three editing handles appear:

Select the rectangle with the Selection tool, and choose Modify > Group .


create radial gradients

Now let's draw the final rectangle, which will make up our Stage's background.

Again, the gradient is there, but it's not quite what we want. Let's change it.

In order to see a large part of the Work Area surrounding the Stage, choose View > Magnification > 25% .

Select the Fill Transform tool, and click the rectangle to select it. Four editing handles appear:

Change the view back to the magnification you like to work at. Select the rectangle, and group it (Modify > Group ).


reusable graphics

Since our background is the same throughout our Web site, we can reuse what we've drawn multiple times. To do that, we need to convert our three rectangles into one reusable symbol . When a symbol is used on the Stage, it's called an instance . (See extra bits on Page 29.)


edit a symbol

Let's edit the symbol to add a line. (See extra bits on Page 30.)

From the Toolbox, select the Line tool.

Press (Windows) or (Mac) to turn off guides.


organize with layers

Layers, as we outlined before, are great organizational tools. They control the stacking order of objects in your movie. We're going to create a new layer above the current one and move our hidden line there.

First, let's rename the current layer to reflect what it contains.


move between layers

Moving objects from one layer to another in Flash works differently than in most drawing applications. Here's how it's done.

Choose Edit > Cut to move the line from the bkgd rects layer to the clipboard.

Finally! We can see our line now. It was a lot of effort, but isn't it a beautiful line?


import vector art

Sometimes you'll need to add artwork that has been created in another application or file format to your Flash movie. Here, we're going to import logo artwork that's been provided in a Macromedia Fireworks' PNG file that contains vectors (editable paths) and bitmap objects (images).

In the Import to Library dialog , locate the file t_blooms logo_small.png, which you downloaded from this book's companion Web site and copied into the site's development_files folder. Select the file, and click Open (Windows) or Import to Library (Mac).

In the Fireworks PNG Import Settings dialog that appears, set the following options:

Do not check the Import as a single flattened bitmap check box.


organize symbols

If the Library panel for your file is not visible, choose Window > Library . In the Library panel, you'll see three new listingstwo bitmaps (which were included in the logo file) and a folder named Fireworks Objects that contains the new logo symbol. Let's take a moment to begin organizing our symbols, which will save us time and headaches later.

-click to select the two bitmap symbols in the Library panel. Click and drag the symbols into the t_blooms logo folder. Double-click the t_blooms logo folder icon to collapse the folder view.

Click the New Folder button at the bottom of the Library panel to add a new folder to the list. Name the folder bkgd objects . Drag the other objects in the list into the new folder.