10.5. Burning CDs Unlike the word "ripping," the term "burning" describes what's actually happening when you save data to a CD. A tiny laser inside your PC's CD (and DVD) drive burns tiny pits into the spinning disc's surface, all without creating an awful smell. An optical reader inside the drive reads the pits to convert what it finds there back into data. FREQUENTLY ASKED QUESTION
CD Rainbow Books | | I sometimes hear the words "Red Book" and "Yellow Book" applied to CDs. What's that all about ? When engineers set a technology standard for all PCs to follow, they usually choose a bizarre string of numbers or acronyms; "IEEE-1394" comes to mind, for example. When the engineers bound a bunch of books describing different ways to store information on CDs, they named each standard after the color of the book's cover. The "Red Book" standard, for instance, describes the proper way to write information onto a music CD so every CD player can read it. So, when technoweenies say that a CD subscribes to the "Red Book" standard, they mean it's a plain old music CD. "Orange Book" refers to a CD-Rthose blank discs your PC can write on. If a company swerves from a standardadding copy protection to a music CD, for instance, or tossing in some videosthat CD's no longer considered a "Red Book" CD, so it doesn't qualify for the official "Compact Disc Digital Audio" logo shown below. Worse than that, it may no longer be compatible with the CD players in your computer, stereo, and car. To avoid arousing consumer suspicion over their copy-protected products, many record companies dropped the "Compact Disc Digital Audio" logo from all their CDs, even the ones that follow Red Book standards to the letter. Here are the standards, and the type of discs they describe. Most start by following the Red Book standard, and then toss in some extra features. -
Red Book (CD Digital Audio) . The basic standard for all CDs, including, of course, music CDs. -
Yellow Book (CD-ROM and CD-ROM XA) . CDs designed for a PC to read. -
Orange Book (CD-R and CD-RW) . CDs recordable by a PC. -
White Book (Video CD) . CDs with video content that plays in most DVD players. -
Blue Book (Enhanced CD, CD+G, and CD-Plus) . Music CDs with extra features like videos or photos. -
Beige Book (Photo CD) . Kodak's format for storing photos on a CD. -
Green Book (CD-i) . Rarely used. CD-Interactive contains educational material and games . -
Purple Book (DDCD) . Eclipsed by the DVD market, Double-Density CDs hold more storage than CDs and require a special reader. -
Scarlet Book (SACD) . Super Audio CDs carry high-fi audio that's playable on fancy SACD players, but not on PCs, CD players, or DVD players.  |
Not all CD drives can write to CDs, though; some old drives only read CDs, and some early CD burners aren't compatible with Windows XP. To see if your CD drive can write to CDs, open My Computer, right-click your CD drive, and then choose Properties. If the Properties window shows a tab named Recording, shown in Figure 10-4, Windows XP knows how to write to your CD. Figure 10-4. A Recording tab on the Properties box means Windows XP recognizes the drive as a CD burner. Note the checkbox marked , "Enable CD recording on this drive." If your PC has two CD burners (or a CD burner and a DVD burner ), turn on that checkbox for your fastest drive and use that drive for burning CDs. Oddly enough, Windows XP's built-in burning tools let you designate only one drive as the burner. (Most third-party burning programs ignore this setting, letting you burn to the drive you choose.) 
No Recording tab? Then Windows XP doesn't recognize your CD as a recordable driveit's a regular old CD drive that's still fine for playing music or installing programs. On the other hand, if your drive burned CDs in the pastperhaps before you upgraded to Windows XPreach for the usual bag of fixes: hunt down a Windows XP compatible driver (Section 16.5.4) for your drive model, install the driver, and see if Windows XP recognizes the drive. If that doesn't workand you need to burn CDsyour only solution is to buy a newer burner, particularly if your drive is more than five years old (a date of manufacture often appears on CD drives.) Some CD-and DVD-recording software removes the Recording tab from a burner's Properties page, forcing you to abandon Windows XP's built-in tools and use their software, instead. That's no sacrifice, though, as most third-party CD burning software works much better than Windows XP's burning program. But whether you're using third-party software or Windows XP's built-in tools, CD burners can write information to a CD in three different formats: data, music, or video. Each burns the files using a slightly different format designed for the appliance that will be reading them: a PC, a CD player, or a DVD player. -
Data . This format creates CDs with files intended for your PC. This includes any backups you're making of digital photos, MP3 files, documents, programs, and other PC- related files. -
Music . This format creates a music CD for playing back on a CD player. This includes CD players on your home stereo, PC, car, or private helicopter. Also choose this format to convert compressed music filesMP3, WMA, or AAC filesto a music CD. -
Video . This rather obscure format saves video and slideshows onto a CD in the VCD format , letting you play them back on a DVD player to watch on your television. (See Section 10.6 for more on this format.) The next sections explain how to burn a CD with data, music, or video, ensuring that the CDs play back on your player of choice.
Tip: To avoid any stutters or gaps in the CDs you burn, defragment your hard drive (Section 9.5) before starting the burn process.
10.5.1. Burning Data to a CD If you'll be reading your newly burned CD on your PC, save the files as data . Your PC treats the CD just like a thin, portable folder, letting you store files on it for later reference or moving to another PC. When storing data files on a CD, burning the files works just like copying the files to a folder, USB drive, or other storage device, but with one hitch: Windows XP burns the data to a CD in a two-step process. -
Select the files you want, and tell Windows XP you want them copied to the CD . You can do this several ways. -
Drag and drop . Drag the data directly onto the drive's icon in My Computer, or, if you've double-clicked the drive's icon, directly into the drive's window. -
Right-click . Right-click any data files you've selected, choose Send To, and then choose your drive from the pop-up menu, as shown in Figure 10-5, top. -
My Pictures . Select any pictures in the My Pictures folder, and then choose Copy to CD from the Picture Tasks menu along the folder's left side. Once you tell Windows which files you want copied, the CD drive's window looks like Figure 10-5, bottom. -
Insert a blank CD into your drive, label side up, and tell Windows to burn the files to the CD . Windows XP doesn't immediately copy the files straight to the CD, however. Instead, it copies the files to a temporary holding tank called a "staging area" on your hard drive. There, Windows arranges the files into one big, streamlined batch for smooth writing to the CD. If you're copying lots of information, this can consume 650 MB or more of space. Finally, tell Windows XP to begin burning by using either of the following methods . Figure 10-5. Top: Windows XP offers several ways to save files or folders to a CD. Perhaps the easiest method is to select them, right-click them, choose Send To, and select your CD burner from the pop-up menu as shown here. (DVD burners can write to CDs, too.)
Bottom: You can see the waiting files when you double-click the CD's drive; the icons appear as shortcuts. Click "Write these files to CD" from the window's CD Writing Tasks pane, and Windows burns the files to your inserted CD. Although this method works fine for creating a data CD for your PC, don't try to create a music CD this way. CD players won't recognize the disc. 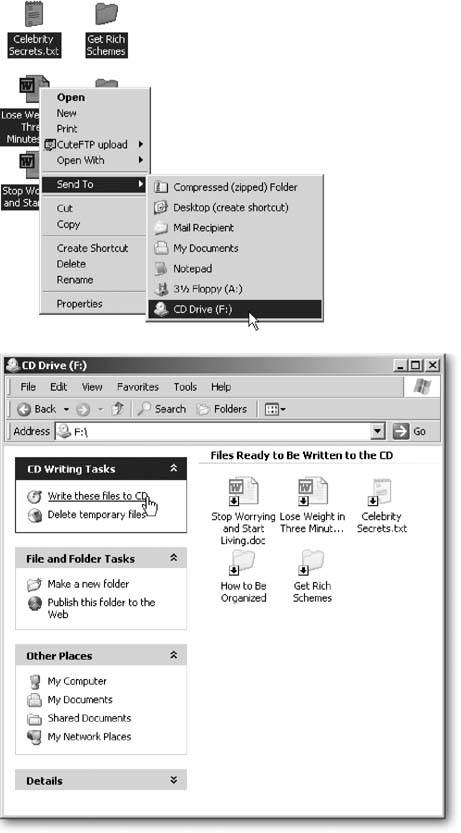 -
Right-click the drive's icon in My Computer and choose "Write these files to CD" from the pop-up menu. -
Double-click the drive and choose "Write these files to CD" from the pane along the left side (see Figure 10-5, bottom). Choose one of those options, and Windows XP's CD Writing Wizard takes over, walking you through naming the CD and writing the files. Most CD-burning drives support multisession recording, meaning you can write information to a CD-R, use it for awhile, and then stick the CD back in and add more information to it. Each time you add more information, you save it as a "session." Once the disk is "finalized," or there's no more room left on the CD, you can't record anything else onto the CD.
Note: Many newer CD and DVD players can play MP3 files from a CD, letting you store more than 10 hours of music on a single CD. These players can still play your regular music CDs, too, if you burn them to their own discs; don't try to mix the two formats on one CD. If your player can handle MP3 files, burn the MP3 files to the CD as data, just as described in this section. Don't burn them as music CDs, described in the next section, or you'll get only about an hour of sound.
10.5.2. Burning Music to a CD Your PC can create music CDs for your stereo or car CD player, but only if you specifically tell your PC what type of CD to create. That means you can't simply drag and drop files onto a CD drive's icon, as you do when creating data CDs. Instead, you need a media player like Windows Media Player or iTunes, or a third-party CD burning program. Those programs decompress your MP3s into WAV filesthe format used by music CDsbefore writing them to disc. This section explains how to create music CDs with both Media Player and iTunes. 10.5.2.1. Burning a music CD with Windows Media Player Media Player lets you create music CDs, but, as with some of this program's other music-saving functions, this feature comes with a twist that serious music lovers may find annoying. Media Player creates music CDs only from compressed files stored in either the MP3 or WMA format (Section 7.3.2). (Files on a commercial CD you buy in a music store are always in the higher quality WAV format.) Since the MP3 and WMA formats leave out some of the WAV format's audio fidelity, your music CD won't sound nearly as good as the original. Dedicated CD-burning software like Nero Ultra Edition (www.nero.com) and Roxio Easy CD and DVD Burning (www. roxio .com) do a much better job. But if this limitation doesn't bother you, here's how to turn your MP3s or WMA files into a music CD. -
Open Media Player's Library . Click Media Player's Library button along its top to see the program's library, an organized list of all your music files arranged by artist, album, genre , and release year. The Library also lists any playlists you created, as well as playlists that Media Player automatically created based on your listening habits (Section 8.4.2). When you view the Library, Media Player displays the three columns shown in Figure 10-6. Figure 10-6. To burn songs onto a music CD, start by choosing a category from your Library, shown in the left pane; that category's songs show up in the middle pane. When you spot songs you want to burn to the CD, drag them to the Burn List on the right pane. The higher a file's bit rate number, the better it sounds when burned to a CD. (To see any song's bit rate, right-click its name in Media Player's Library and choose Properties.) For best results, try to burn songs with a bit rate of 256 Kbps or higher. 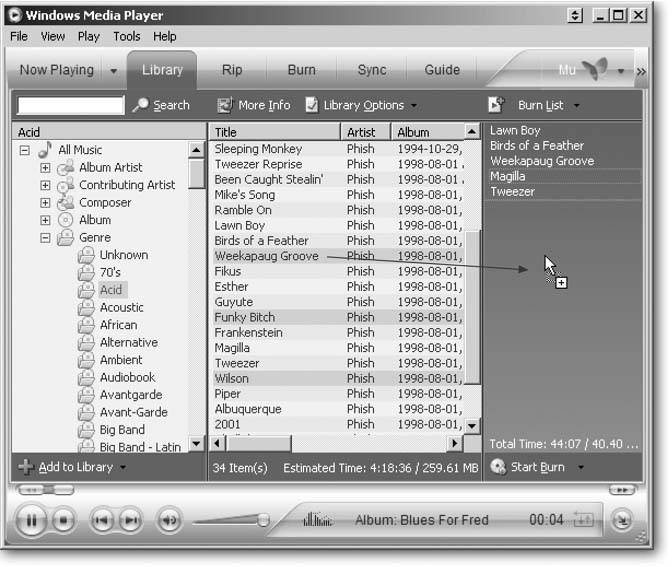 -
The first column lists all your music, organized by artist, album, genre, categories, and more. -
The middle column shows items you've selected from the first pane. If you clicked on Zydeco, for instance, the middle pane shows all your Zydeco songs. -
The third column shows the list you're assembling, which is usually your Now Playing Listthe list of the music you're currently listening to. It can also show the list of music you're burning (Burn List) or the list of tracks you're copying to your portable music player (Sync List); see Section 8.4.2. -
Create a Burn List, if needed . If you want to burn an existing playlist from your library, right-click the playlist's name in the left column, and, from the shortcut menu, choose "Add to Burn List." Simple. You're through. To create a Burn List from scratch, click the drop-down menu atop the right columnthe menu usually says Now Playing Listand then choose Burn List. When the Burn List appears, remove any leftover songs from previous burning sessions by choosing Clear List from that same drop-down menu. Create your Burn List by dragging songs from the middle pane to the Burn List in the right pane, as shown in Figure 10-6. Keep dragging until you've created your Desert Island Disc for the day. -
Weed out songs from your Burn List that won't fit on the CD . Keep a measured eye on the Total Time numbers along the Burn List's bottom edge. Your CD holds only 80 minutes (see Section 10.4 for more on disc length), so if your Burn List's Total Time shows more than 80 minutes, your songs won't all fit. (If you're cutting it close, remember that Media Player sticks two seconds between each song, which could add another 2030 seconds to your total.) -
Insert a blank CD-R disc in the CD drive and then click Start Burn . The Start Burn button is the tiny icon just beneath the Burn List. As the CD burns, Media Player shows you approximately how much time it's taking. When you finish burning your CD, be sure to label it with a permanent marker. Blank CDs and written CDs look identical; now's your best chance to add a distinguishing feature. POWER USERS' CLINIC
Burning High Quality Compilation CDs | | Compressing a CD's music file into a tiny MP3 file removes about 90 percent of the file's original data. To its credit, the compression mechanism craftily cuts away portions that the human ear rarely misses. But still, it's like turning a brick into a sponge. At first glance, they're both look like rectangular blocks. But look close and you see the difference. Similarly, burning MP3 files into CDs creates songs with 90 percent of the information missing. That's why MP3s that are burned back into CDs never quite sound as good as real CDs. And that's why iTunes offers better quality than Media Player when burning CDs. Unlike Media Player, iTunes lets you rip songs from CDs straight to decompressed WAV files. When you burn those WAV files back to a CD, you don't lose any sound. Those WAV files consume a huge amount of hard drive space10 times as much as MP3 filesso they're impractical to leave sitting around on your hard drive. But for getting the best quality on your compilation CDs, rip a handful of your favorite songs as WAV files using iTunes and then burn them to CD immediately afterwards. Then delete the WAV files when you're sure the burn worked. Yes, this is bothersome extra work. But that's what it takes to create complication CDs that sound just as good as the ones sold in the stores. |
10.5.2.2. Burning a music CD with iTunes Just like Windows Media Player, iTunes can burn any file in its library to a music CD that you can listen to in a CD player. Just follow these steps: -
Select an existing playlist you want to burn, or create one from scratch . If you already have a playlista file containing an ordered list of songsin mind, right-click its name, choose Burn Playlist to Disc, and then leap ahead to step 3. If you don't have suitable playlist yet, create one by choosing File  New Playlist. (Feel free to leave the list with the default name of "Unnamed Playlist," as youll probably delete it right after burning your CD.) When your newly created blank playlist appears in iTunes' Source list, double-click its name to open it, as shown in Figure 10-7. Then populate your playlist by dragging favorite tunes onto it from iTunes library. New Playlist. (Feel free to leave the list with the default name of "Unnamed Playlist," as youll probably delete it right after burning your CD.) When your newly created blank playlist appears in iTunes' Source list, double-click its name to open it, as shown in Figure 10-7. Then populate your playlist by dragging favorite tunes onto it from iTunes library. Figure 10-7. An untitled playlist in iTunes. If you drag more tunes onto your playlist window than will fit onto a CD, iTunes burns only as many as will fit. When the CD fills up, iTunes ejects it and asks you to insert another blank CD to fill with the rest. Remember that you can burn only seven CDs from a particular playlist. After seven, you must either recreate that playlist from scratch, or alter it by switching the song's order or adding/deleting songs. It's an inconvenience, but it keeps the record companies happy.  Alternatively, you can drag and drop files onto the playlist's name on iTunes Source list, but the name's a pretty small target for dropping. Just as with Windows Media Player, the bottom of iTunes lists the amount of time your selected songs consume; keep it under 80 minutes to fit onto a CD. -
Click the Burn Disc button in iTunes' top-right corner . The Burn Disc button turns into a black and yellow nuclear fallout shelter symbol, and iTunes sits there, waiting for you to realize you need to insert a blank CD into your PC's newly opened drive tray. -
Insert a blank CD, printed side up, and click the Burn Disc button again . The Burn Disc button begins whirling as iTunes starts converting the files to the format used by music CDs and writing them onto the CD. Remember to label your new CD with a Sharpie or other permanent marker before you lose track of which CD is which. 10.5.3. Burning a VCD (Video CD) A VCD is a CD containing up to 74 minutes of video and stereo sound. Although it plays fine on most DVD players, the quality's closer to video tape than a DVD. That's fine for many people, including those in many Asian countries , where movie studios release hundreds of movies in VCD format. Although Windows XP can't create VCDs, many third-party programs (including most CD- and DVD-burning programs) create them without a hitch. This odd format comes in handy for several reasons. -
Showing digital photos on TV . Most cameras can connect directly to a TV for showing photos to a group . But once you've transferred your photos from your camera to your PC, that's no longer an option. You can show everybody your photos on your PC's monitor, but a better crowd pleaser is to create a VCD with the photos in a slideshow. Put the VCD into your DVD player and let everybody watch the show on TV. Most VCD-creation software lets you juice up the photos by adding soundtracks , as well. -
Showing videos on TV . Not everybody shoots hour-long videos with a high-quality DV camcorder. Most digital cameras, as well as some less expensive camcorders, shoot short, low-quality videos. Many people download short, lo-fi videos from the Internet, as well, showing everything from movie trailers to demos of self-built robots. You can watch those short videos on your TV by lugging over your PC and connecting the right cables (Section 3.5.1). But burning them to a VCD is faster and easier. Plus, if your PC doesn't have a DVD burner, VCDs are the best way to store your short videos for easy access right beside your TV set. A standard-but-obscure format for more than a decade , VCDs play on PCs, Macs, most DVD players, standalone VCD players, and even some game consoles. Mail a VCD slideshow to your friends , and they probably own something to play it on, whether they know it or not. (Be sure to tell them to insert it into their DVD player.)
Note: Some software and DVD players also support SVCD (Super VCD) format, which offers a step up in video quality. That extra quality comes with a price, though, as it limits the amount of video on the CD from 74 minutes to about a half hour. Before burning a lot of SVCDs, create a test disc to make sure your DVD player handles the format.
|