5.10. Editing with Movie Maker Editing a movie is like threading chunks of meat and vegetables onto a shish kabob. You cut each piece to the right size , position each one onto a long skewer so the flavors intermingle, and, hopefully, wind up with something tasty when you're done cooking. Similarly, you take your movie's raw materials (your imported video, digital photos, and music), cut each piece to the right size, and position each one in an order that enhances the rest. When you're done, Movie Maker cooks your work into a finished movie. Movie Maker's Collection area, shown in Figure 5-11, serves as the platter holding all your parts. The Storyboard along the bottom of Figure 5-11 serves as the skewer, where you thread the parts together. For a sneak preview of any clip or sound in your Collection area, double-click it, and it plays in the Preview area along the right side of the window. Figure 5-11. Movie Maker lets you work in three separate areas: the Collection area, the Storyboard, and the Preview window. All your imported clips, songs, and photos live in the Collection area. Weed out any awful clips from the Collection area by right-clicking them and choosing Delete. To view or hear a particular clip in the Collection area, double-click it; the Preview window to the right immediately begins playing it. In addition to the Preview window's standard Stop and Play controls, the Next Frame and Previous Frame buttons let you find the best moment to start and stop each clip. When you familiarize yourself with the content in each of your clips, drag them onto the large squares in the Storyboard area, piecing them together into a movie. Rearrange clips on the Storyboard by dragging them to different spots as needed. 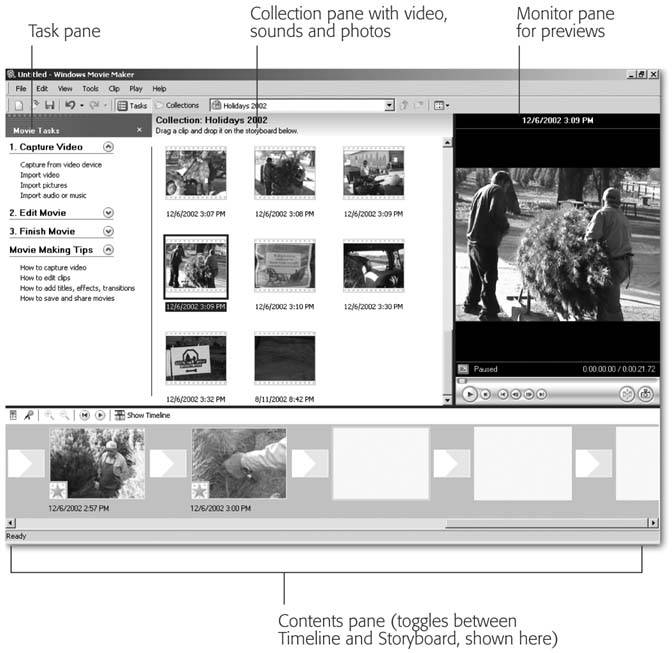
Follow these steps to assemble your clips into a movie. -
Drag your clips onto the Storyboard in a rough order for your movie . The Collection area shows only the first frame of each clip. To remember how a particular clip looked , give it a double-click and watch the Preview pane. If it's worth including in the movie, drag it onto the Storyboard below. Got a stinker? Right-click the clip and then choose Delete. Changed your mind about something you've just added to the Storyboard? Drag it back to the Collection area. Don't worry if a clip needs a little editing; right now, just capture the movie's general flow. -
Trim each clip . Most of your clips probably need a bit of editing. Your camcorder sometimes jiggles a bit when you press the Record button, for instance, or the pitcher takes too long before throwing the ball. Once you place a clip on the Storyboard, Movie Maker lets you trim away its boring sections. To apply the knife , switch from Storyboard to Timeline view: click Show Timeline (Figure 5-12, top), and Movie Maker displays your clips by their length. Longer clips consume more space on the Timeline than shorter ones. Figure 5-12. Top: The film strip along Movie Maker's bottom edge toggles between two views, each designed for different work. The Storyboard view shows each clip as a single frame, which is handy when placing your clips into the correct playback sequence. To change where a clip appears in your movie, drag it to a different location on the strip.
Bottom: The Timeline view shows your clips by their length, so you immediately see when one long clip needs trimming to keep the pacing even. Shorten a clip by clicking it, and then drag inward or outward on the little black triangle poking from each edge. Below the filmstrip lies your Audio/Music layer, waiting for you to add a soundtrack with a quick drop of an MP3 file. 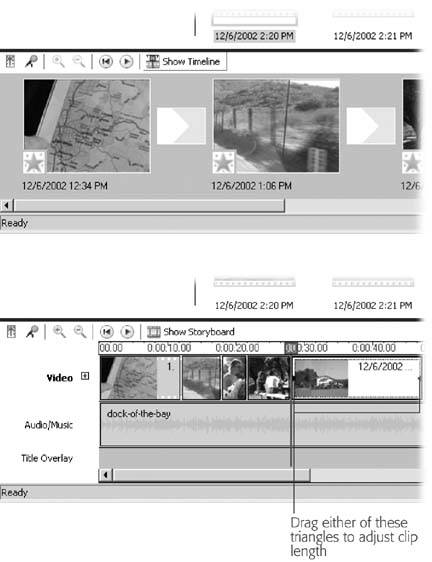 To trim a clip's beginning or end, click it; the clip sprouts a "handle," a little black triangle on each side of the clip. Drag the triangles inward to trim the beginning or end. For instance, to edit out the camcorder jigglies from your clip's beginning, drag the black triangle inward from the clip's left edge. As you drag, the Preview window updates to show the clip's new opening frame. When you've removed the jiggles, stop dragging. Click the Preview window's Play button to check your edit. Dragged too far? Drag it back, and Movie Maker restores the trimmed edge. Admittedly, the Timeline's small size makes for clumsy edits. For more precise editing, spread out your view by choosing View  Zoom In or pressing Page Down. The Timeline expands, letting that one little clip fill the entire screen. A drag on the black triangle then trims the clip one frame at a time. Zoom In or pressing Page Down. The Timeline expands, letting that one little clip fill the entire screen. A drag on the black triangle then trims the clip one frame at a time.
Split (or press Ctrl+L). Movie Maker neatly breaks that clip into two sections. Edit the tail end of the first section, and the beginning of the second section, to remove that boring part.
Add Transitions between each clip . Transitions control how one clip moves to the next. As your movie stands now, one clip stops, and then another immediately starts. But just as new word processor fans immediately start decorating their letters with fancy fonts, new movie editor fans quickly add wild transitions between their clips: one clip shatters into pieces, for instance, revealing the next clip " beneath " it. To see Movie Maker's frenzy of transitions, choose Video Transitions from the drop-down menu in the Collections area. Movie Maker temporarily replaces your collection of clips with transitions. Double-click any transition to view its effect in the Preview window. Add your favorite transitions by switching to Storyboard view, shown in Figure 5-12, top; then drag the transition to the small squares between the frames .
Tip: To avoid making your video look like a TV commercial, stick with simple fades between major scene changes.
-
Add opening titles and credits . You've assembled your movie's order, edited the clips, added the soundtrack, and sprinkled in a few transitions. To begin wrapping it up, add your opening title and ending credits by choosing Tools Titles and Credits. Movie Maker guides you through typing in your title and credits and inserting them anywhere in the moviethe beginning and end (if you want to go for the traditional look), or overlaid on certain clips (if youre looking for something a bit more artsy). -
Add the soundtrack . Unless you took careful pains both when filming and editing, your movie's a jumble of cut-off sentences. Cover up the hubbub with a soundtrack: drag a music file from your Collections area onto the Timeline's Audio/Music layer, which is located right below your movie. Drag the end of the soundtrack inward to match the ending of your movie. Then, with a deft flourish, give it a right-click and choose Fade Out so the music tapers off to coincide with your movie's ending. -
Save your movie . Movie Maker offers several ways to save your movie, which you can get to by choosing File Save Movie File. Unfortunately, your movies probably too big for any of the listed choices but the first and last. -
My Computer . This saves your edited movie onto your hard drive. (Your captured, unedited version remains on your hard drive, too.) Choose this option if your PC has a writable DVD drive, and then burn it with your DVD-burning software. (Windows XP requires third-party software to burn DVDs.) -
Recordable CD . This option fits your movie onto a CD, cutting its quality, if necessary, to fit a CD's 700-MB size limit. Microsoft stores the movie in its own High-MAT format, playable on Windows PCs and a tiny handful of Panasonic DVD players. -
Email . Since most email accounts can barely send a high-quality digital photo (Section 5.5), Windows shrinks your video to a postage stamp before popping it into an email. -
The Web . Again, Windows saves it to a miniscule size, and then tries to get you to sign up with their partner, Neptune, to store your video on the Internetfor a fee, of course. -
DV camera . Your best option by far if you don't own a DVD burner, this setting saves your edited video to a fresh tape in your digital camcorder at the highest quality. When you finally buy your DVD burner , import the edited version from the tape and burn it to the DVD. 5.10.1. Troubleshooting Movie Maker PCs have enough trouble handling large digital photos. Movies pack anywhere from 15 to 30 photos into a single second of digital footage. To edit movies successfully, your PC needs a large drive, a fast video card, and something for you to do while waiting for your PC to process those fancy transitions between your stunning vacation clips. Movie Maker works best on a Pentium 4; the video may appear choppy on slower computers or take exceptionally long to save to a file. Movie Maker may make the following complaints while you're working; here's how to solve them. -
FAT32 4 GB file size error . This message pops up when your captured video file has swollen larger than 4 GBwhich is larger than the limit of your hard drive's storage system, known affectionately as FAT32 . The solution is to stop, close Movie Maker, and convert your hard drive to the more modern storage system known as NTFS (Section 9.7.2). Then restart your PC, reload Movie Maker, and start over. Newer PCs with large hard drives rarely display this message, but it turns up on older PCs, laptops, or newer PCs with small hard drives (40 GB and less). GEM IN THE ROUGH
Passing the Director's Job to the Robot | | Windows Movie Maker does a fairly good job of walking you through the process of editing a movie, but sometimes those controls, transitions, effects, and timing decisions can seem overwhelming. If you've imported your video but don't know where to start with all the controls, let Movie Maker's AutoMovie take over. Choosing Tools AutoMovie whittles down your decisions to one: what style of movie do you want? Movie Maker offers five choices: -
Flip and Slide . Movie Maker links your clips with slick transitions. For instance, one clip curls out to reveal the new one beneath. The end result can be a little amateurish, but it gives you an idea of the effect transitions have on a project. -
Highlights Movie . A good choice for starters. This option sticks with basic editing tricks: simple cuts, fades, a quick title, and your own credits. -
Music Video . This cuts your clips to the pace of your soundtrack. Fast-paced music creates quick cuts; slow music adds a relaxed touch with longer clips. -
Old Movie . Special effects "age" the video to resemble 30s flicks. Good for costume parties, but not much more. -
Sports Highlights . Here, Movie Maker trims everything but your quick zooms and fast pans, capturing only the moments when you went wild at the controls. Choose your style, as well as any background music and titles, and Media Player takes the chair , assembling your clips to create its own director's cut. You'll probably cringe at the results. But looking at the finished movie gives you an example of how the clips, transitions, and music all come together on the storyboard to create a video. Whether AutoMovie leaves you with a good starting place or a bad example, it's a starting point. |
-
Can't capture video automatically . Movie Maker usually controls your digital camcorder with confidence when automatically capturing video. But if your digital camcorder brushes off its advances, switch to Manual capture mode (Section 5.9.1). Rewind the camcorder yourself, push its Play button, and click Movie Maker's Start Capture button. -
Not enough disk space available . This message appears when your hard drive's too stuffed to save your edited video. That leaves you three options: cut the movie's length by snipping clips, choose a lower quality setting to save space, or buy an external hard drive (Section 9.6.3) to hold your movie.  |