3.8. Video Card (aka Display Adapter) Windows XP calls it a "Display Adapter," most people call it a "video card" or "graphics card," but no matter what it's called, your PC's video circuitry translates your PC's numbers into something visible, and then passes the images along to your monitor. Think of it as the projector for your monitor's screen. To suit different people, from accountants to kids with joystick-calloused fingers, video circuitry comes in two main styles, described below. -
Built-in chip . Most people simply need enough graphics power to display words, photos, and maybe a few games on the screen. To cut costs, the PC industry shrunk low-power video circuitry onto a single chip and popped it onto your motherboard (Section 1.4). Known as "onboard video," this works fine for most peopleexcept gamers, who want to explore computer-generated galaxies. -
Standalone card . Other people want more powerful video, often for editing video or playing games. This more elaborate video circuitry works like a minicomputer, calculating the geometry needed to update the screen instantly, whether you're repositioning a window, or watching changing shadows on a mermaid as she undulates through rippling sea grass. With prices averaging $200 to $400, a high-performance video card could be the most expensive thing inside your computer. Whether your PC creates video through a chip or a standalone card, this section explains how to adjust its settings to work best with what you're doing. 3.8.1. Adjust Video Settings in Windows XP Most video settings hail from early years when video cards rarely matched your PC's power. Back then, people needed to dial back some settings in order to let the card focus on other areas. For example, they'd cut back on the number of colors displayed onscreen to squeeze higher resolutions from their video card. When first installed, Windows XP automatically squeezes your video card's muscles and adjusts the video settings to showcase Windows XP at its best. With today's cheap and powerful video cards, Windows XP usually sets everything to full strength. Occasionally, you need to tweak some settings, like increasing the resolution to view a large digital photo, for instance. To adjust any of your video card's settings, head to Windows XP's command central of video settings: Start  Control Panel Display Settings tab (Figure 3-11). (If you dont see the Display option inside the Control Panel, click "Switch to Classic View" in the Control Panel's left-side pane.) Control Panel Display Settings tab (Figure 3-11). (If you dont see the Display option inside the Control Panel, click "Switch to Classic View" in the Control Panel's left-side pane.) Here's the rundown of how these settings affect what you see on the screen. -
Display . This area names your PC's currently connected monitoror at least the one Windows XP thinks is attached. If the name listed here matches the one on your monitor, everything's fine. But when this says "Generic," Windows XP has resorted to its own general purpose drivera bare-bones driver that won't correctly list all your monitor's capabilities. To update the driver, visit the Web site of your monitor's manufacturer, drop by its Customer Support section, and then download the driver for your specific model of monitor. Run its installation program, and Windows XP updates the items on this window to match your monitor's specifications. If you've connected two or more monitors to your PC, Windows XP lists their names here in a drop-down list. Figure 3-11. The choices in this window let you adjust your screen resolution, so you can pack more or less information onto your screen, and choose the number of displayed colors. Most people leave both settings at their highest levels, since that produces the best image on most digital monitors. If the high resolution makes the text difficult to read, click the Advanced button and increase the "DPI" setting. That makes the letters larger, but preserves your screen's crisp, detailed look. 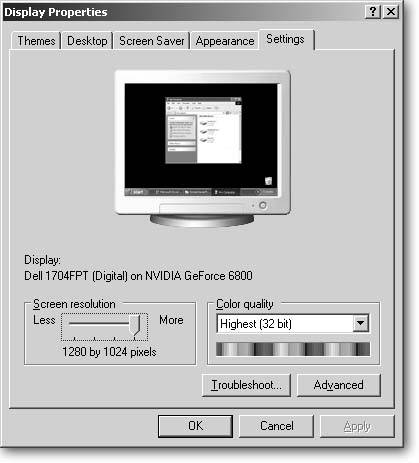 -
Screen resolution . This sliding control lets you choose your display's resolutionthe size of the pixel grid it uses to display images. LCD monitors come with a fixed number of pixels, so they work best when set to the highest resolution available. Choosing a lower setting still works, but looks awful , forcing the monitor to blur together adjacent pixels to mimic lower resolutions. (CRT monitors don't have this problem, as they can change the size of the pixels to match lower resolutions.)
Tip: If the highest resolution shrinks your LC monitor's text beyond legibility, click the Advanced button (Section 3.8.2) to increase the DPI (Dots Per Inch) setting. Your letters will be larger and clearer when you restart your computer.
-
Color quality . Windows added this drop-down control several years ago to let people choose the number of colors displayed at one time. (Older video cards lacked the power to display many colors simultaneously .) Today's video cards fixed that problem, so people usually leave this at its highest setting, usually "32-bit." (That works out to 16,777,216 colors, enough for all but the most finicky graphic artists .) If Windows looks bloated and lacks its usual vivid colors when first started, Windows XP probably started in "Safe Mode," a troubleshooting mode used when something's wrong. The picture looks terrible, but it's enough to let you control Windows while diagnosing the problem. (The video card's often the culprit, usually because it can't find the correct driver, which is usually available for download on the manufacturer's Web site. -
Troubleshoot . This button summons the Video Display Troubleshooter in Windows' Help menu. Useful as a last resort (provided you can still see the monitor), it interviews you about your problem and offers suggestions. -
Advanced . Click this button when you're having serious trouble with the display; it grants quick access to the drivers (Section 16.5.4) for your video adapter and monitor. The General Tab's DPI setting is an often overlooked gem; it lets you beef up the size of your letters and menus should the high Screen Resolution shrink them beyond legibility. Owners of older, CRT monitors should check the Refresh Rate on the Monitor tab. Set it to the highest rate the monitor offers (usually 75 Hz or more) to avoid flickers. (LCD monitors work fine at 60 Hz.) GEM IN THE ROUGH
Making Letters Large Enough to Read | | Digital monitors offer crisp and clear displays only when set at their highest resolution. That high resolution also lets you squeeze more information onto the screen, which is handy for copying information from one window and pasting it into an adjacent email. But when set to a high-resolution, sometimes the display's text becomes too tiny to read. To solve the problem with a CRT monitor, simply switch to a lower resolution, sacrificing desktop space for better legibility. But digital monitors blur when they're not set at their highest resolution. What's the solution to keeping everything crisp and legible? The trick is the (Dots Per Inch) DPI setting, which keeps the display's crisp, high resolution, but tells your monitor to devote more pixels to its content, making everything bigger. To change your DPI settings, right-click the Start Control Panel Display Settings Tab Advanced DPI Setting. Windows normally uses 96 pixels to create an onscreen inch, or 96 DPI. Choose Large size (120 DPI) from the DPI setting's drop-down menu to increase the size of characters by 25 percent. To complete the process, Windows may need to install some fonts (occasionally asking you to insert your Windows XP CD), and then you may need to restart your computer before the change takes place. But when Windows reawakens, it sports a fresh new look: crisp and legible. |
3.8.2. Upgrade Your PC's Video Card Most people never upgrade their PC's video card. When the video works, it works fine for yearsusually for the life of the monitor. Still, you may want to upgrade the quality of your PC's video for these reasons: -
Speed . These days, two of the best ways to speed up an old PC come by adding memory (Section 1.6) or adding a faster video card. Your PC may be plenty powerful, but if the video card can't sling the information onto the screen quickly enough, your PC slows down. -
Dual monitors . A second video card lets you attach a second monitor (Section 3.3) to your PC for a wider desktop vista. -
Television . Many new video cards come with a built-in TV tuner, letting you watch TV on your desktop. With a TV tuner, you can even keep your favorite channel running in a little window in your screen's corner. -
Upgrading your LCD monitor . If your current LCD monitor accepts digital video (Section 3.1.2) but you're plugging it in through a VGA port, you're not seeing your display at its best. Replace that old video card with a digital one to put some dazzle in your monitor's display. Follow these steps to upgrade your motherboard's built-in video with a new video card, replace an existing video card, or add a second video card to your computer. -
Identify your PC's video slot . Powerful video cards demand lots of attention from your PC. Consequently, your PC's motherboardthat flat plate holding all your PC's circuitrygives the card a special communications channel: a high- powered slot created just for the video card. But since video technology changes so quickly, engineers redesign that slot's capabilities nearly every year. And that brings trouble: before you know what type of card to buy, you must figure out what type of video slot lives on your motherboard. You can open the PC's case (Section 1.3), look at the slot (Section 1.7.1, and examine the fine print written next to the slot. Or, you can find your motherboard's manual and look up its AGP Bus specifications . But it's much less work to run SiSoftware's free Sandra software (Section 1.3). When the program starts, run the module named "PCI(e), AGP, CardBus Bus(es) Information." Sandra examines your video slot and spits up the dirt, as shown in Figure 3-12. -
Buy the right card for the slot . If your motherboard contains a PCI-Express slot, you're in luck. Buy a card matching the speed of your slot (that'll almost always be a 16X card) and count your blessings. PCI-Express is a newer standard that's faster than AGP, and is well-supported by the latest video card manufacturers. But if your motherboard contains an AGP slot, fasten your seatbelt. The AGP slot evolved through six different specifications over the years, with each new breed using a perplexing variety of voltages, slot sizes, and holding latches. Sprinkling in more anguish for the consumer, AGP card manufacturers consistently mislabel their cards' speeds, voltages, types, and capacities . The solution? First, don't buy AGP cards from stores that don't accept returns. Second, buy a card that's the same speed as your slot: 2x, 4x, or 8x. (Each "x" shows how much faster the card is than the original AGP slot.) Cards with faster speeds are generally backward compatiblethey still fit into slower-rated slots, but they'll fall back to meet that slot's slower speed. Buying a faster card than your PC's slot supports is a waste of money. Figure 3-12. Top: The free program Sandra identifies the video slot on this 1999 PC as AGP (Accelerated Graphics Port) Version 1.0. The card supports speeds of 1x and 2x, meaning it's compatible with the first released AGP cards, as well as that card's twiceas-fast replacement. To buy a video card for this computer, buy an AGP card that supports both 1x and 2x transfer rates. (Look for the words "AGP 2x" somewhere on the new card's box.)
Bottom: Sandra identifies the video slot on this 2004 PC as PCIe (Peripheral Connect Interface Express) with a width of 16xthe longest and fastest of the PCIe slots. To upgrade this PC, buy a PCIExpress card with a width of 16x. The card's box should say "PCI-Express 16x."  -
Insert the card into the slot . After identifying your slot and buying a card that works with it, the hard part's over. Push the card into your motherboard's video slot and secure it as described on Section 1.7.3. If the card doesn't fit, then you bought one that's incompatible with your slot. Return it, and buy a different brand or model that's the same speed as your AGP slot. When you turn your PC back on, Windows XP discovers the new card and shuffles around, looking for the card's driver. To help Windows XP find it, run the Setup program on the CD that came with the new video card. If the driver gives you trouble or you need help installing it, Section 16.5.4 contains a detailed guide to installing drivers. If your PC doesn't start at allit begins beeping at you or displays an error messageyour new card isn't compatible with your motherboard. Make sure you've identified your video slot correctly in step 1, and then exchange the card for a different, more compatible model. 3.8.3. Troubleshooting Video Card Problems When something's wrong with the displaythe colors don't look right, a moving window leaves a trail across the screen, or you spot other video odditiesfingering the culprit often proves difficult. The monitor displays only what the video card sends it, so when something on the monitor looks off, the problem usually lies with the video card. Run through this list of fixes to solve the problem. -
Update the driver . Video companies update their drivers more quickly than any other PC industry. Sometimes new drivers appear on a weekly basis. Before assuming something's wrong with your monitor or video card, be sure to visit the Web site of the video card's manufacturer. Visit the Customer Service or Support area and download the latest driver for your particular video card. That cures most problems. If the latest driver makes things worse , "roll back" to the old driver (see Section 16.5.5). Then try a slightly older driver from the video card manufacturer's Web site. Video card drivers are picky, and some people find that older drivers work better with their PC's equipment than the newer ones. When you find one that works, make a note of its version (see Figure 16-7) and stick with it. -
Check the card's fan . Being tiny computers themselves , video cards generate enough heat to fry a finger. Today, most video cards include built-in fans. Remove your PC's case (Section 1.3), and make sure the card's fan is still spinning. If it's not, check to see if the fan's power connectors are tightened. On the other hand, if your computer's main fan isn't working, you need a new power supply (Section 1.9). -
Verify the slot type . AGP slots and cards use a special notch and groove system to ensure that only compatible AGP cards and slots fit together. If a little notch in the slot keeps your card from fitting, be thankful: the card and slot use different voltages, and the little notch keeps you from frying both your new (but wrong voltage) video card and your motherboard.  |