Section 16.3. System Restore
16.3. System RestoreIt's fun to watch parts of movies played backwards. That puddle of spilled coffee suddenly curls up, flies through their air, and lands inside the cup; the anguished person holding the cup resumes smiling, and then walks backwards up the stairs. If only the bottom step of every staircase had a built-in rewind button. Windows XP's is called System Restore, and while it won't remove coffee from your keyboard (Section 2.2), it often can return your PC to a time when everything worked correctly. System Restore does this by automatically taking snapshots of Window's most important settings, tucking them away in Restore Points, and then files them by time and date. When you install a promising new program that turns into a disastereven after it's uninstalledhead for a Restore Point created before you installed the program. The Restore Point not only resurrects Windows' settings, but also flushes out any newly installed programs that may be causing problems. When Windows XP wakes up, everything's back to normal. Running System Restore won't change any of your data or emails. That letter you wrote yesterday will still exist when you use a Restore Point from last week. Instead, think of System Restore as a backup system for Windows XP's own settings, the boring things you don't particular care aboutuntil they're botched and Windows XP suddenly stops working correctly. Windows XP automatically creates a Restore Point approximately once a day (depending on how often your PC's been running) and whenever these things happen:
Windows XP stakes out up to 12 percent of your PC's hard drive for System Restore's stash of system settingsa considerable amount of room. If you value your hard disk space more than System Restore's safety net, lower that percentage a few notches: right-click My Computer, choose Properties, and then click the System Restore tab, shown in Figure 16-2. Click the Settings button, and then adjust the percentage by dragging the slider to the left or right. 16.3.1. Performing a System RestoreEnlisting the help of System Restore involves selecting one of your PC's many Restore Points, hopefully one created just before things went wrong. System Restore is completely reversible, so you don't have much to lose. Follow these steps to fire up System Restore and return to the past.
Figure 16-3. Each bold-faced date on the calendar represents a Restore Point created on that day. Click any boldfaced date to choose that day's Restore Point. Or, to flip quickly through all your available Restore Points, click the little leftor right-pointing arrow on either side of the current month. The box on the right lists all the Restore Points that were created for the day you've chosen. Windows XP's automatic, daily Restore Points are named System Checkpoints.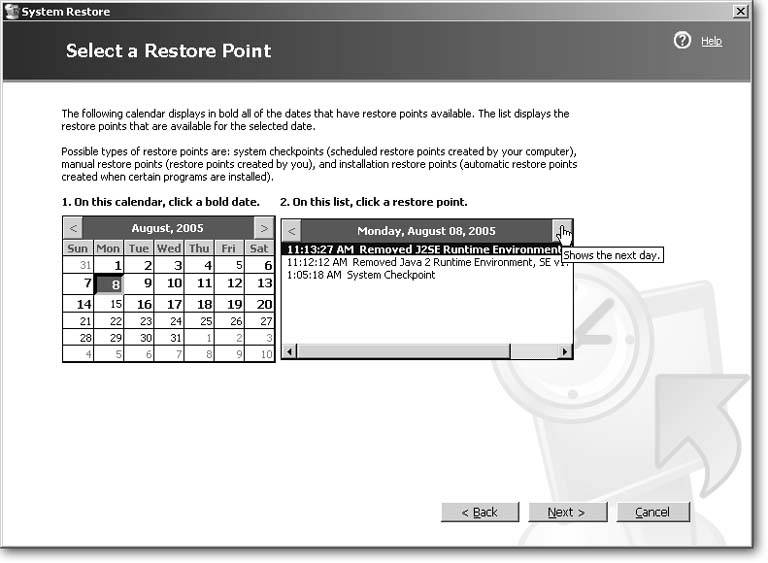 When Windows XP reappears on your screen, it's decked out with whatever settings it had on the Restore Point you chose. If everything seems fine, you've cured the problem. If your PC wakes up with an even worse headache , return to System Restore and choose "Undo my last restoration." That brings you back to where you started, letting you choose a different Restore Point. 16.3.2. Creating a Restore PointSystem Restore's nifty time travel concept sounds wonderful, as long as you can choose from a large selection of Restore Points. Without them, you're stuck in today's catastrophe with no place to go. To keep System Restore well-stocked, Windows XP automatically creates a new Restore Point almost every day. But the real beauty of System Restore is when you create your own Restore Points rather than relying on Windows XP's robotic automation. Create your own Restore Point after you fix something problematicwhen you uninstall a balking program, for example, or you finally install all the drivers necessary to run a temperamental computer part. Setting a custom Restore Point lets you go back to a time where you know for certain things worked well. Actually, anytime that you notice your PC running particularly well, feel free to create a Restore Point to preserve that moment. The routine goes like this:
|
 All Programs
- ERP System Acquisition: A Process Model and Results From an Austrian Survey
- Enterprise Application Integration: New Solutions for a Solved Problem or a Challenging Research Field?
- Data Mining for Business Process Reengineering
- Intrinsic and Contextual Data Quality: The Effect of Media and Personal Involvement
- Healthcare Information: From Administrative to Practice Databases