14.5. Securing Your Network Ethernet cables aren't pretty, but they're secure. If you're using these sturdy pipes to connect your PCs, a hacker would have to break into your home to break into your network. Wireless networks, by contrast, spill past the confines of your home and out into the neighborhood, where other people can detect them. Powerline adaptersthe ones that connect PCs through your home's electrical wiringalso spill your network's signal outside your home, spreading through the power lines into your neighbor's house. That's why it's important to add a password to both your wireless connection and your Powerline adapter's connection (should you be using either one of these systems). Without password protection, you're dangling a virtual network cable out your window, inviting strangers to connect to your network. Anybody who can access your network has free range. They can not only copy your files and plant viruses, but they can delete any and all of your shared files. And when somebody deletes files from your PC through a networked connection, those files are gone for good; they don't drop into your Recycle Bin (see Section 16.1). With that bit of unpleasantness out of the way, this section explains how to secure both wireless and Powerline networks. 14.5.1. Securing Your Wireless Connection Security is so much easier in the spy movies. The guy wearing the dark sunglasses flips open a little box, pushes a red button, and the metal doors all slam down from the ceiling. Unfortunately, securing your wireless network isn't as easy as pushing a button. That's why so many people ignore it. Instead, it requires accessing your router's settings, rummaging through menus , and dealing with unfamiliar words, all so you can accomplish these three tasks : -
Name your wireless network . Your wireless network needs a simple one-or-two-word name , known among WiFi geeks as a "SSID" (Service Set Identifier). Naming your network helps keep it separate from other wireless networks filling the airwaves. When Windows presents you with a list of nearby wireless networks (Section 14.3), you can spot your own network at a glance. -
Turn on encryption by assigning your router a password . When assigned a password, the router encodes your network's wireless signal before sending it through the air waves. Only people who know the password can decode the signal, bringing you to the next step. -
Enter the encryption password on your PCs that have wireless adapters . After adding a password to your router's wireless signal, you need to enter that same password onto your wireless-enabled PCs. Without it, they can't make sense of the Internet connection and assorted data being served up by the router. Once you enter the passwordand your new SSIDinto your wireless PCs, they can accept the signal just fine. All this encoding/decoding stuff happens transparently , although the network may run a tad more slowly. The biggest change you'll notice is spotting the little "lock" icon appear next to your network's name in the list of wireless networks, shown in the bottom of Figure 14-4. Windows XP's Wireless Network Setup Wizard simplifies these three requirements down to a few choices on two simple menus, sparing you from navigating your router's complex setup menus. The downside? Only a few routers from Belkin and D-Link support the wizard. If you spot the code word "Windows Connect Now" on your router's box or packaging, then it's wizard-friendly: head for the box on Section 14.5.1.1 to finish off this password business with a few quick clicks. If your router doesn't support the Wireless Network Setup wizard, reach for your router's setup software. Look for instructions on how to secure your wireless network (other terms to look for: "adding security," "activating encryption," and "advanced settings"). If the CD for your wireless equipment has long disappeared or the instructions prove too daunting, follow the steps in the next two sections to manually password protect your wireless network. WORKSHOP WORKAROUND
The Wireless Network Setup Wizard | | Securing a wireless network involves entering a passworda lengthy string of seemingly random letters and numbersinto your wireless router, and entering that same password into each of your wireless-connected PCs. If your router supports "Windows Connect Now," the Wireless Network Setup Wizard can help handle the job of copying the password. The wizard, a piece of software added to Windows XP by Service Pack 2 (Section 15.4), creates and stores a password on a USB drive (Section 9.2)a thumb- sized drive for carrying small files. After the wizard copies the password onto the USB drive, you need only plug that USB drive into your router and each PC that needs the settings. Then you're finished, comfortable with a secure, password-protected network. To put the Wireless Network Setup Wizard to work on "Windows Connect Now" equipment, double-click the wizard's icon in the Control Panel (Start  Control Panel Wireless Network Setup Wizard). After the wizard introduces itself, follow these steps to secure your router: Control Panel Wireless Network Setup Wizard). After the wizard introduces itself, follow these steps to secure your router: -
Give your network a name. Type a name for your wireless network into the "Network name (SSID)" box. The SSID can be any name you likeas long as it contains no more than 32 letters, numbers , and/or punctuation marks. -
Decide how to handle the network keya technospeak term for "password." The wizard offers two options: Automatically assign a network key (recommended) . Choose this option, and Windows thinks up a password, sparing you the effort. It's the easiest option, as you'll see in the next step. Manually assign a network key . This lets you type in an existing password. Choose this if you've already waded through your router's setup menu, created an SSID and set up a password, and now want the wizard to enter that password into this PC. -
If your router and wireless adapter both support the WPA (WiFi Protected Access) encryption standard, turn on the checkbox called, "Use WPA encryption instead of WEP," and click Next. -
Choose "Use a USB flash drive (recommended)." If you don't have one of these little marvels, choose "Set up a network manually," instead. Windows copies the network's SSID and password onto the USB drive for transport. -
Insert the USB drive into your "Windows Connect Now"-compatible router's USB port. Like something out of a James Bond thriller, the router's lights blink three times to let you know it's received the code. -
Insert the USB drive into every PC with a wireless adapter and click OK after every screen. When you insert the USB drive into a PC, a window appears, asking if you'd like to run the Wireless Network Setup Wizard. Click OK and the wizard adds the PC to the wireless network and hands it the SSID and password, and your PC connects to the network. It's a simple solution to a complex problem. If the wizard doesn't appear when you insert the USB drive, open My Computer (Start My Computer), double-click the USB drives icon, and double-click the file SetupSNK.exe. The wizard installs the SSID and password, which are both stored in the adjacent "userkey.psw" file. |
14.5.1.1. Name your wireless network and add a password Every wireless network requires a name called its SSIDbefore it can work. Strangely enough, though, most wireless networks begin working as soon as you plug in your wireless router and turn on your wireless PC. They work because the manufacturer already names your network before shipping it out the door. The name's neither imaginative nor personalized. If you bought your wireless router from Linksys, for example, your wireless network is most likely named "Linksys." When you turn on your wireless laptop outdoors in any major city and begin looking for wireless networks, as shown in the middle of Figure 14-4, you'll grow accustomed to seeing the name "Linksys" listed as an available network. The name "Linksys" means that that network's owner didn't bother to change the name, which you're going to do in this section. And since they didn't bother to change the name, they probably didn't bother to set a password on their network, eitherand that's the second thing you'll do in this section. Here's how to find your router's setup menu, rename your wireless network, and add a password to keep other people from using it: -
Open any Web browser . When you open a Web browser on a newly installed wireless network, the browser may complain that it can't connect to the Internet, but don't worry. You don't need to connect to the Internet to set up your router. Instead, you're taking advantage of something crafty your router does with its settings menu. The settings menu is listed on a special Web page that's actually tucked inside the router. The beauty of this arrangement is that you can change your router's settings by firing up any Web browser on any of your networked PCs and visiting that hidden Web page. There's no security risk here, as the router's smart enough to limit access to your own networked PCs. That keeps people from accessing that page through the Internet and messing with your setup menu. Changing a router's settings works best on a PC with a wired (that is, Ethernet) connection. So to follow these steps, either do so from a PC that's already plugged directly into your router, or to temporarily make that happen: plug an Ethernet cable between any PC and one of the ports on your router. -
Connect to your wireless router by typing its Web address, user name, and password into your browser's Address bar . To view the router's hidden Web page, you need to enter three pieces of information: -
A Web address -
A user name -
A password You can find all three items in your router's documentation, but feel free to cheat by checking out Table 14-1. That table lists this information used by the most popular router manufacturers. Router's don't use normal Web site names like www.router.com. Instead, you need to type in a string of numbers known as an IP (Internet Protocol) address. For instance, if the address is http://192.168.1.1 , type that entire string into your browser's Address bar, as shown in the top of Figure 14-7, and then press Enter. When the router displays its log-in screen, type in the username and password, as shown in Figure 14-7, top right. If the address, username, and password listed in Table 14-1 don't work, consult your router's documentation; the information is probably listed there. Table 14-2. SSID, user name, password, and Web address info for popular router brands | Router Brand | Default SSID | User name | Password | Address | | Belkin | WLAN or belkin54g | <blank> | <blank> | http://192.168.2.1 | | D-Link | default | admin | <blank> | http://192.168.0.1 | | Linksys | Linksys | <blank> | Admin | http://192.168.1.1 | | Microsoft | MSHOME | <blank> | Admin | http://192.168.2.1 | | Netgear | NETGEAR | admin | Password | http://192.168.0.1 | -
Find the wireless router's main settings page . Most routers make finding this page easy by showing it to you as soon as you connect to the router. -
Enter a new name into the SSID box . Delete the listed name in the SSID box and type in something new. What you choose isn't as important as what you don't choose. Since you'll be broadcasting this information along with your network's signal, don't choose your own name or street address. That gives too much information to some dedicated loser who wants to break into your connection. Instead, call it "Potato Chip," "Tree," "Joy," or something similarly non-descript. Your only limits are keeping the name to within the 32-character limit. The SSID is case sensitive , so it treats "joy" as a different name than "Joy." -
Turn on password protection . Depending on its age, a router comes with two types of security: -
WEP (Wireless Equivalent Privacy) . This older type of security has been cracked. But since most people don' bother to type in any passwords, WEP is still one step up the security ladder from a completely unprotected network. If it's all your router offers, turn it on. -
WPA (WiFi Protected Access) and WPA2 . These options offer the most security. If you spot either of these options on your router's settings page, turn either of them on instead of WEP. Figure 14-7. Top: Type your router's address in your Web browser and press Enter to visit the router's settings page.
Second from top: You'll be greeted by a settings page gatekeeper; enter your browser's user name and password for admittance.
Second from bottom: Enter a different name into the SSID box, set WEP to Mandatory, and then click WEP Key Setting to create a password.
Bottom: Type a passphrase and then click Generate. The router presents you with a password key, which you'll need for each wirelessly connected PC that you want to join the newly secured network (details on entering the key start on Section 14.5.1). 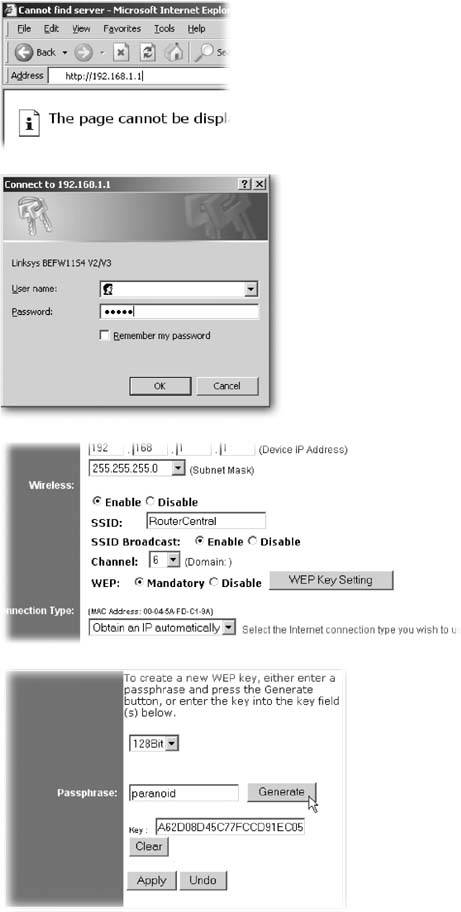 -
Create a password, and then click Apply . Because of the way the various encryption systems work, passwords must meet rigorous specifications regarding length, capitalization, and characters . They're so difficult to think up that most routers toss you a lifeline: they think one up for you if you hand it a word to begin with. That word is called a passphrase . Enter a passphrase, click Generate, and the router kicks out a password that looks something like 628105712FE6CEEA92040A8AA4 . When you click Apply, the router immediately starts encrypting its wireless communications, knocking off all of your wirelessly connected PCsincluding the one you may be using now to change its settings (that's why you want to make sure you've got a direct Ethernet connection to your router). -
Write down the SSID, the password, and your passphrase . This step could be the most vexing part of the whole security process. You need to enter the SSID and password into each computer that connects wirelessly to your network. One typo will lock you out. And you need the passphrase so you can regenerate that exact password should the router lose its settings. (If you use a different passphrase down the road, you'll need to enter whatever new password it generates into all your wirelessly connected PCs.) 14.5.1.2. Tell the password to your wirelessly connected PCs Now that you've password protected the network signal, you must enter the password into each of your wirelessly connected PCs. The Wireless Network Setup Wizard (Start Control Panel Wireless Network Setup Wizard) can do this for you automaticallyif you have a USB drive (Section 9.2) and your PC has a USB port. If you meet those requirements, head to the box on Section 14.5.1.1 and follow the steps listed. The wizard copies the SSID and password to the USB drive. When you insert that USB drive into a PC, the wizard leaps back into action, automatically entering the information into that PCs wireless adapter. If you don't have a USB drive or your PC doesn't have a USB port, you can type in the settings by hand by following these steps: -
Open your wireless network's Properties page . You can do this in any of several ways: -
Double-click the wireless icon in your taskbar, and then, from the window that appears, choose Changed Advanced Settings from the task pane. -
Right-click My Network Places (Start My Network Places) and choose Properties. Right-click your wireless connections icon, and then choose Properties from the shortcut menu. -
Choose Start Control Panel Network Connections. Then right-click your wireless connections icon and choose Properties from the shortcut menu. -
Click the Wireless Networks tab, and then click Add . -
Type the name of your SSID and your password, as shown in Figure 14-8, and then click OK . Figure 14-8. Type in the name of your SSID and the network key (the password) you created on your router. Be sure not to make any typographical errors, or you won't be able to connect to the network. 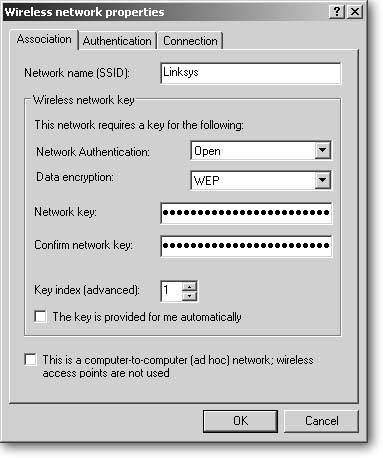
14.5.2. Activating Powerline Security A Powerline adapter's signal runs through about 1,000 feet of electrical wiring before it eventually peters out. That's plenty of room for the signal to flow through your electrical system's wires as they twist and turn around studs, doorways, and windows. It's also enough oomph to spill over into your neighbor's homes , letting them tap into your unprotected signal. To stop people from eavesdropping on your network, follow these steps to password-protect a Powerline network. Compared to password-protecting a wireless signal, this procedure's a leisurely stroll through a sunny park. These instructions apply to Netgear's XE-102 Powerline adapters; the menus will probably be slightly different for other manufacturers. -
Copy each adapter's password onto a piece of paper . Look on the back of each adapter, and you'll find a passworda series of numbers or letters. The password faces the outlet, so visitors can't read it. Write down each password, dashes and all. Double-check your work to make sure you haven't made any errors. Each adapter's password serves as its personal identifier, letting your network know who's who. In a moment, you'll assign a "master" password to your entire network, and the setup software will send that new master password to each adapter you're identifying here. POWER USERS' CLINIC
Adding More Security | | Most wireless equipment comes with plenty of built-in security that nobody bothers to turn on, usually because it's too difficult to figure out. If you're feeling adventurous, poke around in your router's settings page and make the following additional changes. Each adds an extra layer of security to your wireless network. -
Disable "broadcast SSID." Any time you turn on a PC with a wireless adapter, it lists the SSID of all the available wireless networks, making it easy to connect with them. If you tell your router not to broadcast the SSID, your wireless network drops off those menus. To connect your own PCs, enter the SSID manually on your PC's wireless settings page (see Figure 14-8). That limits your wireless network to people who already know your SSID and keeps strangers in the dark. -
Change the router's default password . Most routers come with well-known passwords, shown in Table 14-1. Changing the password keeps kids from breaking into your router's settings and changing them for kicks. -
Keep your wireless router away from windows . Signals travel further through glass than walls. Keep the router in the center of the house, if possible, to keep the signal from spilling over to the street. -
Buy equipment with flashable firmware . Security standards keep changing to keep up with people who have broken them. When a security standard changes, flashable firmware (see Section 17.2.9) lets you upgrade the router with the latest standard, letting you stay one step up on the bad guys. Most routers support flashable firmware and firmware upgrades to keep pace with new features. Firmware upgrades lengthen the life of your router, but they're no free ticket to the fountain of technological youth. Eventually, new features require different circuitry that can't be added with new firmware. When you need that hot new feature, it's time to buy a hot new router. Some of these changes require you to spend some time with your router's menus, finding and changing these settings. Change as many as you need to give you peace of mind. | -
Plug one Powerline adapter into a wall outlet near your PC, and connect an Ethernet cable between that adapter's network port and your PC's network port . In order for you to set the password, your PC needs a direct connection to the Powerline adapter. You can't set the password if a router sits between your PC and the adapter. -
Plug all the other Powerline adapters that you're using into nearby wall outlets . You can, but you don't need to, plug the other adapters into outlets in the same room. -
Install and run the Powerline Setup software on the PC connected to the Powerline adapter . The adapters come with their own installation CD, which includes an encryption utility. Run the installation CD, and it installs the encryption utility program, usually leaving an icon for the utility on your desktop, as well as on your Start menu. If you're using a Netgear Powerline adapter, start the program by clicking Start Netgear Powerline Encryption Utility. -
Enter a network password in the Network Password box, and then click Apply (see Figure 14-9) . The password should be between six and 16 letters long for Netgear's XE 102 adapters. The program considers upper- and lowercase letters to be different: "MeatLoaf" is a different password than "meatloaf." Figure 14-9. Each adapter comes with a unique password stamped on its backside . Enter the passwords into the encryption program's Remote Device Password box, one by one, clicking Add after you enter each one. After entering them all, type your own made-up password in the Network Password box. Then click the Set All button to assign each adapter the same password you just created. The adapters remember the password even after they've been unplugged, making it easy to use one adapter for your laptop, plugging it into different outlets whenever you move your laptop to another room. 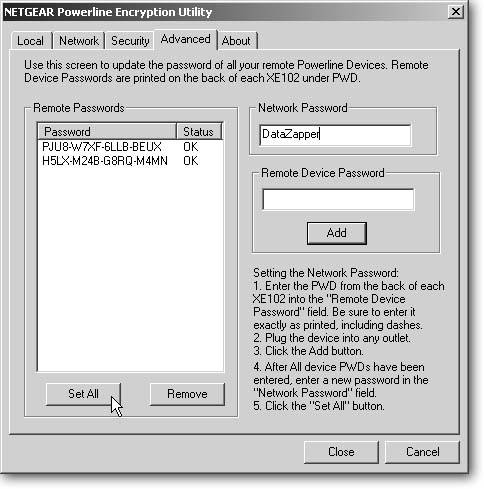
The program shoots your chosen network password through your home's wiring to share it with all your Powerline adapters simultaneouslya nice touch of convenience. The adapters remember their passwords when they're unplugged, too, so you need only to wade through these six steps oncewhen first password-protecting your system.  |