14.3. Setting Up a Simple Home Network Once you have a network's basic ingredients , you're ready to join the networking party. The following steps show you how to create a home network that serves almost everybody's needs. At first, the work might seem like you're putting together a large and complicated puzzle that doesn't ever finish. But have faith: you only have to go through this hassle once. -
Turn off your PCs . Just like surgery, setting up a network works better when the patients are anesthetized, unable to protest. -
Install network adapters for PCs that need them . The wireless router is friendly to wired and wireless connections alike. You just need to make sure that every PC on your network has some kind of network adapter (Section 14.2.2). If you do need to add one, you've got three choices, described on that same page. Whichever method you go with, Windows usually picks up on what you've plugged in and helps you install the drivers (Section 16.5.4) from the adapter's installation CD. Chapter 16 has troubleshooting advice if your machine doesn't seem to recognize your newly installed adapter. -
Plug in the wireless router . Remove the router from its packaging and find its power cord and installation CD, then plug your router into an electrical outlet near your broadband modem. Routers are designed to turn on automatically; they don't have on/off switches. (That lets them jump back to life after a power outage .) Also make sure your router's within reach of at least one PCat least as close as the length of the network cable that will be connecting them. -
Connect your broadband modem to the router . If your cable or DSL modem is currently connected to a PC, unplug the Ethernet cable from the PC. Then plug the newly freed cable into the port on your router that's reserved for the modem. That port's usually off to one side, as shown in Figure 14-2, top, and often bears the name "modem," "Internet," or the acronym "WAN" for "Wide Area Network." (The Internet's a very wide network.) Your network is a "LAN" (a Local Area Network), by contrast, since it's limited to your residence or office.
Note: Network cables make a little "click" as they lock in place. Give each cable a slight tug to make sure it won't fall out.
-
Connect your PCs to your router . You can connect your PCs to the router in a number of ways: -
Network cable . Routers come with a row of numbered ports reserved for your PCs. Connect a cable between your first PC's network adapter and one of the numbered ports; then repeat for your other PCs. -
Powerline adapters . Plug one Powerline adapter into an electrical outlet near your router, and then connect a network cable between the Powerline adapter's network port and a numbered port on your router. You only need this one Powerline adapter to inject the network signal into your home's electric wires. Plug your other Powerline adapters into electrical outlets near your out-of-the-way PCs; then connect a network cable between the Powerline adapter and those PC's network adapters. -
Wireless adapters . Depending on your wireless adapter, it plugs into your USB port, your laptop's PC Card slot, or a slot inside your PC. If you've got a really modern PC or laptop, your wireless adapter might already be installed (Look for anything in your machine's documentation that says something about your computer being WiFi-ready or WiFi-capable.) -
Turn on your PCs . As soon as Windows wakes up on your PC, it should sense the router, which is feeding it an Internet connection. Your wired PCs might even be able to fire up a browser at this point. If not, they will after the next step. PCs with WiFi adapters will display a balloon in the corner of the screen, shown in the top of Figure 14-4, saying, "Wireless networks detected ." -
On your wireless PC, click the message balloon to see a list of the wireless networks within rangeincluding the one created by your newly installed wireless router . The Wireless Network Connection dialog box opens, shown in the middle of Figure 14-4, listing the nearby wireless networks. WiFi-laptop owners will become very familiar with this step. You'll see the message balloon whenever Windows sniffs out the presence of a nearby wireless network, be it inside a coffee shop, hotel lobby, or airport. It may even appear when your ever-helpful laptop tries to connect with your neighbor's WiFi network. If the message balloon disappears before you have a chance to click it, the detected network didn't necessarily disappear. You can always see nearby wireless networks by going to the Control Panel (Start  Control Panel), double-click Network Connections, and then, from the shortcut pane along the left side, choose View Available Wireless Networks. That same Wireless Network Connection dialog box comes into view. Control Panel), double-click Network Connections, and then, from the shortcut pane along the left side, choose View Available Wireless Networks. That same Wireless Network Connection dialog box comes into view. -
. The Wireless Network Connection window lists all the nearby wireless networks that Windows notices. If you see more than one network listed, your job is to guess which one belongs to your newly installed wireless router. Here are the clues: -
If only one wireless network is listed, you've found it. Click its name, click the Connect button, and then move to the next step. -
Your wireless network probably has the strongest wireless signal. Since you're so close to the wireless router, check the signal strength meters along the window's right edge (Figure 14-4, middle). The little bars fill up as the signal grows stronger, so look for the network name with the fullest signal strength meter. Figure 14-4. Top: This balloon lets you know when Windows senses a wireless network within range. Click the balloon to see the wireless networks it found.
Middle: The window lists each network's name, known as its SSID (Security Set Identifier), along with the network's signal strength. (The stronger the signal, the higher the signal strength meter.) Password-protected networks have a padlock icon, meaning you must enter a password to connect to them. Networks without a password, called unsecured networks, let you log on without a password. To connect to a network, click the network's name and then click the Connect button at the bottom of the window. If you move to the coffee shop across the street, click "Refresh network list" to make sure you're still within range.
Bottom: Windows lets you know when the wireless connection begins working. 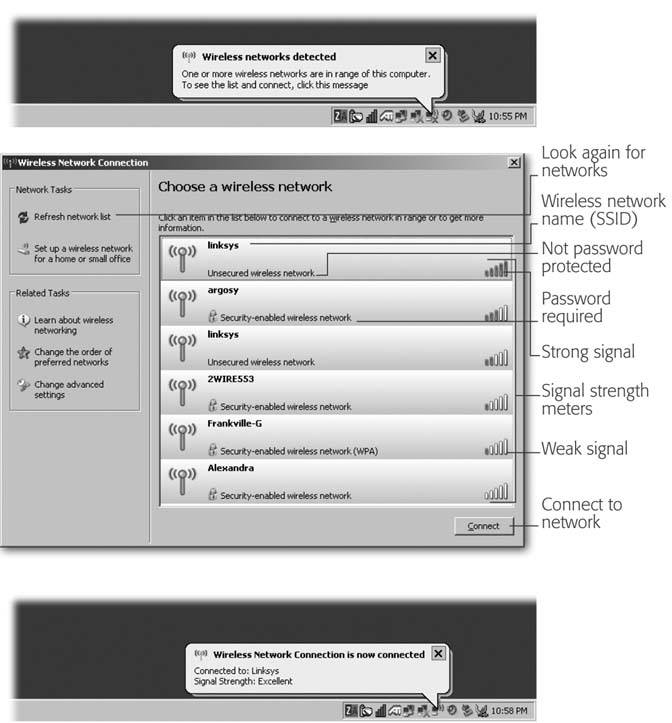 -
Your new wireless network isn't password-protected, since you haven't yet entered a password. (That comes later in these steps.) -
Your new wireless network might be named after your router's manufacturerLinksys, for example, or Belkin. When you connect to the network, the word "Connected" appears over your connected network's signal strength meter on the right. -
Run Windows Network Setup Wizard, covered in the next section, on every PC on your network . Windows Network Setup Wizard fine-tunes the network settings on each PC, introducing them to the router to make sure they can talk to the Internet, as well as share the files (Section 14.4.5) stored in each PC's Shared Documents folder. The wizard also flips some switches to let any networked PC send files to any other PC's printer (Section 14.7). Finally, the wizard turns on Windows XP's built-in firewall to protect your network. At this point, all your computers should be able to connect to the Internet. -
Secure your wireless and Powerline connections . Depending on your network connection, you may need to add security to keep passing strangers (or the neighbors) from waltzing in on your network. Here's the rundown: -
Ethernet cable . Ethernet cables are pretty airtight. No extra security is required. -
POWER USERS' CLINIC
When Your Router Needs a Password | | Most routers work fine when you follow the steps listed above. But a few Internet Service Providers (ISPs) pipe their Internet signal to you using a technology known as PPPoE (Point-to-Point Protocol over Ethernet). That fancy language boils down to one main thing on your end: you need to enter your user name and password before using the Internet. Some ISPs also require you to enter a service name . (You'll know you're in PPPoE land when you sign up with your ISP; they'll tell you they use PPPoE in the setup materials they send you.) Since your broadband modem now connects to a router rather than a PC, your router now needs to know those brief tidbits of information. You may have forgotten your user name and password after dutifully typing them in when first hooking up your PC to the DSL or cable modem. Or perhaps your ISP's technician entered them for you when hooking up your PC. If you don't recall your user name and password now, look on the service contract papers your ISP left you after setting up your broadband modem. If you're stuck, call your ISP's customer support line; explain that you're adding a router and ask for any settings you may need. (They've heard this question many times from frustrated subscribers, and they're used to giving it out.) Be sure to write everything down, confirming the spelling, before hanging up. Then fire up your router's installation CD and run its setup program. When the program asks if you have a PPPoE modem, say Yes; then fill in the boxes for your user name, password , and, if your ISP requires it, the service name required to connect. For more information about how to configure routers, check out Home Networking: The Missing Manual . |
-
Powerline . Powerline adapters send your network's signal through your home's electrical wiringwhich eventually leads off your roof, onto the telephone pole, and into your neighbor's homes . To keep others from entering your network, add passwordsan easy task that's covered on Section 14.5.2. -
Wireless . If any or all of your PCs connect to your router via WiFi, you need to secure your network by adding a password (to your router and each of your WiFi-connected PCs) and giving your network its own name, as described on Section 14.5.1. Securing a wireless network is much easier to do when connectedtemporarilyvia a wired connection. All you need to do is plug an Ethernet cable between any single PC and the router, and then you can whip through all this security business. Once you're finished securing your network, you can then unplug the cable and live a full wireless life. |