12.3. Composing and Sending Email When the Internet Connection wizardthe helper from the previous section that walked you through setting up your email accountleaves you at the main Outlook Express screen, you'll find your first piece of mail already waiting. To see it, click Inbox from the Folders pane along the screen's left edge. This message didn't come through the Internet, though, like most email. Microsoft simply programmed Outlook Express to greet all newcomers with the same welcome message. (They don't really know your email address.) The best way to get real mail is to start sending some mail to your friends (send and ye shall receive). Outlook Express lets you create and send email using any of the following methods : -
Click the Create Mail button from the toolbar at the top of the program. -
Choose File  New Mail Message. New Mail Message. -
Choose Message New Message. -
Click the Address Book icon, right-click a name , and then choose Action Send Mail. (For more information on entering names into the Address Book, see Section 12.5.) Outlook Express opens a new window containing a blank email, complete with a blinking cursor in the To: box, ready for you to add an address (see Figure 12-5, top). Follow these steps to finish your email and send it on its way. -
Address the message . Either of these methods make it easy to stock the To: line with your recipients' addresses: -
Start typing a recipient's name into the To: field. Outlook Express automatically plucks that person's address from your Address Book (Section 12.5) and inserts it into the To: field. -
Click the To: button to reveal your Address Book, shown in the middle of Figure 12-5. Hold down Ctrl, click the names of everyone you want to receive the message, and then click the Address Book's To: button. Click OK when you've selected everybody, and then your Address Book automatically inserts those selected addresses into the To: field of your blank email. If the recipients aren't listed in your Address Book, however, you need to resort to the old way of entering names: type in the email addresses individually, separated by commas or semicolons, like this: grumpy@messycottage.com, happy@chortle.com, sneezy@pollen.com. -
Add any additional recipients to the CC: or BCC: fields . The To: field works best for people who need to take action on your email; placing them in the To: field means you're expecting them to reply. But when other recipients aren't directly involved, keep them up to date by using one of the other two boxes: -
CC (Carbon Copy) . Save this box for people who aren't directly involved and don't need to reply. For instance, if your boss asks you to buy more coffee, place your boss's name in the CC: field and the coffee vendor's name in the To: field. That whisks your emailed coffee request to the vendor and lets your boss know you've taken care of the job. -
BCC (Blind Carbon Copy) . Carbon Copy and Blind Carbon Copy do the same thing: send a single piece of mail to several people simultaneously . There's one important difference, though: Carbon Copy lists the email addresses of all the recipients, so everyone on the receiving end can see who's been included; Blind Carbon Copy leaves them off . This small distinction makes a big difference. For instance, add extra recipients to the Blind Carbon Copy field when they don't know each other, letting them keep their email addresses private. Blind Carbon Copy also works great for letting the police see your response to the ransom letter. If you absolutely must forward a joke to all your friends, place their addresses in the BCC: field, not the To: or CC: fields. That keeps their email addresses away from the eyes of strangers (and spammers) when it's forwarded another 14 times. Figure 12-5. Top: To send a message to one person or several people simultaneously, click the To: button (circled) to open the Address Book.
Middle: When the Address Book opens, hold down Ctrl and click every person who you want to send your message to; the Address Book highlights each name you click. If you click a name by mistake, click it again to "deselect" it. When you've selected the recipients, click the To: button.
Bottom: The Address Book automatically addresses your email to your chosen recipients. 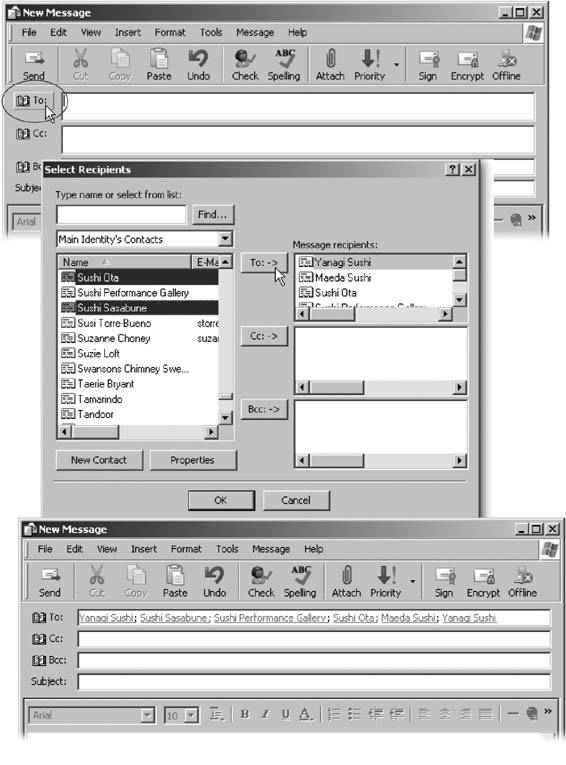
Tip: Outlook Express sometimes hides the Blind Carbon Copy field. To put it back on the menu, open any saved message, choose View All Headers, and then close the message. The next time you open a message that you want to send, the Blind Carbon Copy area is waiting for you.
Sum up your message in the Subject: field . Many people receive dozens, if not hundreds, of emails each day. To make yours stand out, sum up your message's point in the Subject: field. "Hey there" doesn't work well as a subject; "Should I buy french roast or decaf" does. If people can't decipher your email's subject with a glance at its Subject: line, your mail may disappear in a haystack of other nondescript emails. -
Choose a format, if you like . Many people ignore this step, preferring to simply type their message. Others take pains with their email's format the way the message is displayed on the screen. Outlook Express offers two formats: the fancy HTML (Hypertext Markup Language), shown in Figure 12-6, or the simple Plain Text. Both formats are described below: Figure 12-6. When you choose to write a message using the HTML format, Outlook Express places a toolbar across the top of your note. The toolbar works much like the toolbar in a word processor, letting you select words and change their fonts and colors to spice up an email. 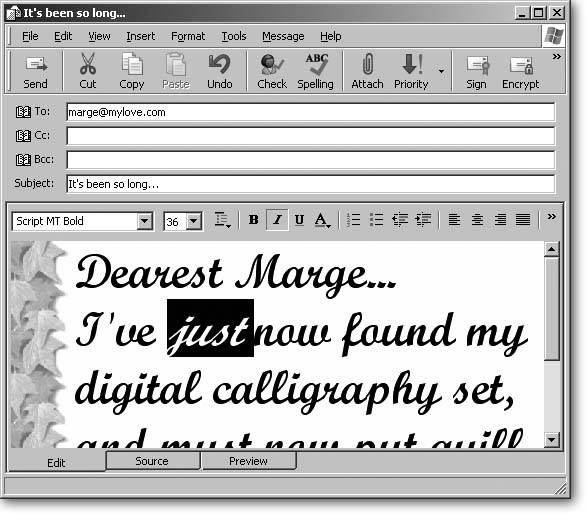 -
Plain (Format Plain Text). Plain text looks just like it sounds. As you type your message, Outlook Express places plain black letters on a white background, with no colors, underlines, italics, pictures, buttons , fancy font sizes, or flashing lights. Since its simple and to the point, Plain Text works best in most situations, especially at work. -
HTML (Format Rich Text (HTML)). The HTML format lets you create letters that resemble mini-Web pages, with elaborate backgrounds and special fonts. HTML works best for party flyers, or casual email between friends. If youre sending the email to somebody at work, stick with plain text; some corporate email programs strip HTML messages of their formatting, turning your colorful stationary back into plain text. To choose the default mail format Outlook Express uses for all your new messages, choose Tools Options Send tab; in the area called Mail Sending Format, select either HTML or Plain Text. GEM IN THE ROUGH
Sincerely YoursAutomatically | | Sending lots of email means lots of repetitive typing, especially when ending a message. Email doesn't allow for scrawled signatures for a closer, so most people make do by typing their name and perhaps adding the name of their company, Web site, or a witty phrase. To speed things up, add those words to a signature that Outlook Express automatically tacks onto the end of your email. To create a customized signature, choose Tools Options Signatures tab New; the Signature Settings area appears, ready for you to type in a signature in the Edit Signature area. If you've set up several accounts in Outlook Express to handle different email addresses, click the Advanced button, and click the email account you'd like to bear that particular signature. (That lets you assign a bawdy signature for your personal email address, for instance, but stick to standard fare for your work email address.) Tack on your newly created signature to all of your messages from the assigned account by turning on "Add signatures to all outgoing messages." If you prefer to reserve your signature for a few specific messages, leave that option turned off. Instead, choose Insert Signature when composing an email. | But no matter which format you choose there, you can change the format setting, on-the-fly , when composing a new message: choose Format Plain Text or Format Rich Text (HTML). One thing to remember, though: choosing Plain Text is always appropriate, as it's easy to read. But since most spam comes formatted in HTML, your HTMLformatted email may be kicked into the recipient's Junk folder by her spam filter. The bottom lineuse HTML formatting with caution, and definitely not for must-see email messages. -
Type your message . Type your missive into the message window's bottom half. The usual editing rules apply here, which means that you can cut (Ctrl+X), copy (Ctrl+C), and paste (Ctrl+V) words or sentences while writing your message. -
Send your message by clicking Send on the message's toolbar . As soon as you click the Send button, Outlook Express connects to the Internet, delivers the mail to your ISP's mail server, and then starts your mail on its path to the recipient's inbox. That lack of delay can be dangerous. The off-the-cuff message you dashed off in 10 seconds could live in somebody else's PC (not to mention in her mind) for a long time.
Tip: You may prefer that Outlook Express wait a few minutes before sending your emails, giving you time to add last-minute thoughts or even cancel the message if you suddenly realize calling someone a toad won't improve matters. Adding a delay is a two-part process. First, choose Tools Options Send tab and turn off "Send messages immediately." Then click the General tab and turn on "Check for new messages every XX minutes," changing XX to any number between 1 and 480 minutes. (Ten minutes usually works well.)
Mail Recipient. Outlook Express then quickly opens a new message and attaches your selected file or files. -
Open a new message, and then drag and drop a file (or a group of selected files) into your open message window. Outlook Express then tacks the file or files onto your email for transporting. -
Open a new message and choose Insert File Attachment from the New Message window. Navigate to the folder containing the desired file, and then double-click the file you want. Repeat for other files. (To send several files in the same folder, hold down Ctrl while clicking each file you want.) Attached the wrong file to your message? Right-click the misplaced file's icon from within your email window, and from the shortcut menu, choose Remove to pry the file from your message. (Outlook Express was sending only a copy, so your original file stays unharmed.) One warning: don't try to send a friend 25 favorite photos from your trip to Tunisia, or any other large files. Sending files that add up to more than 5 MB can create several problems. -
Not everybody has a speedy broadband connection (Section 11.1.2), so your vacation photos may end up tying up your friend's dial-up connection for hours. -
Many email accounts allow only about 5 MB of storage. Your friend may receive your message, but nothing else. All his other email bounced (Section 5.7) because your huge file hogged his entire mailbox. -
Many mail servers balk at large files and bounce them back to you, wasting your efforts. You've got several options if you do find yourself needing to send large files; the first step is recognizing when your attachments qualify for beefy status. Keep an eye on the file's size as you attach it; Outlook Express also lists the size next to each attached file's name. When the total exceeds 5 MB, try some of these solutions. -
If you're sending digital photos, let Windows XP resize them for you automatically (Section 5.5). Smaller photos consume less space, letting you safely send a dozen decent- sized photos. Consider posting your photos to a photo-sharing site (Section 5.5.2), and then sending your friend the site's Web address. -
Try sending large files through YouSendIt (www.yousendit.com). This free Web site lets you upload a file, and then sends the recipient an email with the link where he can download it. -
To avoid dealing with a third-party service like YouSendIt, chat hounds can send large files through an Instant Messaging program. When you've exhausted all these options, don't forget how our ancestors made do: copy your large files to a CD (Section 10.5.1), and mail or FedEx it to your friend or coworker's street address. 12.3.2. Spell Checking Much to the dismay of bad spellers, speedy typists, and fumble-fingered folk, Outlook Express doesn't include a built-in spell checker. Instead, Spelling is listed on the menu (Tools Spelling) as an unavailable, "grayed out option, leading people to think they've somehow broken their program. Instead, Microsoft deliberately left out spell checking as one more way to annoy people into upgrading to its full-featured email program, Outlook, which includes a spell checker. However, if you install Microsoft Word, FrontPage, Works Suite, or similar Microsoft programs, Outlook Express sneaks over and borrows that program's spell checker, letting its spell check option appear on the menu in its full glory . Then you can press F7 (or choose Tools Spelling) to spell check your newly composed message. Even better, make Outlook Express automatically check your spelling before sending any messages by choosing Tools Options Spelling tab and turning on the "Always check spelling before sending checkbox.
Tip: To spell check a particular word while composing, double-click the word to select it, and then press F7. Outlook Express then quickly spell checks that word, skipping the rest of your message.
|