Hack 44 Wardrive with Knoppix
| < Day Day Up > |
| Use Knoppix effectively as a wireless site survey tool that captures GPS coordinates along with data . 5.9.1 KismetMike Kershaw, the author of Kismet, declares the following at http://www.kismetwireless.net:
Essentially, Kismet is your best friend from conducting a basic site survey to cracking Wired Equivalent Privacy (WEP). Some people find it daunting to use the best wireless networking utility because of the setup. People are daunted not by Kismet per se, but by the correct drivers, the other needed patches to the kernel, and the needed user -land tools. So imagine the ability to boot off of a CD-ROM and have all of your hardwarenot only supported for use, but also already configured. That's the beauty of using Knoppix and Kismet together. 5.9.2 Required Wardriving HardwareWardriving normally requires just a wireless network card. However, with the addition of a GPS unit you can map your excursions:
Magellan 310, 315, 320 Garmin GPS III Garmin etrex GPS 45 Crux II GPS PCMCIA card Holux GM-200 serial version Holux GM-200 USB (needs USB-to-serial support in kernel) Holux GM-210 USB (needs USB-to-serial support in kernel) Garmin eMap Garmin GPSMAP 295 Garmin GNS 530 Garmin GPS 12MAP EAGLE Expedition II DeLorme Earthmate Magellan Meridian Gold (works only with NMEA V2.1 GSA setting) 5.9.3 Set Up GPSPlug in your USB-to-serial adapter; when Knoppix boots, the adapter is then automatically detected and its drivers are loaded. Plug the eTrex serial adapter into the USB adapter, then plug in your eTrex and turn it on. For Kismet to use the GPS data, it must have a way to collect it. Kismet uses the gpsd program to read the data from this hardware. To start gpsd , run: knoppix@ttyp0[knoppix]$ sudo gpsd -K -p /dev/ttyUSB0 Replace /dev/ttyUSB0 with the address for your USB-to-serial adapter (check with the dmesg command). (With my setup, gpsd will die without the -K setting, so I suggest that you use -K if you have to use USB in your GPS setup.) The gpsd command I use is a bit more complicated, because I like to keep a text log of all the output that gpsd generates. I keep a separate terminal tab open with the output of gpsd copied to the screen and to a log file. The screen output is helpful if gpsd crashes, and the log file preserves my data collection if the laptop loses power. Here's my command: knoppix@ttypo0[knoppix]$ sudo gpsd -D 4 -K -p /dev/ttyUSB0 2>&1 tee gpsd-log You can verify that gpsd is working with the following command: knoppix@ttyp3[knoppix]$ sudo lsof -ni grep gpsd gpsd 6018 root 3u IPv4 8922 TCP *:2947 (LISTEN) To verify that gpsd is reporting correct values, connect to localhost:2947 with netcat : knoppix@ttyp1[knoppix]$ nc localhost 2947 DATA GPSD,D=,A=0.000000,A=0.000000 This output shows that the GPS unit isn't even plugged in, but it's clear that gpsd is keeping the device open and is ready for data. Even if you don't receive a signal for your GPS unit, Kismet still functions. This way, the GPS subsystem in Kismet knows that the GPS unit doesn't have a lock, but in the event that it does, Kismet receives that data without you starting up gpsd again. 5.9.4 Configure KismetThe main configuration files for Kismet are in /etc/kismet/ . Most of the settings you are interested in changing are in kismet.conf and kismet_ui.conf . To make sure you have to set this up only once, you use a persistent home directory [Hack #21] and copy the configuration files to it: knoppix@ttyp0[knoppix]$ mkdir ~/.kismet/ knoppix@ttyp0[knoppix]$ cp /etc/kismet/kismet.conf ~/.kismet/kismet.conf knoppix@ttyp0[knoppix]$ cp /etc/kismet/kismet_ui.conf ~/.kismet/kismet_ui.conf
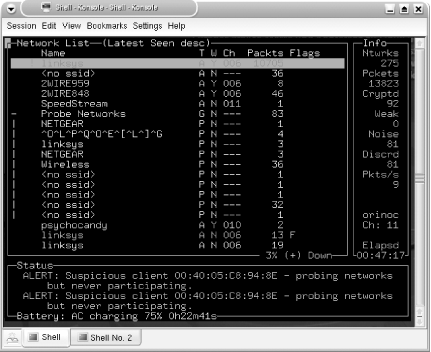
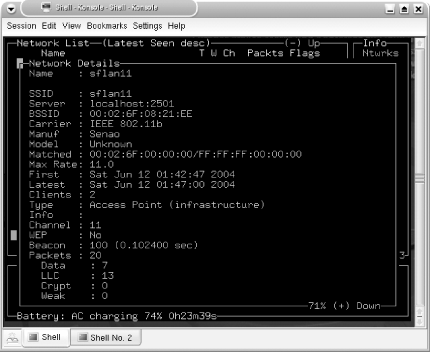
At the very least, change the default card to match your hardware. Find this line: source=orinoco,eth0,orinocosource and change it to match your card type, card interface, and card name , respectively. The kismet.conf file contains example source lines for other cards to make changes easier. If you plan to use GPS when you are wardriving, also change: gps=false to: gps=true All of the other defaults are a matter of personal taste. After you get a feel for running Kismet, you will learn how to configure these defaults. Make your edits to the configuration files in your home directory, and save your changes. To launch Kismet with your alternate configuration files requires a -f option to specify the path to the kismet.conf file and a -u option to specify the path to the kismet_ui.conf file knoppix@ttyp0[knoppix]$ sudo kismet -f ~/.kismet/kismet.conf -- -u ~/.kismet/kismet_ui.conf When you start Kismet, you find that the wonderful world of wireless has a lot fewer secrets. If at any point you need help, hit H for a list of commands. In Figure 5-3, you can see that I have 275 networks with a total packet capture of 13823. Ninety-two of those packets are encrypted, 81 are noise, and at the moment, I am capturing at a rate of 9 packets a second. Figure 5-3. Kismet default screen Notice that Kismet has Group filters and that Probe Networks has a number of elements. There is a default Linksys access point with factory settings (in red). In the bottom pane, there are various other alerts as they occur. In this case, I have a client that is probing networks. Figure 5-4 shows the Network Details for a selected network. All of the fields are self-explanatory. Figure 5-4. Kismet network details An interesting feature of Kismet is the ability to lock onto a network. Select a network, then hit the L key to lock on to stop the channel hopping and set monitoring only to the selected network's channel. To resume hopping , press H. Once you finish running Kismet, you can close the program by hitting Ctrl-Q. By default, logs are written to the current working directory as Kismet runs. If you're in your persistent home directory, and it's a small USB storage drive, this directory may fill up quickly. In an example run, I have six log files in my home directory: total 15912 -rwxrwxr-x 1 knoppix knoppix 346788 Jun 14 01:10 Kismet-Jun-13-2004-1.csv -rwxrwxr-x 1 knoppix knoppix 13221727 Jun 14 01:10 Kismet-Jun-13-2004-1.dump -rwxrwxr-x 1 knoppix knoppix 574530 Jun 14 01:10 Kismet-Jun-13-2004-1.gps -rwxrwxr-x 1 knoppix knoppix 639665 Jun 14 01:10 Kismet-Jun-13-2004-1.network -rwxrwxr-x 1 knoppix knoppix 100326 Jun 14 01:10 Kismet-Jun-13-2004-1.weak -rwxrwxr-x 1 knoppix knoppix 1398795 Jun 14 01:10 Kismet-Jun-13-2004-1.xml You can look at the .csv , .xml , and .network with any text editor, and you can analyze the .dump file with ethereal . The .weak file is used for the capture of weak ( otherwise known as "interesting") packets, and can be analyzed with airsnort or other programs that are used with cracking WEP. The storage of so-called "weak" packets in a separate file can come in handy if you're low on space, so you can delete the other files and keep just these to crack. The .gps file is an XML document that contains latitude, longitude, heading, speed, altitude, and time markers. When populated with correct information, this file makes your Kismet data useful on a large scale. You can overlay your network findings on a satellite map of the area or from other map sources. 5.9.5 Draw a Map of Your Wardriving SessionYou can easily map the findings of your wardrive (or you can do this over GPRS while driving, as in [Hack #18] ). To make a map with a Kismet log, connect to the Internet, then run: knoppix@ttyp0[knoppix]$ gpsmap -v -o MapExample-test-Mapblast.gif -S 0 -n 1 -G -t -b -r --feather-range -u -a -B 3 --feather-scatter -p -q 0 -e -k Kismet-Jun-13-2004-1.gps This command creates a GIF image with the name MapExample-test-Mapblast.gif in your current working directory. It uses the online Mapblast resource to download a given range of coordinates that cover the entire .gps file. Gpsmap color-codes networks based on their given WEP status and whether a given node is in a factory state. It makes a color map that displays the distance traveled and shows the range of networks based on strength at given points where the networks are still within range. Reference the key at the bottom of the map if the colors and symbols confuse you.
Gpsmap accepts a number of options so you should read the manpage . Some of the options, such as scaling, can take hours, but most of the time, it's a quick 30-second job. Experiment. By using filters, you can make interesting maps that show only access points that are open, that are owned by people you know, or that all have a given SSID, or you can make up other wireless settings. If you find wardriving to be interesting, expand by exploring with kismet_drone . Using Knoppix, encryption, and a stealth computer, you can collect volumes of data (on your own network of course). 5.9.6 Join NetworksWhat's the purpose of wardriving if not to make use of the connections you find? Don't answer that. I prefer to assume you have harmless intent. To join a network you've discovered , you must either quit the kismet server or use a second wireless card for the connection. I use a few short scripts to assist with joining networks. The first script, cng_mac , generates a random MAC address, which is useful for testing MAC filtering on a wireless network: #!/usr/bin/perl # # GPL v2 # # jake@appelbaum.net # # A quick script that generates a random variable # It looks suprisingly like a MAC address # Something like: 23:00:C0:FF:EE:00 # However it will take the first set of octets and set a vendor code # Vendor codes are in /usr/share/ethereal/manuf # # /usr/share/ethereal/manuf for (`cat /etc/kismet/client_manuf`){ push (@vendorcode, ) if ($_ =~ /(^[^#]\S+)\s/); } srand(time( ) % 345); printf("%s:%X%X:%X%X:%X%X",$vendorcode[rand(1) * $#vendorcode], \ rand(16),rand(16),rand(16),rand(16),rand(16),rand(16)) The run_wardrive script resets a PCMCIA wireless card and brings its interface back up with a random MAC address. If you are using an integrated wireless card, you may comment out the first four lines of the script, leaving only the ifconfig commands: #!/bin/sh # GPLv2 # jake@appelbaum.net # cardctl eject sleep 1 cardctl insert sleep 1 ifconfig down ifconfig hw ether `~/bin/cng_mac` ifconfig up Use run_wardrive , where is the PCMCIA slot containing your wireless card and eth0 is the network interface: knoppix@ttyp0[knoppix]$ sudo run_wardrive 0 eth0 Put both of those scripts in the ~/.dist/bin directory of your persistent home directory (or create ~/.dist/bin with mkdir ~/.dist/bin if it doesn't already exist) and give the scripts executable permissions: knoppix@ttyp0[knoppix]$ chmod a+x ~/.dist/bin/cng_mac ~/.dist/bin/run_wardrive Jake Appelbaum |
| < Day Day Up > |
