Hack 74 Resize Windows Partitions
| < Day Day Up > |
| Avoid spending money on Partition Magic or other commercial partitioning tools by using Knoppix to easily resize FAT, FAT32, and even NTFS partitions . There are two methods for resizing Windows partitions with Knoppix: use QTParted for all filesystems or ntfsresize for NTFS partitions. QTParted gained the capability of resizing NTFS only recently, so if you use an older Knoppix CD, you might need to use ntfsresize , which requires more work and is more error-prone . QTParted is a GUI frontend for the command-line program parted .
Once you defragment the filesystem that you wish to resize, boot into Knoppix and resize it with QTParted using the same steps outlined in [Hack #56] . To run QTParted , click K Menu Figure 7-1. Resize a partition with QTParted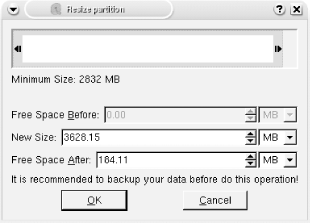 If you want to resize an NTFS partition and your version of QTParted does not support NTFS resizing, you can also use the ntfsresize tool. There are two slightly different methods for using ntfsresize , depending on whether you want to enlarge or shrink a partition. 7.5.1 Enlarge NTFS PartitionsBefore using ntfsresize to enlarge a partition, you must use a tool such as fdisk or cfdisk to delete the partition, and then recreate it in the new larger size. If you want a safeguard against mistakes, you should back up the partition table with the steps outlined in [Hack #54] before making any changes. You can use fdisk or cfdisk ( cfdisk is considered to be more user -friendly) from the command line: knoppix@ttyp0[knoppix]$ sudo fdisk /dev/ hda Change hda to the name of the drive you wish to edit. It is important that you recreate the partition with the same starting block and partition type as the old partition.
If you have any free space before the existing partition, you might find that fdisk makes it easier to specify the starting block than cfdisk . Either way, once you delete the old partition, recreate it at the same starting block and with the same partition type. Write down the exact size of the new partition, because this information is necessary to use ntfsresize . Then write your changes to the disk. Don't worry. This does not actually delete any data on the partition, it only changes the partition table itselfa table describing where partitions begin and end located at the beginning of your hard drive. If you decide not to resize the partition, you can still turn back. Just use cfdisk or fdisk to change the partition size back to normal. If you leave the partition table at its new size, do not try to reboot to Windows until you finish the steps, or you could lose or damage your files. Once you resize your NTFS partition, you might need to reboot before the kernel uses the new partition table. Fdisk or cfdisk should notify you if this is the case, once you write the changes. Once the new partition table is written and ready, you can resize the partition with the following command: knoppix@ttyp0[knoppix]$ sudo ntfsresize -s size /dev/ hda1 Replace size with the new size of the partition that you wrote down earlier, and replace hda1 with the partition you want to resize. By default, the size parameter is in bytes, but you can specify kilobytes, megabytes, or gigabytes by appending K, M, or G, respectively.
When ntfsresize is finished, it sets the partition so that it requires a filesystem check at next boot. So, when you next boot to Windows, it checks the filesystem with chkdsk before it allows you to load Windows. It is important that you do not mount the new disk under Knoppix until you have allowed chkdsk to run on the new partition. 7.5.2 Shrink NTFS PartitionsThe method for shrinking an NTFS partition with ntfsresize is the reverse for the method used to enlarge it. You must run ntfsresize on the drive, and specify the drive's new size: knoppix@ttyp0[knoppix]$ sudo ntfsresize -s size /dev/ hda1 The ntfsresize program then attempts to shrink the partition to the specified size. If it encounters file fragments, or you give it a size that is too small, ntfsresize exits with an error that states that the partition size is too small, and provides an acceptable size. After you resize the filesystem itself, you must shrink the partition. Use fdisk or cfdisk to delete and recreate the new partition, making sure to start the partition on the same block with the same partition type as before: knoppix@ttyp0[knoppix]$ sudo fdisk /dev/ hda Fdisk accepts a partition size in kilobytes, megabytes, or gigabytes just like ntfsresize , so just make a note of the new partition size. Once you have resized the partition itself, it is necessary to reboot the machine into Windows and allow it to run chkdsk before you attempt to mount or otherwise change the partition under Knoppix. |

 System
 | < Day Day Up > |