Hack21.Let amaroK Rock Your Music Collection
Hack 21. Let amaroK Rock Your Music Collection
Use amaroK to integrate great music features such as album art, Audioscrobbler, Musicbrainz, song lyrics, and great playlist management into one application. As more people have started listening to their music collections on their computers, a number of Internet services have appeared to help manage collections and to utilize all this great metadata that exists on MP3s. The services have ranged from CDDB and FreeDB, which provide album and track information based on CD signatures, to services that provide album art and lyrics. A number of the music players under Linux have utilized one or two of these types of services either natively or through the use of plugins, but the amaroK music player seems to be one of the best at integrating them all by default into a useful and powerful interface. In this hack, I discuss many of the different features of the amaroK player and how to get the most out of them. 2.10.1. Get amaroKamaroK is becoming a pretty popular music player, and many distributions already provide packages for it, so you can probably use your standard packaging tool to install itbut if your distribution doesn't provide it, go to the official page at http://amarok.kde.org and download a package for your distribution. If your distribution doesn't have a package, just grab the source and build it according to the installation instructions. Once amaroK is installed, launch it from your desktop menu or type amarok into a console. The first time amaroK launches, it will run you through a configuration wizard so that it can find your music files. Point it to your collection and amaroK will scan through each of the files and collect all the metadata for its internal database. Depending on the size of your collection, this may take some time; however, I've found that amaroK is able to scan even a large collection pretty quickly.
As part of the initial configuration wizard, amaroK will ask you to choose the default display style for the application. The xmms style splits amaroK into a small navigation window with controls to play, pause, and so on, and a large playlist window with the rest of the controls. The juk style combines everything into a single large window (it's named after another KDE music management program with a similar interface). Which style you choose is a matter of taste; however, I found that when I tried the xmms style, I was always opening the other window to glance at context-sensitive information such as album art, so I changed it to a single window interface. For simplicity, I will describe sections of the amaroK window as though it were in the single-window style for the rest of this hack. 2.10.2. amaroK Window SectionsOnce you have finished the first run wizard and your music is loaded, you will see the main amaroK window (see Figure 2-6). This window is split into two main sectionsa playlist on the right and a series of tabs along the left that open into a sidebar and display a number of different context-sensitive information panels. This sidebar is where the real power of amaroK lies, and I will talk more about it in a minute. The playlist section is like most other playlist sections for media players and displays title, artist, album, and other metadata that amaroK has scanned from your music. To play a track, select it and click the play button along the bottom or click Actions Figure 2-6. Main amaroK window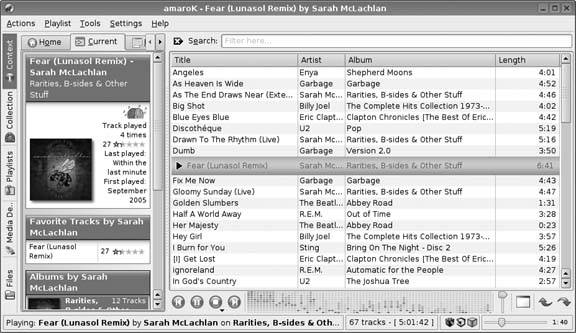 The right-click window also gives you the ability to edit metadata for the track. Select View/Edit Meta Information from the right-click menu, and you can change artist, title, and other information about the track manually or click Fill-In Tags Using MusicBrainz to take advantage of amaroK's MusicBrainz integration. MusicBrainz compares an audio signature from your track with its own database of signatures and provides you with a list of songs it thinks the track might be. In my experience, usually only one (or occasionally two) of the options it returns will be applicable, so it's easy to pick out the track. Select the track and MusicBrainz will fill in all the metadata for you. When you are finished editing the information, click Save & Close to save your changes. [Hack #30] provides more information about tagging your files using MusicBrainz. 2.10.3. Configure amaroKamaroK has many different options, from basic features to advanced sound engine controls. Click Settings The engine display is where configuration can get a bit complicated. amaroK itself doesn't know how to play MP3s, Oggs, and so on, and instead uses various audio engines that do. This makes amaroK very flexible in that it can adapt to a number of audio engines to suit its environment. Audio engines include the xine engine, GStreamer, aRts, and others. Which engine you choose depends on your specific environment, but for instance, if you use a KDE desktop you probably use aRts to manage your audio, so choose that engine. If you use GNOME you might want to try the GStreamer plug-in. If either of those engines don't work or seem buggy, try the xine engine, which I've personally found to be more stable than the others. Depending on which engine you choose, this display allows you to configure a number of advanced options for that engine, so tread carefully here. The collection display lets you tell amaroK where to find your music on the system through a tree view of the filesystem. Click on a directory and check it to add it to amaroK's list. In this display you can also configure whether amaroK uses a local SQLite database or a MySQL database to store its collection database, including listening stats. By default, amaroK uses an embedded SQLite database, but [Hack #22] has information on how to configure and use amaroK with a centralized MySQL database. Finally, the Scrobbler display will allow you to configure an Audioscrobbler account if you wish to submit your listening data to Audioscrobbler. Audioscrobbler is an Internet service through which subscribers upload their listening habits. Audioscrobbler uses this data to figure out listening preferences and displays suggestions in the sidebar or adds them to your current playlist. Set this option by clicking the small toggle box in the main window next to the volume slider. You'll know you have the right one when you see the tool tip "Append Suggestions on." 2.10.4. The SidebarThe real usefulness of amaroK comes into play in the sidebar. This sidebar splits different types of context-sensitive information into a series of vertical tabs called Context, Collection, Playlists, Media Device, and Files. Each tab opens into a different sidebar full of information and controls for your music collection. Click on a tab to show that set of information and click a second time to hide the sidebar completely. 2.10.4.1. The Context Pane.The Context pane is the first tab in the sidebar and is the tab you will likely display most when you are just listening to your music. This pane has three tabs along the top: Home, Current, and Lyrics. Like the name indicates, the Context pane displays context-sensitive information based on the current playback state and the track that is playing. If no track is playing only the Home tab is enabled. This tab displays lots of different information about your listening habits and music collection, including a list of your favorite tracks from data that amaroK automatically collects based on your listening habits. In addition, the Home tab lists the newest tracks you have added to the collection and a list of least-played tracks. When a track is playing, the Current and Lyrics tabs are enabled. The Current tab provides a lot of useful information about the current track split into a few sections. The first section displays information about the current track, such as the title and album, along with album art if it has been configured. If you haven't yet found album art for this track, click the question mark icon or right-click and select "Fetch from amazon.com" and amaroK will search Amazon.com for appropriate cover art. Cycle through the list of images until you find the correct cover and click Save to set that image as the cover art for this album. Once you set the cover art for one song, all the other songs for that album will display the cover art as well. Click the Lyrics tab to attempt to retrieve lyrics for the current track and display them in that pane. If amaroK can't find a perfect match, it will list a number of possible matches or even allow you to enter your own search terms to find lyrics. amaroK also keeps track of your listening habits and will display the first time and the last time that you listened to this particular track in addition to its current rating. amaroK calculates ratings based on your listening habits. The rating algorithm is a bit more complex than this description, but basically songs that you listen to all the way through are rated higher and songs that you skip or only partially play are rated lower, so to give a song a higher rating, listen to it more often and listen to it completely.
If you are connected to the Internet, the next section of this pane will display a list of suggested songs based on the current track using Audioscrobbler. With Audioscrobbler support enabled, amaroK will grab a list of suggested tracks from Audioscrobbler based on the track you are currently listening to, and display the tracks you happen to have in your collection, sorted by your ranking. Right-click a track and select Append to Playlist to add it to your current playlist. Click Settings The next section in this pane displays a list of your favorite tracks by the same artist and underneath that a complete list of your albums by that artist, sorted by date, so that you can easily add them to the current playlist. You can also use this view to easily edit metadata for entire albums. Right-click on one of the album titles in the list and select View/Edit Meta Information, and you will be able to edit information about the album and apply it to all tracks for that album. 2.10.5. The Collections PaneThe Collections pane provides you with a complete list of tracks that amaroK has found in your collection sorted by artist and album. You can enter a keyword at the top of the pane to filter the list. Right-click on an artist, album, or specific track to add it to the playlist, queue it in the current playlist, create a new playlist, or edit meta information. 2.10.6. The Playlist PaneThe Playlist pane provides an interface for all of the playlists that you have created or that amaroK has found in your collection. You can add, delete, or edit existing playlists from the top part of the pane. The bottom section of the pane is titled "Smart Playlists" and provides a number of virtual playlists that amaroK has created based on your collection. These virtual playlists include all songs in the collection, your favorite tracks (based on amaroK's rating system), your most played tracks, and even a set of fifty random tracks. Click Create Smart-Playlist to open a window where you can create your own rules-based playlist. For example, using this feature, you can tell amaroK to create a playlist of all Rock genre songs released between the years 1982 and 1988 that you have listened to less than five times in the past two months. The process is simple; just create one or more rules that specify your criteria and save. A rule is composed of three pieces: a database field to act upon which is chosen from the drop-down list; an operand that states how to match your criteria against the data; and finally a criteria string. The + button at the end of the default single rule line lets you add additional rules. 2.10.7. The Media Device PaneIf you use an iPod, the Media Device pane will let you drop files into a queue to transfer to your iPod. Click the Transfer button at the bottom and amaroK will initiate the transfer process. 2.10.8. The Files PaneThe Files pane is a general file system browser that lets you find tracks or playlists on your system and add them to amaroK. You can also use a keyword filter to display only files that match your keyword. |

 Rescan Collection. You can also click Tools