| Are you ready to start engineering the final masterpiece? All the elements you'll use to build the main body sections of the final are now complete; you just need to put them together. You'll create a polished stage on which your client's ever-important product information will shine. The orange section First you'll create a mellow background and position your backdrop: 1. | Create a new composition named Section1_Orange in the Sections folder, with dimensions 720x540, Frame Rate 29.97, and Duration 10;00.
| 2. | Add the Orange Squares comp at time 0;00.
| 3. | Go to time 0;28, and create a new solid named BG Orange that's comp size and pale orange (RGB: 255, 194, 137).
| 4. | Drag the solid layer under the Orange Squares comp in the Timeline.
| 5. | Go to time 1;00. Drag the Moving BG Orange comp to the Timeline, and position it so it's layer 2.
| 6. | Change its Position to 346, 325.
Beginning to build the orange section  |
The spot will look more professional and work much better if the transitions interact with the elements they're revealing. The setup doesn't have to be elaborateyou'll simply tweak the transition's position so the transition interacts with the backdrop: 1. | Go to time 1;29, and add a Position keyframe of 560, 100 to the Orange Squares layer. Doing so lines up the final radiating orange square with the small orange solid's resting position.
Adding the Position keyframes to the transition 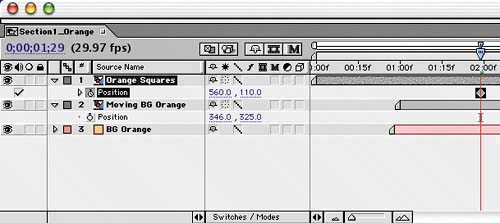 | 2. | Return to time 0;00, and change the Position of the Orange Squares layer to 78, 476. Now the orange squares radiate outward starting from the lower-left corner of the composition.
| 3. | Go to time 0;25. You should tweak the Orange Squares layer's position so that it covers the entire comp during the transition to the Moving BG Orange comp. Add a Position keyframe of 360, 270, and then copy the keyframe.
| 4. | To hold the Orange Squares layer in that position during the transition, go to time 1;06 and paste the keyframe you copied.
| 5. | Scrub the frames between the two keyframes you just created. You'll notice that the Orange Squares composition moves around even though the two keyframes have the same coordinates. To fix this, select the keyframe at time 0;25, and choose Animation > Toggle Hold Keyframe.
Timeline with the Hold keyframe 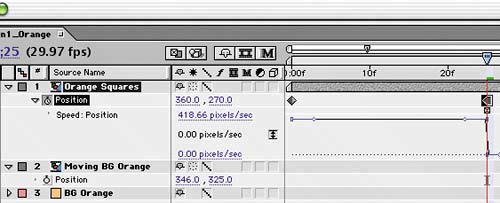 |
Play back what you have so far, and note how the Orange Squares comp crops the squares as they scale outward. To fix this, turn on the Collapse Transformations switch for the Orange Squares comp layer. Now the layers aren't confined by the dimensions of the Orange Squares composition. The scaling squares are cropped by the nested comp's dimensions. 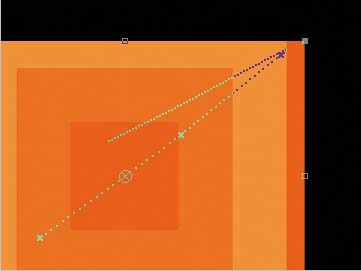
The Collapse Transformations switch reveals the layers entirely. 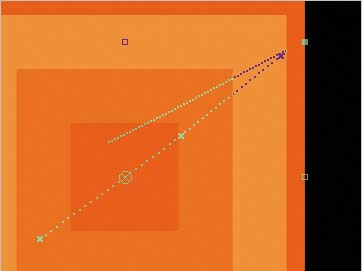
Matting a photo Next, let's begin adding the client's product photos: 1. | Go to time 4;00, and add a composition marker (Shift+2).
| 2. | Create a new solid called Pic Matte that has dimensions of 720x720 and is any color. (Since you'll be using this solid as a track matte to frame and crop the product photos, the color doesn't matter as long as it's different from the mid orange color so you can see it in the Comp window as you work.)
| 3. | Set the Scale (44.1, 31.5) and Position (346, 278) of the Pic Matte so it takes up the top two thirds of the larger orange square.
Adding the Pic Matte 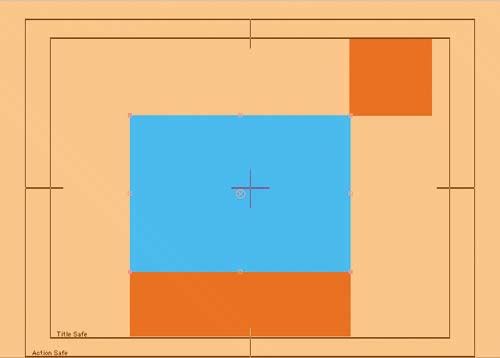
| 4. | Add the Bedroom_01.jpg file to the Timeline, under the Pic Matte layer. Notice that the image fills the entire composition.
| 5. | Change the Bedroom_01 layer's Track Matte to Alpha Matte "Pic Matte". The image is cropped to the Pic Matte layer's dimensions.
| 6. | Change the Position of the Bedroom_01 layer to 360, 260 and the Scale to 65, 65%.
Adding the Track Matte to the picture 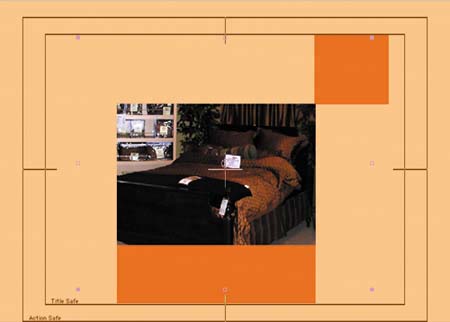
| 7. | Add a 0% Opacity keyframe.
| 8. | Go to time 4;10, and change the Opacity to 100%. Now the product image fades in after the orange squares land in place.
|
Adding text The images are all in place, but they're only half of your visual symphony. Let's bring in another movement: text. You'll start with an element that will remain consistent throughout the project: 1. | Press 2 on the keyboard to return to time 4;00.
| 2. | Create a new horizontal text layer that displays the word STYLE in a dark orange color (RGB: 214, 75, 3). (For the other text properties, we used Futura Condensed Medium, size 92 pixels, and centered.)
| 3. | Move forward in the Timeline so you can see the photo. Move the text so it's centered in the mid orange area under the photo. (We used Position 344, 475.)
Creating the STYLE text element 
|
Next, you'll create a horizontal graphic element to serve as a backdrop for text you'll place above the photo: 1. | Press 2 to return to time 4;00.
| 2. | Create a new solid layer named Horizontal Bar that has dimensions 720x110 and is colored a pale orange (RGB: 255, 232, 206).
| 3. | Position the Horizontal Bar at 436, 110 so its bottom edge lies along the top edge of the big square.
| 4. | In the Timeline, drag the Horizontal Bar layer so it's just above the BG Orange layer.
| 5. | Apply the Linear Wipe effect (Effect > Transition > Linear Wipe) to the Horizontal Bar layer.
| 6. | Set the effect's Wipe Angle to 0 x +270.
| 7. | Add a Transition Completion keyframe of 100%.
| 8. | Go to time 4;10, and change the Transition Completion property to 30%. Now the solid slides in from left to right.
Settings for the Linear Wipe effect 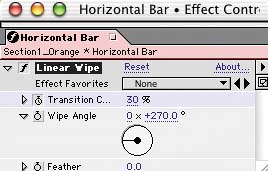
|
Now you'll create a vertical version of the backdrop you just created, for the left side of the photo: 1. | Copy the Horizontal Bar, and then paste it at time 4;02.
| 2. | Rename the duplicate solid to Vertical Bar, and change its dimensions to 110x540 and its color to RGB 255, 232, 206.
| 3. | Position the Vertical Bar at 129, 326 so its right edge lies along the left edge of the big square.
| 4. | Change the Vertical Bar's current Wipe Angle keyframe to 0 x +0.0.
| 5. | Go to the Vertical Bar's next keyframe at time 4;12, and change the Transition Completion to 21%.
Adding the color bars 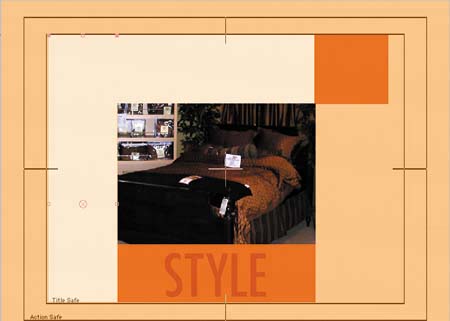
|
Now that you have your backdrops, you can add the last two text elements. The first is a vertical element that scrolls on the screen and then fades to a lighter color: 1. | Create a new horizontal text layer that displays STYLE in a dark orange color (RGB: 214, 75, 3). (For the other text properties, we used Futura Condensed Medium, size 92 pixels, and centered.)
| 2. | At time 4;13, add a vertical text layer that displays PERSONAL in a dark orange color (RGB: 214, 75, 3). (For the other text properties, we used Futura Condensed Medium, size 36 pixels.)
| 3. | Position the text so the top of the P is about even with the top of the picture (about 133, 310).
| 4. | Apply a Linear Wipe effect (Effect > Transition > Linear Wipe).
| 5. | Set the Wipe Angle to 0 x +0.0.
| 6. | Create a 100% Transition Completion keyframe.
| 7. | Go forward 15 frames by pressing Ctrl+G (Windows) or Command+G (Mac OS) and entering +15 in the dialog.
| 8. | Change the Transition Completion to 0%.
| 9. | Go to time 5;08, and add a 100% Opacity keyframe.
| 10. | Go forward 15 frames, and change the Opacity to 50%.
Fading down on the text 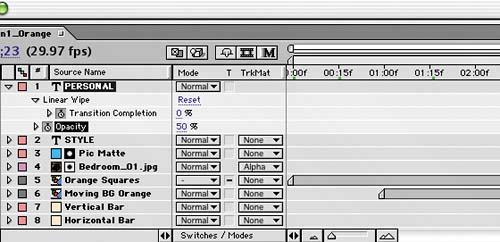 |
The final text element is horizontal and lies above the photo. It also scrolls on and fades out: 1. | Go to time 5;08, and create a horizontal text layer that displays EXPRESSION in a dark orange color (RGB: 214, 75, 3). (For the other text properties, we used Futura Condensed Medium, size 36 pixels.)
| 2. | Position the layer at 330, 127.
| 3. | Apply a Linear Wipe effect (Effect > Transition > Linear Wipe) to the layer.
| 4. | Set the Wipe angle to 0 x +270.
| 5. | Create a 100% Transition Completion keyframe.
| 6. | Go forward 15 frames, and change the Transition Completion to 0%.
| 7. | Go to time 6;03, and add an Opacity keyframe at 100%.
| 8. | Move forward 15 frames to time 6;18, and change the Opacity to 50%.
Adding the second text layer 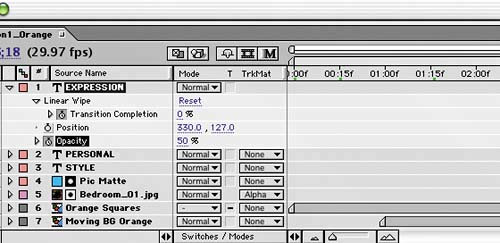 |
The orange section is now complete. Save and preview your work. Creating the green section Once again, you'll use the duplicate-and-modify technique to create the other sections. You've probably already guessed that, since the 3D moving squares background is laid out differently, it will require you to make some adjustments to placement. Let's forge ahead into green territory: 1. | Duplicate the Section1_Orange comp, and rename the duplicate Section2_Green. Open the Section2_Green comp.
| 2. | Delete the Moving BG Orange layer, and replace it with the Moving BG Green composition.
| 3. | Select the Orange Squares layer, and then hold down Alt (Windows) or Option (Mac OS) while dragging the Green Squares comp onto the Orange Squares layer.
| 4. | At time 0;00, change the Position keyframe of the Green Squares layer to 560, 110.
| 5. | At time 1;29, change the Position to 132, 426.
| The keyframes at time 0;25 and time 1;06 remain at 360, 270 to effectively wipe the screen.
| 6. | Rename the BG Orange layer to BG Green, and change its color to a pale green (RGB: 185, 217, 161). (Leave the remaining settings alone.)
Changing the small square's position for the green layout 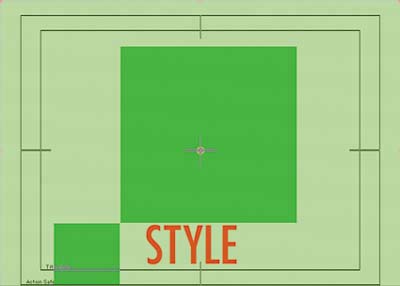
|
In order to add more visual interest, you'll move the picture matte relative to the background: 1. | Press 2 to go to time 4;00.
| 2. | Reposition the Pic Matte layer to 375, 289, and then duplicate it.
| 3. | Select the Bedroom_01 layer, and hold down Alt (Windows) or Option (Mac OS) while dragging the Chandelier.jpg image to replace the Bedroom_01 image in the Timeline. The Chandelier image inherits the keyframes and position in time.
| 4. | Scale Chandelier.jpg to 55, 55%, and Position it at 372, 295.
| 5. | Go to time 5;13, and add a 100% Opacity keyframe to the layer.
| 6. | Go forward 15 frames, and change the Opacity to 0%.
Adding a cross dissolve 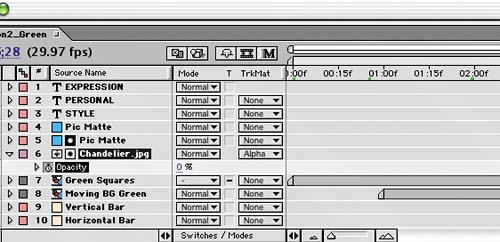 |
To get more bang for the buck out of this section, add a second picture that will cross-fade with the other image: 1. | Go to time 5;13, and add Kitchen_02.jpg to the Timeline.
| 2. | Drag the layer under the topmost Pic Matte layer.
| 3. | Set Kitchen_02's Track Matte to Alpha Matte "Pic Matte".
| 4. | Set its Scale to 41, 41% and its Position to 376, 270.
| 5. | Add a 0% Opacity keyframe to Kitchen_02.
| 6. | Go forward 15 frames, and change the Opacity to 100%.
Adding a second image to the composition  |
If you preview the composition from time 4;00 to 6;00, the chandelier photo should fade out while the kitchen image fades in at the same location. Next, you need to move the vertical and horizontal bars to match the rest of this layout: 1. | Go to time 4;00.
| 2. | Select the Vertical Bar layer, and press the [ key to bring the layer's In point to the current time.
| 3. | Change the color of the Vertical Bar and Horizontal Bar solids to RGB 215, 254, 188.
| 4. | Move the Vertical Bar to Position 589, 353, and move the Horizontal Bar to 572, 458.
| 5. | Press U to reveal all keyframes for the Horizontal Bar layer, and then change the layer's final Transition Completion keyframe to 40%.
Moving the color bars to fit with the green layout 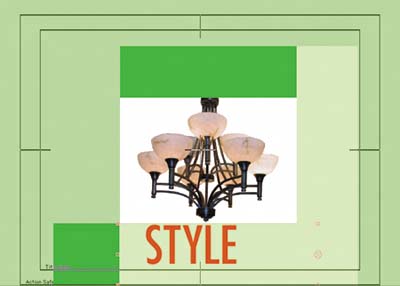
|
Of course, you need to change the text elements. You'll also change the timing of the linear wipe so it looks better with the length of the shorter words: 1. | Select the STYLE text layer, and change the color to a really dark green (RGB: 38, 106, 37).
| 2. | Change the layer's Position to 375, 165, so the text is centered in the green space above the picture.
| 3. | Go to time 4;13, select the EXPRESSION text layer, and press [ to move the layer's In point to the current time.
| 4. | Change the text to say LIGHT, and change the color to a really dark green (RGB: 38, 106, 37).
| 5. | Position the text at 375.5, 465.5 so it's centered under the picture.
| 6. | Press U to reveal the text layer's keyframes.
| 7. | Go to time 5;03, and select the final Transition Completion keyframe and both Opacity keyframes.
| 8. | Drag the selected keyframes, and press Shift to snap the Transition Completion keyframe to the CTI. Doing so increases the duration of the linear wipe to 20 frames to account for the shorter word (and shifts the opacity fade-out).
Changing the text 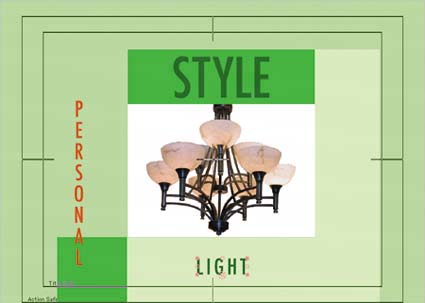
| 9. | Change the PERSONAL text layer to say SPACE, and change its color to darkest green (RGB: 38, 106, 37).
| 10. | Position the layer at 589, 288 so it lies to the left of the photo.
| 11. | Go to time 5;18. With the SPACE layer still selected, press [ to move the layer's In point to the current time.
| 12. | Go to time 6;18, and press U to reveal the layer's keyframes.
| 13. | Select the last three keys, and drag to the CTI. (Drag and then press Shift to snap the final Transition Completion keyframe to the CTI.)
Altering the linear wipe to work with the new text  |
Save your work, and close the composition. The purple section You're almost finished with the main sequences: You just need to take care of your friend Purple. Although the layout of the purple moving squares background is more similar to the original orange section, you want to reuse the photo cross fade you created in the green section: 1. | Duplicate the Section2_Green comp, and rename it Section3_Purple. Open the Section3_Purple composition.
| 2. | Select the Green Squares layer. To replace this layer but retain its keyframes, press Alt (Windows) or Option (Mac OS) as you drag the Purple Squares composition from the Project window onto the Green Squares layer.
| 3. | At time 0;00, change the Position keyframe on the Purple Squares layer to 154, 456.
| 4. | At time 1;29, change the Position keyframe to 124, 110.
Leave the keyframes at time 0;25 and time 1;06, because they hold the transition.
| 5. | Select the Moving BG Green layer. Hold down Alt (Windows) or Option (Mac OS), and drag the Moving BG Purple composition onto it to replace it.
| 6. | Move the Moving BG Purple layer to Position 355, 326.
| 7. | Change the BG Green layer's name to BG Purple, and change the color to pale purple (RGB: 187, 168, 255).
Changing the layout and colors for the purple section 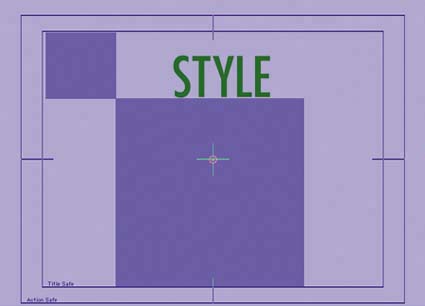
|
The Vertical Bar and Horizontal Bar must be moved, sized, and colored to match the new layout: 1. | Go to time 4;10. Change the color of the Vertical Bar layer to RGB 214, 209, 255 and its dimensions to 116x540.
| 2. | Move the layer to Position 137, 329.
| 3. | Change the Horizontal Bar layer's color to 214, 209, 255 and its dimensions to 720x115.
| 4. | Move the layer to Position 442, 113.
|
The pictures must also be replaced, and you need to move the matte in relation to the new backdrop: 1. | Select the Chandelier layer, and then hold down Alt (Windows) or Option (Mac OS) while dragging Chair_02.jpg onto the layer in the Timeline.
| 2. | Change the Scale to 60, 60% and the Position to 421, 310.
| 3. | Select both Pic Matte layers, and set their Positions to 355, 280.
| 4. | Select the Kitchen_02 layer, and then hold down Alt (Windows) or Option (Mac OS) while dragging Television.jpg onto it in the Timeline.
| 5. | Change the layer's Scale to 50, 50%, and move it to Position 360, 271.
Adjusting the mattes and pics to work with the new layout 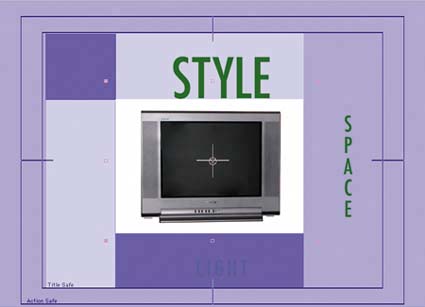
|
Naturally, the text elements also need to change for the purple section: 1. | Change the STYLE text layer's color to darkest purple (RGB: 85, 60, 168).
| 2. | Move the layer to Position 354, 477 so it's below the photo.
| 3. | Change the SPACE text layer to read FORM.
| 4. | Change the layer's color to darkest purple (RGB: 85, 60, 168).
| 5. | Set the layer's Position to 138, 298.
| 6. | Change the LIGHT text layer to read FUNCTION.
| 7. | Change the color to a really dark purple (RGB: 85, 60, 168), and set the Position to 353.5, 126.5.
Changing the text for the purple section 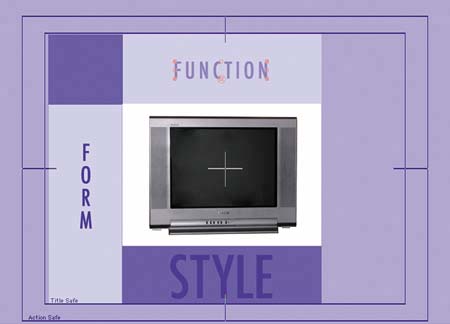
|
For some variety, swap the In points of the FUNCTION and FORM layers: 1. | Go to the In point of the FORM layer (time 5;18), and set a new composition marker (Shift+3).
| 2. | Go to the In point of the FUNCTION layer (time 4;13).
| 3. | Select the FORM layer, and press the [ key to move the In point to the current time.
| 4. | Press 3 to return to the composition marker at time 5;18.
| 5. | Select the FUNCTION layer, and press [ to move its In point.
Switching the timing on the horizontal and vertical text  |
Looks goodbut it's a little too boxed in comparison to the green and orange sections, which use the small square solid to break up the square shape the other elements create. Never fear, though; there is a simple solution: - At time 4;10, set the Transition Completion keyframes for both the Horizontal Bar and the Vertical Bar layers to 0% so the solids extend beyond the screen.
Settings for the Linear Wipe effect 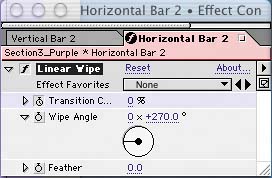
Save your work, and close the composition. The yellow section You're almost finished creating your sections. Now you'll add the logo with a new twist on the end tag that you created in the previous chapter. Create a new composition named Section4_Yellow in the Sections folder, with dimensions 720x540, Frame Rate 29.97, and Duration 10;00. Although you could copy and replace the footage you need and delete the rest, it's just as fast to build this comp from scratch: 1. | Drag the Yellow Squares composition to the Timeline at time 0;00, and then turn on the Collapse Transformations switch.
| 2. | At time 0;00, create a Position keyframe of 132, 114.
| 3. | At time 0;25, change the Position to 360, 270.
| 4. | Go forward three frames to time 0;28. Create a new solid named Yellow BG that's comp size and pale yellow (RGB: 252, 253, 162).
| 5. | Drag the Yellow BG layer under the Yellow Squares layer in the Timeline.
| 6. | Go to time 2;00, and add the Style_Logo composition above the other two layers in the Timeline.
| 7. | Insert a 0% Opacity keyframe.
| 8. | Go to time 2;10, and change the Opacity to 100%.
Beginning to build the yellow section 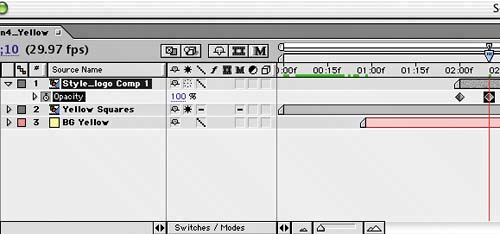 |
Save and preview your work. Fun with Vector Paint As you did in Chapter 1 ("Spinning Squares"), you'll animate the text's layer style in the Photoshop file to create more visual interest. This time you'll use the Vector Paint effect instead of the Radial Wipe effect used in the Chapter 1 project: 1. | Open the Layer Effects comp in the Style_logo Comp 2 folder in the Project window.
| 2. | Go to time 0;10 in the Layer Effects comp Timeline.
| 3. | Select both the Bevel Highlight and the Bevel Shadow layers.
| 4. | Choose Effect > Paint > Vector Paint.
| 5. | Set the following Vector Paint effect properties for both layers:
Brush Setting Radius: 15 Playback Mode: Animate Strokes Playback Speed: 1.00 Composite Paint: As Matte
Settings for the Vector Paint effect 
| 6. | Add a keyframe for Playback Speed to the Bevel Shadow layer.
| 7. | Paint over the letters of STYLE in the Composition window as if you were writing them on the screen. Don't worry if it looks messy; just be sure you cover the entire area of each letter.
| 8. | Go to time 1;00, and set the playback speed to 50.00.
| 9. | Copy both keyframes, go to time 0;10, and paste the keys on the Bevel Highlight layer.
Timeline with Vector Paint keyframes 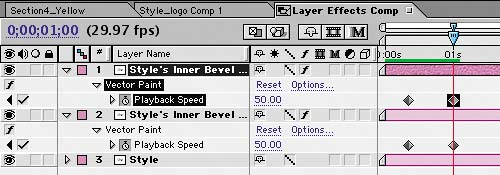
|
Save and preview your work. As you can see, the bevel appears to be painted on by invisible hands. Completing the end tag Now you'll add the company's Web address and animate the text's tracking so the text expands onto the screen: 1. | Return to the Section4_Yellow comp, and go to time 3;00.
| 2. | Create a new text layer that says www.styledesigncenter.com.
| 3. | Position the layer so it's centered below the logo.
| 4. | Add a 0% Opacity keyframe.
| 5. | Go forward 15 frames to time 3;15, and change the Opacity to 100%.
| 6. | Press the J key to go back to time 3;00.
| 7. | Display the text properties for the layer, and then choose Animate > Tracking in the Timeline.
The Animate menu in the Timeline 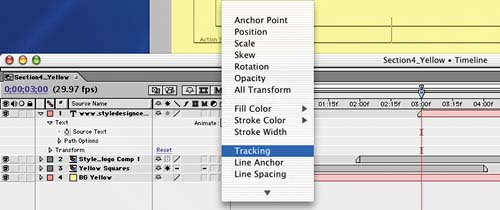 | 8. | Add a Tracking Amount keyframe, and set it to 20 to squish the letters together.
| 9. | Go to time 3;15, and change the Tracking Amount to 5.
|
Save and preview your work. After the bevel effect covers the logo, the Web address expands outward to the comp edges. |