Flylib.com

Books Software


mask an image

 < Day Day Up > 

mask an image

Next we'll import a photo into our file and mask out or hide parts of it so that only a portion of the image is used in our flyer.

Select Insert > Choose ( - ) to open the Import dialog .

Navigate to the Assets folder .

Select the file garden.jpg and click Insert .

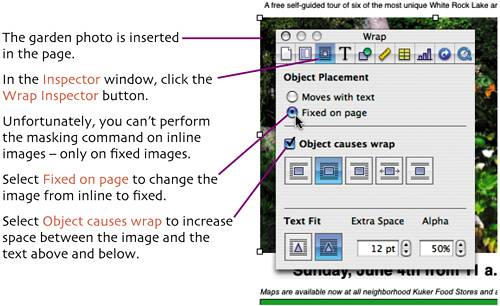
Select Format > Mask ( - ).

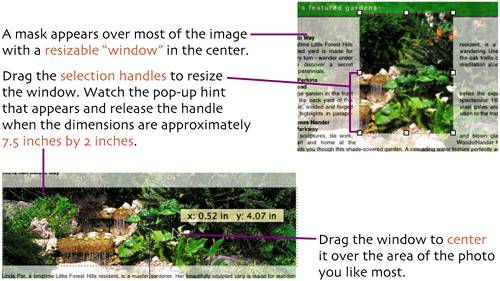
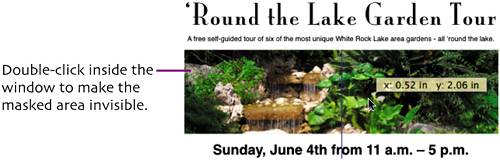
The photo is out of position now. You can drag it into place or use the arrow keys to reposition it.

 < Day Day Up > 
 < Day Day Up > 

modify page layout

So far in our projects we've only worked with single column layouts. For the list of homes featured on the garden tour we're going to change to a two column layout.

Select View > Show Layout ( - ) to turn on the Layout view.

The home listing shifts down creating too much space between it and the rectangle above.

The layout is converted to two columns, and the homes list automatically reflows into the columns .

For better symmetry in our design, we'd like for the James T. Kirk listing to start at the top of the second column.

To accomplish that, place the insertion point before James T. Kirk .

Choose Insert > Column Break .

 < Day Day Up > 
 < Day Day Up > 

text wrapping

We witnessed some text wrapping around our garden image when the text moved below and above it. Now we'll adjust the wrapping of text around an image to create an interesting visual effect.

Select Insert > Choose ( - ).

Navigate to the Assets folder, select the file WRONG logo w_text.png , and click Insert .

Release the logo to place it.

Use the up and down arrow keys to adjust the placement of the logo until the text reflows in a way you're most happy with.

Choose View > Hide Layout ( - ) to turn off Layout view .

 < Day Day Up > 
 < Day Day Up > 

sample color from image

By default, the rectangles we drew earlier have a green color fill and a black stroke. Let's change that and provide some consistency between our design and colors that are already in use by the organization. We'll do that by sampling a color from the logo image.

Click to sample the color and apply it to the rectangle's fill.

In the Graphic Inspector pane, choose None from the Stroke menu to remove the stroke from the rectangle.

 < Day Day Up > 
 < Day Day Up > 

save colors

To make the color easily available for use on other objects, we can save it in the Colors window.

Click in the color well and drag downward.

When the cursor is over the row of empty color wells at the bottom of the window, release the mouse - dropping the color into a color well.

Select the other rectangle in the document.

In the Colors window, click and drag the blue color from the well at the bottom of the window.

 < Day Day Up > 
 < Day Day Up > 

add drop shadows

As the final visual touch to our flyer, we'll apply drop shadows to the photo and the title text.

Stop when you hit upon a combination of settings that you like, keeping in mind that the shadow shouldn't extend too far on either side of the photo or it will get cut off when you print the flyer.

 < Day Day Up >