Management and Administration Scenarios
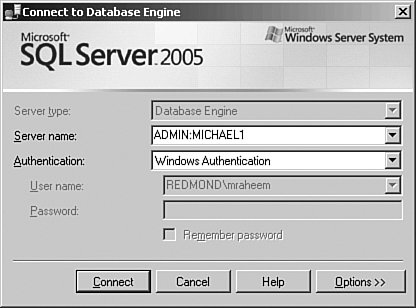
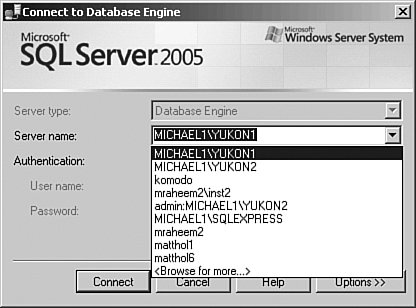
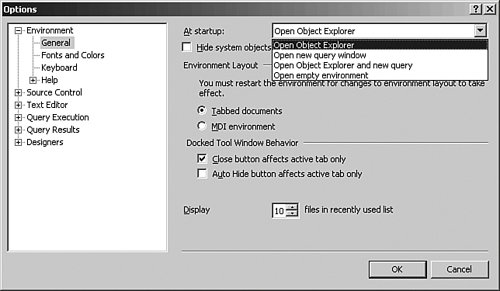
| In this section, we originally started writing about the typical management scenarios such as how to back up and restore a database, how to manage indexes, or how to administer security. However, we soon realized that we were just reiterating the scenarios that are already described in product documentation. Instead, we decided to focus on describing real-life (and some painful) scenarios that customers have usually asked us about in person, via newsgroups, or during our presentations. We will also be describing some interesting scenarios and some features that are not fully supported by Microsoft. Please be cautious in using the undocumented features. We highly recommend that you try to test these results in your development/testing environment before applying them to your production servers. Connecting to a Server via Dedicated Administrator ConnectionDedicated Administrator Connection (DAC) is a high-priority connection to the server. DAC is a powerful connection, and it should be used only for troubleshooting, when the server is "hung" and does not accept new connections. SQL Server officially supports DAC connections only from the SQLCMD command line utility tool. However, you can also use Query Editor in Management Studio for DAC connections. To make a DAC connection, prefix the name of the server with ADMIN: in the connection dialog. For example, if you want to make a DAC connection to the default instance of Database Engine on a server named MICHAEL1, you enter ADMIN:MICHAEL1 in the Server name field on the connection dialog (see Figure 4-24). It is good practice to disconnect and free up the DAC connection as soon as your troubleshooting is complete. Figure 4-24. Making a DAC connection from Management Studio. DAC is limited to only one connection. If you use DAC for a query window and try to open other components of Management Studio such as Object Explorer in the context of the same connection, you will get strange errors. This is one of the reasons Microsoft does not support making DAC connections with Management Studio. Note By default, you cannot make a remote DAC connection. Remote DAC is disabled on new installations of SQL Server. See the topic "Remote DAC" in Chapter 3 for information about enabling this option. Removing Most Recently Used (MRU) Server Names from the Connection DialogThe Server name drop-down list box in the Connection dialog stores the 10 most recently used (MRU) server names (see Figure 4-25). The Connection dialog stores the server name after it has successfully connected to the server. Although this is a convenient feature, there are situations in which you may want to remove the dormant servers from this list or remove all the entries for security reasons. You may also want to copy the list to another workstation or share it with another user. Figure 4-25. Making a DAC connection from Management Studio. The server name MRU list is distinct for each user on a computer. The list is stored in a file named mru.dat under the Application Data directory for each user: C:\Documents and Settings\<user name>\Application Data\ Microsoft\Microsoft SQL Server\90\Tools\Shell\mru.dat To remove all server entries from the list, delete or rename the file to oldmru.dat. To share the MRU list with another user, identify the user's mru.dat file, and replace it with the source mru.dat file. To copy the connection dialog server MRU list to another server, simply copy the source mru.dat file from the source to the target server. Changing Default Startup Behavior of Management StudioBy default, launching Management Studio displays the connection dialog, prompting you for a connection to a server. After it is connected, it opens Object Explorer in the context of the specified server. You have the option to change this default behavior to opening a new query window, opening Object Explorer and a new query window, or not being prompted for a connection at all. To change the startup behavior of Management Studio, do the following:
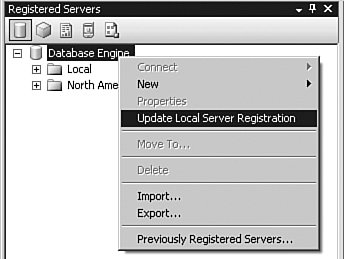
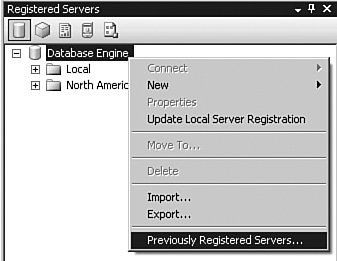
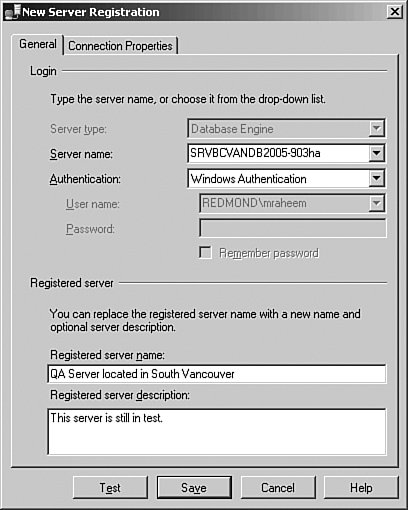
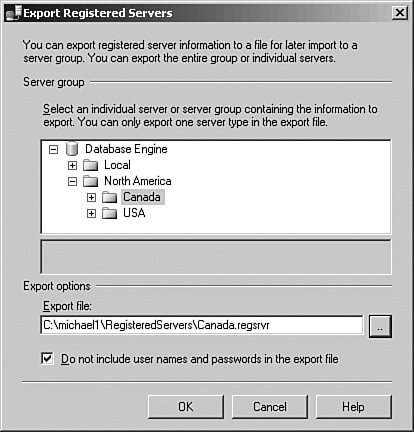
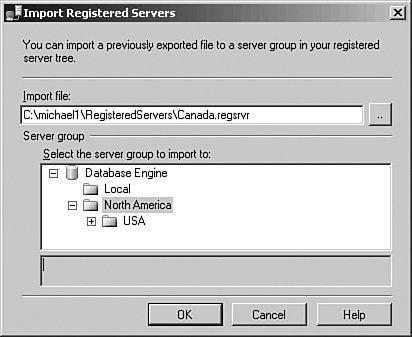
You may need to restart Management Studio for the new setting to take effect. Updating Registered Servers with Local InstancesWhen a user launches SQL Server Management Studio for the first time, it discovers the local instances of SQL Server and automatically adds them to the list of registered servers for that user. However, if new instances are added or old instances are removed, the registered servers could get out of synch with the actual instances. Of course, the user could add or delete instances manually (see Figure 4-27), but there is an automated way to register the local instances quickly. Figure 4-27. Updating Registered Servers list with local instances of SQL Server. To add or update the list of your registered servers automatically with local instances of SQL Server on a computer, right-click on the root node of a server type (such as Database Engine), and select Update Local Server Registration. Be aware that this option works only for the selected server type. To update all server types, you have to select the server type from the Registered Server toolbar and perform an update. Importing Registered Servers from Enterprise ManagerSQL Server 2005 provides the functionality to keep your SQL Server 2000 registered servers during both upgrade and migration to SQL Server 2005. If you upgrade an instance of SQL Server 2000 to SQL Server 2005 by using the SQL Server 2005 setup program, the old Registered Servers in Enterprise Manager are automatically upgraded to registered servers in Management Studio. However, if you do a side-by-side installation of SQL Server 2005 on the same computer as SQL Server 2000, Enterprise Manager and Management Studio do not share the same registered servers. In this case, you can optionally import the SQL Server 2000 Enterprise Manager registered servers to Management Studio. To do this, right-click on the Database Engine node in the Registered Servers window in Management Studio and select Previously Registered Servers (See Figure 4-28). Figure 4-28. Migrating registered servers from Enterprise Manager. Referencing Registered Servers with a Friendly NameServer names do not usually correspond to the functionality of or the role of the server. In addition, some server names may be too long or too similar to one another, which makes you more prone to performing the wrong task on the wrong server. Management Studio provides the capability to register a server with a friendly name. Figure 4-29 displays the New Server Registration dialog. The name shown in the field Server name is the physical name of the server, but the one shown in the field Registered server name could be the same or different from the physical name. By default, Registered server name is the same as Server name. As you type a name in the Server name field, the same name is automatically entered in Registered server name. However, after entering server name you can override the Registered server name with a friendly name. In Figure 4-29, the physical name of the server is SRVBCVANDB2005-903ha, but its registered server name is QA Server located in South Vancouver. Figure 4-29. You can assign a friendly name to your registered servers. As shown in Figure 4-30, registered servers are displayed by registered server name, followed by server name in parentheses. In the example, it is displayed as QA Server located in South Vancouver (SRVBCVANDB2005-903ha). Figure 4-30. Registered Server window displays the friendly names. The preceding paragraphs described how to register a new server with a friendly name. You can also assign a friendly name to a previously registered server by editing its properties. To do so, right-click on the Registered Server window and select Properties in the exposed context menu. This launches the Edit Server Registration Properties dialog, where you can change the value of the Registered server name field. Copying Registered Servers Between Users and ComputersRegistered servers are stored on the local computer where Management Studio is running. The registered server information is stored for each user and it is not shared between users. To copy the registered server information between two computers or two users, you need to use the import and export functionality of registered servers. You can follow these steps to export the registered server information for a user on a particular computer:
Note The option Do not include user names and password in the export file is applicable only to registered servers that used the SQL Server Authentication option and specified a password during registration. For security reasons, we highly recommend you do not include the passwords in the export file and let the user who imports the file specify the passwords after importing the file. To import the registered server information for a user on the same or a different computer, follow these steps:
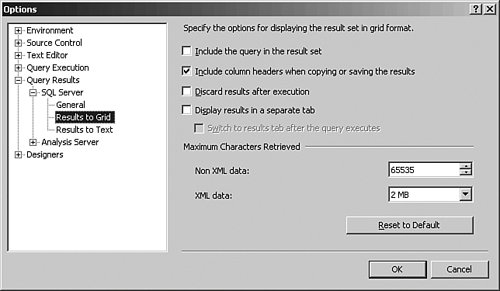
Note It is good security practice to delete the registered servers import file after you have completed the import operation. Adding Registered Servers to an Export FileAs you have seen above, Management Studio provides a user interface to add registered servers. But what if you are in a situation where you have to create tens or hundreds of registered servers? The answer is to leverage the SQL Management Objects (SMO). SMO's Microsoft.SqlServer.Management.Smo.RegisteredServers namespace provides a rich library of classes that you can use in your Visual Basic .NET or C# code to create, remove, and manage registered servers. You can look up the library in Books Online. However, there is an undocumented and perhaps easier way to manipulate the registered servers' information without using SMO. The registered servers export file is in XML format. You can append the new registered servers to the XML file. To understand the schema of the export file, try creating a registered server named Server1 and export the registered server to a file named S.regsrv. Next, open S.regsrv in the XML editor in Management Studio. As shown in Figure 4-33, you can see that the server information is surrounded by <Server> tags. Figure 4-33. Editing a registered server export file in the XML editor in Management Studio.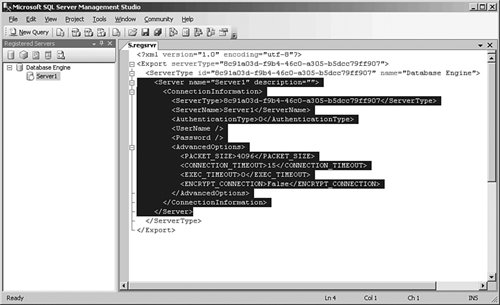 To add a server named Server2 to the export file, copy and paste the text between server tags. Next, in the pasted text change Server1 to Server2 (indicated in bold characters as follows): <Server name="Server2" description=""> <ConnectionInformation> <ServerType>8c91a03d-f9b4-46c0-a305-b5dcc79ff907</ServerType> <ServerName>Server2</ServerName> <AuthenticationType>0</AuthenticationType> <UserName /> <Password /> <AdvancedOptions> <PACKET_SIZE>4096</PACKET_SIZE> <CONNECTION_TIMEOUT>15</CONNECTION_TIMEOUT> <EXEC_TIMEOUT>0</EXEC_TIMEOUT> <ENCRYPT_CONNECTION>False</ENCRYPT_CONNECTION> </AdvancedOptions> </ConnectionInformation> </Server> Next, save the S.regsrv export file and try importing it in Management Studio. You will see Server1 and Server2 in the Registered Servers window, as shown in Figure 4-34. Figure 4-34. Manipulating the registered server export file to add a new registered server.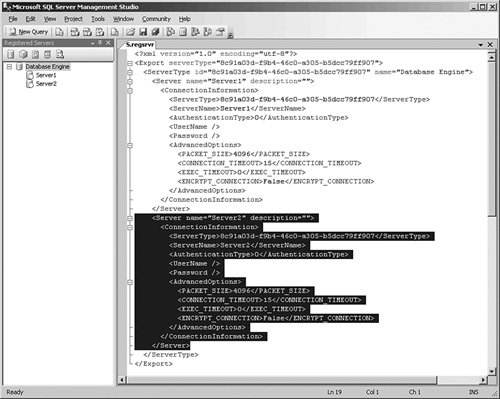 Copying Query Result to Excel SpreadsheetYou can copy part or all of a query result to a Microsoft Office Excel spreadsheet or any other text editors. To export all the resultset, right-click on the results grid and select Save Results As in the context menu. This option saves the results in a Comma-Separated Value (CSV) file, which you can subsequently open in Excel. Alternatively, you can select all or part of the data in the results grid and copy and paste it in an Excel spreadsheet. To select all the cells in the result set grid, you can right-click and choose Select All, or click on the top-left corner of the results grid as displayed in Figure 4-35. Figure 4-35. You can click on the top-left corner of the result grid to select all data in a query result set. If you followed these instructions, you may have noticed that neither saving the results to a CSV file or copying all or part of the result set includes the column headers. To include the column headers in the file or copied data, follow these steps:
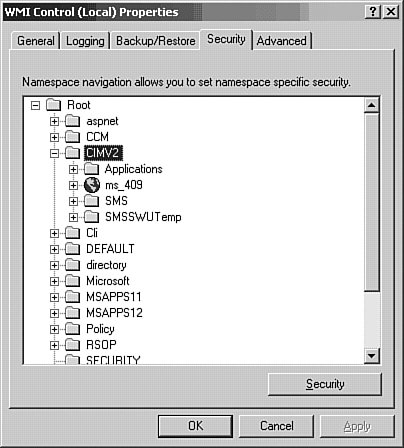
You may need to re-execute your query in a new query window for the new setting to take effect. Configuring WMI to Show Server Status in Registered ServersRegistered Servers and Object Explorer windows display the state of SQL Server services through a small icon appearing to the left of the server node. Both Registered Servers and Object Explorer use Windows Management Instrumentation (WMI) to query the state of the services. To query the status of the services successfully, two things must happen: 1) The computer that hosts the SQL Server services must have WMI installed, and 2) the user who is running Management Studio must have permissions to access the WMI object remotely on the computer that hosts the SQL Server services. You can follow these steps to grant WMI permission to a particular user.
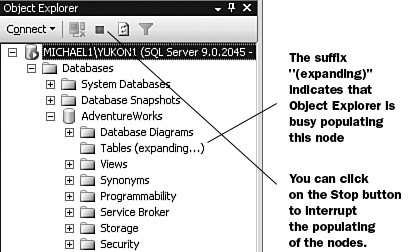
Leveraging an Asynchronous Population of Objects in Object ExplorerYou can take advantage of the asynchronous operation of Object Explorer, especially when you are dealing with a large number of server objects. This means that while Object Explorer is busy populating nodes, Management Studio remains responsive and you can continue performing other tasks such as editing or executing a query, expanding another node in Object Explorer, connecting Object Explorer to another server, and even canceling the population of the nodes. The capability to cancel is a great feature for situations in which you have accidentally expanded a highly populated node and you want to cancel the population and apply a filter instead. To better understand the asynchronous operation of Object Explorer, make use of the following script. First, you need to create a highly populated node in Object Explorer. You can execute the following script below to create 25,000 tables in the AdventureWorks database. -- This script creates 25,000 tables in AdventureWorks database USE AdventureWorks GO DECLARE @i INT ,@table_ddl VARCHAR(4000) SET @i = 100001 WHILE @i - 100000 <= 25000 BEGIN SET @table_ddl = 'CREATE TABLE Table' + SUBSTRING(CONVERT(CHAR, @i), 2, 5) + '(ID INT NULL)' EXECUTE(@table_ddl) SET @i = @i + 1 END After the script has executed successfully, try connecting Object Explorer to the server and expanding the Tables node. Notice that while Object Explorer is busy populating the Tables node, the phrase (expanding...) is appended to the end of Tables node (see Figure 4-38). Now you can collapse the Tables node and perform other tasks in Management Studio. You can even click on the Stop button in the Object Explorer toolbar to stop populating the nodes. Figure 4-38. Asynchronous operation of Object Explorer provides the functionality to stop the population or perform other tasks during the population of the node. The asynchronous behavior of Object Explorer is due to its multithreaded operation. Object Explorer can spawn up to four threads for its population of the nodes. This means you expand up to four highly populated nodes in Object Explorer and continue performing other tasks in Management Studio. Editing Queries in Disconnected ModeUnlike Query Analyzer in SQL Server 2000, Management Studio enables you to edit queries without connecting to a server. This is particularly useful in situations in which the server is not available and you still want to take advantage of the rich editor features such as keyword color-coding, dynamic help, or source control. Another potential situation is one in which you want to guard yourself against accidental execution of an incomplete script against the server. If you want to open a new script in disconnected mode, select File, New, Database Engine Query (or any other query type). Next, click on Cancel in the Connection dialog. The editor is now ready to type a new query. Notice the title of the query says not connected and the query window status bar also says Disconnected. As soon as you are ready to execute the query, you click on the connect button in the query toolbar or select Query, Connection, Connect from the Management Studio main menu. If you want to open an existing query in disconnected mode, simply click on Cancel in the connection dialog. If you have a query that is already connected and you want to continue editing it in a disconnected mode, click on the disconnect button in the Management Studio query toolbar or select Query, Connection, Disconnect from the main menu. To disconnect all queries, select Query, Connection, Disconnect All Queries from the main menu in Management Studio. Using Query Designer for Writing QueriesManagement Studio provides a graphical query designer for authoring Transact-SQL queries. To design a new query, open a new query window, and press Ctrl+Shift+Q on the keyboard or select Query, and Design Query in Editor from the main menu in Management Studio. In the Add Table dialog, you can select tables, views, functions, or synonyms for your query. The Query Designer automatically discovers the relationship between the selected objects. After you have selected the objects, you can define the output columns, sorting, or grouping in the resultset. While you are designing the query graphically, the SQL pane on the bottom of the query designer displays the T-SQL syntax of your query (see Figure 4-39). Figure 4-39. Query Designer in Management Studio provides the functionality to graphically author a Transact-SQL query.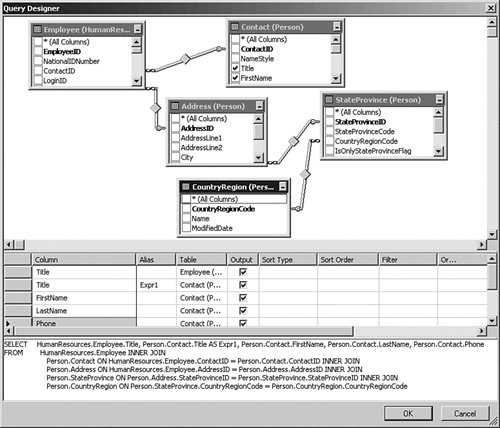 You can also get a graphical representation of an existing query in Query Designer by selecting all or part of the T-SQL script in a query window and selecting the option Design Query in Editor from the context menu or the main menu in Management Studio (see Figure 4-40). Any changes to the query in Query Designer updates the query in the query window. Figure 4-40. Management Studio provides the functionality to design all or part of a T-SQL query in Query Designer.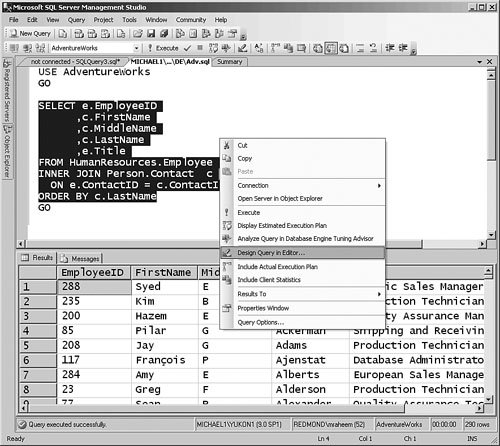 Executing a Query Across Multiple ServersOne of the common management actions is executing a script across multiple servers. The query editors in Management Studio provide a couple of solutions for executing scripts across multiple servers. The first option is to use the Change Connection feature of query editors in Management Studio. Let's go through an example and see how you can leverage this feature. Suppose your objective is to execute the following T-SQL script to back up the AdventureWorks database across three servers: SERVER1, SERVER2, and SERVER3. -- To permit log backups, before the full backup, alter the database -- to use the full recovery model USE master GO ALTER DATABASE AdventureWorks SET RECOVERY FULL -- Back up the full AdventureWorks database BACKUP DATABASE AdventureWorks TO DISK = 'C:\BAK\Adv_Full.bak' -- Back up the AdventureWorks log BACKUP LOG AdventureWorks TO DISK = 'C:\BAK\Adv_Log.bak' Open up a new database engine query, connect to SERVER1, copy and paste this script, save the query as backup.sql, and execute it. To execute the same script on SERVER2, you do not need to close the script and reopen it (as you had to in SQL Server 2000 Query Analyzer). Instead, click on the Change Connection button Figure 4-41. The change connection feature of Management Studio enables you to connect a query to another server.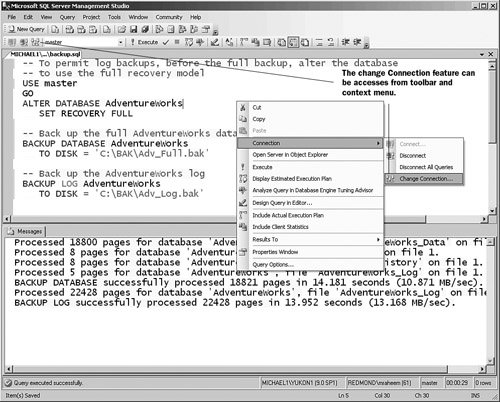 Another option to execute a T-SQL query across multiple servers is to use the SQLCMD Mode feature of the T-SQL query editor. Let's go through the same example and see how you can execute the script across SERVER1, SERVER2, and SERVER3 by using SQLCMD mode. In Management Studio, open the backup.sql file that you saved earlier. Right-click on the tab of the query window and select Copy Full Path, as shown in Figure 4-42. The full path in the example is C:\BAK\Adv_Full.bak. Figure 4-42. Context menu of the query window provides a number of features, such as copying the full path of the query.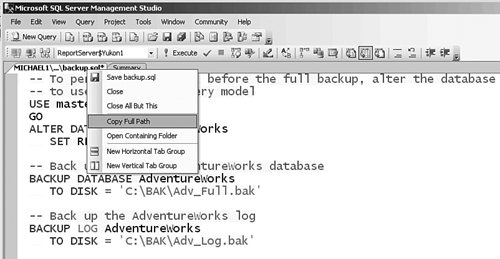 Next, open a new query window, select SQLCMD mode by either clicking on the SQLCMD button Figure 4-43. Management Studio provides the functionality to execute queries in SQLCMD mode.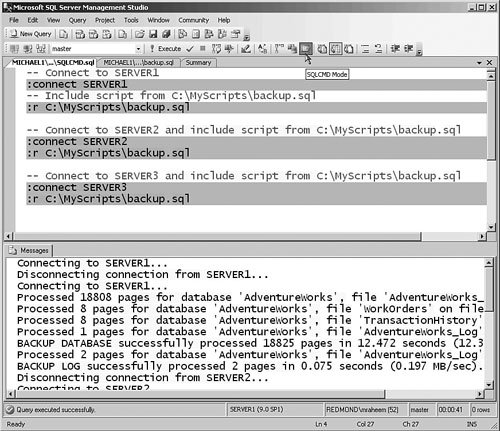 Viewing and Editing XML DataManagement Studio hosts a rich XML editor. In addition, the XML editor is integrated with T-SQL query editor for viewing XML data. To open an XML file in Management Studio, select File, Open, File in the main menu and select the XML file in the Open File dialog. With the XML datatype now being a native datatype in SQL Server, the XML query result is displayed as a link in the grid format (see Figure 4-44). Figure 4-44. XML data returned as part of query execution in grid format.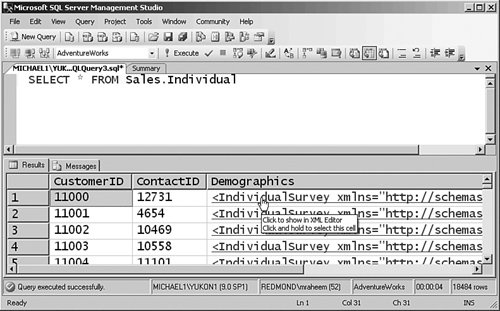 To view the XML resultset in the XML editor, click on the XML link in the results grid (see Figure 4-45). Figure 4-45. XML query results can be viewed in the XML Editor of Management Studio.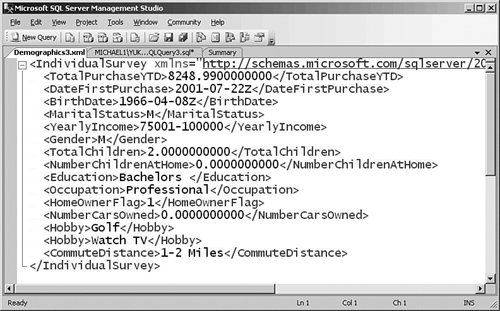 Deleting and Scripting Multiple ObjectsUsing Object Explorer, you can delete or generate a script for one object. So how would you go about deleting multiple objects or quickly generating a DDL script for a selection of objects? The answer is in the Summary window. The Summary window allows deletion of multiple objects and the generating of CREATE and DROP scripts. To select a range of nodes, click on the first node, hold the Shift key, and click on the second node. To select an individual node, click on the first node, hold the Ctrl key, and click on the subsequent nodes. After the nodes are selected, choose the Script or Delete options in the Summary window context menu (see Figure 4-46). Figure 4-46. The Summary window provides the functionality to delete or script multiple objects.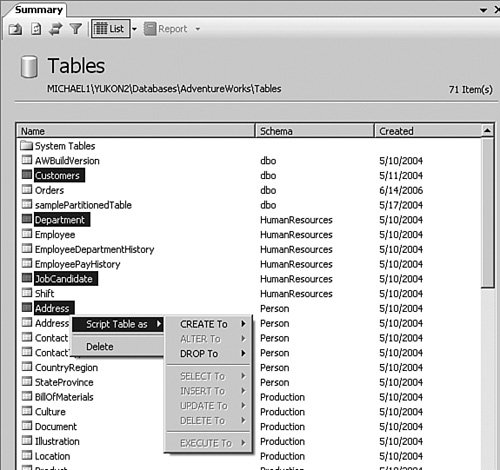 Note The Summary window provides only simple scripting options. For more advanced scripting options, use the Generate SQL Server Scripts Wizard. |

EAN: 2147483647
Pages: 149