The Main GroupWise Screen
When you
Figure 1.1. The GroupWise interface provides access to all GroupWise features.
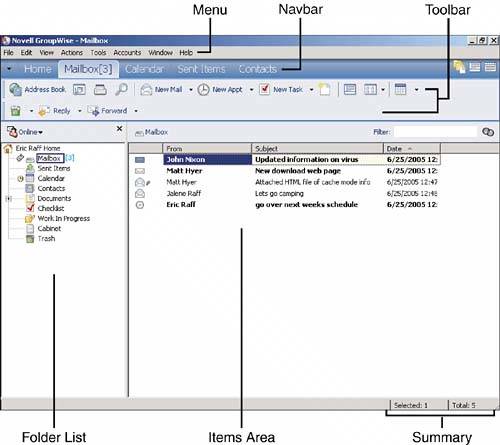
NOTE You can open multiple GroupWise windows and customize each one with a different view of your GroupWise information. As you can see in Figure 1.1, the main screen has six principal areas:
These interface elements comprise the basic control elements of the main GroupWise screen and allow you to interact with the program
NOTE Your system administrator may have changed the default settings for your organization. As a result, you may see a slightly different interface when you first launch the GroupWise 7 client. The right side of the Nav bar contains three icons. They allow you to show or hide the folder list, QuickViewer, or main menu. |
The Home View
New to GroupWise 7 is the Home view. It is extremely powerful in that it allows you to see any information contained within GroupWise through one window. The first time you access the Home view, a help screen providing basic information about the Home view and how you can begin customizing it will appear. By default, when you click on the Home tab in the Nav bar or select your Home view from the Folder list, you see your calendar for the day, your checklist items, and any unread information in your mailbox. The Home view uses
panels
to display various content inside the Home view. The true power of the Home view is in the panels. Panels can be added, rearranged, and customized to display anything in any format you
|
The Folder List and Items AreaThe Folder list contains a hierarchical structure of the folders that are used to organize and hold messages and documents. The items area displays the individual messages located in the selected folder. The Folder list and items area are linked to each other. To view the items in a folder, simply select the folder in the Folder list on the left; the items in that folder then appear in the items area on the right.
Nine folders appear automatically in the main GroupWise screen. In Chapter 5, "Message Management," you learn how to adjust the settings for these folders and how to create new folders for storing your messages. Table 1.1 lists the nine
Table 1.1. Default GroupWise Folders
TIP You can use the Nav bar to navigate to different folders. You can also add any folder to the Nav bar by right-clicking it and selecting Customize Nav Bar. Having more tabbed areas allows you to hide the Folder list, giving you more screen space to view your items. The following sections describe each of the default system folders in more detail. Mailbox
When you want to see your new messages, you must
You open the Mailbox folder simply by clicking it. You see a list of your opened and unopened messages in the items area, as shown earlier in Figure 1.1. To read a message, double-click the message line. The message opens in a new window. To open an item through the Unread Items panel, simply double-click the item.
NOTE After an item has been opened, it will stay visible in the Unread Items panel until you navigate off and then back to the Home view. This allows you to delete or reply to the message you have just read from within the Home view. Sent Items
The Sent Items folder is your
Figure 1.2 shows the Sent Items folder. The first time you double-click an item in the Sent Items folder, a dialog box appears asking what you want the double-click action to perform in the future. You have the choice of either having the message open or having the status information appear. This dialog box appears only the first time you double-click a sent item. Your choice in this dialog box becomes your default action. (You can change this option later by clicking Tools, Options, Environment and clicking the Default Actions tab.) Figure 1.2. The Sent Items folder allows you to access and manage messages you have sent.
TIP All sent items have a red arrow next to them indicating that the item was sent from your GroupWise account.
When you view the status information of a message, you can see detailed information about what has
From the Sent Items folder, you can resend messages that need to be updated, modified, or sent to additional recipients. To resend a message, select the Resend option after right-clicking on the message. You can also resend from the Actions menu. When you edit and resend a message, you can retract the original message as long as the recipient has not opened it yet.
To retract a message, highlight the message in the Sent Items screen and press the Delete key. Next, select either Recipient's Mailbox or All Mailboxes. (Selecting the My Mailbox feature does not retract the message but instead deletes it from your Sent Items folder.) Deleting from the recipient's mailbox retracts the message and
TIP
You can retract only messages that have not been opened by the recipient. Also, the recipient is not
CalendarThe calendar feature enables you to create, view, and manage your appointments, tasks, and notes. These calendar items can be personal items (for example, a personal note to yourself), or they can be group items (for example, a meeting request). Figure 1.3 shows the calendar. Figure 1.3. The calendar provides access to your appointments, tasks, and notes.
NOTE Chapters 6 and 7 explain personal and group calendaring in more detail. You can view your calendar items in the items area by clicking the Calendar folder. To view the calendar as its own window, click Window and choose Calendar. Then select the Calendar view you want to see, such as Day, Week, or Month. You can also click the Calendar tab on the Nav bar. ContactsThe Contacts folder stores your mail contacts. For each contact, you can enter several different types of information such as name, birthday, email address(es), Instant Messaging IDs, comments, and so on. By default, the Contacts folder is linked to the GroupWise Frequent Contacts address book. You can manage the contacts from this Contacts folder or from within the address book. There is also a History tab available when you look at the details of a contact that will display all the mail sent to or from this contact in one window. To learn more about working with and managing your contacts, see Chapter 4. Documents
GroupWise can be used as a
ChecklistThe Checklist folder enables you to keep track of items requiring an action. It displays items in your personal Task List. (The first time you open the Checklist folder, you see an information screen that gives you an overview of this folder; this screen goes away after you place an item into the folder.) This folder includes both items that you have created yourself and tasks others have assigned to you. (Tasks are explained in more detail in Chapters 6 and 7.) A task is something that requires an action on your part, such as following up on an email message or returning a telephone call. Each task has a start date and a due date. Overdue tasks are carried forward in the Calendar views and are then displayed in red, indicating past-due status. If you send a task item to someone else and that person accepts the task, you can track its status by opening the task from the Sent Items folder and viewing its properties. Work In ProgressYou can use the Work In Progress folder to store drafts of messages that have not been sent, as shown in Figure 1.4. For example, if you begin writing a message and run out of time to complete it or need to obtain additional information, you can save a draft of the message in the Work In Progress folder. Later, you can retrieve the message from this folder, complete it, and send the message along to the recipients. The Work In Progress folder is accessible from the GroupWise WebAccess client as well. This feature allows you to work on items in the office, save them, and then finish them from wherever you have access to a web browser. Figure 1.4. Work In Progress allows you to save drafts of messages for later completion.
NOTE
Saving reoccurring appointments to the Work In Progress folder creates multiple occurrences of the items and unlinks the items so that you cannot send them without reconfiguring the
The Work In Progress folder is also useful for storing drafts of documents if you are using the document management features of GroupWise. CabinetThe Cabinet folder is the place where you can create additional folders that you use to organize your messages. Figure 1.5 shows an example of the Cabinet. You use this folder to organize messages in the same way you use the directory and subdirectory structure on your computer to organize files. You can place messages that pertain to the same project in a folder, nest folders inside other folders, and link messages to multiple folders. (Chapter 5 explains more about folders and how to manage your messages.) Figure 1.5. The GroupWise Cabinet allows you to organize and manage your messages by creating additional folders under it.
Trash
When you delete a message from
To view the messages in the Trash, simply click the Trash folder. Figure 1.6 shows how the Trash folder looks when it is open. Messages do not
Figure 1.6. The Trash stores your deleted messages.
By default, messages are automatically emptied from the Trash after seven days unless your administrator has made changes to this setting. You may also be able to adjust this number. To choose the number of days you want deleted messages to stay in the Trash before they are automatically emptied, edit the value by choosing Tools, Options, Environment and then selecting the Cleanup tab associated with Trash. (Chapter 11 explains how to set this option.)
In some GroupWise configurations, you might be prompted to confirm a final deletion of an item that the GroupWise system has not yet backed up. If the GroupWise system has not
|