| The GroupWise 7 client has the capability to access multiple email accounts in addition to the GroupWise mailbox on a GroupWise post office. Using the GroupWise client to access other mail accounts relieves you from using multiple email programs to access these additional accounts. These Internet accounts are accessed through a POP or IMAP connection. The GroupWise 7 client also supports access to newsgroups and can function as an NNTP reader. Procedures for setting up each of these access methods are discussed in the proceeding pages. NOTE See Appendix D, "POP Versus IMAP Accounts," for more information on what POP and IMAP accounts are and which one would work best for your needs.
Using the Internet mail account with the GroupWise client is as easy as using any other personal folder. You can read, forward, reply to, delete, and otherwise manage your Internet mail just like you can any other GroupWise message. To get your new email messages from your Internet mail account, from the Accounts menu, choose Send/Retrieve, All Marked Accounts or Send/Retrieve, <Internet Account Name>. Your computer uses either a network or dial-up connection to establish a connection with the mail server, retrieves your new messages, and sends outgoing messages. NOTE From a storage perspective, after you access an Internet email account using GroupWise, the messages are stored in your GroupWise mailbox, having been "pulled" from the Internet mail server. The exception is an IMAP4 mailbox, in which case the messages are copied from the IMAP server to your GroupWise mailbox.
Enabling access to an Internet mail account using GroupWise requires you to know information about how to connect to each mail account. This information tells the GroupWise client where your Internet mailbox may be located and how to access it. NOTE When you set up an Internet mail account, you are provided with certain information, such as the mailbox type (POP3 or IMAP), server name, your login name for the server, your password on that server, and the email address for the account. You need all this information to set up access to the account using GroupWise. You can obtain this information from your Internet service provider (ISP) where your Internet mail account is located.
To access Internet mail accounts using GroupWise, you can technically be in online, cache, or remote mode. However, if you want to access external mail accounts (POP3 or IMAP) in online mode, the system administrator must have enabled this setting for your system. If you do not have an Accounts menu option, you are not enabled to access external accounts while in online mode. You then need to use cache or remote modes to set up additional accounts. Chapter 10, "Remote Access," discusses how to set up GroupWise for cache and remote modes. Setting Up POP Access to Internet Mail Accounts From the GroupWise client, if you create a POP account, you can store messages in a personal folder or your mailbox. If you create an IMAP or NNTP account, the mail or newsgroup items are stored in special IMAP or NNTP folders. NOTE To learn more about personal folders, refer to Chapter 5, "Message Management."
Follow these steps to set up a POP connection to an alternate mail account: 1. | From the GroupWise client, choose Accounts, Account Options.
NOTE If GroupWise is running in online mode, the Accounts menu may not be displayed. Check with your system administrator if you use online mode and you need to add an external Internet account. You can also switch to cache or remote modes to access the Accounts menu. | 2. | From the Accounts dialog box, choose Add.
| 3. | If prompted, enter your country, area code, and outside line access number. Click Close.
| 4. | From the Create Account screen, shown in Figure 8.13, enter a name for the Internet mail account. Because this is just a label for what you want to call this service, you can enter anything you'd like.
Figure 8.13. You use this dialog box to specify the account name and account type. 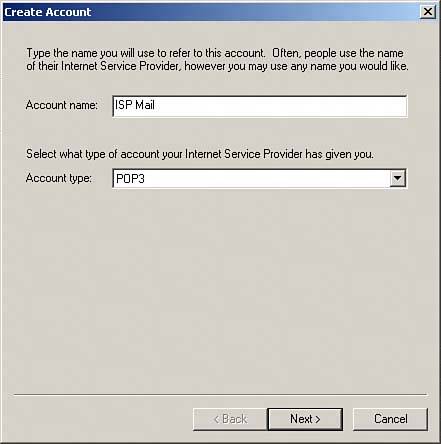
| 5. | Select the type of Internet mail account (POP3) and click Next.
NOTE See Appendix D for more information on what POP and IMAP accounts are and which one would work best for your needs. | 6. | In the Create Internet Account screen, as shown in Figure 8.14, enter the following fields as provided by your ISP and click Next:
- Incoming Mail Server This is the POP3 server where your mail is stored.
- Login Name This is the ID provided to you to access the incoming mail server.
- Outgoing Mail Server Usually, the same as the incoming mail server, this server is used when sending messages from this particular Internet account.
- Email Address This is the email address for this Internet mail account.
- From Name This is the name you would like displayed in the From field when you reply to messages that you receive in this Internet mail account.
Figure 8.14. This dialog box enables you to configure your Internet mailbox connection information. 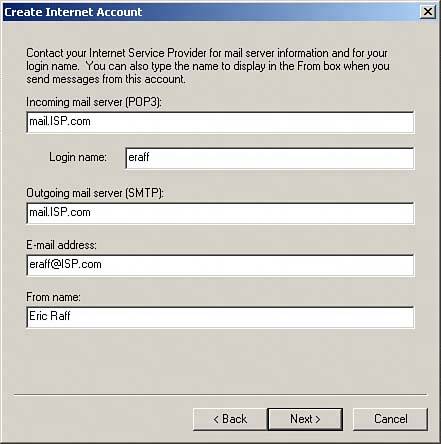
| 7. | In the next screen, you configure the method you'll use to access your Internet mail account, either connecting through the LAN or using your modem. Usually, this will be a LAN connection. Choose the appropriate method and click Next.
| 8. | In the Create Internet Account screen, shown in Figure 8.15, you select the folder (by clicking the box next to the desired folder) and place it within your GroupWise folder structure to hold incoming mail for this Internet mail account. (You can also create a new folder by clicking the Create New Folder for Account option at the top of the dialog box and entering a folder name after you click Finish.) If you want to have this mail show up in the main Mailbox folder, you can select it. This way, all your new mailwhether from a GroupWise user or sent to your Internet accountwill show up in your Mailbox folder.
Figure 8.15. You can create a new folder to contain the POP Internet account messages. 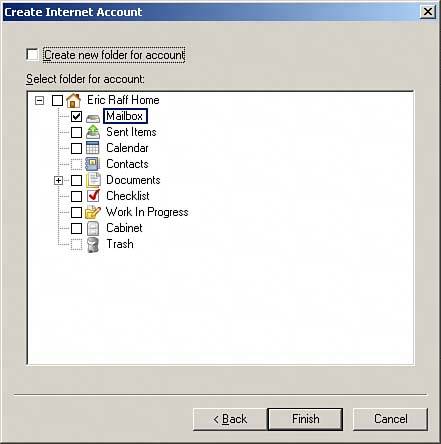
| 9. | Click Finish to complete the Internet mail account setup. Both your regular GroupWise account (if previously configured) and the new Internet mail account you just set up are listed in the Accounts box, as shown in Figure 8.16.
Figure 8.16. Your Internet account is now listed and ready for GroupWise to access. 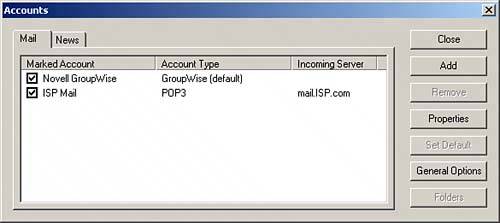
|
If you need to enter additional configuration settings for an account, you can go to the properties of the account. From here, you can set other configuration items on the account such as whether to use SSL or if you are required to log in before sending mail from the account. The check box next to the new account indicates that this account will be synchronized by default. If you want to manually synchronize the new account, you should clear the check box. To issue a manual synchronization of the account, choose Accounts, Send Receive, and select this particular account from the list of available accounts. Setting Up IMAP Access to Internet Mail Accounts IMAP (also known as IMAP4) is another type of Internet mail account that provides the use of folders and other advantages over traditional POP3 mailboxes. GroupWise can be used as an IMAP mail client, similar to the way it can be used as a POP client. If you have an IMAP mail account, you can use IMAP folders to store and organize the IMAP messages. One benefit to IMAP mailboxes is that messages are still available on the mail server after the IMAP mail client has retrieved them. NOTE See Appendix D for more information on what POP and IMAP accounts are and which one would work best for your needs.
To set up an IMAP folder, follow these steps: 1. | Determine where you would like to place the IMAP folder in your folder structure.
| 2. | Highlight the "parent" folder under which you want to place your IMAP folder. Right-click and choose New Folder. Select IMAP Folder as the folder type and click Next.
| 3. | From the Create Account screen, enter a name for the IMAP folder in the Account Name field. One suggestion would be to use the name of your IMAP4 service provider. Click Next.
| 4. | In the Create Internet Account screen, complete the following fields, as shown in Figure 8.17, and click Next:
- Incoming Mail Server The name of the IMAP mail server, as provided to you by your ISP
- Login Name Your login name to the IMAP server
- Outgoing Mail Server The name of the outgoing SMTP mail server, as provided to you by your ISP
- Email Address Your Internet mail address for this IMAP mail account
- From Name The name you want to use to send all IMAP messages from
Figure 8.17. You use this dialog box to create an IMAP Internet account. 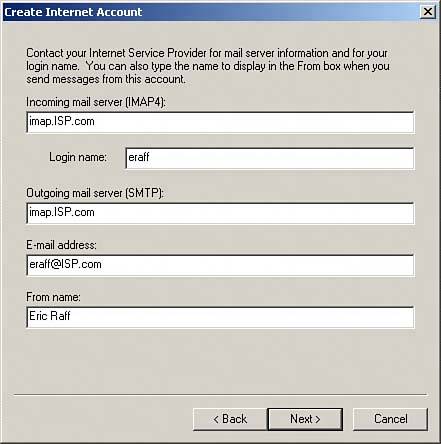
| 5. | In the next screen, enter the connection method you want to use to connect to the IMAP mail server and click Next.
| 6. | In the Create Folder screen, you can enter a description and position for the IMAP folder, as shown in Figure 8.18. When you are done, click Next.
Figure 8.18. You can place an IMAP folder where you decide in your Cabinet or folder structure, just like any other folder. 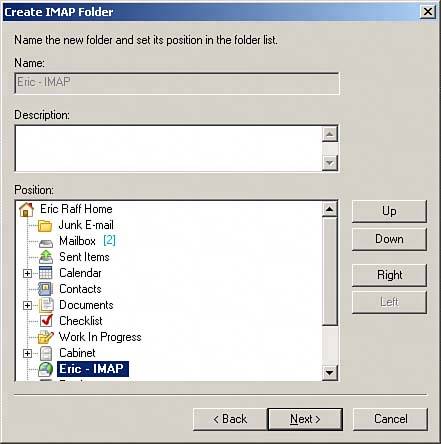
| 7. | On the Display screen, you can configure the sort options, columns, and other customizable settings for this folder. These settings are described in Chapter 10. Click Finish after you have made your desired changes. Notice that the new IMAP folder has been created. To access your IMAP messages, simply click the IMAP folder. You are prompted for your IMAP server login information, as shown in Figure 8.19.
Figure 8.19. You need to log in to your IMAP service. 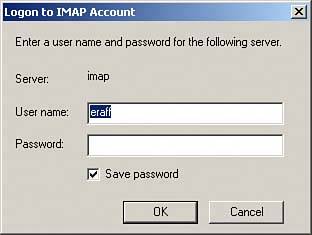
| 8. | Enter your login name (it will probably appear automatically) and your password. You can click the Save Password box, if desired. Click OK. Your IMAP messages appear in the right pane of the GroupWise client.
|
Usually, the default settings for the IMAP folder will suffice. To perform additional configuration, right-click the IMAP folder and choose Properties. The following tabs are used to configure the folder, as shown in Figure 8.20: General Includes the email address, from name, organization, and reply address. Server Includes the ISP IMAP server name, login information to the IMAP mail server, and the SMTP mail server name. You can also define whether you want to use a secure connection to the Internet mail server. Connection Specifies the method to connect to the IMAP mail server. Advanced Includes the root folder path (the folder on the IMAP server that contains your Mailbox folders), other folder options, IMAP and SMTP port information, SSL options, and download options. NOTE For both POP and IMAP accounts, if you do not use an SSL connection, your username and password are likely to be sent over the network unencrypted, making it simple for an intruder to discover your POP or IMAP account's username and password.
Signature Includes signature information placed at the end of messages sent from your IMAP mail account.
Figure 8.20. You can customize your IMAP folder using this dialog box. 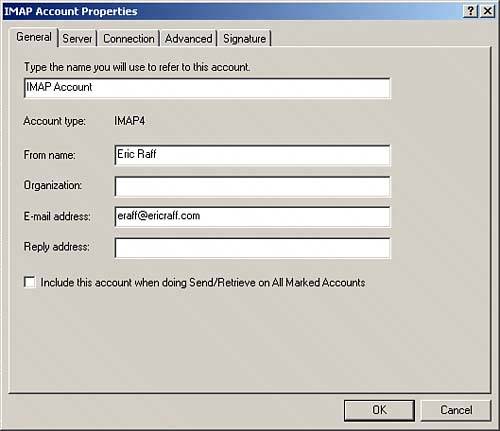
The IMAP mail protocol is a very popular mailbox standard, and GroupWise allows you to configure access to it as well as your corporate email. NNTP Folders and Internet Newsgroups Internet newsgroups (which use the NNTP protocol to send and receive news information) are a useful tool for sharing information related to a specified topic, such as car repair. GroupWise 7 can access NNTP newsgroup information and store the messages under a separate folder. The newsgroups are updated with new information as it becomes available. The newsgroups appear under the NNTP folder you create. To set up an NNTP newsgroup folder, follow these steps: 1. | Determine where in your folder structure you want the NNTP folder to be placed.
NOTE Separate folders under the main NNTP folder are automatically created for the different newsgroups you subscribe to. | 2. | Right-click the "parent" folder under which you want to set up the NNTP folder and choose New Folder. Select NNTP Folder and click Next.
| 3. | In the Account Name field, enter a name for the NNTP folder, such as Newsgroups, and click Next.
| 4. | In the Create News (NNTP) Account screen, shown in Figure 8.21, enter the following information and click Next:
- News (NNTP) Server This is the NNTP server name, as provided to you by your ISP.
- My Server Requires Authentication If your ISP's newsgroup server requires authentication, enter your ISP login name and password.
- Email Address This is your ISP email address.
- From Name This is the name your newsgroup postings will be from.
Figure 8.21. NNTP newsgroup account access is configured in this dialog box. 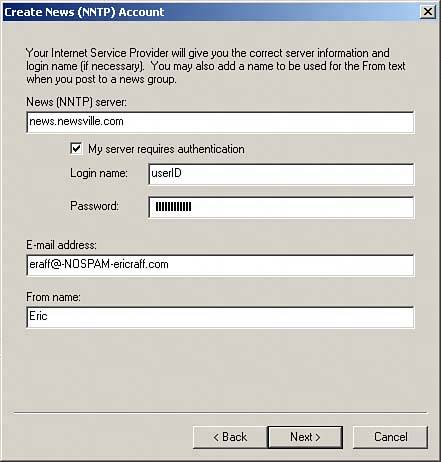
TIP You may want to change your real email address when using NewsGroups so that web crawlers are not able to harvest your real email address. Figure 8.21 shows an example of this. A person would know to remove the NOSPAM- from the email address if he or she wanted to send email to you. If this email address is harvested by some sort of newsgroup scanner, you would not be affected. Also, you should put the incorrect text after the @ symbol so that your organization's mail servers never even get the messages. | 5. | In the Create Internet Account screen, set up the method to connect to your ISP, just as you did for your Internet mail account, and click Next.
| 6. | Enter a description and the position of the new NNTP folder (see Figure 8.22) and click Next. The name of the folder is the name you entered in the Account Name field in step 3.
Figure 8.22. The NNTP newsgroup account is represented by an NNTP folder. 
| 7. | Establish the folder's default settings, such as columns and the sort method, and click Finish. These settings are described in Chapter 11.
|
Now that you have set up the NNTP folder, you can begin to access newsgroups. ACCESSING NEWSGROUPS AND USING THE NNTP FOLDER To subscribe to newsgroups, right-click the NNTP folder and choose Subscribe to Folders. Your computer accesses the news server and pulls down a listing of all available newsgroups, as shown in Figure 8.23. Figure 8.23. The NNTP server displays the available newsgroups. 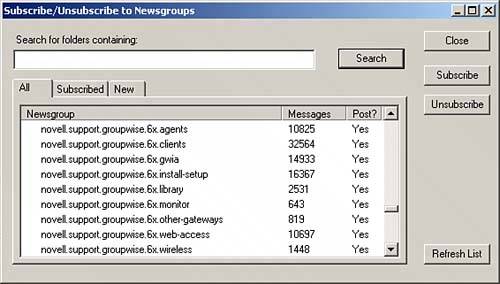
NOTE Your computer may slow down and may even appear to stop responding while downloading the thousands of newsgroups (sometimes up to 50,000) on the news server. It should "come back to life" after a while, usually a few minutes. The count of newsgroups flashes at the bottom of the screen while downloading.
Select the newsgroup(s) you would like to subscribe to and click Subscribe. Ctrl+click to select multiple newsgroups. You can also search for newsgroups by entering search criteria in the Search for Folders Containing box and clicking the Search button. TIP You can view the newsgroups you are subscribed to by clicking the Subscribed tab. To unsubscribe to a newsgroup, select the Subscribed tab, highlight the desired newsgroup, and click Unsubscribe.
Click Close, and your newsgroup will appear as a subfolder under your NNTP folder. SUBSCRIBING TO ADDITIONAL NEWSGROUPS To obtain a new list of available newsgroups, right-click the NNTP folder and choose Subscribe to Folders. Your computer uses the connection method you set up earlier to establish a connection with the newsgroup server and then updates your NNTP folder with new newsgroups. You can then use the New tab to see any new newsgroups available. Use the steps described earlier to subscribe to a new newsgroup. ACCESSING NEWSGROUP MESSAGES When you click a newsgroup, the messages it contains are listed in the right pane of the GroupWise window, as shown in Figure 8.24. Figure 8.24. Newsgroup messages appear within the subfolder under the main NNTP folder. 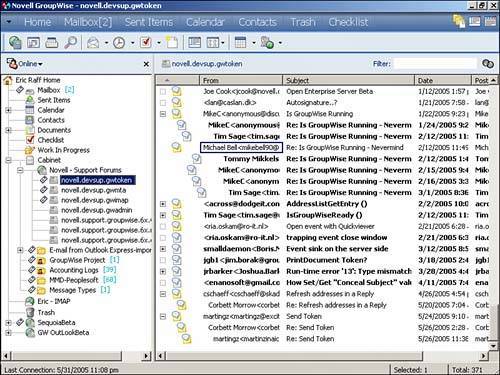
Newsgroup messages can be handled just like any other email. You can reply back to the sender, include the entire newsgroup as a recipient, or forward or delete the message, if desired. You can also create a new discussion topic in the newsgroup. TIP You can copy (that is, link) a newsgroup message to another folder by clicking the message and dragging it to the other folder.
The actions you need to perform on the newsgroup itself are available to you by right-clicking the newsgroup: Send/Retrieve This command updates your mailbox with new messages, sending any replies or new discussions. Reset This command enables you to download entire newsgroups, with fresh copies of all postings. New Discussion This command allows you to enter a new discussion topic in the newsgroup. Collapse All Threads This command collapses all messages; only the discussions are listed. Mark All Read This command allows you to mark all postings as "Read." This capability can be helpful if you subscribe to a new newsgroup and do not want to see the unread icon for all the previous postings. Simply mark them Read, and then as new postings arrive, you will know which ones are new. Search on Server This command enables you to search the news server for messages, by sender or subject.
These steps are adequate for accessing most newsgroups; additional configuration of the NNTP folder is covered next. ADDITIONAL CONFIGURATION OF THE NNTP FOLDER Usually, the default settings for the NNTP folder will suffice. To perform additional configuration of the NNTP folder, right-click the NNTP folder and choose Properties. You can use the following tabs to configure the folder, as shown in Figure 8.25: General Includes the email address, from name, and reply address Server Includes the ISP news server name and the login information to the news server if required Connection Specifies the method to connect to the news server Advanced Includes the NNTP port, SSL options, download options, and general settings Signature Includes the signature information placed at the end of posted messages to newsgroups
Figure 8.25. Additional configuration of the NNTP folder is accomplished using this dialog box. 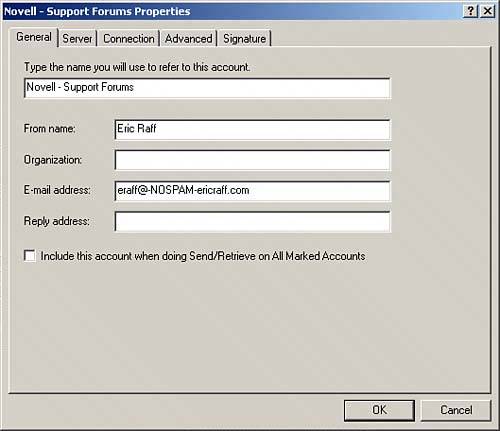
NNTP newsgroups are very good for accessing communities of information related to a specific interest or topic. Importing Messages, Addresses, and Account Settings GroupWise allows you to import items, addresses, and settings from other email programs installed on your computer. To import these items, open the GroupWise Importer by choosing File, Import POP3/IMAP. You see the screen shown in Figure 8.26. From here, follow these steps: 1. | The GroupWise client displays any possible mail programs that are installed on the computer from which it can import mail. Select the email program to import from and click Next.
| 2. | On the next screen, select the email messages, account settings, or address book items to import, or choose a combination of these items. Click Next.
NOTE Steps 310 assume you selected all three options (email messages, account settings, and address book items) in step 2. | 3. | On the next screen, select the folders from the existing email program to import (see Figure 8.27). You can select all or some of the folders. Click Next.
Figure 8.27. You can select the folders to import messages from. 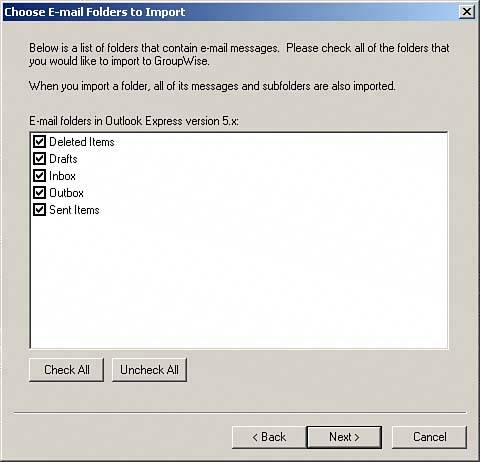
| 4. | On the following screen, you specify the name and location of the GroupWise folder that will hold your imported email messages (see Figure 8.28). In the Name field, enter a name for the folder and use the buttons on the right (Up, Down, Right, Left) to place the folder in your GroupWise mailbox. Click Next.
Figure 8.28. This screen enables you to configure the folder that the messages will be imported into. 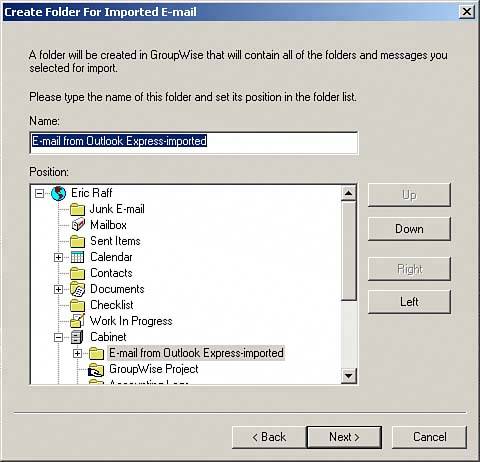
| 5. | On the next screen, you name the new personal address book that will hold your imported addresses. Enter a name for the new address book and click Next.
| 6. | On the next screen, you import the settings for the email program installed on your computer, which in this case is Outlook Express (see Figure 8.29). Click the check box next to the account name you want to import settings from. You can also rename this account by clicking the Rename button, entering a new account name in the resulting dialog box, and clicking OK. Click Next.
Figure 8.29. You can select the account to import settings from in this screen. 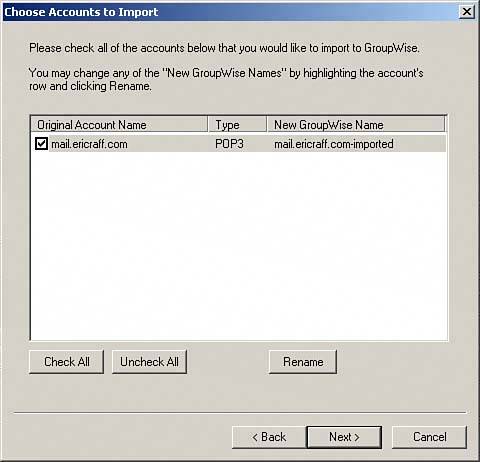
| 7. | On the Choose Folders for New Accounts screen, shown in Figure 8.30, you determine which GroupWise folder will hold the messages sent to that email account. It is a good practice to make a new folder for the account. Click the Change Folder button and then click the check box next to an existing folder (if desired) or click the Create New Folder for Account button to enter the name and location of a new folder. Click Next.
Figure 8.30. On this screen, you can set up a new folder to hold the messages for the imported account. 
| 8. | You then see a summary page, similar to the one shown in Figure 8.31, of all your selections. If you would like to make changes, use the Back button to do so. When everything is satisfactory, click Next to begin the import. You see a new screen with status bars for the import as it happens. The amount of time this process will take depends on the number and size of the email messages and addresses you are importing.
Figure 8.31. You see the summary page before beginning the import. 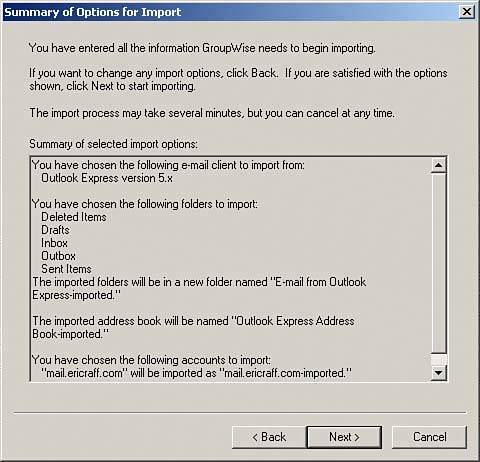
| 9. | After you have finished the import, you see a results screen that displays the success or any errors of the import. Click Done to end the GroupWise Importer.
| 10. | You now have the following items (assuming you selected all three import sources):
Email messages imported into a folder you specified. A new personal address book containing the addresses you imported. A new account for GroupWise to get messages from based on the settings you imported. The process of accessing and using the new account is identical to accessing and using an account you create manually. We cover that in the next section.
|
Figure 8.26. This dialog box allows you to choose which email program you want to import from. 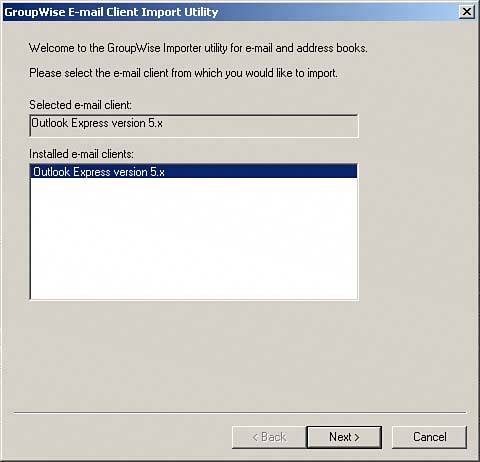
Congratulations! You have imported your other email program's settings into GroupWise, and you are now ready to use GroupWise to access the outside email account. |