Lesson 1: Performing Configuration Tasks
3 4
There are a number of tasks you might need to perform to configure the Windows operating system, the SQL Server service, the SQL Server Agent service, and SQL Server Enterprise Manager. In this lesson, you will learn how to set various available configuration options and when the use of each is appropriate. For many environments, little or no configuration is required.
After this lesson, you will be able to
- Verify that Windows 2000 is configured to optimize SQL Server 2000 performance
- Configure properties of the SQL Server service
- Configure properties of the SQL Server Agent service
- Register additional SQL Server instances with SQL Server Enterprise Manager
- Share SQL Server Enterprise Manager registration information
Estimated lesson time: 45 minutes
Configuring Windows 2000 (and Windows NT 4.0)
Optimizing a Windows 2000 (or Windows NT 4.0) server for performance is beyond the scope of this book. However, there are three specific operating system settings that affect SQL Server 2000 that you might need to check or configure.
Maximizing Throughput for Network Operations
During the installation of SQL Server 2000 on any Microsoft Windows 2000 (or Microsoft Windows NT 4.0) server edition, the Setup program automatically configures the operating system (if not already set) to maximize throughput for network applications. This setting optimizes server memory for distributed applications that perform their own memory caching (such as SQL Server 2000).
Changing the default setting is not recommended, and the Full-Text Search feature in SQL Server 2000 requires the default setting. To verify this setting in Windows 2000, open Network And Dial-Up Connections, right-click Local Area Connection, and then click Properties. In the Local Area Connection Properties dialog box, highlight the File And Printer Sharing For Microsoft Networks check box (this check box should already be selected) and then click the Properties button. When the File And Printer Sharing For Microsoft Networks Properties dialog box appears, verify that the Maximize Data Throughput For Network Applications option button is selected. See Figure 12.1.
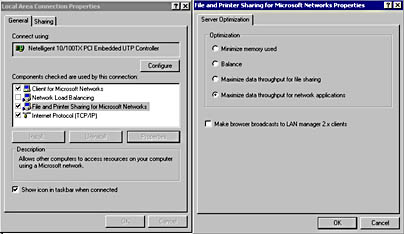
Figure 12.1
Verifying the Windows 2000 setting for data throughput.
Configuring Server Application Responsiveness
During the installation of SQL Server 2000 on any Windows 2000 (or Windows NT 4.0) server edition, the Setup program automatically configures the operating system (if not already set) to run background and foreground services with equal amounts of processor resources. This setting is optimal for background tasks (such as Windows services).
If you are connecting to your SQL Server 2000 instance from a local client, you can improve the responsiveness of the local client (and all other) foreground applications by optimizing performance for applications. To verify or change this setting, open System in Control Panel, click the Advanced tab in the System Properties dialog box, and then click the Performance Options button. You then make your selections in the Performance Options dialog box. See Figure 12.2.
Configuring Virtual Memory
Although SQL Server 2000 generally is designed to minimize hard disk paging (given sufficient physical memory), Windows 2000 (and Windows NT 4.0) virtual memory size and configuration can affect SQL Server 2000 performance, particularly on a computer hosting a variety of Windows 2000 server applications. In general, consider setting the virtual memory size to 1.5 times the amount of physical memory on the computer. If you are using the Full-Text Search feature, the virtual memory size should be set to three times the amount of physical memory for optimal performance.
In addition, placing paging files on multiple disks generally improves performance. However, avoid placing paging files on disks containing data or transaction log files. To verify or change virtual memory settings, open System in Control Panel, click the Advanced tab, and then click the Performance Options button to display the Performance Options dialog box. In the Virtual Memory group box, click the Change button to display the Virtual Memory dialog box and then either verify or change virtual memory settings. See Figure 12.3.
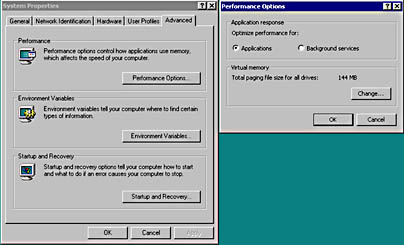
Figure 12.2
Configuring Windows 2000 application responsiveness.
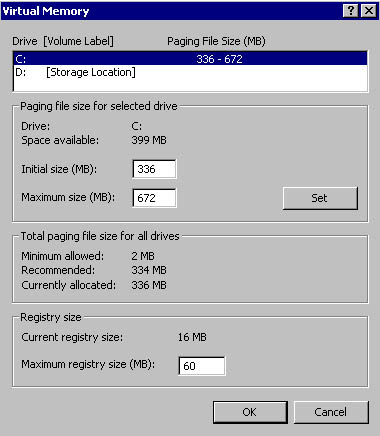
Figure 12.3
Changing Windows 2000 virtual memory settings.
Configuring the SQL Server Service
The SQL Server service is designed to be self-tuning and self-regulating. Although manual tuning of parameters can improve performance in some environments, most SQL Server 2000 installations perform optimally using the default settings. Configuration options to manually control the behavior of the SQL Server service are available for each of the following:
- Connections
- Database
- Memory
- Processor
- Server
Caution
Tuning these parameters manually can result in a degradation of performance over time rather than an improvement in performance. Use manual tuning with extreme caution, and monitor performance to determine its effect.
You can view or change most configuration settings using SQL Server Enterprise Manager. You can view or change all configuration settings using the sp_configure system stored procedure. Executing the sp_configure system stored procedure with no parameters displays the current settings for all configuration options. Some options are not visible unless you enable Show Advanced Options. A setting of zero for an option indicates that the SQL Server service is managing the option dynamically. After changing a setting with sp_configure, you must either issue the RECONFIGURE statement or restart the SQL Server service for the change to take effect (depending upon the change). When changing a setting using SQL Server Enterprise Manager, it will prompt you if you must restart the SQL Server service in order for the setting to take effect.
Note
Each option has a running value and a configured value. If an option has been changed, but not yet activated, the running value and the configured value will differ.
Connections
To change client connection settings using SQL Server Enterprise Manager, right-click the instance name in the console tree, click Properties, and then click the Connections tab in the SQL Server Properties (Configure) dialog box. You can also click SQL Server Configuration Properties from the Tools menu, and then click the Connections tab. See Figure 12.4.
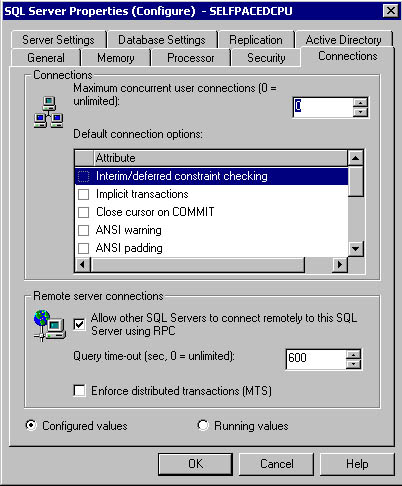
Figure 12.4
Changing client connection settings.
Table 12.1 describes these connection settings using the sp_configure option name for each setting. The option in the SQL Server Enterprise Manager interface is more descriptive than the option name.
Table 12.1 Connection Settings
| Option Name | Description | When to Use |
| User connections | Specifies the maximum number of simultaneous user connections, up to the maximum value allowable. The actual number of user connections allowed is dependent upon the version of SQL Server 2000 you are running and upon the limitations of your applications and hardware. Dynamic by default. | To avoid overloading SQL Server 2000 with too many concurrent connections. |
| User options | Specifies default query-processing options for all client connections. No options are set by default. | To set global query-processing defaults for client connections. |
| Remote access | Permits or denies access by remote logins via remote stored procedures. Default is to allow remote access. | To secure a local server and prevent remote access. |
| Remote proc trans | Enforces the use of distributed transactions using MS DTC to protect server-to-server procedures. Default is not to enforce. | To require an MS DTC distributed transaction to protect Atomicity, Consistency, Isolation, and Durability (ACID) properties of transactions. |
| Remote query timeout | Specifies the number of seconds before SQL Server 2000 times out when processing a remote query. Default is 600 seconds (10 minutes). | To manage the remote timeout default. |
Database
To change database settings using SQL Server Enterprise Manager, right-click the instance name in the console tree, click Properties, and then click the Database Settings tab in the SQL Server Properties (Configure) dialog box. See Figure 12.5.
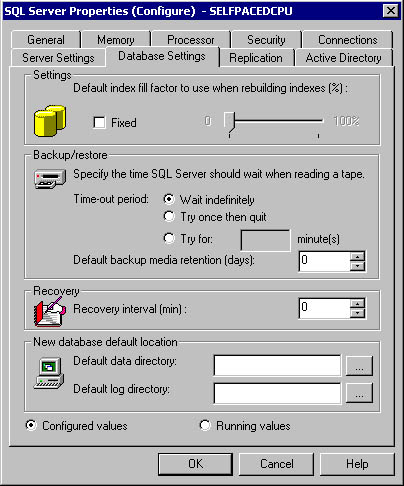
Figure 12.5
Changing database settings.
Table 12.2 describes these database settings using the sp_configure option name for each setting.
The SQL Server Enterprise Manager interface also allows you to specify a new default data and transaction log directory for all new databases in the Database Settings tab of the SQL Server Properties (Configure) dialog box.
Table 12.2 Database Settings
| Option | Description | When to Use |
| Fill factor | Specifies how full each index page should be when creating a new index using existing data. By default, SQL Server 2000 will fill each clustered and nonclustered index page, leaving only a small amount of space for additional data before a page split must occur. | Set a value to minimize future index page splits. Set at 100% for a read-only table to which new data is not added. |
| Media retention | Specifies a default length of time to retain each backup. Default is 0. | To set a default media retention value for all backup sets. |
| Recovery interval | Controls how frequently the checkpoint process runs by specifying a maximum length of time (in minutes) for automatic recovery to complete. Default is dynamic based on number of data modifications and the amount of free space in the transaction log. | To distribute hard disk writes more evenly and avoid spikes of hard disk activity. |
Memory
To change memory settings using SQL Server Enterprise Manager, right-click the instance name in the console tree, click Properties, and then click the Memory tab in the SQL Server Properties (Configure) dialog box. See Figure 12.6.

Figure 12.6
Changing memory settings.
Table 12.3 describes these memory settings using the sp_configure option name for each setting.
Table 12.3 Memory Settings
| Option | Description | When to Use |
| Max server memory | Specifies the maximum amount of memory SQL Server 2000 can use for its buffer pool. Default is dynamic memory allocation. | To limit memory use on a nondedicated computer so other server applications are more responsive. |
| Min server memory | Guarantees a minimum amount of memory for SQL Server 2000 to use for its buffer pool. Default is dynamic memory .allocation. | To guarantee memory use on a nondedicated computer so SQL Server 2000 is more responsive |
| Set working set size | Sets aside a specified amount of physical memory for SQL Server 2000. Used with the max server memory and min server memory settings. Default is zero. | To prevent Windows 2000 from swapping out pages to other server applications (no matter how much they might need memory or how idle SQL Server 2000 is). |
| Min memory per query | Specifies a minimum amount of memory (in kilobytes) allocated to each query. Default is dynamic. | Increase to improve performance of small to medium queries. |
SQL Server 2000 dynamically allocates and deallocates memory within the buffer cache to optimize performance. It bases the amount of memory used on the SQL Server 2000 load and competing memory requirements from other server applications. If all available physical memory is already committed to a server application, it takes processor cycles to reallocate memory between server applications. To ensure that physical memory is immediately available for all server applications running on the Windows computer, you might set a minimum and a maximum server memory value. In this case, SQL Server 2000 will dynamically allocate and deallocate memory between these minimum and maximum values.
Note
Memory required by the SQL Server service for basic operations is not dynamically managed and might cause hard disk paging if insufficient physical memory is available.
On a dedicated SQL Server 2000 computer, setting the minimum and maximum value to the same high value, and setting a working set size equal to that value, might slightly improve performance. With these settings, memory will be allocated to SQL Server 2000 as needed and then remain allocated. It will not be reallocated to other server applications.
Note
If you are running the Full-Text Search feature, you might need to set a maximum memory value so that SQL Server 2000 can reserve sufficient memory for the Microsoft Search service to run optimally. The amount required for the Microsoft Search service depends on the size of tables that contain full-text indexes and the level of full-text query activity.
Processor
To change processor settings using SQL Server Enterprise Manager, right-click the instance name in the console tree, click Properties, and then click the Processor tab in the SQL Server Properties (Configure) dialog box. See Figure 12.7.
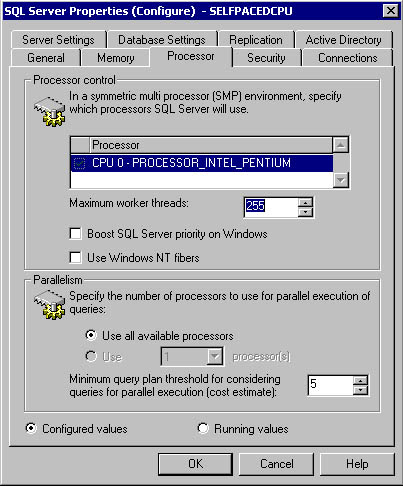
Figure 12.7
Processor settings.
Table 12.4 describes these processor settings using the sp_configure option name for each setting.
Server
To change server settings using SQL Server Enterprise Manager, right-click the instance name in the console tree, click Properties, and then click the Server Settings tab in the SQL Server Properties (Configure) dialog box. See Figure 12.8.
Table 12.5 describes these server settings using the sp_configure option name for each setting.
Table 12.4 Processor Settings
| Option | Description | When to Use |
| Affinity mask | Excludes a processor on a multiprocessor computer from processing SQL Server 2000 threads. Default is equal distribution of SQL Server 2000 processes across all processors. | To exclude SQL Server threads from processors with specific workloads from Windows 2000. |
| Cost threshold for parallelism | Determines which query plans are considered long or short. Used by SQL Server 2000 to determine when it should create and execute parallel execution plans for queries. Default value is 5. | To force or limit the use of parallel query plans on multiprocessor computers. |
| Lightweight pooling | Specifies the use of fibers (fiber mode scheduling) within threads, rather than separate threads for each task. Default is thread mode scheduling. | On multiprocessor computers with excessive context switching and a consistently heavy processor load. |
| Priority boost | Specifies the SQL Server 2000 processor scheduling priority. Default is normal priority (which is 7). | To increase scheduling priority on a dedicated SQL Server 2000 computer with multiple processors. |
| Max degree of parallelism | Specify the number of processors used in parallel plan execution. Default is to use all available processors. | To suppress parallel plan generation. |
| Max worker threads | Specify the number of worker threads available to SQL Server 2000 processes. Default is 255. | Set to smaller value on systems with low numbers of connections to improve performance. |
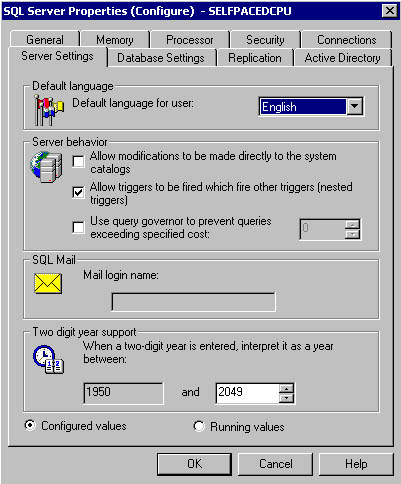
Figure 12.8
Server settings.
The SQL Server Enterprise Manager interface also allows you to specify a new default language for server messages to users and a mail profile name for a mail session in the Server Settings tab of the SQL Server Properties (Configure) dialog box. Setting up SQLAgentMail and SQL Mail is covered in Lesson 2.
Integration with Active Directory
If your SQL Server 2000 installation is running in a Windows 2000 Active Directory environment, you can register your SQL Server 2000 instance in Active Directory. This adds an MS-SQL-SQLServer object as a Service Connection Point (SCP) object in the container for the computer on which the SQL Server 2000 instance is running. An SCP is an Active Directory object that represents services that are available on the network. The MS-SQL-SQLServer object records information about the SQL Server service, such as connection information. Users and applications can search Active Directory for information regarding published SQL Server 2000 instances on the network.
The MSSQLServerADHelper service performs the actual registration task. This service is dynamically started by an instance of SQL Server or the Analysis Manager when needed and then stopped when it has completed its task. This service also verifies that the SQL Server service domain user account has sufficient permissions to update all Active Directory objects for this SQL Server 2000 instance, as well as any databases or replication publications. To register (or unregister) an instance or a database with Active Directory, the SQL Server service domain user account must be a member of either the Windows 2000 or Windows NT 4.0 local Administrators or local Power Users group on the SQL Server 2000 computer.
Table 12.5 Server Settings
| Option | Description | When to Use |
| Allow updates | Specify whether direct updates can be made to system tables. When Allow Updates is disabled, updates are not allowed to the system tables, even if a user is assigned the appropriate permissions with the GRANT statement. Default is disabled. | Use only with direction from Microsoft Product Support Services. |
| Nested triggers | Control whether a trigger can cascade (initiate another trigger). You can nest triggers up to 32 levels. Default is to permit cascading of triggers. | To prevent cascading of triggers. |
| Query governor cost limit | Specify the maximum length of time (in seconds) a query can run. Default is to allow queries to run indefinitely. | To prevent runaway queries. |
| Two-digit year cutoff | Specify either the current century or the next century when a two-digit date is used. a two-digit date of 49 is interpreted as 2049 and a two-digit date of 50 is interpreted as 1950. Default for OLE Automation objects is 2030. | To provide consistency Default is 2049, meaning that in date values between SQL Server 2000 and client applications. |
You can register (or unregister) an instance using either SQL Server Enterprise Manager or the sp_ActiveDirectory_SCP system stored procedure. Using SQL Server Enterprise Manager, right-click the instance name in the console tree, click Properties, and then click the Active Directory tab in the SQL Server Properties (Configure) dialog box. To register an instance of SQL Server 2000, click the Add button. To unregister an instance, click the Remove button. See Figure 12.9.
After registering an instance, you can also register each database using either SQL Server Enterprise Manager or the sp_ActiveDirectory_Obj system stored procedure. Using SQL Server Enterprise Manager, right-click the database you want to register, click Properties to display the Properties dialog box, and then click the Options tab. If you have registered the instance with Active Directory, an Active Directory group box will appear in the Options tab. In the Active Directory group box, you select the List This Database In Active Directory check box to enable you to list the database in Active Directory. If the instance is not registered, you will not see the Active Directory group box. See Figure 12.10.
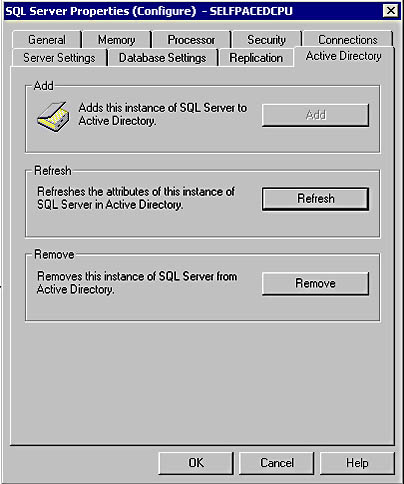
Figure 12.9
Registering SQL Server in Active Directory.
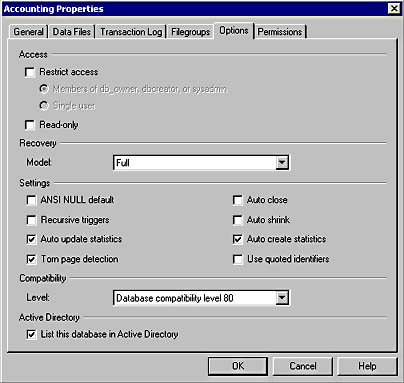
Figure 12.10
Registering a database in Active Directory.
Configuring the Service Account
The SQL Server and SQL Server Agent services run under either a domain user account or the local system account. These services must run under a domain user account to perform most server-to-server activities. Although this domain user account does not require any special permissions for most activities, certain SQL Server 2000 functionality requires the domain user account to have additional permissions, as shown in Table 12.6.
Table 12.6 Additional Permissions Required for Certain SQL Server 2000 Functionality
| Service | Permission | Functionality |
| SQL Server service | Act as part of the operating system and replace a process-level token. | Run an operating system command for a user who is not a member of the sysadmin server role. |
| SQL Server service | Member of the local Power Users or local Administrators group. | Publish and manage SQL Server 2000 objects with Active Directory. |
| SQL Server Agent service | Member of the local Administrators group. | Create operating system and Active Script jobs not belonging to members of the sysadmin server role. |
| SQL Server Agent service | Member of the local Administrators group. | Configure the SQL Server Agent service to autorestart if it stops unexpectedly. |
| SQL Server Agent service | Member of the local Administrators group. | Configure the SQL Server Agent service to run jobs when the processor is idle. |
If your SQL Server 2000 installation requires the functionality listed in Table 12.6, you must ensure that the domain user account used by the applicable service has sufficient permissions or use the local system account (this account has full local privileges). The details of the functionality mentioned in Table 12.6 are discussed in context in this chapter and in Chapter 13.
Configuring the SQL Server Agent Service
You configure the properties of the SQL Server Agent service using SQL Server Enterprise Manager.
General Properties
To configure the general properties of the SQL Server Agent service, expand the Management container, right-click SQL Server Agent, and then click Properties to display the SQL Server Agent Properties dialog box. See Figure 12.11.
In the General tab, you can configure the location of the error log file, enable the recording of execution trace messages (for troubleshooting), and enable the error file to be written as a non-Unicode file (resulting in a smaller log file size). Recording of execution trace messages can generate large files. You can also configure a recipient on the network to receive net send pop-up message notification of errors recorded by the SQL Server Agent service. Configuring a mail session for the SQL Server Agent service is covered in Lesson 2.
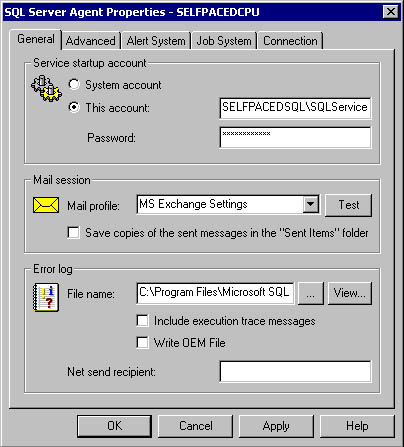
Figure 12.11
Configuring the general properties of the SQL Server Agent.
Advanced Properties
To configure advanced properties of the SQL Server Agent service, click the Advanced tab in the SQL Server Agent Properties dialog box. See Figure 12.12.
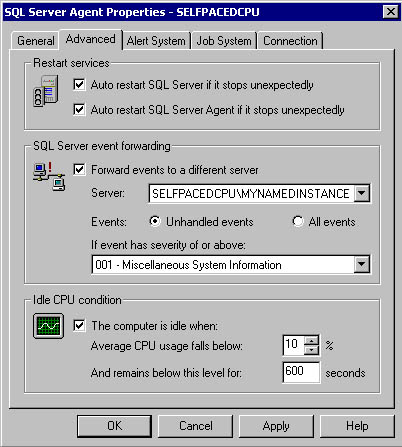
Figure 12.12
Configuring the advanced properties of the SQL Server Agent.
In the Advanced tab, you can configure the SQL Server Agent service to restart automatically if it stops unexpectedly by selecting the Auto Restart SQL Server Agent If It Stops Unexpectedly check box. This feature requires local administrator rights by the SQL Server Agent service account (either granting them to the domain user account or using the local system account). By default, the SQL Server service is already configured to restart automatically.In the SQL Server Event Forwarding group box, you can configure the SQL Server Agent service to forward some or all SQL Server events to another server. You can use this feature to enable centralized alert management for a group of servers. Plan carefully, because this generates additional network traffic, generates additional load on the centralized server, and creates a single point of failure. To use this feature, you must use a server that you have registered with SQL Server Enterprise Manager. Configuring alerts is covered in Chapter 13.
In the Idle CPU Condition group box, you can also define when the processor is considered to be idle. In Chapter 13, you learn to create jobs that the SQL Server Agent service runs when the processor is considered to be idle. You define the idle condition by specifying a percentage below which the average processor usage must fall for a defined length of time. This feature requires local administrator rights granted to the SQL Server Agent service account (either granting them to the domain user account or using the local system account).
Connection Properties
You configure the connection properties of the SQL Server Agent service by clicking the Connection tab in the SQL Server Agent Properties dialog box. See Figure 12.13.
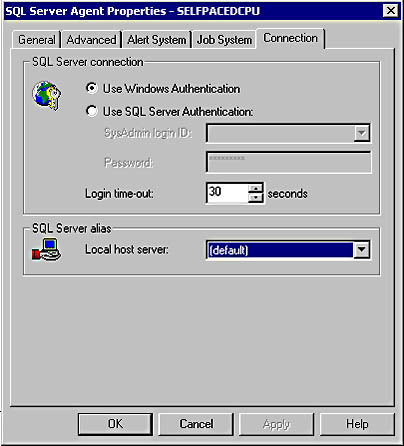
Figure 12.13
Configuring the connection properties of the SQL Server Agent.
By default, the SQL Server Agent service connects to the local SQL Server 2000 instance using the domain user account specified as the service account. However, in the SQL Server Connection group box, you can specify that all connections to the local instance use a SQL Server login account that is a member of the sysadmin server role. You can also modify the login timeout value from the default of 30 seconds. Finally, if you have configured nondefault client Net-Libraries, you might need to specify a SQL Server alias that you previously created using the Client Network Utility.
Registering SQL Server 2000 Instances with SQL Server Enterprise Manager
Before you can administer and manage SQL Server 2000 (and SQL Server 7.0) instances with SQL Server Enterprise Manager, you must register those instances. When you register an instance, you must specify the server name, instance name (if applicable), the login authentication method, login information if SQL Server authentication is specified, and the logical group within SQL Server Enterprise Manager. You can register instances using the Register SQL Server Wizard or directly with SQL Server Enterprise Manager.
Using the Register SQL Server Wizard
You can select the Register Server Wizard by clicking Wizards from the Tools menu or by right-clicking a server group or registered instance and then clicking New SQL Server Registration. See Figure 12.14.

Figure 12.14
The Register SQL Server Wizard.
You can disable the Register SQL Server Wizard by selecting the From Now On, I Want To Perform This Task Without Using A Wizard check box in the Welcome To The Register SQL Server Wizard page. If you disable the wizard, you must access Register Server Wizard by clicking Wizards from the Tools menu. Click Next to display the Select A SQL Server page. The wizard displays the available instances detected on the network. Select the SQL Server instances you want to register. See Figure 12.15. If an instance is not displayed, you can enter it manually. For example, a server might not be displayed because it is not currently running or because it is not broadcasting its existence.
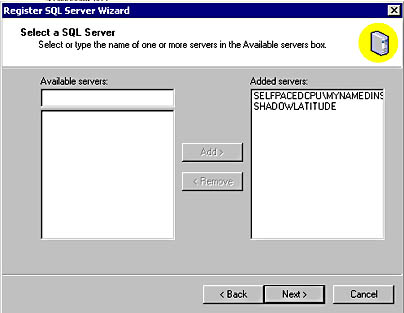
Figure 12.15
Selecting an instance of SQL Server to be registered.
Click Next to select the authentication mode to connect to each instance in the Select An Authentication Mode page. Notice that you must select the same authentication mode for all instances selected. You can configure custom connection information for specific instances later in the wizard. See Figure 12.16.
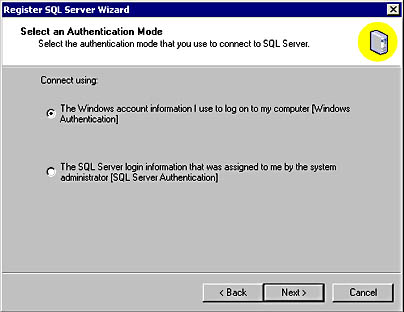
Figure 12.16
Selecting an authentication mode for servers being registered.
If you select SQL Server authentication, you are prompted for connection information in the Select Connection Option page. You can supply the SQL Server login that will be used each time SQL Server Enterprise Manager connects to any of these instances. You can also configure SQL Server Enterprise Manager to prompt you for a SQL Server login each time it attempts to connect to an instance. This is useful if multiple users are sharing registration information and will be connecting using different SQL Server logins, each with different permissions within an instance. See Figure 12.17.
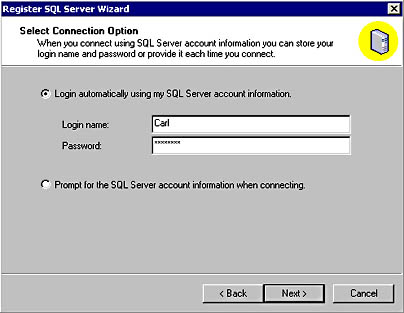
Figure 12.17
Selecting connection options for servers being registered.
Next, in the Select SQL Server Group page, you can choose to add these new instances being registered to an existing SQL Server group within the management console or to a new top-level SQL Server group. See Figure 12.18.
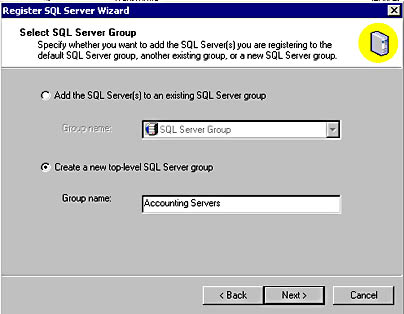
Figure 12.18
Selecting a logical group for servers being registered.
Next, in the Completing The Register SQL Server Wizard page, the Register SQL Server Wizard verifies that it can connect to each instance using the authentication method and credentials specified. See Figure 12.19.
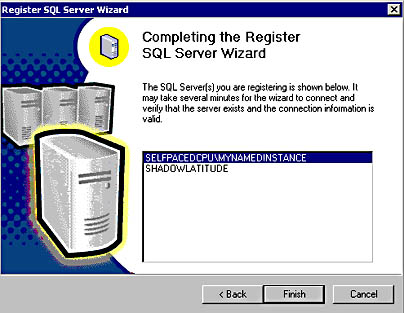
Figure 12.19
Verifying connections to the servers being registered.
If the wizard is unable to connect to any instance using the registration information provided, you can select the instance that failed and provide custom registration information for that instance. See Figure 12.20.

Figure 12.20
Providing custom registration information for specific instances.
If the connection still fails, you have the option to register the instance without verifying the registration information. This option is useful if the account you want to use has not yet been created or if the instance is not currently running. See Figure 12.21.

Figure 12.21
Registering an instance non-verifiable connection information.
Using SQL Server Enterprise Manager
To register instances directly, right-click the SQL Server group or a registered instance, and then click New SQL Server Registration. If you have not previously disabled the Register SQL Server Wizard, in the Welcome To The Register SQL Server Wizard page, select the From Now On, I Want To Perform This Task Without Using A Wizard check box to bypass this wizard. Click Next. See Figure 12.22.
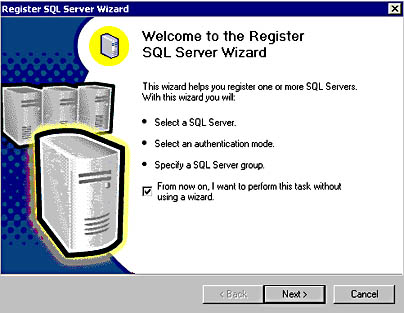
Figure 12.22
Bypassing the Register SQL Server Wizard.
Next, the Registered SQL Server Properties dialog box appears. You can register individual SQL Server instances by providing the same information discussed in the previous section. See Figure 12.23.
Additionally, you can choose to change the following defaults for a new instance being registered (or for an instance that is already registered):
- Display the SQL Server state (running or not)
- Display system databases and objects
- Automatically start a SQL Server instance (if necessary) when SQL Server Enterprise Manager attempts to connect
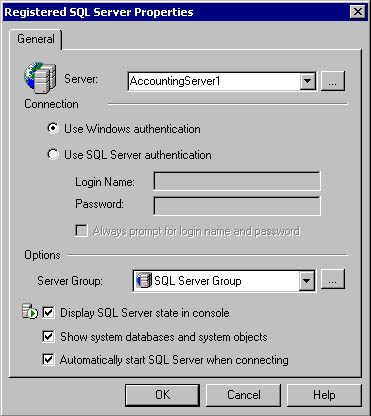
Figure 12.23
Registration properties for a SQL Server instance.
Sharing Registration Information
By default, registration information within the SQL Server Enterprise Manager management console (as well as customization information) is private to each user. For example, if a system administrator registers 15 separate SQL Server instances, another system administrator logging on to the same computer (using her or his Windows user account) will not see the 15 servers already registered.
However, a system administrator can choose to share this registration information with other system administrators on the same computer or on other computers. This is useful when a number of different system administrators are administering the same instances from a single computer. It is also useful for creating a central registration store when many instances are being administered. This permits administrators to use the same registration configuration regardless of the computer they log in to. To use this capability, the system administrator running SQL Server Enterprise Manager must be a member of the local Administrators group on the computer containing the central store and on the local computer.
To share registration information, click Options from the Tools menu and then, in the SQL Server Enterprise Manager Properties dialog box, clear the Read/Store User Independent check box. See Figure 12.24.
To read registration information from another server that has cleared the Read/Store User Independent check box, click the Read From Remote option button and then, in the Server Name text box, enter the name of the server containing the central store.
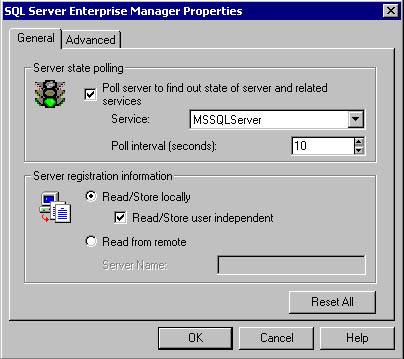
Figure 12.24
Settings for sharing registration information.
Lesson Summary
The SQL Server 2000 Setup program configures the Windows operating system for optimal use by SQL Server 2000 in most environments. However, you should ensure that disks containing data and transaction log files are not also used for virtual memory. The SQL Server service is generally self-tuning. In some environments, manually tuning certain configuration settings might improve performance, but tuning the SQL Server service improperly will negatively affect performance. The service account used by SQL Server and the SQL Server Agent services needs additional rights to perform certain advanced functions. Finally, to enable these advanced functions (such as defining the CPU idle condition), you need to configure advanced properties of the SQL Server Agent service.
EAN: N/A
Pages: 126