Lesson 3: Running the SQL Server 2000 Setup Program
3 4
After you have selected your SQL Server 2000 edition, and installed the Windows operating system you have decided to use, you are ready to install SQL Server 2000 by running the SQL Server 2000 Setup program. This lesson covers running the SQL Server 2000 Setup program interactively to install an instance of SQL Server 2000 on the local computer. The details of default, named, and multiple instances are covered in Lesson 4 of this chapter. Remote and unattended installations are covered in Lesson 5 of this chapter. Upgrading from earlier versions of SQL Server is covered in Chapter 4, and installing SQL Server 2000 on a virtual server for failover clustering is covered in Chapter 16.
After this lesson, you will be able to
- Understand how to start the SQL Server 2000 Setup program
- Understand the difference between the Client Tools Only, the Server and Client Tools, and Connectivity Only installation types
- Describe the components that are installed and the software configuration options that are selected when a Typical or a Minimum setup is selected
- Determine when to select a Custom setup
Estimated lesson time: 30 minutes
Running the SQL Server 2000 Setup Program
There are several ways to start the SQL Server 2000 Setup program for an interactive installation of SQL Server 2000. The easiest way to begin is to simply insert the SQL Server 2000 compact disc into the CD-ROM drive. From the initial dialog box, you can install SQL Server 2000, Analysis Services, or English Query by clicking on SQL Server 2000 Components. The initial dialog box presents a number of additional options, including providing access to the setup/upgrade portion of Books Online, the Release Notes, and SQL Server Web site at Microsoft. Double-clicking on Autorun.exe in the root of the CD-ROM also accesses this initial dialog box. After clicking SQL Server 2000 Components, click Install Database Server to start the SQL Server 2000 Setup program. See Figure 2.1.
Note
You can also start the SQL Server 2000 Setup program by double-clicking on Setupsql.exe in the \X86\Setup folder.
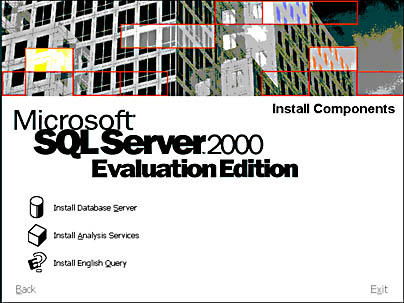
Figure 2.1
Selecting SQL Server 2000 components to install.
Understanding Installation Types
After you choose to create a new instance of SQL Server 2000 on your local computer (instances and remote installations are covered later in this chapter and upgrades are covered in Chapter 4), you can select Client Tools Only, Server and Client Tools, or Connectivity Only. MDAC 2.6 is installed with each of these installation types. MDAC 2.6 is required to connect to named instances of SQL Server 2000. Choose Connectivity Only to install network libraries for client connectivity. This requires approximately 50 MB of hard drive space. If you select this option, you have no choice to install any client management tools, Books Online, or any server components. See Figure 2.2.
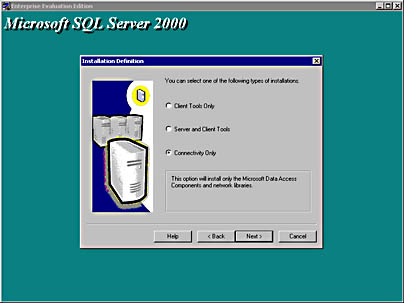
Figure 2.2
Defining the installation type.
Choose Client Tools Only when you need to install client management tools, as well as connectivity software, to connect to and administer an existing server running SQL Server 2000. Selecting this option installs all the client management tools, the client connectivity components, Books Online, and an interface for stored procedure debugging. If you select the Client Tools Only option, you can choose to install additional development tools and code samples. You can also choose not to install Books Online or some of the client management tools. See Figure 2.3.
Choose Server and Client Tools when you need to install a server running SQL Server 2000, as well as connectivity software and client management tools. Selecting this option allows you to install SQL Server 2000 in its entirety with all available tools and components.

Figure 2.3
Selecting components of SQL Server.
Selecting a Setup Type
When you select an installation of Server and Client Tools, you can select to install a Typical, Minimum, or Custom setup. The default location for program and data files for each of these setup types is \Program Files\Microsoft SQL Server. If this default location is low on available hard drive space, consider moving the program and data files to another location. Click Browse to specify a new location for program files and for data files. They do not need to be in the same location. See Figure 2.4.
If you select Typical or Minimum, you are presented with these three additional choices. The SQL Server 2000 Setup program makes all other choices for you.
| Choice | Options |
| Services Accounts | Select the local system account or a domain user account for the SQL Server and SQL Server Agent services. You can also select whether you want either or both of these services to start automatically with the operating system (Windows 2000 and Windows NT 4.0 only). See Figure 2.5. |
| Authentication Mode | Windows Authentication Mode (default) or Mixed Mode. If Mixed Mode is selected, you are prompted to provide a password for the sa login account. This account is a SQL Server login account that has full system administration privileges. You should never install SQL Server in Mixed Mode without setting (and recording in a secure location) the password for the sa login. See Figure 2.6. |
| Choose Licensing Mode | Per Seat or Processor License. See Figure 2.7. |
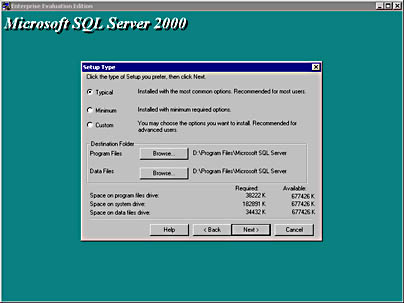
Figure 2.4
Choosing the setup type.
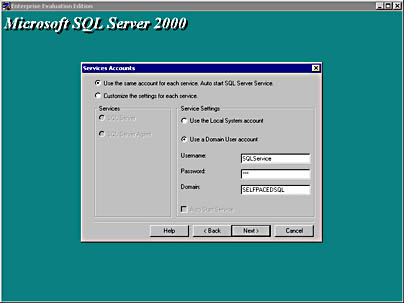
Figure 2.5
Selecting the logon account for services.
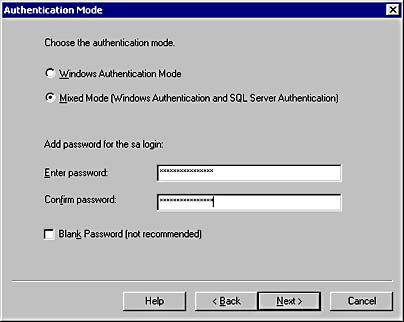
Figure 2.6
Choosing the authentication mode.
Note
The Licensing Mode option is not available when installing the Enterprise Evaluation edition. Per seat is the licensing mode for the Enterprise Evaluation edition.
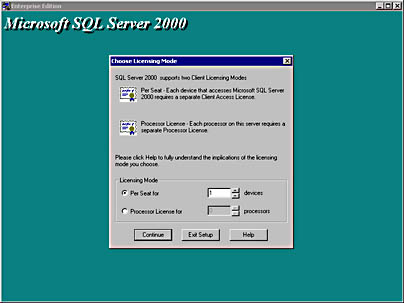
Figure 2.7
Choosing the licensing mode.
If you choose a Custom setup, additional choices are available to you. Through the use of a Custom installation, you can
- Install additional development tools (headers and libraries, MDAC SDKs, and backup/restore APIs)
- Install code samples (fifteen different types of code samples are available)
- Choose specific components to install or not install
- Change the default collation settings to match the collation of another instance of SQL Server or the Windows locale of another computer
- Select and configure additional network libraries for use with a default SQL Server instance
- Change the default named pipe (default is \\ \pipe\Mssql\sql\query <file://\\pipe\Mssql\sql\query> for the default instance)
- Change the default TCP/IP sockets port number (default is 1433 for the default instance and is dynamically assigned at startup for named instances)
- Define the proxy server address, if you set SQL Server to listen on a proxy server
See Figures 2.8, 2.9, and 2.10.
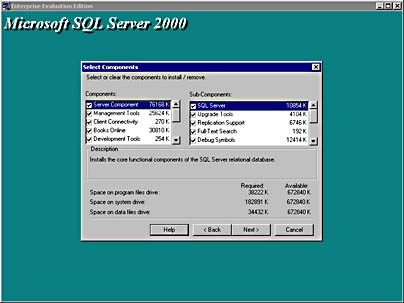
Figure 2.8
Selecting components in a Custom setup.
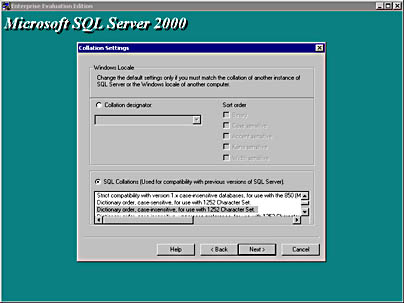
Figure 2.9
Changing default collation settings.
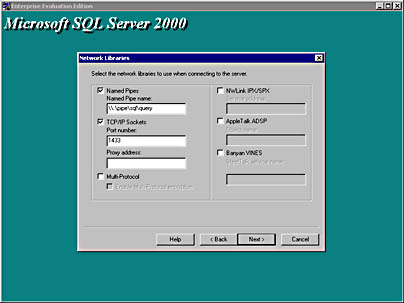
Figure 2.10
Selecting network libraries.
Table 2.5 lists the components installed with each setup type.
Table 2.5 Installed Components
| Component | Minimum | Typical | Custom |
| Database server | Yes | Yes | Optional |
| Upgrade tools | No | Default instance only | Optional |
| Replication support | Yes | Yes | Optional |
| Full-text search | Yes | Yes | Optional |
| Management tools | None | Yes | Optional |
| Client connectivity | Yes | Yes | Optional |
| Books Online | No | Yes | Optional |
| Development tools | None | Stored procedure debugger only | Choice of tools |
| Code samples | None | None | Choice of samples |
| Collation settings | Determined by setup | Determined by setup | Choice of collation settings |
| Network libraries | TCP/IP sockets and named pipes | TCP/IP sockets and named pipes | Choice of additional network libraries |
Practice: Installing a Default Instance of SQL Server 2000
In this practice you install a default instance of SQL Server 2000, using the Microsoft SQL Server 2000 Evaluation Edition.
To install a default instance of SQL Server 2000
- Ensure that you are logged on to the SelfPacedSQL.MSFT domain controller as Administrator.
- Insert the SQL Server 2000 compact disc into the CD-ROM drive.
The Microsoft SQL Server 2000 Evaluation Edition page appears.
- Click SQL Server 2000 Components, and then click Install Database Server.
The Welcome page for the Microsoft SQL Server Installation Wizard appears.
- Click Next.
The Computer Name page appears with Local Computer selected.
- Click Next.
The Installation Selection page appears with Create A New Instance Of SQL Server, Or Install Client Tools selected.
- Click Next.
The User Information page appears.
- Type your name in the Name text box (if it does not already appear there), and then click Next.
The Software License Agreement page appears displaying the 120-day Evaluation License for Microsoft SQL Server 2000.
- Click the Yes button.
The Installation Definition page appears with Server And Client Tools selected.
- Click Next.
The Instance Name page appears with the Default check box selected.
- Click Next.
The Setup Type page appears with Typical selected.
- Click Next.
The Services Accounts dialog box appears with Use The Same Account For Each Service. Auto Start SQL Server Service. selected. Use A Domain User Account is also selected.
- In the Username text box, type SQLService.
- In the Password text box, type sql.
- In the Domain text box, verify SelfPacedSQL appears, and then click Next.
The Authentication Mode page appears with Windows Authentication Mode selected.
- Click Next.
The Start Copying Files page appears.
- Click Next.
The SQL Server 2000 Setup program will start installing SQL Server 2000 beginning with the MDAC. When the SQL Server 2000 Setup program is complete, the Setup Complete page will appear.
- Click the Finish button.
Lesson Summary
The SQL Server 2000 Setup program provides installation types for Client Tools Only, Server and Client Tools, and Connectivity Only. Use Connectivity Only to install only MDAC 2.6 and network libraries. Use Client Tools Only to install MDAC 2.6, client management tools, connectivity, and Books Online. Use Server and Client Tools to install a server running SQL Server 2000, MDAC 2.6, all client management tools, connectivity, and Books Online.
The SQL Server 2000 Setup program provides a Typical, Minimum, or Custom setup type when the server and client tools installation type is selected. Selecting a Typical or Minimum setup type makes most of the installation decisions for you. Select a Custom setup type if you want full control of which components are installed and how they are configured.
EAN: N/A
Pages: 126