| As noted in the introduction, technology validation is divided into three separate categories. Each category focuses on the specific technology infrastructure being used by Project Server to support the application functionality. Because Project Server relies on several other applications and network services, it is crucial to confirm that all supporting technical facilities are working together. The three categories are, as follows: Server operating systems validation Network systems validation Application installation validation
Server Operating Systems Validation Project Server 2003, Windows SharePoint Services, and SQL Server 2000 have similar server operating system requirements that need to be verified and validated before these applications can be installed on the servers. The validation sequence is the same whether the system architecture is a single server or multiple servers. Project Server View Processor, Session Manager, and SQL Server require Windows 2000 Server. PWA and Windows SharePoint Services require Windows 2003 Server. Certain settings in Windows 2003 Server need to be verified and validated to ensure that Project Server works properly. These settings include setting the system as an application server, enabling Internet Information Services and ASP.NET, and deselecting Enhanced Internet Explorer Security. Internet Information Services/Enhanced Internet Explorer Security Verification Windows 2003 does not install and start Internet Information Services if the operating system was installed using the default settings. Checking and installing Internet Information Services is accomplished by performing the following steps: 1. | Log on to the server. (It is preferable to log on as the domain service account.) Go to the Control Panel and select Add or Remove Programs.
| 2. | Select Add/Remove Windows Components on the left side of the dialog box.
| 3. | Select applications and click on Details.
| 4. | Verify that Internet Information Services and ASP Applications are selected, as shown in Figure 12.1.
Figure 12.1. IIS and ASP.NET services must be active for proper Project Server installation. 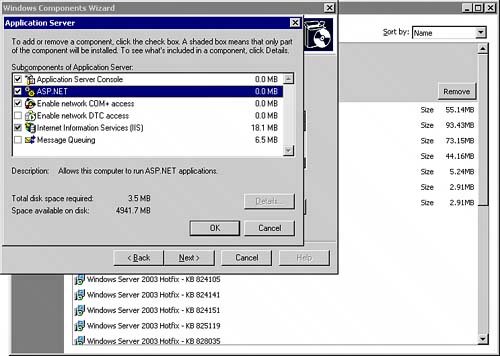
| 5. | Click OK.
| 6. | Scroll down the list and verify that Enhanced Internet Explorer Security is not selected.
| 7. | Click OK.
|
If any changes were made as a result of the preceding steps, Windows begins installing the configuration. Network Systems Validation Project Server, Windows SharePoint Services, and SQL Server work most efficiently when the servers are members of the same domain. User authentication can be managed as a group from the primary domain controller or Active Directory group. The installation of Project Server 2003 calls for the use of service accounts. The application references these accounts to perform processing and data access during normal operation. Verifying the network system involves confirming that these accounts are properly defined and are members of the appropriate user groups on the servers running Project Server, Windows SharePoint Services, and SQL Server. Verifying Local Administrators/OLAP Administrators on All Servers Conduct the following steps on each server to verify that the Windows service account created on the domain or active directory server is a member of the local Administrators group: 1. | Log on as a local administrator.
| 2. | Go to Control Panel, Administrative Tools, Computer Management, as shown in Figure 12.2.
Figure 12.2. Verify that the domain service accounts are members of the appropriate local user groups. 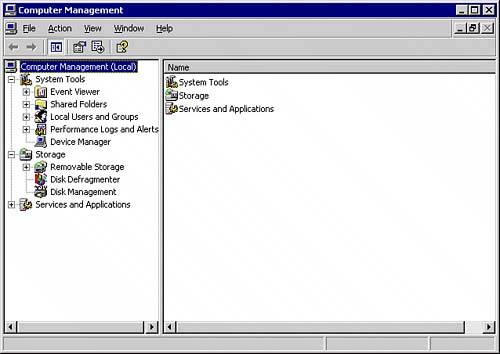
| 3. | Select Local Users and Groups.
| 4. | Select Groups and double-click the Administrators Group (see Figure 12.3).
Figure 12.3. The service account must be a member of the Administrators group on the server running Project Server. 
| 5. | Double-click the OLAP Administrators Group. Verify that the OLAP service account is a member of this group (see Figure 12.4).
Figure 12.4. The service account must be a member of the OLAP Administrators group on the server running Project Server and SQL Analysis Services. 
| 6. | Repeat Steps 1 through 5 for each server in the architecture.
|
Application Installation Validation Validating the installation of the various applications is conducted in three phases. Phase 1 validates the SQL Server installation including SQL Analysis Services. Phase 2 validates the Windows SharePoint Services installation. Phase 3 validates the installation of Project Server 2003 and connectivity through Project Professional 2003. SQL Server/Analysis Services Installation Validation Perform the following steps to validate that SQL Server 2000 is properly installed and configured for use with Project Server 2003. This validation includes both SQL Server and SQL Analysis Services. 1. | Log on to the SQL Server using the service account logon and password, as shown in Figure 12.5. This account should have local administrator and OLAP administrator privileges.
Figure 12.5. Navigate to the SQL Server registry key. 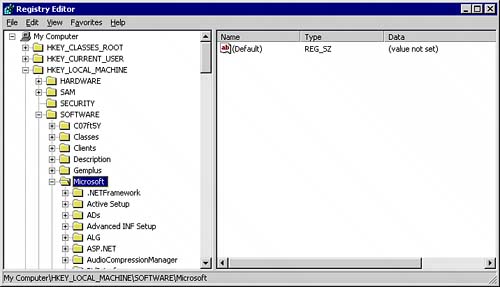
| 2. | Verify that the version of SQL Server with Service Pack 3a has been installed by opening registry editor (Regedit). Navigate to the registry key for SQL Server and click on the Current Version registry, as shown in Figure 12.6.
Figure 12.6. The Current Version registry should be 8.00.194 for SQL Server 2000 SP3a. 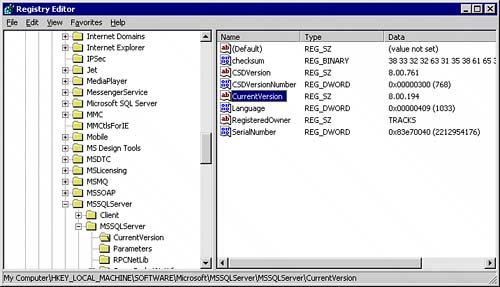
| 3. | Launch SQL Analysis Manager, as shown in Figure 12.7.
Figure 12.7. Use the SQL Server Analysis Manager client interface to manage the OLAP repository. 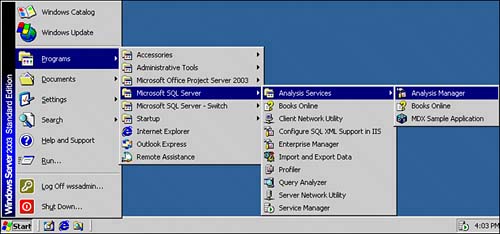
| 4. | Right-click the server and select Edit Repository Connection String, as shown in Figure 12.8.
Figure 12.8. View the connection string for the OLAP repository. 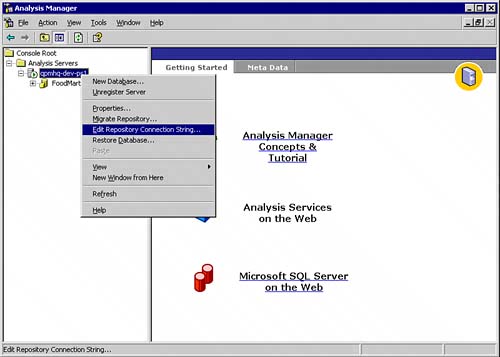
| 5. | Verify that the repository has been migrated to a SQL database, as shown in Figure 12.9.
Figure 12.9. The connection string should begin with Provider=SQLOLEDB. 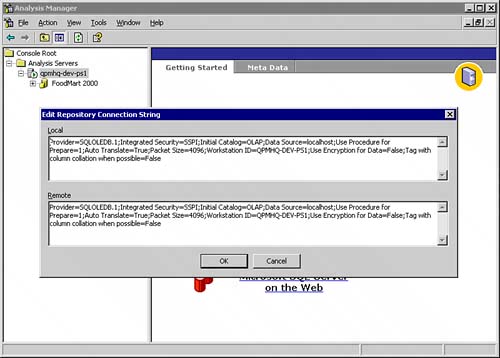
| 6. | Close Analysis Manager. Log off SQL Server after completing the validation.
|
Windows SharePoint Services Installation Validation Validation of Windows SharePoint Services consists of three tests that verify proper installation. The first test verifies that the Windows SharePoint Services installation is valid. This is accomplished by performing the following steps: 1. | Log on to the server running Project Server using the account identified as the Windows SharePoint Administrator.
| 2. | Navigate to the Admin page and Manage Windows SharePoint Services.
| 3. | Click Test URL next to the SharePoint Central Administration URL, as shown in Figure 12.10.
Figure 12.10. Proper access to the Windows SharePoint Central Administration will be granted only to a member of the local administrators group on the Windows SharePoint Server. 
| 4. | Proper installation is verified by the Central Administration website page opening on the desktop, as shown in Figure 12.11.
Figure 12.11. The Windows SharePoint Central Administration site opens for validated local administrator Windows accounts. 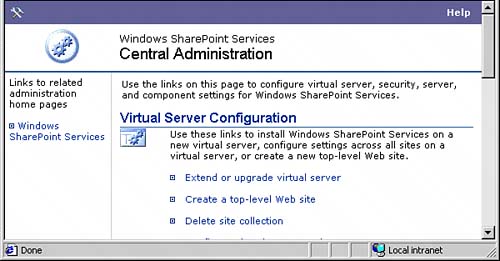
|
The second verification test verifies access to Windows SharePoint Central Administration using the Domain service account set up to administer Windows SharePoint. Follow these steps to perform the test: 1. | Click on the Start menu and select Administrative Tools.
| 2. | Select Windows SharePoint Central Administration, as shown in Figure 12.12.
Figure 12.12. The service account should have access to the Windows SharePoint Services Central Administration menu item when logged on to the Windows SharePoint Server. 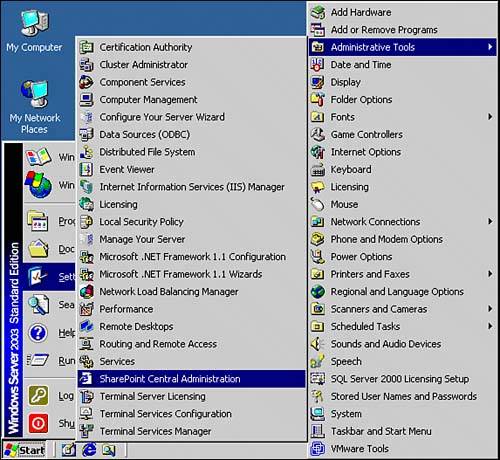
| 3. | Having the ability to access the SharePoint Central Administration website confirms that the service account has the proper permissions and that Windows SharePoint Services is installed correctly.
|
The third verification test confirms that the WSS site for Public Documents was properly created during the Windows SharePoint configuration process in Project Server. Follow these steps to perform the test: 1. | Log on to PWA as an administrator.
| 2. | Navigate to the Admin page and select Manage Windows SharePoint Services.
| 3. | Click on the hyperlink to the Public Documents site, as shown in Figure 12.13.
Figure 12.13. Access the Public Documents WSS site from PWA. 
| 4. | The Public Documents website opening up confirms proper configuration of Windows SharePoint Services with Project Server, as shown in Figure 12.14.
Figure 12.14. Accessing the Public Documents WSS site confirms proper configuration of WSS with Project Server. 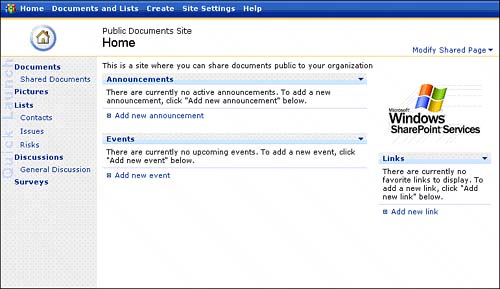
|
Project Server Installation Validation Project Server installation validation begins with the simple test of logging on to Project Server as an administrator. Several other verifications are performed by navigating to each main menu page including Task, Projects, Resources, Status Reports, Updates, Risks, Issues, and Documents. Navigate to all the action and option items on each page to confirm proper installation. A message indicating no data to view appears on any data view. Additional tests are performed from the Admin page to verify proper installation of SharePoint Services and SQL Analysis Services. The SharePoint verification tests were discussed in the preceding section. Validation of the OLAP service is accomplished by performing the following steps from the Admin page: 1. | Select Manage Enterprise Features.
| 2. | On the Update Resource Tables and OLAP Cube page, scroll down to the Update Frequency section of the page and select the option Update Only When Specified.
| 3. | Click on Update Now. This initiates the building of a new OLAP cube (see Figure 12.15).
Figure 12.15. Selecting the Update Now button verifies the connection to OLAP server. 
| 4. | Refresh the page until the Current Cube Status indicates that the cube was successfully built, verifying proper installation and configuration of the OLAP Service in Project Server.
| 5. | A role needs to be defined on the Analysis Server and access granted to all users on the network so that the OLAP cube is accessible for view creation in Project Server. Log on to the Analysis Server as the OLAP administrator.
| 6. | Start Analysis Manager. Expand the tree on the left until the cube created by Project Server is visible, as shown in Figure 12.16.
Figure 12.16. There may exist more than one OLAP cube, so make sure to select the correct one. 
| 7. | Right-click the mouse on the cube name and select Manage Roles.
| 8. | Click the New button in the dialog and create a role such as "CubeViewers," as shown in Figure 12.17.
Figure 12.17. Creating a new user group to allow specific domain users to have access to the OLAP cube. 
| 9. | Click on the Options tab and select all three items in the list.
| 10. | Add the group Domain Users or Everyone as members to the role. Specific domain users can be added to the role if the cube is to be limited to specific users. Make sure that you include the Project Server administrator if limited access is preferred.
|
At this point, the OLAP cube is available for view creation in PWA. The next test confirms that a Portfolio Analyzer view can be created using the OLAP server and the cube. Make sure that you perform this test from a workstation that has Microsoft Office Professional 2003 to fully verify this functionality. To perform the test, follow these steps: 1. | Open PWA as the administrator. Navigate to the Admin page.
| 2. | Select Manage Views. Click on Add View at the top of the list.
| 3. | Select Portfolio Analyzer on the View Creation page, as shown in Figure 12.18.
Figure 12.18. Selecting Portfolio Analyzer on the view creation page should connect to the OLAP server. 
| 4. | Verify that the cube was accessed by viewing the field list and scrolling down the page to confirm that the Office Web Component PivotTable control and Chart control are visible and active.
| 5. | Confirm that all items on the toolbar over each control are active by clicking on them, as shown in Figure 12.19.
Figure 12.19. Check that the field list appears if you are able to connect to the OLAP server. 
| 6. | Select Cancel at the bottom of the page after validation is complete.
|
|