| Views available through Microsoft Office Project Professional and Project Web Access (PWA) client interfaces deliver many default reports for EPM solution users. Enterprise Outline Codes and Fields are a core component of an efficient reporting system design and allow your organization to define filters, sorts, and groups based on the specific reporting needs of your organization. Five view types are available through PWA client: Project Center views use Enterprise Project Outline Codes and Fields to help filter, group, sort, and define views. Project views use Enterprise Task Outline Codes and Fields to help filter, group, sort, and define views. Resource Center views use Enterprise Resource Outline Codes (including Enterprise Resource Multivalue Outline Codes) and Fields to help filter, group, sort, and define views. Assignment views use Enterprise Task Outline Codes and Fields to help filter, group, sort, and define views. Portfolio Analyzer views use Enterprise Project Outline Codes and Enterprise Resource Outline Codes to help filter, group, sort, and define views.
Project Center Views Project Center views provide summary-level information about projects in your portfolio. You can use Enterprise Project Outline Codes and Fields to organize and manipulate data through your custom filters, groups, and sorts that are part of your Project Center view definitions. NOTE Before you can use information in the Project Center page, you must log on to Project Server. Also, the projects displayed in the Project Center include only your enterprise projects and not the projects that you saved as separate project files.
The Project Center also includes useful indicators for project-related information. For example, document or issue indicators are displayed in the Indicators column if you have linked documents or issues to a project. Your role in the organization typically determines what you can see and do in the Project Center using PWA clientyour security context. Depending on the permissions settings associated with your user role and account (your security context), you can perform different actions on your projects and resources or see different sets of project and resource data. Creating and Modifying a Project Center View To create a new Project Center view, select Admin, Manage Views, Add View, and then select the Project Center radio button. To modify a Project Center view, select Admin, Manage Views, and then select the Project Center view that you want to modify and click Modify View. Also, you have the ability to copy an existing view definition and use it as a starting point for a new view. The menus and options you have available for creating and modifying a Project Center view are identical, except that when you are modifying any view, the current view definition information is displayed. For example, if you want to add the Project Status Enterprise Project Outline Code to the Project Center Summary view, you need to perform the following steps: 1. | In PWA select Admin, Manage Views from the menu.
| 2. | Select the Summary view below the Project Center view type and then click Modify View. The screen to add or modify a Project Center view is divided into sections, as shown in Figure 10.1.
Figure 10.1. Enter the information required to define a new Project Center view. 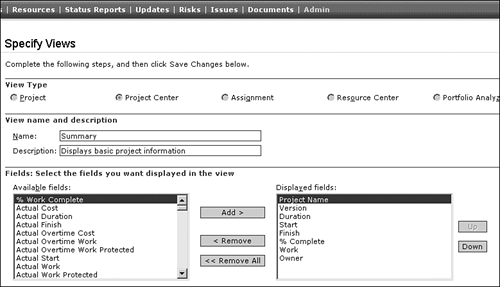
In the Modify View section you can edit an existing view by changing its attributes. These attributes are as follows:
- View Type The view type is already set to the Project Center view type when you choose to modify one of the Project Center views. Select a view type if you are defining a new view.
- View Name and Description The view name must be unique. Choose a name that describes the purpose of the view or the view users. The Description field is available for editing only to the administrator, and it is used to describe the view purpose in more detail.
- Fields This section has two panes. The pane on the right lists fields that are currently part of the view definition. The left pane displays the list of fields available for use in the view but have not yet been added to the view definition. You move fields between the left and right pane by selecting the appropriate fields and then clicking Add, Remove, or Remove All.
- Field Width Defines the width in pixels you want to use for the field to display. The default is to allow PWA client to automatically adjust the column width for the field.
NOTE Three fieldsProject Name, Start, and Finishare included as default fields set for all Project Center views and cannot be removed from the view definition. - Up and Down buttons Allow you to change the field display sequence in the view.
The field listed at the top in the right pane appears on the far left in the Project Center view, the second field from the top in the right pane appears second from the left, and so on, when the view is displayed. - Splitter Bar Allows you to choose where you want the splitter bar to appear in the view. You can change the default number of pixels displaying in the field.
- Gantt Chart Format In this section, choose the type of Gantt chart or custom Gantt chart you want to use to display information. The default Gantt chart format is Gantt Chart (Project Center). You change the format by selecting the drop-down list box and selecting an alternative Gantt chart format.
- Grouping Format This section allows you to associate a unique grouping scheme with your views. Grouping format provides additional visual cues to users about the view being used. The default grouping format is Timesheet. You can change the grouping format by selecting the drop-down list box and choosing an alternative grouping scheme.
- Default Group, Sort Select the default group schemes and/or sorting order you want to use with your view. Users can later change the group or sort when they use a particular Project Center view, and click the Revert button on the Filter, Group, Search section of the screen to return to the default settings.
- Outline Levels Select default outline levels displayed as part of the view. The administrator can control the outline levels and therefore the details displayed as part of the view.
- Filter Specify filters to be applied to a view to limit the number of items displayed. A filter is applied to the raw data before the view is displayed. For example, you could filter the view to display only active projects. Each filter has four components, as shown in Figure 10.2.
Figure 10.2. Define an optional filter as part of the view to limit the number of items displayed in the view. 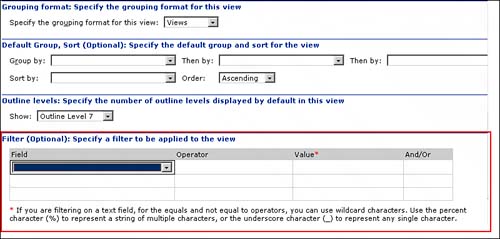
If you want to define a view with preexisting filters, you need to understand the function of each field to make sure that the data displayed will be correct. A description of filter fields follows: - Field Click the cell under the Field heading to see a drop-down list of all fields that can be used as part of a filter.
- Operator Click the cell under the Operator heading to see a drop-down list of all operators that can be used to define a filter test condition.
- Value Specifies the value being tested by the operator.
- And/Or Up to three separate fields can be tested as part of the filter definition, using logical And/Or operations. If you select And, the data must pass all tests to be included in the view. If you select Or, the data is excluded if any of the tests are passed. For example, if you specify a filter for Generic equals No And RBS equals USA.Seattle, all resources that are both individuals and have the location code USA.Seattle associated with them are displayed in the view. If you use Generic equals Yes Or RBS equals USA.Seattle, all resources that are either generic or have the location code USA.Seattle are included in the view.
- Categories (Optional) Control users who can see and use the view. Users associated with categories that include this view can see the view in the Project Center.
The Categories section has two panes. The pane on the right side defines the categories that the view is currently part of. The left pane contains the list of available categories. You can move categories between panes by selecting the category name and clicking Add, Add All, Remove, or Remove All.
| 3. | Select Enterprise Project Outline Code4(Project Status) from the list of available fields and click Add.
| 4. | Select Enterprise Project Outline Code4(Project Status) at the bottom of the list of displayed fields, and click the Up button as many times as necessary to move the selected Enterprise Outline Code to the position where you want it in the view.
| 5. | Click Save Changes.
| 6. | In PWA client, select Project Center and make sure that the Summary view is selected.
| 7. | Select the Filter, Group, Search tab, and from the Group By pull-down list, select Project Status. Your projects are now grouped by Project Status value, as shown in Figure 10.3.
Figure 10.3. Organize your projects in Project Center Summary view showing your projects grouped based on their Project Status. 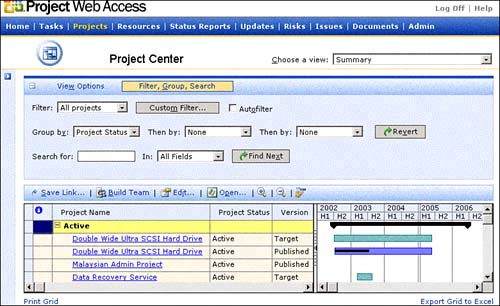
|
NOTE Use the horizontal scrollbar at the bottom of the project list to review fields that do not appear on the screen. Remember that you can change the field placement by using the Up and Down buttons in the Modify Views page (where you add or modify fields within a view).
NOTE You need to review more detailed information before you can start building custom views and reports. For additional in-depth information about defining, using, and managing custom views, see the Microsoft Office Project Server 2003 Administrator's Guide, Chapter 4, "Managing Views."
Project Views Project views display task, assignment, or resource information specific to a single project. Project views display detailed information about project tasks, including Enterprise Task Outline Codes and Fields. You can view, group, filter, and sort information in Project views based on the information defined in the Enterprise Task Outline Codes. Creating and Modifying a Project View To create a new Project view, select Admin, Manage Views, Add View, and then select the Project radio button. To modify a Project view, select Admin, Manage Views, and then select the Project view that you want to modify and click Modify View. In addition, you have the ability to copy an existing Project view definition and use it as a starting point for a new Project view. The menus and options you have available for creating and modifying a Project view are identical, except that when you are modifying any view, the current view definition information is displayed. You can choose from three types of Project views available: For example, if you want to add the Charge Codes Enterprise Task Outline Code to the Project Task Summary view, you need to perform the following steps: 1. | In Project Web Access, select Admin, Manage Views from the menu.
| 2. | Select the Task Summary view below Project view type and then click Modify View.
The screen to add or modify a Project view is divided into sections, as shown in Figure 10.4.
- View Type This is already set to the Project view type when you choose to modify one of the Project views. Select a view type if you are defining a new view.
- View Name and Description The view name must be unique. Choose a name that describes the purpose of the view or the view users. The Description field is available for editing only to the administrator, and it is used to describe the view purpose in more detail.
- Table Select the appropriate information type based on what details (task, resource, or assignment) you want to see in the report.
- Fields This section has two panes. The pane on the right lists fields currently part of the view definition. The left pane displays the list of fields that are available for use in the view but have not yet been added to the view definition. You move fields between the left and right pane by selecting appropriate fields and then clicking Add, Remove, or Remove All.
- Field Width This field defines the width in pixels you want to use for the field to display. The default is to allow PWA client to automatically adjust the column width for the field.
NOTE Three fieldsTask Name (or Resource Name if the Resource table is selected for the view), Start, and Finishare included as default fields set for all Project views and cannot be removed from the view definition. - Up and Down These buttons allow you to change the field display sequence in the view.
The field listed at the top in the right pane appears on the far left in the Project Center view, the second field from the top in the right pane appears second from the left, and so on, when the view is displayed. - Splitter bar Allows you to choose where you want the splitter bar to appear in the view. You can change the default number of pixels displaying in the field.
- Gantt Chart Format Using this section, choose the type of Gantt chart or custom Gantt chart you want to use to display information. The default Gantt chart format is Gantt Chart (Views). You change the format by selecting the drop-down list box and selecting an alternative Gantt chart format.
- Grouping Format This allows you to associate a unique grouping scheme with your views. Grouping format provides additional visual cues to users about the view being used. The default grouping format is Timesheet. You can change the grouping format by selecting the drop-down list box and choosing an alternative grouping scheme. To prevent unauthorized access to project data, you can group only by fields displayed in the view.
- Default Group, Sort Select the default group schemes and/or sorting order you want to use with your view. Users can later change the group or sort when they use a particular Project view and click the Revert button on the Filter, Group, Search section of the screen to return to the default settings.
- Outline Levels Select default outline levels displayed as part of the view. The administrator can control the outline levels and therefore the details displayed as part of the view.
- Filter Specify filters to be applied to a view to limit the number of items displayed. A filter is applied to the raw data before the view is displayed. For example, you could filter the view to display only tasks that have a particular charge code attached. Each filter has four components as shown previously in Figure 10.2 and as listed here:
- Field Click the cell under the Field heading to see a drop-down list of all fields that can be used as part of a filter.
- Operator Click the cell under the Operator heading to see a drop-down list of all operators that can be used to define a filter test condition.
- Value Specifies the value being tested by the operator.
- And/Or Up to three separate fields can be tested as part of a filter definition, using logical And/Or operations. If you select And, the data must pass all tests to be included in the view. If you select Or, the data is excluded if any of the tests are passed. For example, if you specify a filter for %complete equals 0 And Enterprise Task Outline Code3(Charge Codes) equals division1.001, all project tasks that have not started and have the Charge Code "division.001" associated with them are displayed in the view (see Figure 10.5).
Figure 10.5. Define optional filter as part of the view to limit the number of tasks displayed in the Project view. 
- Categories (Optional) Control users who can see and use the view. Users associated with categories that include this view are able to see the view when they select a project in the Project Center.
The Categories section has two panes. The pane on the right side defines the categories that the view is currently part of. The left pane contains the list of available categories. You can move categories between panes by selecting the category name and clicking Add, Add All, Remove, or Remove All.
Figure 10.4. Enter the information required to modify the Task Summary view. 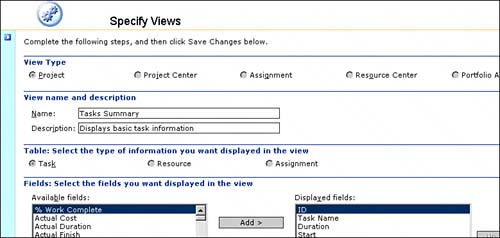
| 3. | Select Enterprise Task Outline Code3(Charge Codes) from the list of available fields and click Add.
| 4. | Select Enterprise Task Outline Code3(Charge Codes) at the bottom of the list of displayed fields, and click the Up button as many times as necessary to move the selected Enterprise Outline Code to the position where you want it in the view.
| 5. | Click Save Changes.
| 6. | In PWA client, go to Project Center. Select a project you want to view detailed task, resource, or assignment information for by clicking on the link representing the project. Select Task Summary view from the list.
| 7. | Select the Filter, Group, Search tab, and from the Group By pull-down list, select Charge Codes. Your projects are now grouped by Charge Codes value, as shown in Figure 10.6.
Figure 10.6. View task information for a single project using the Task Summary view showing your tasks grouped by their charge codes. 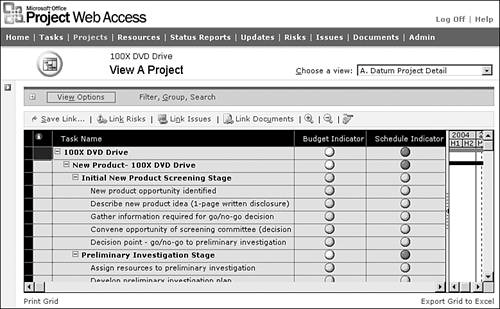
|
NOTE For additional in-depth information about defining, using, and managing custom views, see Microsoft Office Project Server 2003 Administrator's Guide, Chapter 4, "Managing Views."
Resource Center Views Resource Center views provide information about all your company resources. The Resource Center provides views for your resource managers and executives to analyze resource availability and commitments. You use your custom Enterprise Resource Outline Codes to filter, group, and sort views in the Resource Center by location, department, skills, or other information that you defined as Enterprise Resource Outline Codes and Fields. The default Resource Center Resources Summary view contains a list of resources that are part of your Enterprise Resource Pool. The Resource Center can also include resource views that use views with grouped resources based on various Enterprise Resource Outline Codes, a view that allows a user to edit resource attributes such as Location, Department, or Skills and availability and usage views for any selected resource. Creating and Modifying a Resource Center View PWA has one Resource Center view defined, called Resources Summary, that is created by default during the installation. You can create another Resource Center view by selecting Admin, Manage Views, Add View from the menu and then selecting the Resource Center radio button. As with the Project Center views, you can copy an existing view to create a basis for a new view as well. To modify a Resource Center view, select Admin, Manage Views from the menu; then select the Resource Center view that you want to modify and click Modify View. The functionality and options associated with creating or modifying Resource Center views are identical, except that the currently selected view configuration information is displayed when you modify the view. To create or modify a Resource Center view, follow these steps: 1. | Using PWA client, log on as the administrator and select the Admin tab.
| 2. | Select Manage Views from either the main menu or the side pane menu.
| 3. | To add a new Resource Center view, select Add View, and then select the Resource Center radio button. To modify an existing Resource View, select the view from the list and click Modify. Figure 10.7 shows the partial view of the Specify Views screen to create/modify a Resource Center view.
Figure 10.7. Provide the information required to create or modify a Resource Center view. 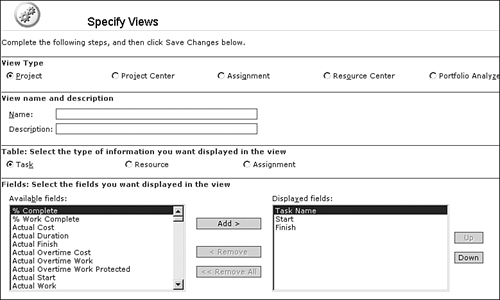
In the Modify View section you can create a new view, or you can edit an existing view by changing its attributes, described as follows:
- View Type The view type is already preset to the Resource Center view if you are modifying a Resource Center view. However, you need to select the Resource Center view type if you are creating a new Resource Center view.
- View Name and Description The view name must be unique. Choose a name that describes the purpose of the view or the view users. The Description field is available for editing only to the administrator, and it is used to describe the view purpose in more detail.
- Fields This section has two panes. The pane on the right lists fields that are currently part of the view definition. The left pane displays the list of fields that are available for use in the view but have not yet been added to the view definition. You move fields between the left and right pane by selecting appropriate fields and then clicking Add, Remove, or Remove All.
- Field Width This field defines the width in pixels you want to use for the field to display. The default is to allow PWA client to automatically adjust the column width for the field.
NOTE Two fieldsUnique ID and Resource Nameare included as default fields set for all Resource Center views and cannot be removed from the view. - Up and Down These buttons allow you to change the field display sequence in the view.
The field listed at the top in the right pane appears on the far left in the Resource Center view, the second field from the top in the right pane appears second from the left, and so on, when the view is displayed. - Grouping Format This section allows you to associate a unique grouping scheme with your views. Grouping format provides additional visual cues to users about the view being used. The default grouping format is Timesheets. You can change the grouping format by selecting the drop-down list box and choosing an alternative grouping scheme.
- Default Group, Sort Select the default group schemes and/or sorting order you want to use with your view. Users can later change the group or sort when they use a particular Resource Center view, and click the Revert button on the Filter, Group, Search section of the screen to return to the default settings.
- Outline Levels Select default outline levels displayed as part of the view. The administrator can control the outline levels and therefore the details displayed as part of the view.
- Filter (Optional) Specify filters to be applied to a view to limit the number of items displayed. A filter is applied to the raw data before the view is displayed. For example, you could filter the view to display only resources from a particular location or department. There are four components to each filter, as shown in Figure 10.8 and in the following list:
- Field Click the cell under the Field heading to see a drop-down list of all fields that can be used as part of a filter.
- Operator Click the cell under the Operator heading to see a drop-down list of all operators that can be used to define a filter test condition.
- Value Specifies the value being tested by the operator.
- And/Or Up to three separate fields can be tested as part of filter definition, using logical And/Or operations. If you select And, the data must pass all tests to be included in the view. If you select Or, the data is excluded if any of the tests are passed. For example, if you specify a filter for Enterprise Resource Code1 (Department) equals "Corporate.Accounting" And Generic equals "No", all individual resources from Accounting department are displayed in the view.
Figure 10.8. Define optional filter as part of the view to limit the number of resources displayed in the Resource Center view. 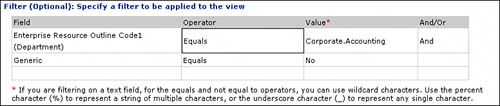
- Categories Control users who are able to see and use the view. Users associated with categories that include this view are able to select the view when they go to Resource Center.
The Categories section has two panes. The pane on the right side defines the categories that the view is currently part of. The left pane contains the list of available categories. You can move categories between panes by selecting the category name and clicking Add, Add All, Remove, or Remove All. - RBS Filter When the administrator selects the RBS Filter box to implement this optional filter, the resources listed in a view will be restricted to the resources associated with the RBS hierarchy below the position of the user who is viewing the resource list.
| 4. | Click OK to save the new or modified Resource Center view. Click Cancel to return to the Specify Views screen without making any changes.
|
NOTE For additional in-depth information about defining, using, and managing custom views, see Microsoft Office Project Server 2003 Administrator's Guide, Chapter 4, "Managing Views."
Assignment Views Assignment views provide information about the resource assignments in your organization. The Resource Center enables resource managers and executives to look at the status of the individual task assignments. Assignment views can include Enterprise Task Outline Codes to filter, group, and sort the tasks that have resources assigned to them. Before you can use Assignment views, task assignments in your projects must be published using Project Professional client. Creating and Modifying an Assignment View Assignment views display task assignments for your resources, including projects and tasks that resources are currently working on, nonproject time entered by resources, and other assignment-related data, including the time-phased information about resource work and actual work. To create a new Assignment view, select Admin, Manage Views, Add View, and then select the Assignment radio button. To modify existing Assignment view, select Admin, Manage Views, and then select the Assignment view that you want to modify and click Modify View. Also, you have the ability to copy an existing view definition and use it as a starting point for a new view. The menus and options you have available for creating and modifying Assignment views are identical, except that when you are modifying an existing view, the current view definition information is displayed. For example, if you want to add the Task Type field to the Assignment Summary view, you need to perform the following steps: 1. | In PWA select Admin, Manage Views from the menu.
| 2. | Select the Summary view below Assignment view type and then click Modify View. The screen to add or modify an Assignment view is divided into sections, as shown in Figure 10.9.
Figure 10.9. Enter the information required to define a new Assignment view. 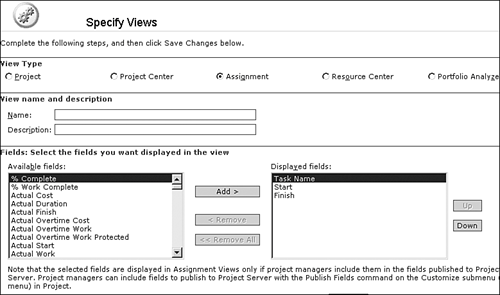
As discussed previously in this chapter, creation of new views, or editing an existing view for both projects and resources, can be customized to suit end users' requirements. Similarly, Assignment views can be customized to respond to end users' needs by entering information in the fields displayed, as discussed here:
- View Type The view type is already set to the Assignment view type when you choose to modify one of the Assignment views. Select a view type if you are defining a new view.
- View Name and Description The view name must be unique. Choose a name that describes the purpose of the view or the view users. The Description field is available for editing only to the administrator, and it is used to describe the view purpose in more detail.
- Fields This section has two panes. The pane on the right lists fields that are currently part of the view definition. The left pane displays the list of fields that are available for use in the view but have not yet been added to the view definition. You move fields between the left and right pane by selecting appropriate fields and then clicking Add, Remove, or Remove All.
NOTE The custom fields you select are displayed in Assignment views only if your project managers include them in the fields published to the Project Server database. Project managers can include fields to publish to the Project Server database by using the Publish Fields command on the Customize submenu of the Tools menu in Project Professional client. To use Publish Fields, select Tools, Customize, Published Fields. Project Professional client has to be connected to the Project Server database when you want to publish additional custom fields. - Field Width This field defines the width in pixels you want to use for the field to display. The default is to allow PWA client to automatically adjust the column width for the field.
NOTE Three fieldsTask Name, Start, and Finishare included as default fields set for all Assignment views and cannot be removed from the view definition. - Up and Down These buttons allow you to display sequence in the view.
The field listed at the top in the right pane appears on the far left in the Assignment view, the second field from the top in the right pane appears second from the left, and so on, when the view is displayed. - Splitter Bar Allows you to choose where you want the splitter bar to appear in the view. You can change the default number of pixels displaying in the field.
- Gantt Chart Format Choose the type of Gantt chart or custom Gantt chart you want to use to display information. The default Gantt chart format is Personal Gantt (Tasks). You change the format by selecting the drop-down list box and selecting an alternative Gantt chart format.
- Grouping Format This section allows you to associate a unique grouping scheme with your views. Grouping format provides additional visual cues to users about the view being used. The default grouping format is Timesheet. You can change the grouping format by selecting the drop-down list box and choosing an alternative grouping scheme.
- Default Group, Sort Select the default group schemes and/or sorting order you want to use with your view. Users can later change the group or sort when they use a particular Assignment view, and click the Revert button on the Filter, Group, Search section of the screen to return to the default settings.
- Outline Levels Select default outline levels displayed as part of the view. The administrator can control the outline levels and therefore the details displayed as part of the view.
- Categories (Optional) Control users who will be able to see and use the view. Users associated with categories that include this view are able to see the view in the Project Center.
The Categories section has two panes. The pane on the right side defines the categories that the view is currently part of. The left pane contains the list of available categories. You can move categories between panes by selecting category name and clicking Add, Add All, Remove, or Remove All.
| 3. | Select Enterprise Task Flag1(Billable) and Enterprise Task Text3 (Task Type) from the list of available fields and click Add.
| 4. | Select Enterprise Task Flag1(Billable) and Enterprise Task Text3 (Task Type) at the bottom of the list of displayed fields, and click the Up button as many times as necessary to move the selected Enterprise Outline Code to position where you want it in the view.
| 5. | Click Save Changes.
| 6. | In PWA client select Resource Center; then select View Resource Assignments and make sure that the Summary view is selected.
| 7. | Select the Filter, Group, Search tab, and from the Group By pull-down list, select Project and set the field Then By to Task Type. Your tasks are now grouped by Project Name and then Task Type value, as shown in Figure 10.10.
Figure 10.10. Organize your projects in the Project Center Summary view showing your projects grouped based on their project status. 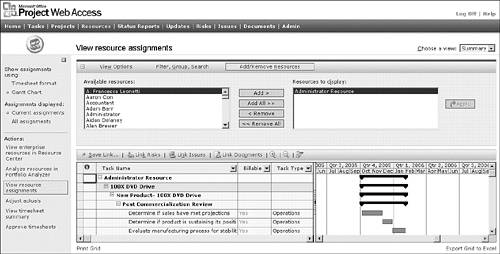
|
NOTE Use the horizontal scrollbar at the bottom of the project list to review fields that do not fit on the screen. Remember that you can change the field placement by using the Up and Down buttons in the Modify Views page (where you add or modify fields within a view).
NOTE For additional in-depth information about defining, using, and managing custom views, see Microsoft Office Project Server 2003 Administrator's Guide, Chapter 4, "Managing Views."
|