Using VBA Macros
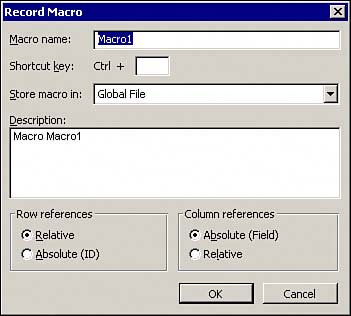
| Microsoft Project 2003 gives you the ability to automate tedious, repetitive, or complex tasks through the use of macros. A macro is essentially a series of commands or instructions that you can save and run whenever you need to by pressing a key combination or by clicking an icon. Each instruction or command within a macro is executed via a programming language called Visual Basic for Applications (VBA). Although this language is basically a watered-down version of Visual Basic, there is almost no limit to the types of tasks that can be performed within Microsoft Project and even beyond. In fact, VBA is so powerful that it could almost be used to create standalone applications, aside from executing from within Project. You have the ability to reference binaries written in other languages, as long as it has objects exposed over the Component Object Model (COM). All macros are stored as snippets of text called modules. These modules can reside in the Global template for use across all projects, or in individual project files. They can also be imported from and exported to Visual Basic style files. Recording MacrosOf course you don't need to be a Visual Basic programmer to make simple macros. Project has the ability to translate all your keystrokes and mouse clicks into corresponding VBA code simply by using the macro recorder and performing the desired task manually. Preparing to RecordBefore recording your macro, it is best to have a plan of all the actions you need to perform. Because Project records all your keystrokes and clicks, any mistakes you make are recorded as well. You also want to determine beforehand whether you want the macro available from a specific file and not globally. If this is the case, open the desired file before recording. From the menu within Project, choose Tools, Macro, and then Record New Macro. The Record Macro dialog box appears, as shown in Figure 28.26. Figure 28.26. The Record Macro dialog prompts you for information about your new macro.
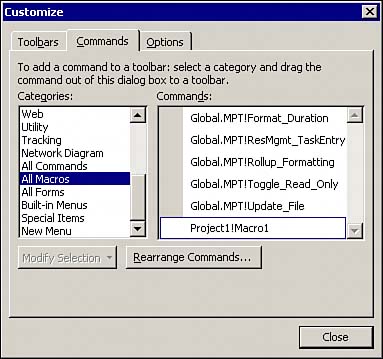
TIP The Visual Basic toolbar provides all the recording flow buttons (Record, Pause, and Stop). This is easier than going through the Options menu each time to control the recording process. Give your new macro a name. Keep in mind that the name cannot contain any spaces or special characters. Also give your macro a brief description. TIP Try to be descriptive with your macro names. This makes it easier to find the desired macro after you've created many of them. If you want, specify a shortcut key combination that can be used to quickly execute your macro (such as Ctrl+R). Specify where you want the macro code to be stored, either in the global file or in the current project file. Keep in mind that if you specify the current project, the macro can be executed only when that project file is open. The reference boxes specify how the macro recorder interprets selection changes on the view sheets. The Absolute options interpret any cell selection literally (such as A5), whereas the Relative options interpret selection changes in relation to the currently selected cell. Record the MacroAfter you click OK on the Record Macro dialog box, Project then translates any actions you perform into its VBA equivalent. If you need to pause the recording for any reason, you can do so either through the macro menu or on the Visual Basic toolbar if you added it. When you are finished, make sure that you stop the recording. Testing the MacroIt's always good practice to test your macro immediately after recording to see whether any changes need to be made. Open the Macro dialog by clicking the Macro menu in Tools, Macro (or by clicking the Play button on the Visual Basic toolbar). With your macro selected, click the Run button and watch as Project performs all tasks that you did in the recording process. Verify that the end result of running your macro is what you expect. Assigning the Macro to a Toolbar ButtonFor macros that you execute frequently, specifying a shortcut key can sometimes be difficult to remember, especially when you frequently use many different macros. A good alternative is to assign your macro to a button on a toolbar. To do so, open the Customize dialog box by selecting Tools, Customize, and select Toolbars (you can also right-click any toolbar and select Customize from there). Select the Commands tab, and find the All Macros option in the Categories list, as shown in Figure 28.27. Figure 28.27. Macros can be dragged from the Customize dialog box to toolbars to create macro buttons.
Drag the desired macro to a convenient spot on the toolbar on which you want the button to reside. After the button is placed, you can click the Modify Selection button to bring up various options used to modify your new button. Some of the more useful options are
TIP If you frequently use many macros, it may be convenient to create a whole new toolbar for your macro buttons. This can be done in the Customize dialog box on the Toolbars tab. Using the same technique, you can also add your macros to the menu bar. Just drag the macro from the Customize window to the desired location on the menu bar. The menu automatically pops up as your mouse moves over it. Any changes to toolbars, buttons, and menus are saved when that instance of Project is properly closed. CAUTION When creating a button or menu item from a macro, try to reference only those that reside in the Global template files. If a macro in a specific file is referenced, that file must be open for it to work. Viewing and Editing VBA CodeWhen Project records a macro, it actually stores VBA code in a subroutine. You can view and edit this code. In fact, you are not limited to just creating macros; you can also create complex functions, classes, and even Windows forms. The Office suite provides the convenient and powerful Visual Basic Editor, which can be opened from Project. This editor provides an easy way to write and debug code, transfer objects among open files, and even design Windows forms for your code to interact with the user. Open the editor through Project's menu Tools, Macro, Visual Basic Editor (or by pressing Alt+F11). A specific macro can be opened by clicking the Edit button with the desired macro selected in the Macros dialog box. Open this dialog box by selecting Tools, Macros, and then Macros. The Project Explorer and Basic ObjectsBy default, the Project Explorer is located on the upper-left quadrant of the editor and contains all open VBA files and objects. Each object usually resides in a Project file and is one of four types:
You can view any object in the Explorer simply by double-clicking it. Right-clicking an object brings up a menu with more options, as shown in Figure 28.28. Figure 28.28. The Project Explorer behaves similarly to Windows Explorer.
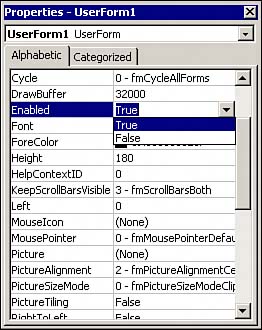
The Explorer functions much like the left pane of the Windows Explorer. This makes dragging objects between different files easy and intuitive. The Properties WindowBelow the Project Explorer (by default) lives the Properties window. This window displays the properties of any selected object, whether it is an object in the Explorer window or a button on a user form. Aside from clicking an object, its settings can also be displayed by selecting it in the top drop-down list of the Properties window, as shown in Figure 28.29. Figure 28.29. Some properties can be easily changed with a drop-down style list.
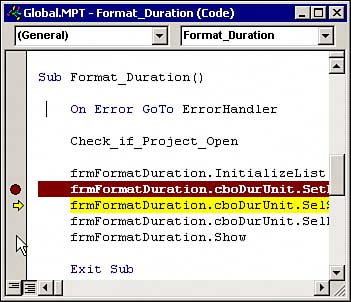
Each type of object has its own corresponding properties list, which can contain anything from the object's name to an image for it to display. Generally the property fields will be a text field or a drop-down list. The actual list itself has two sorting modes, Alphabetical and Categorized. The Categorized mode groups similar properties together for convenience. Both modes display the same list, so it's a matter of preference which one you use. TIP* If ever in doubt of what a property is used for, simply select it and press F1 to bring up the Office help pane. The Code FrameThe code frame contains all windows of code modules for any object that you have open, as well as the form designer for User Forms. This is where all your actual code and form editing takes place. Notice in Figure 28.30 the two drop-down boxes on the top of the Code windows. The drop-down on the left allows you to navigate through any objects located on the open module, like a form. The one on the right navigates through existing and potential subroutines and functions for the object selected on the right. Figure 28.30. The Code window allows you to navigate through code, as well as drag controls to a user form.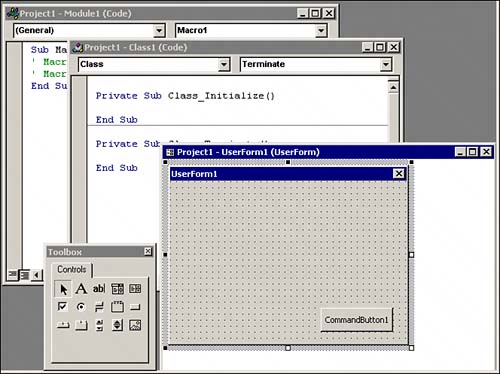 Designing User FormsSome VBA programs may require the user to input information, or may need to display pop-ups to the user. The Visual Basic Editor provides an intuitive Windows form editor to design Windows forms. When you open a form by double-clicking it in the Project Explorer, it is displayed in the Form Designer. You can drag various controls from the controls toolbox (see Figure 28.30) onto your form to build a user interface. After a control is on the form, you can resize it and change its properties in the Properties window to get the desired look and feel. You can change the properties of the child controls placed on a form by just selecting them and using the Object Properties window to change things such as caption and visibility. After the control is placed on the form, you can set and view the code behind the control by double-clicking it. You'll notice when you do that the left drop-down box of the code window shows the name of the control, and the right one shows the subroutine you are in. This subroutine represents various events, such as when a button is clicked. The function is called by VB whenever the event is fired (if a subroutine is specified). To display the user form from code, use the Show method as follows: UserForm1.Show() NOTE When the Show method of a user form is called, program execution for that containing code segment is halted until the user form exits or is closed by the user. Using this powerful editor, you can create what seems like an entire professional application within a Project file, or any Office document for that matter. Debugging VBA CodeWith any type of development, a great deal of time is spent debugging the code. The Visual Basic Editor provides a powerful and easy-to-use debugger. Stepping Through CodeStepping through the code line by line can strengthen your confidence that the code you've written functions as expected. While doing so, you are given a variety of tools to assess your code, and even the ability to change it without halting execution. The following list provides the key combinations you can use to step through your code:
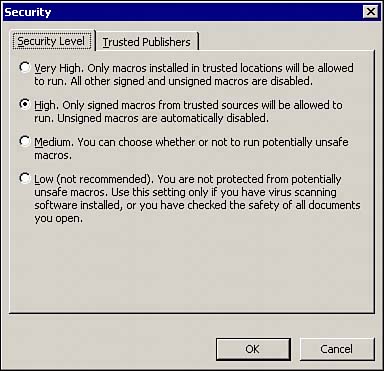
These keys give you the power to alter any code execution flow to help you assess your code's validity. These functions are also provided in the Debug menu, if you happen to forget which key combination you need. The Immediate WindowThe Immediate window is usually displayed as a long bar along the bottom of the Visual Basic Editor, which acts as a text entry box. If this is not displayed, you can enable it in the Views menu or by pressing Ctrl+G. This window provides an easy way to find a value of a variable or the return value of a function. Just type a ? followed by the variable or function you want to test. TIP Always test a function that simply returns a value in the Immediate window to verify that the function returns the expected result. The Project Object ModelThe core structure of Project is based on a hierarchy of objects, all representing different aspects of the Project application. The Project application itself is represented by an object, which contains things such as toolbars and projects. The Project object subsequently contains objects such as tasks and resources. Each object contains various properties that can be altered, such as names of the object (like a task) or some type of state the object may be in. Objects also contain various methods or actions that can be invoked, such as Save() or Close(). The best way to browse an object's properties and methods is by typing the period character after an object's name. A list displays showing all properties and methods. This list is known as intelli-sense and is common in most programming environments. When more information about any object is desired, just search the online help by pressing the F1 key. TIP Pressing Ctrl+Space brings up the intelli-sense list, which can help you browse for an object you may not know the entire name of. Auto-MethodsIncluded with the Project object model are various methods executed throughout various stages of normal editing of a document. These methods can be programmed by adding a subroutine labeled AutoXXX, where XXX is the name of the event to program (press Ctrl+Space to see a list of these). Add the code desired to accompany these events. Security and CertificatesThe closer you look at VBA's capabilities, the more it looks like a standalone development environment. However, the rich power and flexibility it provides is not offered free of risk. It also provides yet another avenue for malicious code to propagate itself and spread havoc across the Internet and intranet. The capability of Office applications to execute subroutines along with built-in events and triggers automatically makes matters worse. Luckily this is easily preventable by properly setting macro security settings within Project and all Office applications. This can be done in the Macro menu under Security, as shown in Figure 28.32. Four different security levels are available:
Figure 28.32. Restrict the code allowed to run by setting macro security.
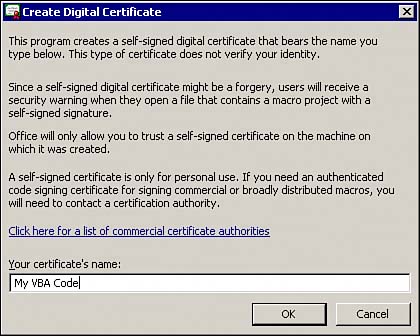
The restrictive nature of these security settings can be a nuisance to VBA developers because their code may not be allowed to run on a client's computer. A common method to overcome this is to send out instructions on how to set macro security settings to low, with a recommendation to return them at the end. This undermines the goal of macro security because it takes only one run of a virus to be detrimental. A safer way is to sign your code with a digital certificate. TIP Don't just ask your users to lower their macro security to run your code. Always digitally sign it. Digital CertificatesThink of a digital certificate as an electronic ID or passport carried along with a file or document. When opening or executing a file, this passport can be verified to ensure that the code's author is trusted, who signed the document when it was originally created. The certificate's authenticity is ensured using a cryptographic method called asymmetric encryption. Asymmetric encryption uses two keys in the encryption and decryption process. A private key is used to encrypt data, and a public key is used to decrypt it. If the information contained within a certificate is not decrypted properly (using the public key), the certificate is considered invalid. Due to the nature of the algorithm to generate the two keys, it is currently computationally impossible to generate a private key from a public key. The certificate also contains hash codes created from the document it signs and the certificate itself. If these differ from on-the-fly generated hash codes, it suggests that the document or certificate was tampered with and is invalid. Just about anyone can create a digital certificate. However, some digital certificates can be obtained from a certificate authority. An author must go through an application process that the certificate authorities use to verify an author's identity. TIP As a developer, getting a certificate issued by an established certificate authority is probably the most efficient method of signing your code. It gives your customers an easier way to verify the authenticity of your code in addition to boosting the professional feel of your company. Creating a CertificateYou can create a new digital certificate yourself to sign code that you have created or for distribution throughout your organization. The Office suite contains a program to easily create a certificate named SelfCert.exe and located in the root office folder, as shown in Figure 28.33. Figure 28.33. Certificates can be created using the SelfCert program.
This program is not installed on a typical installation, so you need to add it through Add/Remove programs. Look for the Office Tool named Digital Signature for VBA Projects to Run from My Computer. After you click OK in the SelfCert window, a certificate is automatically created with that name and saved into the computer's certificate store. NOTE Notice in Figure 28.33 that a link is provided to a list of established certificate authorities. Follow this link if you are interested in applying for a certificate. Exporting and Transferring CertificatesAfter a certificate is created (or installed from another location), it can be imported and exported through Internet Explorer. Simply go to IE's Properties page, click on the Content tab, and then click the Certificates button. Clicking the Import and Export buttons brings up corresponding wizards that guide you through the process. Certificates are exported as a file that can subsequently be emailed or transferred like any other file. TIP To import a certificate into a specific store (such as Trusted Publishers), just select that tab on the certificate window before clicking the Import button. Signing a VBA MacroWhen certificates have been properly created or installed, it is easy to sign your VBA projects. From within the Visual Basic Editor, select the file that you want to digitally sign. From the menu, select Tools, Digital Signature. A dialog box appears showing what certificate, if any, has signed the current document. Click the Choose button to display a list of certificates installed on the current computer, as shown in Figure 28.34. Figure 28.34. Select a certificate installed on your computer to digitally sign VBA code.
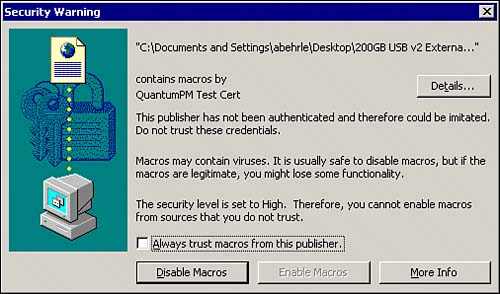
Click OK, and the current VBA project is signed. If the code is changed after it has been signed (on a computer other than the one used for the original development), the signature is automatically removed. Adding a Trusted CertificateAn alternative to requiring users to lower their macro security settings is signing your VBA code and providing users instructions on trusting your certificate. With a security level set to high, they will still receive a security warning telling them the code and certificate are untrusted, as shown in Figure 28.35. Figure 28.35. A security warning is displayed when a macro is signed with an untrusted certificate.
From this security warning, guide your users to click the Details button to view the signature. The Digital Signature Details screen contains a View Certificate button. Clicking this button brings up the Certificate dialog. From here, users can install the certificate as trusted by clicking the Install Certificate button. CAUTION Installing a certificate created with SelfCert poses a security risk because anyone can sign a macro with this certificate. This method should be used only in small organizations where you are certain that the certificate will not become public. Even then, however, it is best to apply for a certificate from an established authority. After the certificate is installed, the user must then reopen the file, and the user can check the Always Trust Macros from This Publisher box. Then when users click Enable Macros, the security warning does not display. Even though it is possible to use SelfCert to sign VBA code, this is not entirely risk-free. If malicious developers get a copy of any document signed by this certificate, they will be able to sign their code, which will consequently be allowed to run automatically on your computer. It is strongly recommended to sign VBA code with a certificate issued from an established certificate authority. The Tip of the IcebergThis section has provided some of the basics when it comes to VBA macros but has just barely scratched the surface. If you are interested in pursuing further knowledge, you have the ability to record and view functions in Project (or other Office applications). Combine that with VBA help and the ultimate resource of the Internet, and you have all you need to become a verbose VBA developer. |


EAN: 2147483647
Pages: 227
- Chapter III Two Models of Online Patronage: Why Do Consumers Shop on the Internet?
- Chapter V Consumer Complaint Behavior in the Online Environment
- Chapter VIII Personalization Systems and Their Deployment as Web Site Interface Design Decisions
- Chapter XII Web Design and E-Commerce
- Chapter XVII Internet Markets and E-Loyalty