Managing Terminal Services
| Using Terminal Services for Windows 2003 Server is the recommended method for deploying Project Professional and Microsoft Office 2003. This section outlines the benefits, considerations, and other useful information regarding deploying Terminal Services for Project Server 2003. Terminal Services Versus a Virtual Private Network (VPN)VPNs are becoming an everyday necessity for most organizations with remote users to secure data and protect company resources. Unfortunately for remote users, VPNs tend to be slow, and these latency issues are magnified to the point of failure for managers using Project Professional to connect to Project Server. This is because the connection from the desktop application to the server contains a lot of query and response. If at any point a response is delayed (times out), the entire process fails. For this reason, latency kills the productivity of your project managers. This is where Terminal Services comes in. Terminal Services eliminates the latency problem for remote users and improves overall performance. Best of all, your data is still secure and in fact may be even more so because the actual sensitive data traffic all remains within the confines of your local area network (LAN). Many great resources can provide more detail on the security model and options of Terminal Services, including Microsoft's site online. Benefits of Using Terminal Services for Project Server 2003The biggest benefits of using Terminal Services will be seen when using applications such as Microsoft Project Professional; however, there are several other important advantages to consider. The following lists some of the benefits of using Terminal Services for both remote and local users:
Considerations for Implementing Terminal ServicesBefore implementing a Terminal Services solution, careful architecture and planning should take place. Performance, availability, and training are just a few of the areas to take into account. The following is a short list of other important considerations:
Installation Order and Application Server ModeThe installation order is important for deploying Project Professional and/or Microsoft Office on a Terminal Server. The server must have Terminal Services installed and enabled prior to installing any other applications. Project Professional automatically detects the implementation of Terminal Services on Windows 2003 and installs properly. CAUTION In Windows server versions prior to Windows 2003, you could choose the Remote Administration or the Application Server mode for Terminal Services. In Windows 2003, the Remote Administration mode is built-in. The terminal server must have Terminal Services Application mode installed for Project Professional to install correctly for use by remote users. Group Policy and the Group Policy Management Console (GPMC)The Windows Server 2003 implementation of Active Directory (AD) provides a key upgrade to managing Group Policy Objects (GPO) in the enterprise. GPOs can perform many management tasks including adding registry entries, enforcing security policies, and even performing software maintenance. The GPMC is a Microsoft Management Console (MMC) snap-in that can be used to create and enable GPOs. You need to download and install it from Microsoft because it is not included on the Windows Server disks or install. TIP Organization Units (OU) are useful when applying GPOs. OUs provide a tree structure, allowing you to apply GPOs similar to the way security groups are implemented. This may come in handy if you want to apply a restrictive policy to your Terminal Server users but don't want to lock out the administrator's functions. OUs can be created and managed using either the GPMC or the AD Users and Computers MMC snap-in.
You can use an .adm file to add a template to the GPO editor. These are text-based files that contain registry and security settings. By default, the GPO editor tries to read .adm files from the Sysvol on the domain controller, but you can add a template from any directory. If the .adm file is new or the time stamp is newer than one currently in the Sysvol, the GPO Editor automatically copies it to the Sysvol. The following is an example of an .adm file that can be used to set the registry entries needed to connect Project Professional to the Project Server: CLASS USER CATEGORY "Project Professional Settings" POLICY "Microsoft Project 2003" KEYNAME "Software\Microsoft\Office\MS Project\Profiles\Windows Logon" EXPLAIN "Set these settings for the hosting environment." PART "Project Server URL" EDITTEXT VALUENAME "Path" DEFAULT "http://servername/projectserver" END PART PART "Windows Logon Name" EDITTEXT VALUENAME "Name" DEFAULT "Windows Logon" END PART PART "Window Logon Account" CHECKBOX VALUENAME "AccountType" VALUEON "0" ;REVERSED ORDER: 0,1 VALUEOFF "1" DEFCHECKED END PART PART "Default" CHECKBOX VALUENAME "Default" VALUEON "Yes" VALUEOFF "No" DEFCHECKED END PART PART "AutoConnect" CHECKBOX KEYNAME "Software\Microsoft\Office\MS Project\Settings" VALUENAME "AutoConnect" VALUEON "Yes" VALUEOFF "No" DEFCHECKED END PART END POLICY END CATEGORY Copy and paste this code into a text file and rename it with a descriptive name and an .adm extension. After the GPMC is installed, follow these steps to add the template to the GPO Editor:
Now that you've added the template, you need to perform a few more steps to see it in the editor to modify:
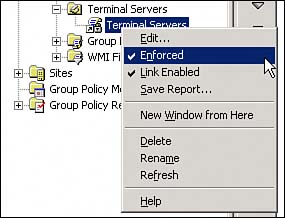
You should now see the template you created and can modify it at will. Make sure that when you are finished making changes that you enforce the policy in the GPMC by right-clicking it and choosing Enforced as shown in Figure 25.16. Figure 25.16. GPMC menu highlighting a GPO.
|
EAN: 2147483647
Pages: 227