The Basics of Process Analysis
| < Day Day Up > |
| So far this chapter has illustrated the principles of relational database design, and provided examples of a notation (the ERD notation) that can be used to produce a compact visual representation of a database structure. But this activity needs to fit into a broader type of activity that we refer to as process analysis . Process analysis (in this book, anyway) refers to the act of deriving a database design from a real-world problem. In a sense, almost all database design needs be preceded by some form of analysis, to determine the scope of the problem being solved and focus on what needs to be built and why. Process analysis begins with a process description and ends with an ERD. That ERD will be the basis for implementing a real solution in FileMaker, a process covered in more detail in Chapter 6, "Working with Multiple Tables." To perform such analysis, you need a firm grip on entities, attributes, and relationships. Understanding relationship optionality is also a helpful tool. Here again is the strategy for going from a problem to an ERD:
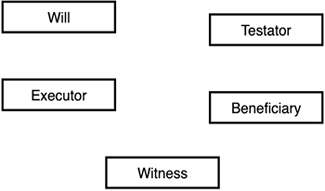
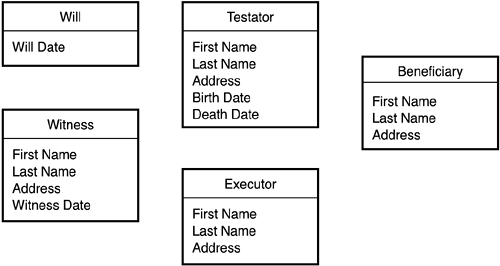
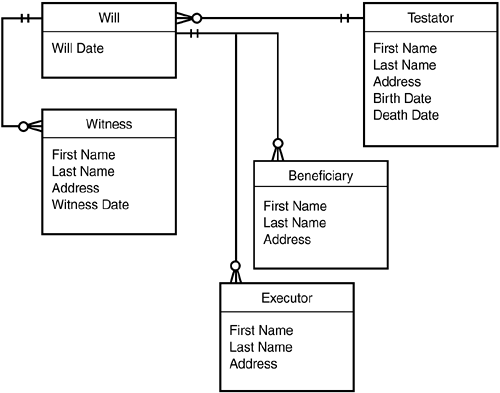
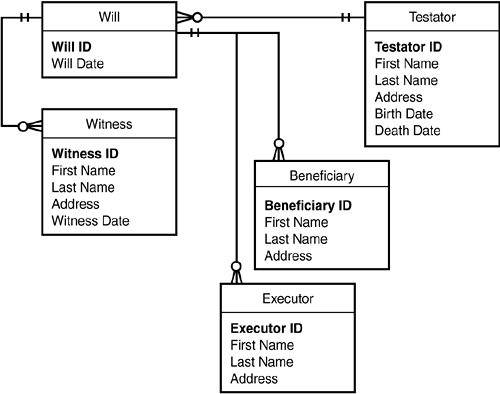
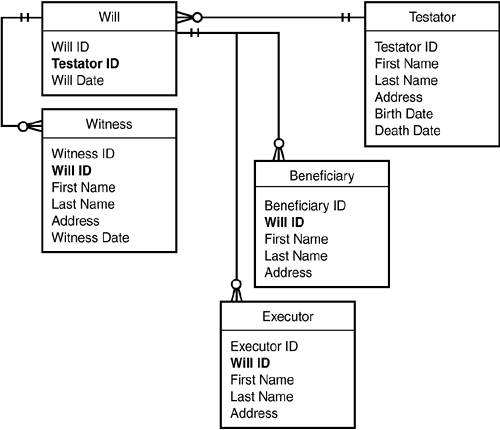
Process Analysis: Legal DocumentsKaren Schulenberg's law office handles a great many estate issues. In particular they handle a lot of wills. They need a software system to track individual wills. For each will, they need to know the identities of the testator, the executor, the beneficiaries, and any witnesses. They need to know the date of the will itself and, if applicable , the testator's date of death. This information constitutes your process description. Determining EntitiesNext, you need a list of candidate entities. One rule of thumb, you might remember, is to pull out anything that looks like a noun. Doing so, you'd get the following list: law office, estate issue, will, testator, executor, beneficiary , witness , date of will, and date of death. The challenge here is to decide which of these are types of things , and which are characteristics of things . For example, "date of will" and "date of death" both seem like characteristics of things (characteristics of a will and a testator, respectively). Witnesses and beneficiaries, by contrast, look like types of things ”you could store additional information about witnesses and beneficiaries ( name , address, height, and so on). As far as the rest of the entity list, you can discard "law office" and "estate issue" because these pertain to the running of the law office, which is not what the desired database is about. "Will" is clearly an entity; in fact, it's the central entity of the proposed system. What about "testator" and "executor"? By the logic we applied to witnesses and beneficiaries, these could both be entities: you could track plenty of additional information about them. So for now, leave them as entities. The current universe of entities is shown in Figure 5.15. Figure 5.15. Initial diagram showing entities for will, testator, executor, beneficiary, and witness. With this entity list in place, you need to fill in the attributes. Some of these may arise from the process description, whereas you may need to fill in others based on common sense or further investigation. Take a look at the entities one by one. For the will, you know that the date is one important attribute. Witnesses and beneficiaries are important too, but you've decided these are entities in their own right. So for now leave the will entity with just a date. The testator is a person, so even though nothing lengthy was specified in the process description, you can reasonably assume you'd want to capture the name and address. The process description states that you need to capture the death date, and you might as well ask for birth date as well. Similar logic applies to the executor, witness, and beneficiary entities. All are people, so you'd presumably want their names and probably addresses as well. For witnesses, you'd also like to know the date on which they witnessed the will. Figure 5.16 shows the developing diagram with these attributes added. Figure 5.16. Developing ERD for a database of wills, with attributes added. With this done, you need to consider the relationships that apply among these entities. Because the will is the critical entity, the instinct here is to look first at the way wills relate to the things around them. For each entity pair you examine, you should determine the relationship type: one-to-one, one-to-many, or many-to-many. Consider first the relationship between a will and its witnesses. This is clearly a one-to-many relationship: a will might have only one witness, but it could certainly have several as well. The same is true of the relationship of a will to its beneficiaries. What about the relationship of a will to an executor? Well, there is generally only one executor, but in extraordinary cases there might be more than one. Again you have a one-to-many relationship. And finally, what about the relationship of a will to a testator? Well, a will can apply to only one testator, so you might first be tempted to call this a one-to-one relationship. But one person (testator) could in theory have several wills, one superseding the other over time. To retain that flexibility, you might be better off thinking of this as a one-to-many relationship. What about other relationships? Is it meaningful to talk about a relationship between witnesses and beneficiaries, for example? Probably not. In any case, you now have an ERD that connects all the entities together: Each entity is now related to every other entity through the "main" entity, which is the will. The resulting ERD is shown in Figure 5.17. Figure 5.17. The "wills" ERD with all relationships drawn. The last step in the process, though not a mandatory one, is to add the optionalities to the existing relationships. There won't be too many surprises with this system. The couplings here are fairly loose. It might well be permissible to have a testator with no wills in the system, for example. It's not likely that a will would have no beneficiaries, but it is possible. And a will need not have associated witnesses, at least not until it's signed. A will might even sit in limbo for a while with no executor assigned. So these relationships are all fairly loose. The ERD with optionalities might appear as in Figure 5.18. Figure 5.18. The "wills" ERD with optionalities added. We've made a slight simplification here, for the purpose of clarity. The diagram indicates that one witness can only ever witness one will. In truth, one person could witness quite a number of wills, which would entail a many-to-many relationship between witnesses and wills. Here, we're effectively presuming that we'll make a new Witness record every time someone witnesses a will, whether or not that person has already done so. Adding AttributesNow you have a pretty good list of entities, but they still need attributes. (These, again, are likely to turn into database fields when you actually build the system.) Add the Primary KeysYou might remember that earlier it was recommended that every entity, without exception, have a primary key. So the first thing to do is add a primary key to each entity in the diagram. Figure 5.19 shows the result. Figure 5.19. The "wills" ERD with primary keys added. Add the Foreign KeysForeign keys, you'll remember, tie the rows of one table to the primary key of another table. Anywhere you have a one-to-many relationship indicated on your ERD, you need two things: a primary key on the "one" side, and a foreign key on the "many" side. In the current example, beneficiaries and witnesses both have a many-to-one relationship with wills. So, in addition to their own primary keys (Beneficiary ID and Witness ID, which you've already added), they each need to store a foreign key called Will ID, that ties each beneficiary or witness record back to a unique record in the Will table. Figure 5.20 shows the ERD with foreign keys added. Figure 5.20. The "wills" ERD with foreign keys added. Add the "Other" AttributesThe keys you've just added represent the ERD's structural attributes. These are the minimal attributes needed to create the relationships you identified in earlier steps. What's left, of course, is all the "actual" data ”the information a user of the system expects to work with. You will have identified some of these attributes during the initial design process, and may have wrestled with the question of whether they should appear as attributes or entities (as with testator and executor in this example, both of which we're calling entities in this design). You'll find out about others as you dig deeper into the requirements for the particular system you're building. In the current example, there may be many other pieces of data about a will that these lawyers want to track. All that information would appear as additional attributes of the Will entity. Strictly speaking, attributes don't need to appear in an ERD. An ERD, after all, is mostly about entities and relationships. In a system with complex entities, showing all the attributes on the ERD would be unwieldy and would obscure the main structure of the ERD. Just make sure that an attribute list for each entity appears somewhere in your design documents. TIP When you first start sketching your ERD, you might just be scribbling on the back of envelope. But sooner or later, especially for large projects, you'll want to turn your ERD into an electronic document of some kind. We recommend you find a suitable tool for doing this. If you want to go with a dedicated diagramming tool, Visio is popular for the PC platform, and on the Mac, OmniGraffle is an excellent tool. But if you don't want to spring for (or worse , spend time learning) a new tool, well, FileMaker's Layout Mode also makes a great ERD tool! It's easy to whip up a small library of ERD adornments and cut and paste them where needed. That way, each of your FileMaker solutions can contain its own ERD, squirreled away in a hidden layout somewhere. |

| < Day Day Up > |