Creating and Managing Layouts
| < Day Day Up > |
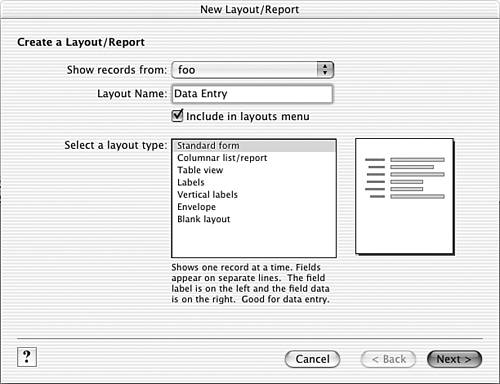
| Creating and managing layouts is one of the most important tasks required of a FileMaker Pro developer. It's also one of the most intuitive. There are, nonetheless, numerous subtle facts and details that you need to know. We encourage you to have a test file open as you go through the following sections so you can try things firsthand. Creating a New LayoutEvery time you create a new table in a file, FileMaker automatically creates a new layout for you as well. The layout is given the same name as your table, and all the fields that you defined at the time of table creation are placed on the layout for you. Figure 4.1 shows an example of what this default layout looks like. Figure 4.1. The default layout created when you add new tables to a file. You can create new layouts any time you want while in Layout mode simply by choosing L ayouts, N ew Layout/Report, or by pressing ( Figure 4.2. This is the first screen of the wizard for creating new layouts. You can create the following six types of layouts:
We do not discuss all the screens of the New Layout/Report Assistant here; they're quite intuitive, even for rookie developers. Besides, if you are new to FileMaker, nothing beats spending an hour just playing around with the assistant to see first hand what the various configuration options do for you. You won't cause harm to any existing layouts by doing so, nor can you hurt the database even if you mess up the creation of a new layout. After a layout has been created, it can be completely modified and turned into whatever you need it to be. Much of the remainder of this chapter is devoted to the tools at your disposal to do just that. TIP There is no tool available for importing layouts from one file to another. If you ever need to do this, the best method is to set up a new, blank layout with parts sized the same as the source layout. Then, copy all the objects from the source file and paste them into the new file. Fields, buttons , and portals need to be respecified to point to their correct referents , but at least all your formatting will be retained. Within a file, you can duplicate layouts by choosing L ayouts, D u plicate Layout. Often, this is a preferred method for creating new layouts, even if they end up looking significantly different from the original. Part sizes, graphic elements, and formatting options are all retained, so modifying as necessary with these as a starting point is usually much faster than creating new layouts from scratch. TIP Create a template layout for yourself that has examples of all the necessary bits and pieces specified (portals, fields, field labels), along with color squares and grid lines. Then you can simply duplicate your template when you need to create a new layout and you'll be well on your way to a finished product. Layout Context
The reason layouts need to be associated with table occurrences is because in a multi-table file, FileMaker needs some way of knowing which records to display in a given layout. In the old days when FileMaker allowed only one table per file, it was always clear that layouts in file X should display records from table X. Now, layouts in file X can be configured to display records from table A, B, or C. The context of a layout is determined by the table occurrence to which it is tied.
You might wonder why layouts need to be associated with table occurrences and not base tables themselves . If you were concerned only with displaying records from the base table, you wouldn't need to worry about table occurrences. But layouts also need to be able to contain records from related tables (that is, portals), and relationships are built between table occurrences, not between base tables. Having a layout linked to a table occurrence makes it unambiguous what context should be used to access related records. When you define a new layout, the very first prompt of the New Layout/Report Assistant is for where to Show Records From. The options in the pick list are all the table occurrences from the current file's Relationships Graph. At any time, you can go into the Layout Setup dialog to see what context has been set or to change it, though this isn't advisable unless you're an experienced multi-table developer. If you do have multiple occurrences of any of your base tables, the selection of a particular occurrence in no way affects your ability to see and/or edit field data in the base table itself. That is, if you don't intend to put any related fields on the layout, then it's likely to be inconsequential which occurrence of that base table you select. Do realize, however, that context for scripts is determined by the currently active layout, so some scripts might behave differently if one or another occurrence is used. Layout SetupThe Layout Setup dialog, accessed under the L ayouts menu, allows you to edit many of the fundamental characteristics of a layout, such as the name of the layout, its context, and how it can be viewed (see Figure 4.3). Figure 4.3. The Layout Setup dialog is where you go to change things such as the name of a layout and its context. Layout NamesYou have a great deal of flexibility in how you name layouts. Layout names do not need to be unique and can be up to 100 characters long. They can include numbers , symbols, spaces, and pretty much anything else you want to use. Though flexibility is a good thing, we suggest you follow a few guidelines:
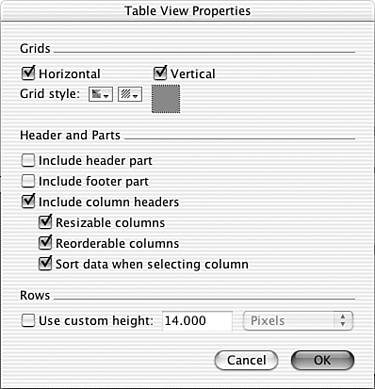
TIP The single hyphen naming trick works in other areas of FileMaker as well, such as within value lists and as a script name. View OptionsEvery layout you develop can potentially be viewed in three different ways: as a form, as a list, or as a table. A user with access to menu commands can use the V iew menu in Browse mode to switch between them. When you navigate to a layout, you will see it in whatever state in which it was last saved, so bear in mind that switching from layout to layout may also change the view setting as well. The differences between the three view types are quite straightforward:
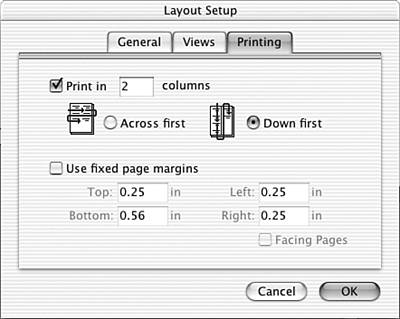
Using the Views tab of the Layout Setup dialog, you can disable user access to certain view types. Although usually not necessary, this can be a good precaution to take to keep adventurous users on the right track. Accessing an inappropriate view type is likely not going to cause much harm, but it certainly can confuse users. Multi-Column LayoutsWhen printing labels and certain types of reports, you might want to present your data in multiple columns. You can specify the number of columns to display on the Printing tab of the Layout Setup dialog; this is shown in Figure 4.5. Figure 4.5. You can customize the print settings for a particular layout on the Print tab of the Layout Settings dialog. In Layout mode, dashed vertical lines represent the boundaries between columns. Columns other than the first are grayed out; the idea is that you need to place any objects you want displayed in the first column, and these objects are replicated to the other columns as necessary. Figure 4.6 shows an example of a 3-column layout used to display a phone directory. Notice that the header and footer part are not divided into columns. This means that if you want headers to appear above the second and third columns, you need to add those explicitly, as we've done in Figure 4.6. Figure 4.6. This example shows how a layout for a 3-column phone directory might appear in Layout mode. It's not possible to have columns of differing widths; every column is the same width as the first one. You can manually adjust the column width by clicking on the dashed divider between the first and second column and dragging left or right as appropriate. Subsummary parts and leading and trailing grand summaries can be used on multi-column layouts, but they behave slightly differently depending on whether you've chosen to display data Across First or Down First. If you chose Down First, then any summary parts are also columnar. On the other hand, if the data is displayed Across First, then summary parts span the full width of the layout, just as the header and footer parts do. The effects of a multi-column layout can be viewed only in Preview mode. In Browse mode, a user sees only a single column of data. Hiding and Reordering LayoutsIn Browse mode, layouts can be either accessible or inaccessible via the layout pull-down menu in the status area. If a layout is accessible, users can see it and navigate to it at will. If it is inaccessible, users can navigate to it only by running a script that takes them there. In Layout mode, all layouts are accessible. Typically, layouts are set to be inaccessible when you need to prevent users from manually navigating to a layout. For instance, you might have report layouts or find screens that require certain preparation before they become useful. There may be unanticipated and/or undesired results if a user is able to bypass the scripts you've created and navigate directly to a layout. The option to have a layout be accessible or not is on the first screen of the New Layout/Report Assistant; it can also be set through the Layout Setup dialog. The Set Layout Order dialog, shown in Figure 4.7, also has a check box on each line that can be toggled to change a layout from visible to hidden and vice versa. Using this method is the quickest way to hide (or show) a number of layouts at once. Figure 4.7. Use the Set Layout Order dialog to set the accessibility and order of layouts. The Set Layout Order dialog, as you might guess from its name, also enables you to change the order in which layouts appear in the layout pop-up list. You can use the double-arrowed selection tool to move a layout up or down in the order. You can accomplish the same thing by selecting a line and pressing ( NOTE
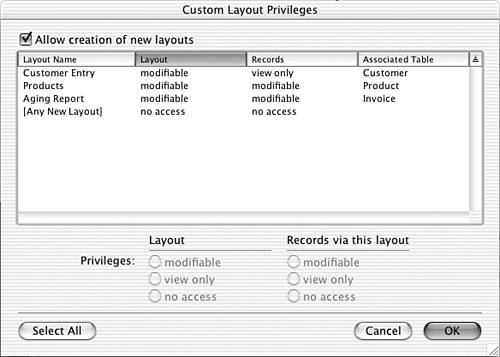
Restricting Access to LayoutsUsing the methods discussed in the previous section to hide layouts is a good way of keeping users from going places they shouldn't, but it's not adequate security if you truly need to restrict access to layouts. Plus, making layouts inaccessible affects all users; you can't set up rules for which layouts are accessible for which users. Added protection for layouts can be achieved by restricting access via privilege sets. A privilege set can be defined to provide either All No Access, All View Only, or All Modifiable control over layouts. Alternatively, you can specify custom layout privileges, as shown in Figure 4.8. You can protect both editing the layouts themselves as well as the data displayed on them. Any user who has no access to a layout, doesn't see that the layout exists, even in Layout mode. Figure 4.8. Custom Layout Privileges enable you to restrict certain users from modifying or viewing certain layouts. If you want to prevent certain users from creating new layouts, leave the Allow Creation of New Layouts option at the top of the Custom Layout Privileges dialog unchecked. Additionally, you can set default privileges that users will have for new layouts by editing the options for the [Any New Layout] line. |
 For more information on table occurrences,
| < Day Day Up > |