Selection Portals
| < Day Day Up > |
| We've covered the basics of portals thus far, and discussed the idea that portals are used to display records from a related table and that the records themselves , well, "relate" in a meaningful way. In other words, the related records shown in a portal correspond to the active record ”Parents to their own children, Class to its attending students, Company to its own employees , Neighborhoods to houses and so on. These relationships are often thought of as "primary." They're the relationships that you depend on to define and determine a database's core architecture. Your users, likewise, will intuitively understand the process of entering data for, say, a class and then fleshing out its roster of students. There's a direct correlation between a primary data structure and the information that users expect to view, enter, and report on. We will now venture beyond that one function and explore other uses of portals. The other, advanced uses of portals mainly revolve around user interface choices where you might opt for a more sophisticated approach in making selections. Basic Selection PortalsThe first advanced portal use that we discuss is what we refer to as a "selection portal." Selection portals are used to present choices to the user in lieu of a value list or menu of some kind (see Figure 16.7). Figure 16.7. Notice that when using a value list you have to expose your internal IDs to users, and that the mechanism here can display information from only one other field. Selection portals offer an alternative to the standard approach of using value lists to choose foreign key values. The only way two records in an equijoin become related is if they share a like value in match key fields. If you want, for example, to relate a real estate agent to a listing record, you can either manually enter the key for an agent into an AgentID field for the listing record, or you can assist data entry by providing a pop-up list or menu of options. Value lists, although a quick and easy means of giving users access to choose related records, can be limited: If you have hundreds of possible values, they can become cumbersome to scroll through. You're also able to display the contents of only two fields, the first of which needs to be the values for your match field. Some developers and designers sensitive to user interface issues feel that these key values expose too much of a database's inner workings to users who may be turned off by having to see and choose from what often are alpha-numeric codes meaningful only to the database itself. Figure 16.8 offers an alternative where users never see the primary keys of a database. Figure 16.8. This portal of options allows users to pick which related record they wish to associate with their current record.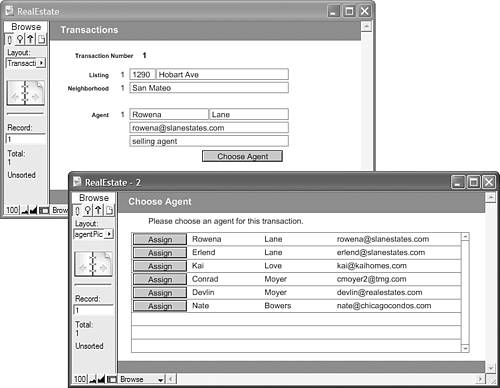 Selection portals address these issues, although admittedly requiring more work to build. When a user wants to associate a record, as shown in Figure 16.8, he need only click the "Rowena Lane" row in the selection portal. Notice that the example shows the selection portal in a different pop-up window. This is a common way to display a selection portal for only as long as it is necessary. Clicking on a row above can also close the window in question. The basic concept for selection portals is fairly straightforward. The goal here is to display all the possible relatable matches for a given record, and then through scripting capture and populate its match key into the appropriate foreign match key on the other side of the relationship. The work involves two elements: creating a portal that displays all the records from the other table, and, second, writing a script that captures and populates the ID after a user has clicked on one of the portal rows available. First define your data structure. In the example shown in Figure 16.8, agents can work with multiple listings, but a listing might have multiple agents as well: one representing the buyers and another representing the sellers. Notice that this now becomes a many-to-many relationship. At times there might be multiple agents on the buying or selling side as well. For the purposes of this example, use the Relationship Graph shown in Figure 16.9. Figure 16.9. We've simplified the fields and relationships in this example to show just the primary data structure and a handful of fields necessary for the example.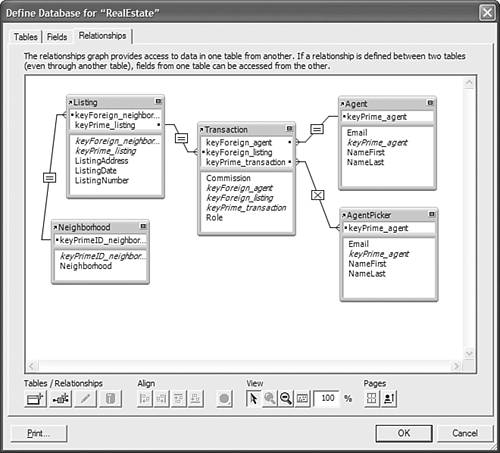 TIP To see this process work, first create an Agent layout and add a portal for all the listings associated with that agent. We recommend displaying your match key fields until you get comfortable with this technique. Now you need a portal that shows all the listings in the table from which users can choose. For any portal, you always first need a relationship, so create a second table occurrence and second relationship. The example in Figure 16.9 related the primeID_agent to the primeID_listing via a Cartesian cross-product operator ( x ). NOTE Note that it doesn't matter what fields you choose as match fields for a cross-product join. The operator doesn't make any comparison and simply relates all records to all records. A second portal can now be placed on your existing layout or, in all likelihood , you would have these two portals displayed on a different layout expressly established for this picking process. You can even combine it with a pop-up window, as explained in Chapter 13, "Advanced Layout Techniques." After your cross-product selection portal is in place, you need to write a script to associate the related record. The script, which will be tied to a button that's placed in the selection portal, needs to navigate to another layout to create the association. So that information about the current record and the selected portal row can be accessible on that other layout, you need to define the button to pass the agent and listing IDs as a script parameter. Use the following: Select_Listing # # establish context Go to Layout [ "Transaction" (Transaction) ] # # create the new record New Record/Request # # set the two foreign IDs required. # This script assumes that the button that launches the script passes the script This basic technique allows you to create a more complete user experience for your users and to expressly control the creation of related records. The advantages of this over a value list are that you can offer more than two fields of information to users, you can leave obscured the key values in your database, and generally the user interface can come across as more polished (depending, of course, on your artistic abilities ). Portal Row HighlightsYou are now exploring ways of working with portals that go beyond simply using them to display data that is related in a real-world sense. You're now establishing relationships that allow for other things. In the example in the preceding section, you related your current record to all records in another table. In this example, we establish a condition by which a single portal row can be highlighted (see Figure 16.10). This is another technique to enhance usability and extend user interface. Figure 16.10. The highlighting gives solid feedback to users that they are acting on the row in question. NOTE Notice that the Assign Selected button has been moved to the top of the portal, rather than placed on every row of the portal. This technique involves setting a global field to the value of the primary key of whichever row the user clicks. You need three fields in all for this technique. We generally add them to the related table or a separate utility table, but keep in mind that you can use globals from any context. The following is a list of the fields you'll need for this technique.
Notice that in cases when gSelectedRowID = the primary key of the related table, the calculation returns the value (in this case a colored rectangle) from gHighlightColor . Because you're using global fields, this solution works perfectly well in a multi-user environment. Whatever a given user has selected as her highlight row remains specific to her session. The final element of implementing highlighted portal rows is to place the HighlightRow calculation field in the portal itself. Make the field exactly the size of the top row of the portal, and set its graphic format to Crop. (Make sure your colored rectangle is larger than the portal rows you plan on having the highlight.) Attach the field to the SelectRow_SetHighlight script. In Browse mode a button does not need to be the top-most object on the screen to work. Move fields above it and your highlight color fills in nicely in the background. You would generally turn off access to the fields in your portal in Browse mode ”so that clicking on the portal row anywhere results in a highlight appearing, rather than a field being entered for data entry.
One additional option when storing a selected row ID and creating a highlighted portal row is that it is possible to then also create a relationship specifically for that selected record. By relating gSelectedRowID to primeID_listing , you now have a relationship that will change as a user clicks portal rows. Consider the implications: You can display related record fields directly on your current layout, based on the selected row (see Figure 16.11). Figure 16.11. Notice that the information on the right corresponds to the related record selected by the portal on the left. This is a great way to address a portal that is getting too crowded with fields. Instead of making each column smaller, or perhaps stacking fields in rows that might then get difficult to read, simply allow users to select a row in a portal and then display additional information about the selected, related record off to the side.
Multi-keys and Multi-row SelectionsIn addition to wanting to highlight a single row, as in the previous example, you may encounter the need to have multiple rows selected at once. In the Agent Listings example, for instance, you may want to allow users to click multiple rows in the listing portal and assign them all at once to the agent in question. This is a particularly handy way of allowing users to do multiple things at once: add a batch of listings to an agent, select multiple people for form letters , apply new dates to a series of records, and so on. There are dozens of possibilities. The technique for this is nearly identical to that already presented. However, we rely on FileMaker Pro's capability to resolve multiple match values in a single field. These multiple match value keys are often called multi-keys . Consider a company table related to an agent table, as shown in Table 16.1. Table 16.1. People
If you establish a relationship to this table by using a field ”global or otherwise ”FileMaker Pro will recognize all return-delimited match key values as though they were individual values. For example, if your company match field holds the following:
then your valid, related records will be Rowena and Kai's. Likewise:
relates to Devlin, Erlend, and Nate. It doesn't matter to FileMaker in which order the values fall, simply that they are valid. With a multi-key match, it is possible to show multiple rows as highlighted or selected in a given portal. You can use again the same three fields you'd use to set up a single row highlight:
If you are modifying the fields from the example given earlier in the chapter, notice that the test in the calculation is now using a FilterValues function that recognizes whether or not an ID is included in your global (as opposed to simply checking whether the two fields are equal). When setting values in gSelectedRowID , a simple Set Field script step won't do the trick any longer. Doing so would replace the contents of the field and you'd be left with just one row selected. Your script needs to look like this: SelectRow_SetHighlight # # if the ID already exists, remove it If [ FilterValues (Listing::gSelectedMultiRows; select_Listing::primeID_listing) ] Set Field [ Listing::gSelectedMultiRows; Let ([ selectedRowKey = select_Listing::primeID_listing & "" ] ; Substitute (Listing::gSelectedMultiRows; selectedRowKey ; "")) ] # # if the ID doesn't exist, append it to the end Else Set Field [ Listing::gSelectedMultiRows; Let ([ selectedRowID = select_Listing::primeID_listing & "" ] ; Listing::gSelectedMultiRows & selectedRowID) ] End If # Commit Records/Requests [ No dialog ] # |
 For more in-depth discussion of data modeling,
| < Day Day Up > |