Portal Basics
| < Day Day Up > |
| As previously mentioned, a portal is essentially a view into a related table. In each row of your portal, you will see fields from records as they relate to the current record to which the portal is tied. Another way to think of portals is that they offer a view into another table from a specific perspective. The match criteria you've established determine the perspective and, depending on how you've set things up, it is possible to change that perspective to useful ends. FileMaker Pro 7 introduced new relationship operators, beyond the single equijoin ("="), and portals have become even more flexible than in the past. However, a portal's basic function of displaying one record per row from a related table remains essentially the same. A Cartesian cross-product operator ( x ), for instance, relates all the records in one table to all the records in another table, regardless of key values. A portal based on such a relationship would therefore display all the records of the related table. Similarly, a < operator compares the match fields on either side of your relationship and the rows in your portal will be displayed accordingly . As a final example, a operator enables you to exclude certain records from your portal. One of the most important details to keep in mind is that the match field in the table from which you want to view records must be indexed (with a value index) for the relationship to properly resolve and display records in a portal. It is not the fields themselves that are matched to form a relationship; it is the comparison of the field's indexed values on one side of the relationship to those of the other. Keep in mind that you can index calculations, as long as they do not reference related or un-indexed fields themselves. It is entirely possible to relate to a calculation field in another table, rather than always relying on data input by users. You cannot create records through that relationship, however. Just as users cannot modify a calculation field, neither can FileMaker Pro itself. As you may recall, portals can be set to allow for the creation of related records. A user can click on the first empty row in a portal and enter data directly. FileMaker Pro then does the equivalent of a Set Field step and rightly places the match field value ”key ”in the analogous field on the other side of the relationship. Indexing is not required for the match field in your current table. You can use global fields or un-stored calculation values to create the bridge between two tables. We get into those techniques later in the chapter. Portals Versus List View/Table ViewKnowing when to use portals is often a matter of personal preference, user interface requirements, and data architecture. Quite often developers go through phases of infatuation with using various ways to display multiple records in a single view. The three tools for doing this are List views, Table views, and portals. Each has its own pros and cons, and we'd argue that all three are used for very different purposes. We encourage laziness (it breeds a need for efficiency), so we tend to favor Table view a lot. You get a good bit of functionality for free, such as column sorting, column headers, the ability to resize and reorder columns . The main downside to Table view is that you cannot add buttons or other visual objects to your rows. You also cannot rename or modify the appearance of column headers. Table view therefore is generally used for layouts that are accessible only to developers. They're usually not suitable for end users. For cases where control over user interface is of paramount importance, List view and portals come into play. The key difference between the two, from a user's perspective, is that a List view can dynamically represent whatever found set your table currently has and portals always display a set of related records. List view displays records in their creation order unless a user or script explicitly sorts the records. Unless you've controlled and turned off menu access, users can omit records, show all records, and otherwise manipulate the found set in an ad hoc manner to suit their needs. List views display the number of rows that will fit on a screen, expanding as much as a user has monitor space. When printing a List view of records, all the records can be printed; page breaks are placed between records as necessary. Portals are differently focused: They are always driven by a specific relationship and always display a fixed number of rows ”only the content changes. They are always sorted (at a minimum in the order in which their related records were created, unless otherwise specified), so if you have a particularly large set of related data, your screen redraw speed may become an issue with hundreds of thousands of records. The obvious advantage of portals is that you can combine them on the same layout with data from other tables ”both with fields from a related record and with other portals. New Portal SetupTo add a portal to a layout, use the Portal tool from the Status Area in Layout mode, and draw a rectangle that approximates how large you want your portal to be. You are then presented with the Portal Setup dialog, from which, at least, you need to choose a table occurrence on which to base the portal (see Figure 16.1). Figure 16.1. These options enable you to govern how a specific portal behaves.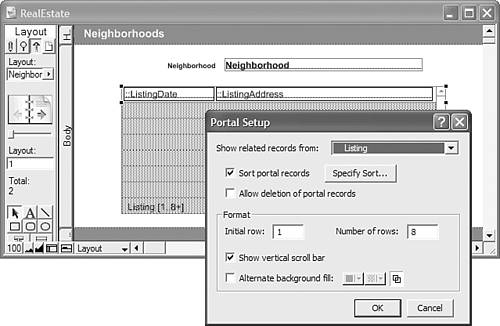 NOTE Setting new portal options in the Portal Setup dialog does not affect other portals in your solution, regardless of whether or not others are tied to the same table occurrence. TIP When choosing from the list of table occurrences, note that it is not possible to create a portal showing records from an unrelated table. By definition portals show related records. If you need to display records in an unrelated manner, create a Cartesian cross-product relationship to the table occurrence in question, but this is still a relationship. It will display all the records from that table. As a helpful reminder, in Layout mode, the name of the table occurrence to which the portal is tied is displayed in the lower left, along with its row format options. We cover those options shortly. Specifying Portal SortingYou can specify the order in which the related records are displayed by specifying sort criteria in the Portal Setup dialog (see Figure 16.2). It's thus possible to create two portals side by side, based on the same table occurrence, that offer two different sort views from the same related tables. Figure 16.2. It is possible to establish different sort options for each portal in your database.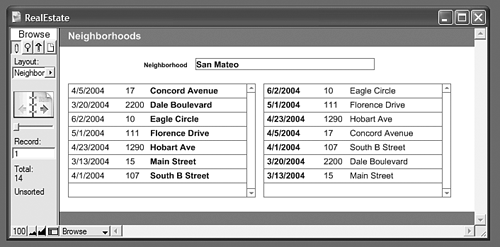 Note that the sort order is hard-coded to the portal. For users to change the sort order, they'd have to enter Layout mode and modify the Portal Setup dialog options. A technique for dynamic, user-based portal sorting is covered later in the chapter. Note that the relationship from the current table occurrence to the destination table occurrence may have a sort defined, but a portal sort overrides the relationship sort. If the table occurrence is multiple hops away on the Relationships Graph, the last relationship is the one that determines the sort order. Allowing Portal Row DeletionBy enabling the Allow Deletion of Portal Records option, you enable users to select a portal row and delete a record by pressing the Delete or Backspace key. They are then prompted by FileMaker as to whether or not they want to delete the one related record in question. Generally you will opt to overlay buttons attached to scripts in portal rows to delete related records so you can more fully control the behavior of portals. This enables you to perform your own functions prior to deleting a record, or at a minimum control the color of a selected portal row; it's not possible to alter FileMaker's default selection mask color. (It varies depending on background color and OS.) The disadvantage of placing buttons that completely fill a portal row is that users may no longer get the visual feedback they need to see that a portal row has been selected. Using the Delete or Backspace key can still work, but the user experience isn't as clear. In the same vein as never attaching anything but scripts to buttons for the purposes of control and maintainability, we almost never use the ability to delete records in portals with FileMaker's default behavior. We opt instead to explicitly place buttons, attached to scripts, to do so. Nonetheless, it's a handy feature to enable if you're working with a database that uses FileMaker's native user interface behaviors. Setup OptionsFileMaker's Portal Setup options enable you to specify a starting row, how many rows (tall) a portal should be, whether to offer a vertical scroll bar, and whether to alternate row colors between that which you set for the portal itself and an alternate color. The row choices are noteworthy. If you turn off your scroll bar, you can opt to display rows 1 “8 in one portal instance and rows 9 “16 in another. Keep in mind that the end point is artificial; a child table can hold potentially millions of child records. With scroll bars turned on, a portal simply allows you to scroll from the initial row downward.
Relationship PropertiesRelationship properties have a direct bearing on a portal's behavior. They were covered in some detail in Chapter 6, "Working with Multiple Tables"; however, we'd like to draw your attention to some particular aspects of the Edit Relationships dialog, shown in Figure 16.3 and in the sections that follow. Figure 16.3. Portal behavior is affected by the options you choose in the lower portion of the dialog.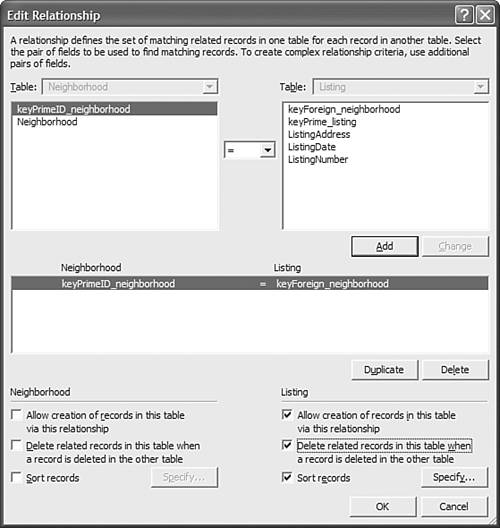 Creating Related RecordsNotice in Figure 16.3 that one of the options you can specify for a relationship is Allow Creation of Records in This Table via This Relationship. When you check this option, a portal that's based on the relationship will contain a blank row beneath the related records, which is readily available for data entry. When a user commits data in that blank related record, FileMaker pushes the value from the current record's match key into the related match field automatically. This behavior is possible only with equijoin (=) relationships in which FileMaker can determine exactly the foreign value to populate in the newly created record. You also need to be able to modify the field in question. If the relationship is tied to a calculation field, FileMaker Pro cannot automatically populate it with a value from a related record (see Figure 16.4). Figure 16.4. Note that the match field, shown here in the first column, is populated automatically.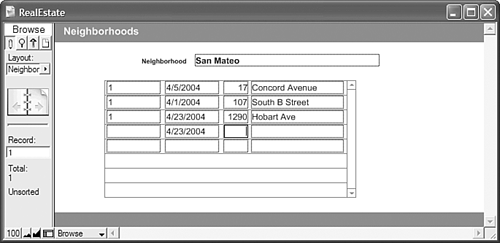 Cascading Deletion of Related RecordsThe next option is "Delete Related Records in This Table when a Record Is Deleted in the Other Table." Choosing this option ensures that when a user deletes a record in one related table, all its related records are deleted as well. This cascading effect ensures that your database doesn't orphan records by allowing a user to delete records without their respective related records. A good example might be a contact person's record and related phone number records. It is unlikely that you'd want to retain just the phone number records after deleting the contact record to which related phone records belong. The downside, of course, is that users may not realize that along with deleting the current record they are also going to delete all the records they see displayed in a portal, or, worse yet, that they will be deleting records they may not see on screen currently. Relationship-Based SortingThe Sort Records option at the bottom of the Edit Relationship dialog enables you to define a sort order for that relationship. If set, it drives the order in which rows are displayed in portals based on this relationship. Portals themselves have their own sorting options and their options override whatever sort properties you set here; however, it's useful enough to consider this a default sort, if you wish. Sticky Portals
The state of your portal is honored until you refresh the screen by changing modes, close the window in question, quit FileMaker Pro, perform a sort or script, or change records. All these actions result in a screen refresh. If you change from one record to another and return to the original, its portal position reverts to the top as well. Portals maintain their position when users actively edit fields in portal rows. Scripted New Portal RecordsIt's quite common for developers to choose to disallow the creation of related records in portals. You might want to circumvent the need for users to scroll to the bottom of a portal to create new related records. You may want to have your portal serve as display only, or you may simply have too many rows and don't want to force users through a bunch of unnecessary scrolling. Doing so means having to modify the relationship itself. You cannot simply turn on and off this behavior on a case-by-case basis at the portal level. After the option to Allow the Creation of Related Records is turned off, you've then got the task of figuring out how ”other than driving users to the related table in question ”to create new related records. One approach to manage the creation of new records is to use a Set Field script step in combination with passing the necessary key match value via script parameter: Go to Layout [ "Contact" (Contact) ] New Record/Request Set Field [ Contact::keyForeignID_company; Get (ScriptParameter) // keyPrimeID_company ] Commit Records/Requests [ No dialog ] Go to Layout [ original layout ] |
 To learn more about relationships and working with portals,
 | < Day Day Up > |