FileMaker Server Security Features
| < Day Day Up > |
| We've reviewed the authentication settings for FileMaker Server, but there are additional security features built in to the Server product. Specifically , there are security settings that control who can administer a FileMaker Server. There are also security controls for the display of files in the Open Remote File dialog. As was mentioned earlier, because the Server administration tools have a different look on Windows and OS X, the following sections look at how these features are configured on both platforms. Administration SecurityThe first thing to understand is how FileMaker Server itself is administered. Using the FileMaker Server Administration tool on Windows, you can use the Administration assistant as shown in Figure 12.30. Figure 12.30. The Administration assistant takes you through the steps required to configure FileMaker Server.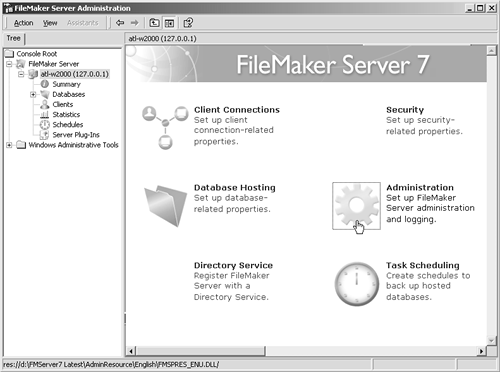 In earlier versions of FileMaker Server, if you had physical access to the server and could launch FileMaker Server Console, then you could administer the copy of FileMaker Server running on that machine. It relied on the server's security to protect administrative access. In other words, if you had enough access to use the keyboard of that server, then you had enough access to administer FileMaker Server. It was possible to password protect the administration function, but that applied only to people who were trying to administer FileMaker Server remotely.
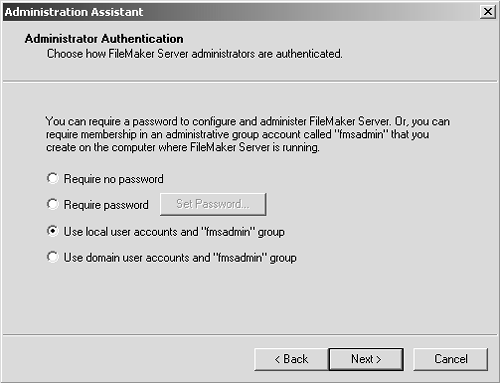
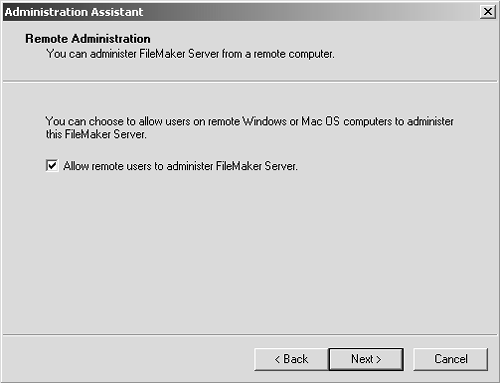
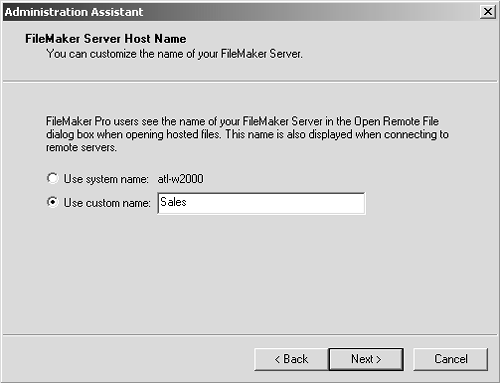
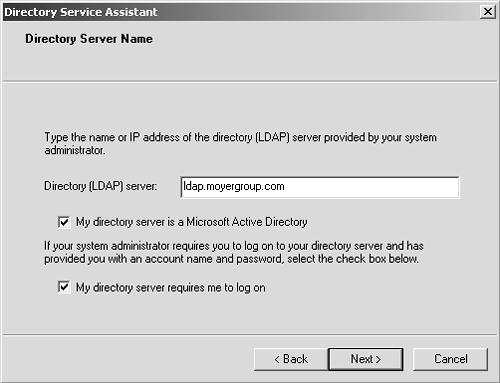
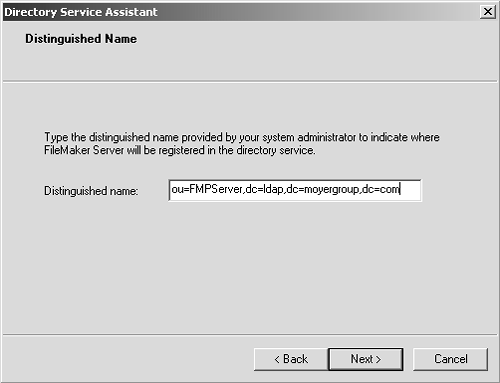
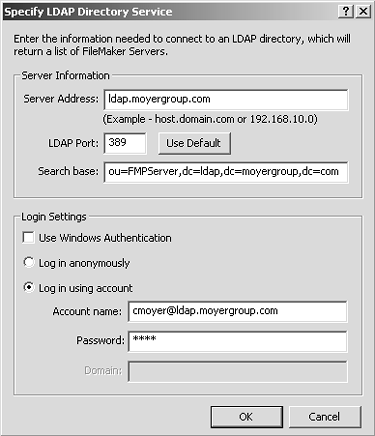
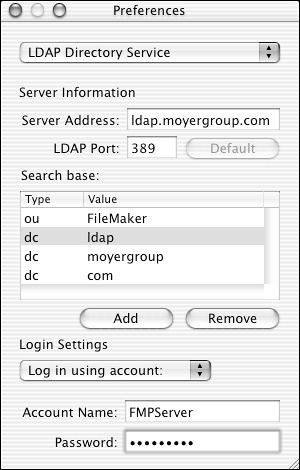
This security on remote administrators is important. Although the old FileMaker Server Console could be used only to administer FileMaker Server running on that machine, the new FileMaker Server Administration tool can administer installations of FileMaker Server running on that machine or anywhere on the network. Another change is that FileMaker Server is more tightly integrated with network security implementations . The old FileMaker Server Console allowed you to only create a remote administration password. The new FileMaker Server Administration tool still allows you to create your own administrative password, but you can also use local server accounts or even domain user accounts as long as they have membership in a group called "fmsadmin," as shown in Figure 12.31. For organizations that have centralized control of accounts and passwords, this feature enables FileMaker to easily integrate with existing account administration functions. Figure 12.31. A group called "fmsadmin" can be used with local or domain user accounts to allow administration of FileMaker Server. The default behavior is for this password protection to authenticate local administrative users. If you want to allow users to administer FileMaker Server over the network, you need to explicitly enable that behavior, as shown in Figure 12.32. Figure 12.32. Administrator authentication applies only to local users unless remote administration is specifically enabled. TIP A configuration option that has minor security implications is the hostname that FileMaker Server displays to remote users. It's a security issue in that the default hostname is the server's system name. If the system name is used as the hostname, that means that remote users can probably identify which physical server is acting as the database host. In cases where highly sensitive databases are being hosted, it might be preferable to obfuscate the true "home" of the data. The hostname can be changed with the same administration assistant, as shown in Figure 12.33. Figure 12.33. Specifying an appropriate hostname can make hosted files easier to locate and can also mask the computer's physical location. That roughly sums up the sequence of events that you'll go through when you use the Administration assistant on the Windows platform. On Mac OS X, all these steps are compressed onto the Administration tab of the Configure section of the FileMaker Server Admin tool, as shown in Figure 12.34. Figure 12.34. This is the Mac OS X administration screen for changing the host name.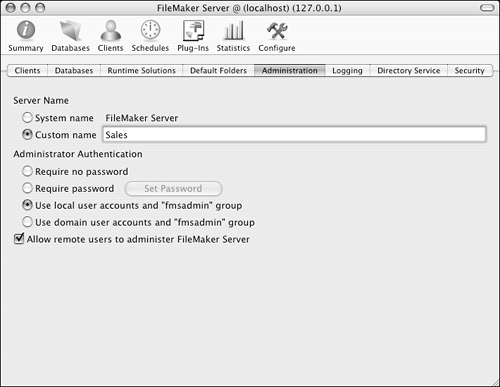 Directory Service IntegrationThe next area we need to look at is FileMaker Server's integration with Lightweight Directory Access Protocol , or LDAP, directory servicesIntegration with an LDAP server adds a layer of security in that an LDAP server can ensure that users see hosted FileMaker databases only if they have been authorized to use them. This feature was in earlier versions of the product as well, but most FileMaker users aren't familiar with how this feature works. That being the case, this section reviews this feature in some detail. But first you need to understand exactly what LDAP is. Those who have had to wrestle with configuring applications to work properly with LDAP services tend not to believe in its "lightweight" moniker. The term lightweight is actually in comparison to its predecessor, X.500, a richer, more complicated directory services model. A directory server is analogous to a search engine for your local network. It's the directory that lists where everything is. It can list contacts for your address book application, or services, such as FileMaker database services, for your FileMaker Pro application. Although it's possible to use a directory server anonymously, the real power comes from using accounts. You can configure your Windows or Mac OS X operating system to authenticate you by using a directory server rather than the accounts built into your operating system. After you've been authenticated to the directory server, network resources, such as hosted FileMaker databases, can be made available to you depending on how your LDAP account has been configured. In the case of FileMaker, if you're using FileMaker Pro and you need to open a database that's being hosted by FileMaker Server, an LDAP server allows you to see only the database files that have been assigned to you. If there are dozens of hosted database files, but you have access to only two, then you'll see only those two in the Hosts dialog. Setting this up is a bit involved, but after you're finished, it's easy to use. The first step is to configure FileMaker Server. For the LDAP server to be aware of FileMaker Server (they should be two separate servers, of course), FileMaker Server needs to register with the LDAP server. Registering FileMaker Server with Directory ServicesOn Windows, launch the FileMaker Server Administration tool and start the Directory Services assistant as shown in Figure 12.35. Figure 12.35. The Directory Service assistant enables you to register FileMaker Server with a directory services server such as Active Directory.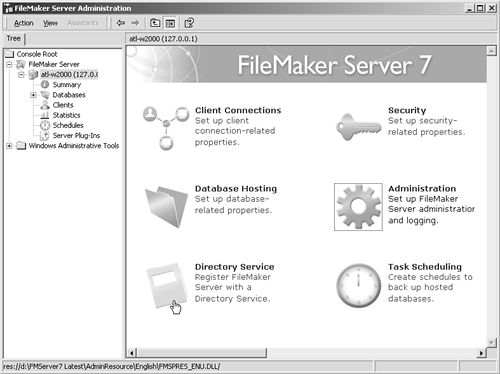 To configure this feature, you're going to need some information from your IT department. You need to know the server's name or IP address, and you need to know a distinguished name to which FileMaker Server can register. The first thing you need to do with the assistant is give the LDAP server's name, although an IP address works just as well, as long as you can be confident that its IP address won't change. In a Windows environment, the odds are that the server will be running Microsoft's Active Directory, which is Microsoft's LDAP product. If so, check the option that denotes that fact, as shown in Figure 12.36. Figure 12.36. You can use either a server name or an IP address to identify a directory server. Your FileMaker server will require account credentials to register with the Active Directory server, so check the option that forces your server to require a logon. If this option is checked, the next screen asks for the logon credentials (account name and password). The next screen asks for a distinguished name. A distinguished name is a kind of pointer that specifies where FileMaker Server needs to register in the directory's tree structure. This directory tree structure is an odd concept, so a different kind of example might be helpful. Think of a house. Suppose that you want FileMaker Server to sit in the first chair at your dining room table. A distinguished name would break this up into branches of a tree, starting with the end of the branch and working its way back to the trunk. In this example, a distinguished name might be ou=first, ou= chair , dc=dining room, dc=246 Sycamore Street, dc=house. Ou stands for organizational unit . An organizational unit is any arbitrary unit that the directory server administrator would like to use to organize the directory. In one case, the appropriate organizational unit might be a department; in another, a sales region. It's completely up to the administrator's discretion. Dc stands for domain component and is used to break down a named server's address. If you want FileMaker Server to register in the FMPServer organizational unit on a directory server named ldap.moyergroup.com, then the distinguished name would be ou=FMPServer, dc=ldap, dc=moyergroup, dc=com. It looks a little bizarre, but it makes perfect sense as soon as you understand the structure to which it's referring. This information gets entered into the Distinguished Name screen of the assistant, as shown in Figure 12.37. Figure 12.37. You'll need to get the appropriate distinguished name information from your directory services administrator. That's about it for a Windows configuration. On Mac OS X, all these screens are condensed onto a single Directory Service tab, as shown in Figure 12.38. Figure 12.38. FileMaker Server Admin on Mac OS X has all the directory services settings listed on one screen.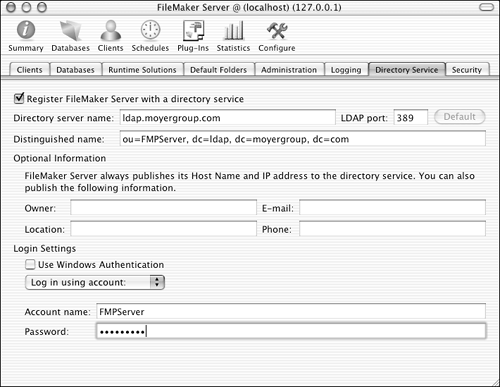 Configuring FileMaker Pro to Use Directory ServicesOnce FileMaker Server has been configured, the next step is to configure FileMaker Pro to make use of the directory server. In FileMaker Pro, choose F ile, Open Re m ote to bring up the Open Remote File dialog. Choose Hosts Listed by LDAP from the View pop-up, click Specify and then enter the LDAP settings as shown in Figure 12.39. Figure 12.39. The LDAP server Search base should match the distinguished name that was used to register FileMaker Server. When this has been configured properly, only the database files that you're permitted to see are displayed on the right side of the Open Remote File dialog. Using Directory Services with the Server Administration ToolIf you're a database administrator, LDAP can act as your directory for all the FileMaker Server installations that you need to administer. The setup for this is similar on Windows and on Mac OS X. On Mac OS X, with the FileMaker Server Admin tool open, choose FileMaker Server Admin, Preferences. Switch from General to LDAP Directory Service, as shown in Figure 12.40. Figure 12.40. The LDAP directory server can list FileMaker Servers that are available for administration. For Windows, switch the View menu from Favorite Servers to Servers Listed by LDAP. Click the Specify button to configure directory service information. After the LDAP preferences have been configured on Mac OS X, choose Server, Connect to FileMaker Server to bring up the Connect to FileMaker Server dialog. Switch from Favorite Servers to Servers listed by LDAP to see a list of available servers. On Windows, just click the Save button to see the list of available servers. That wraps up the overview of FileMaker's security features. Now that you have a good handle on what security tools are available, you can use that knowledge to design an appropriate security plan for your deployment. The first step in developing that plan is to determine the security risk. |
| < Day Day Up > |
- ERP Systems Impact on Organizations
- Challenging the Unpredictable: Changeable Order Management Systems
- ERP System Acquisition: A Process Model and Results From an Austrian Survey
- The Second Wave ERP Market: An Australian Viewpoint
- Relevance and Micro-Relevance for the Professional as Determinants of IT-Diffusion and IT-Use in Healthcare
