Entering Dependency Links
| < Day Day Up > |
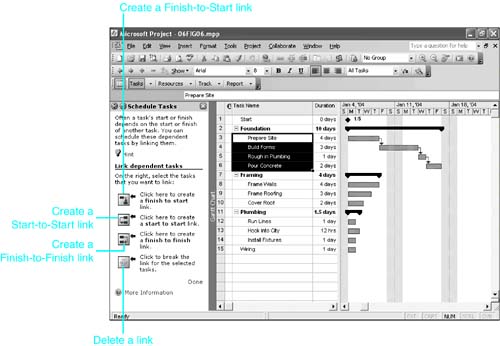
| You can create task links in Project in a number of ways, depending on the active view. The Project Guide provides a quick way to create the most common link types (all but the Start-to-Finish type). Choose Task on the Project Guide toolbar and select Schedule Tasks to display the Schedule Tasks sidepane (see Figure 6.6). Select the tasks you want to link and choose the appropriate link buttons in the Project Guide. Figure 6.6. You can create most links quickly in the Schedule Tasks Project Guide.
You can link tasks in a number of other ways. Each of the methods described here is discussed in detail in the following sections. Some can be used only in very restrictive circumstances, so read about all the methods instead of adopting just one. To create a default Finish-to-Start link with no lead or lag, you can do one of the following:
To create any of the link types (with or without lead or lag time) or to edit one of the links created using a technique in the preceding list, you can do any of the following:
TIP As you will see in later discussions in this chapter, using these last three methods requires you to know or look up the name or ID number for the task you want to link to. In a large project, that can be cumbersome. I almost always use one of the quick methods in the first list to create a standard link (because it's easier to select the tasks in the view than in a dialog box); then I edit the links that require it, by using one of the methods described next . To edit a linkfor example, to include lag time or lead time or to change the type of linkMicrosoft Project provides these equivalent methods:
NOTE You can't change the order of the link (that is, make the successor the predecessor) by using any of these methods. You always have to break the link and start over if you want to designate a different dependent task.
Creating Links by Using the Menu or Toolbar
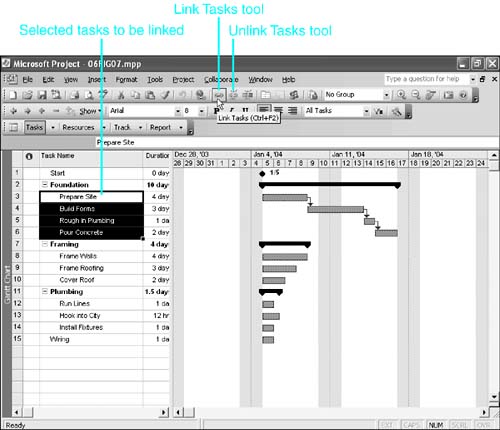
Figure 6.7. You can quickly link selected tasks by using the Link Tasks button. This links the tasks in a Finish-to-Start relationship. There is no limit to the number of tasks you can select for linking with the menu or Link Tasks tool. You can link just one predecessor and one successor at a time, or you can link all the tasks in the project in the same operation. If you select adjacent tasks by dragging the mouse pointer or by using the Shift+down arrow or Shift+up arrow key combinations, Project links the selected tasks from the top downthat is, tasks higher in the list (those with lower ID numbers) are predecessors for the tasks below them (those with higher ID numbers ). The same thing applies if you select all tasks by clicking one of the column headings, such as Task Name. If you build the selection by using Ctrl+click to add tasks, Project links the tasks in the order in which they are added to the selection. The first selected task is the predecessor to the second, and so forth. TIP To select a task for linking, click any field in the task row or click the taskbar in the Gantt Bar graphic. You do not need to select the entire task row.
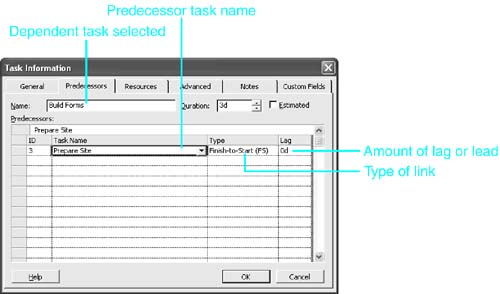
Creating Links by Using the Task Information Dialog BoxNo matter what view is active, you can use the Predecessors tab of the Task Information dialog box to define and edit a selected task's predecessor links (see Figure 6.8). Unlike the Edit, Link Tasks command, the Task Information dialog box enables you to choose the type of link and to enter lag or lead time. Figure 6.8. You use the Task Information dialog box to define types of predecessor links and lag and lead times. To create a dependency relationship by using the Task Information dialog box, follow these steps:
Entering Leads and LagsEntering leads and lags is done the same way whether you use the Task Information dialog box mentioned previously or other forms or dialog boxes. When entering lags and leads, bear in mind that both are entered in the same Lag box on Microsoft Project forms. You use positive numbers to represent lag time and negative numbers to represent lead time. You can enter lag or lead as a number followed by one of the regular or elapsed time code letters you use for entering duration time (that is, m or em, h or eh, d or ed, w or ew, or mo or emo). Lead time is entered as a negative lag. For example, you enter 2d to define a two-day lag and -4h to define a four- hour lead. You type 2ed to schedule a lag of two elapsed days. If you type a number without a time unit, Project appends the default duration unit (which is initially days). You can also express lag or lead time as a percentage of the predecessor's duration. Therefore, if you want a task to start when its predecessor is within 10% of being finished, you can enter a Finish-to-Start link with a 10% lead (entered as -10% ). Project schedules the task to start so that it overlaps the last 10% of the predecessor task duration. Using percentage lags and leads enables the amount of lag or lead to vary with changes in the duration of the predecessor. Thus, the longer the duration of the predecessor, the more time a percentage lag or lead would entail. When you use percentage lags and leads, Project uses the start or finish of the predecessor (as specified in the link type) for the starting point and offsets the start or finish of the successor from that point by the lag percentage multiplied by the duration of the predecessor. For example, if the predecessor has a duration of four days, a Start-to-Start lag of 25% causes the successor's start to be scheduled one day after the predecessor's start. A Finish-to-Start lead of 75% produces the same start date for the successoras long as the duration of the predecessor remains unchanged. Subsequent changes in the duration of the predecessor, however, cause these two links to result in a different start date for the successor.
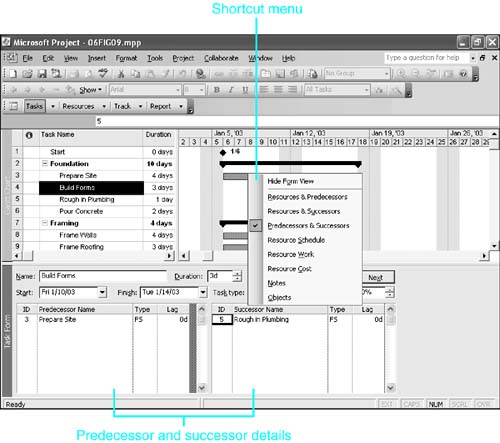
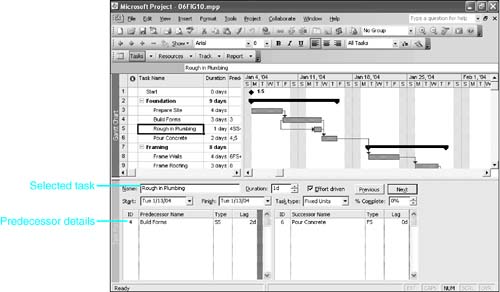
Creating Links by Using the Task Form ViewWith a task view such as the Gantt Chart view in the top pane, you can split the window and use the Task Form view in the bottom pane to define the predecessor and successor relationships (see Figure 6.9). This is an easy way to define or edit complex dependency relationships. You select a task in the top pane and define its predecessor or successor link in the predecessor or successor details in the bottom pane. Figure 6.9. The shortcut menu for the Task Form view offers several choices for displaying task link details in the bottom of the form. The default display of task details in the Task Form view is to show resources and predecessors. If you want to display both predecessor and successor details, right-click over the Task Form and choose Predecessors and Successors. Or you can activate the Task Form view and choose Format, Details, Predecessors and Successors. If you display the predecessor details, you can define a predecessor for the dependent task by following these steps:
Creating Links Using the Entry TableYou can create or edit dependency relationships in the Predecessors field on the Entry table (see Figure 6.11). The Entry table is the default table displayed in the Gantt Chart view. To see the Predecessors field on the table, either move the vertical split bar to the right or click the right arrow on the horizontal scrollbar at the bottom-left side of the Gantt Chart view. Figure 6.11. The codes entered in the Predecessors field define links just as do entries in the predecessor Details area of the Task Form view. NOTE You can add the Successors field to the table and edit both predecessors and successors for tasks in the table. You can enter the simplest relationship, Finish-to-Start, by just entering the task ID number for the predecessor task in the Predecessors field (or the ID for the successor in the Successors field). The other dependency relationships require a very specific pattern of coding. Assume that you want to make Task 5 a predecessor with a Start-to-Start link and a two-day lead. The code in the Predecessors column would be 5SS-2d . The explanation for the code is as follows :
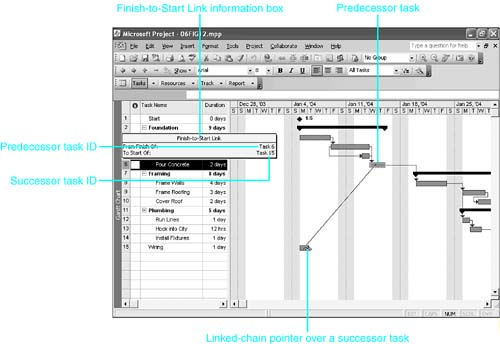
If a task has more than one predecessor, you separate the predecessor definitions with commas (without any spaces). For example, the code 5SS-2d,6,3FS+1d would link the task to tasks 5, 6, and 3. TIP If you do not remember the ID number of the predecessor, leave the cell you are editing selected while you scroll through the task list to find the predecessor task. Do not select the predecessor; just view its ID number. As you start typing, the row for the cell you are editing returns to the screen, and you can finish the link definition. NOTE You form codes for the Successors field identically to the way you form the codes for the Predecessors field. The only difference is that you begin with the ID number for the successor instead of the predecessor. Creating Links by Using the MouseYou can use the mouse to link taskbars on the timescale side of the Gantt Chart view or in the Network Diagram view or Calendar view. You can also use the mouse to edit the linking relationship in the Gantt Chart view or the Network Diagram view. To link tasks with the mouse in the Gantt Chart view, center the mouse over the predecessor task until the pointer changes into a four-arrow icon. Then click and drag the pointer (which should then turn into a linked-chain icon) over the center of the successor task. Hold the mouse button until Project interprets your action as creating a link, changes the pointer into a linked-chain icon, and displays the Finish-to-Start Link information box (see Figure 6.12). Figure 6.12. You drag from the predecessor taskbar to the successor taskbar in order to establish a Finish-to-Start link. Using the mouse for linking is most convenient when you can see both tasks you are trying to link onscreen at the same time. If only one taskbar is visible, you have to drag offscreen , and Project begins scrolling the task list at a furious pace. You can probably do better with one of the other methods of linking the tasks, such as selecting the two tasks (select the predecessor first) and using the Link Tasks tool.
CAUTION Be careful when creating links with the mouse. The mouse pointer is designed to perform a number of actions on tasks. It is easy to accidentally move the task or mark the task as being partially complete. You must watch the shape of the mouse pointer carefully , to ensure that you're doing exactly what you intend to do. TIP If you start using the mouse to link tasks and then want to cancel the linking procedure, simply drag the mouse up to the menu or toolbar area of the Gantt Chart view or the Calendar view and release the button. In the Network Diagram view, you must return the mouse to the task you started with before releasing the mouse button, or you will create a new successor task.
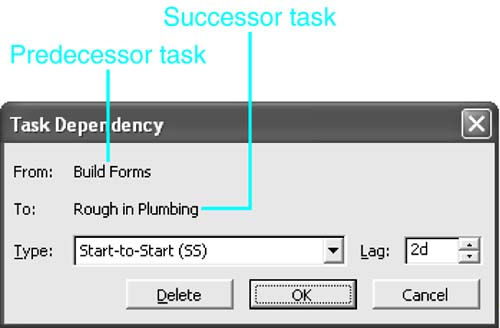
NOTE In the Network Diagram and Calendar views, you must drag from the center of the predecessor task's box or taskbar, and the pointer is the plain white cross, not the four-arrow shape you look for in the Gantt Chart view. In those views, the four-arrow shape appears when the pointer is over the border of the task box or taskbar and means that you will move the task if you drag the border. In all cases, make sure that the mouse pointer is the linked-chain shape when you are over the successor task before you release the mouse button. The dependency type created with the mouse is always a Finish-to-Start relationship. You can change the link type, add a lag or lead, or even delete the link by displaying the Task Dependency dialog box with the mouse in the Gantt Chart or Network Diagram views. To display the Task Dependency dialog box, scroll to display any portion of the linking line between the predecessor and successor tasks. Position the tip of the mouse pointer on the line connecting the tasks whose links you want to edit. A ScreenTip should appear, with the details of the link. Double-click the linking line, and the Task Dependency dialog box appears, as shown in Figure 6.13. The From task in the dialog box is the predecessor, and the To task is the successor. You can change the dependency type with the drop-down list in the Type field. Choosing None removes the link, as does clicking the Delete button. You can redefine the lag or lead in the Lag field. Click the OK button to complete the change. Figure 6.13. You can double-click a task's linking line to display the Task Dependency dialog box for editing task links. NOTE You can't change the names of the linked tasks in the Task Dependency dialog box, nor can you change which task is the predecessor and which is the successor.
Working with the Automatic Linking OptionIf you use only simple Finish-to-Start links in a project, Project's Autolink feature (which is enabled by default) can help you maintain the dependency link sequences when you move, delete, or insert tasks within a linked sequence of tasks. However, Autolink works only if the affected links are Finish-to-Start links. When you change the order of tasks, and thus their ID numbers, in a task table (such as the one in the Gantt Chart view), Autolink acts as follows:
In the Network Diagram and Calendar views, Autolink behaves this way only when you delete a task or insert a new task (because you can't cut, copy, or move tasks to a different ID order in those views). NOTE If you add a task to or remove a task from the beginning or end of a linked chain, instead of in the middle of the chain, Autolink does not include the new task in the chain. Thus, inserting a task at the beginning of a series of linked tasks or after the last task in a linked sequence does not cause Autolink to extend the chain to include the new task. To include a task in a sequence, when the task has been added either to the beginning or end of the sequence, you must link the tasks yourself, using one of the previously discussed methods. By default, Autolink is enabled, but you can disable it by changing the status of the Autolink option. Choose Tools, Options, and display the Schedule tab in the Options dialog box. Deselect the Autolink Inserted or Moved Tasks check box. To set the option status as a global default for all new projects, choose the Set as Default button. Otherwise, the change you make affects only the active project document. TIP
CAUTION As convenient as Autolink can be when editing a simple task list, it can cause problems in large or complex projects by creating unintended task links when tasks are inserted. You should double-check the links to ensure that they are as intended for the project. Unintended task links can become a vexing problem in a project schedule. If automatic linking is enabled and you rearrange an outline, you should carefully review the links that result each time you move a task or group of tasks in the outline. You might have to edit the links to reflect exactly the relationship you want defined. TIP I leave Autolink disabled because it makes changes without asking for my approval, and I have found that I sometimes don't notice an unintended change in the linking for my task lists. Modifying, Reviewing, and Removing Dependency LinksAs you develop a project plan, you will inevitably make changes in the task list, and you will then have to adjust the sequence of links you have established. You might want to modify the type of link between tasks, insert lag or lead time, or remove a link entirely. You can modify existing links in the following locations, all of which are described in detail in previous sections of this chapter:
If you find that a link between tasks is no longer necessary, or if you prefer to change a link to another task, you have to remove the existing link. Just as you can use several ways to create links, you can use many different methods to remove links. You can use the following techniques to remove links:
Auditing the Task LinksThe project schedule is heavily influenced by the linking relationships you establish among tasks. It is very easy to accidentally link tasks or break task links, and if you work with Autolink enabled, some changes you haven't noticed might have been made. Therefore, you should review the link relationships carefully before committing to the project schedule. Accidental links can easily skew the finish date of the project. The Network Diagram view concentrates on the linking relationships by representing each task as a box or node with arrows from predecessor to successor tasks. Because you see so few tasks on the screen in these views, you might want to print the views when using them to review all task links. The Gantt Chart view shows the task links as arrows connecting the taskbars, with the arrow always pointing to the successor task. The Gantt Chart view shown earlier in this chapter, with the predecessor and successor details in the Task Form view in the bottom pane, provides a good review of the task links. For the task you have active, the predecessor and successor tasks are listed in the bottom pane, along with any lag or lead associated with the link. You use the Previous and Next buttons in the bottom pane to review the links. Perhaps the most useful view for auditing task links is the Relationship Diagram view (see Figure 6.14). It shows the predecessors and successors for just the selected task as task nodes, like the Network Diagram view, and it is useful for confirming that you have defined the task relationships as intended. You can display the Relationship Diagram view by itself, but it is most useful when displayed in the bottom pane, beneath another task view in the top pane, such as the Gantt Chart or Network Diagram views. Figure 6.14. The Relationship Diagram view offers a good review of the predecessor and successor links for a task. The task you have selected in the top pane is represented by a box or node in the center of the relationship diagram in the bottom pane, with links to nodes for its predecessors and successors on the left and right. The type of relationship and any lag or lead is shown next to the linked task nodes. In Figure 6.14, the relationship diagram in the bottom pane makes it clear that there are three successors to the Frame Walls task, something that is not easy to see in the Gantt Chart in the top pane. NOTE The Relationship Diagram view is a display-only view. You can't make changes in this view, nor can you print it. You can, however, display the Task Information dialog box for the selected task and make changes there. To display the Relationship Diagram view below the Gantt Chart view, split the window and activate the bottom pane. Choose View, More Views, and select Relationship Diagram in the More Views dialog box. Then click the Apply button to display the view. You can select tasks in the top pane to see their predecessors and successors displayed graphically in the bottom pane. TIP If you select multiple tasks in the top pane, you will see only one of the selected tasks in the center of the bottom pane at a time. You can use the horizontal scrollbar in the Relationship Diagram pane to scroll through all the selected tasks. Pressing the Home key displays the view for the first of the selected tasks, and pressing the End key displays the view for the last of the selected tasks. You can use these same techniques to scroll through the tasks if you display the Relationship Diagram view as a full-screen view. |

 For information about using the Network Diagram view,
| < Day Day Up > |
EAN: 2147483647
Pages: 283